Backlit Window Buttons
 05-06-2006, 02:34 AM
#1
Senior Member
Thread Starter

Join Date: 01-21-2006
Location: United States
Posts: 120
How to backlight your window buttons...
Okay, this isn't exactly going to be a step-by-step, but here's how you can do this yourself... Keep in mind, I knew nearly nothing about auto electrical before I started this and because of this, I avoided splicing into the car's wiring.
1. I bought this. Maybe you know where to find a better price, but I don't. Locally, all could find was red and indigo blue, but I was trying to match the factory dash. 5 feet is way more than enough for this project.
2. I removed the window switch bezel. To do this, pull out the black insert. Put a flat head screwdriver into each of the two small slots. Gently, but firmly pry up the bezel. You might have better luck using one screw driver and pulling on the bezel with your other hand. You might have to gently pry up each corner...It's hardest to get out the first time
3. Get the EL wire- mine came with glue, but it was dried up, so I used a hot glue gun instead. I suspect the glue that came with it was something like super glue-- In my opinion, the hot glue is easier to work with. If you've never used one, you might want to practice first! :)
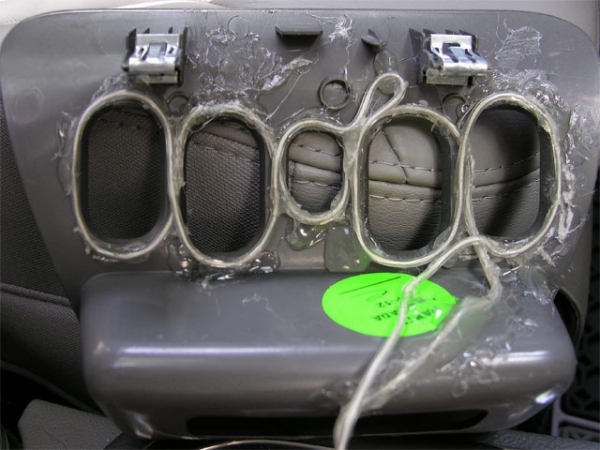
4. On the back of the window control bezel, carefully glue the wire around the button openings. Start at the begining of the EL wire (the side the transformer connects to), but leave several inches loose before you start glueing so it's easier to hook up the wiring and so you can put the window control bezel back properly. Check for clearance before glueing-- make sure nothing is going to be in the way when you put the panel back.
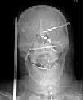
I recommend you route the wire so it enters and exits on the bottom of the bezel-- not the top. That's why mine is a mess of glue (see picture)-- for reasons unknown to me (I really didn't think it through when I started the wire at the *top* of the panel... ), I started at the top and the panel wouldn't fit properly, so I had to re-route the wire (see the weird loop and the glue everywhere? oops).
I left the extra wire attached... just tucked it back inside when I replaced the bezel.
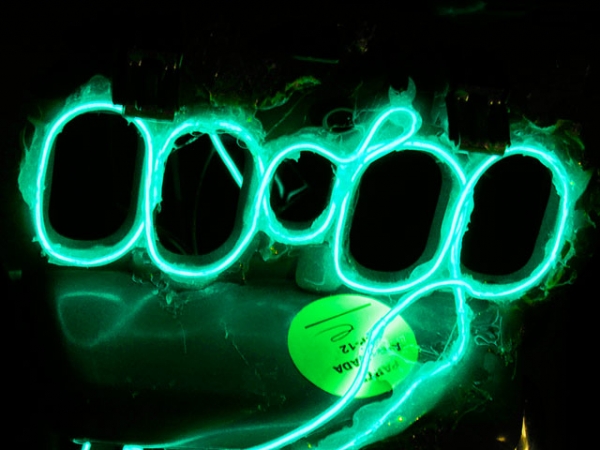
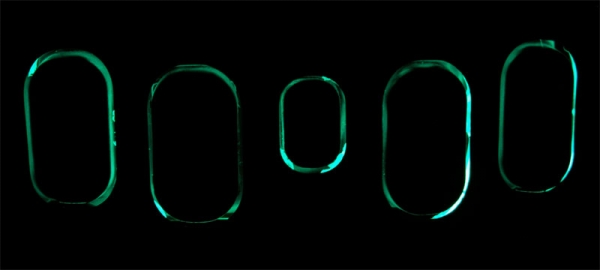
The back of the bezel, with the light on:
Plug in the transformer etc...
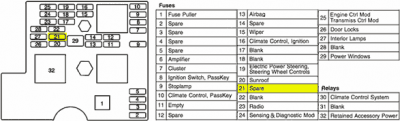
I got power from an unused fuse slot in the passenger side fuse box. I used fuse #21-- it's rated for 20 amps, which is insane for how little power the light requires (though I'm running other stuff as well), but I went with this, at least temporarily because
If you know what or where you want to tap electric from, go ahead.
If you have no idea and you're reading this as a step-by-step...
Pick up an Add-A-Circuit from Pep Boys or Auto Zone. You'll need the mini version.
Plug into #21, connect your power and your ground.... and turn on your car. Your light should work.
Carefully replace the bezel. You have backlit window buttons. Enjoy.
I have very little time right now, so my responses might be delayed. Hope this helps someone.
Okay, this isn't exactly going to be a step-by-step, but here's how you can do this yourself... Keep in mind, I knew nearly nothing about auto electrical before I started this and because of this, I avoided splicing into the car's wiring.
1. I bought this. Maybe you know where to find a better price, but I don't. Locally, all could find was red and indigo blue, but I was trying to match the factory dash. 5 feet is way more than enough for this project.
2. I removed the window switch bezel. To do this, pull out the black insert. Put a flat head screwdriver into each of the two small slots. Gently, but firmly pry up the bezel. You might have better luck using one screw driver and pulling on the bezel with your other hand. You might have to gently pry up each corner...It's hardest to get out the first time
3. Get the EL wire- mine came with glue, but it was dried up, so I used a hot glue gun instead. I suspect the glue that came with it was something like super glue-- In my opinion, the hot glue is easier to work with. If you've never used one, you might want to practice first! :)
4. On the back of the window control bezel, carefully glue the wire around the button openings. Start at the begining of the EL wire (the side the transformer connects to), but leave several inches loose before you start glueing so it's easier to hook up the wiring and so you can put the window control bezel back properly. Check for clearance before glueing-- make sure nothing is going to be in the way when you put the panel back.
I recommend you route the wire so it enters and exits on the bottom of the bezel-- not the top. That's why mine is a mess of glue (see picture)-- for reasons unknown to me (I really didn't think it through when I started the wire at the *top* of the panel...
I left the extra wire attached... just tucked it back inside when I replaced the bezel.
The back of the bezel, with the light on:
Plug in the transformer etc...
I got power from an unused fuse slot in the passenger side fuse box. I used fuse #21-- it's rated for 20 amps, which is insane for how little power the light requires (though I'm running other stuff as well), but I went with this, at least temporarily because
- It's switched power... don't want the light on when I'm not in the car
- It was one of the very few fuse slots that I could access with a Littel Fuse Add-A-Circuit*
*which I don't recommend for this car -- with the tight layout in the fusebox, the right angle of the Add-A-Circuit's plug plus the wire coming out the side, there's not enough clearance to plug it into most of the unused (or used, for that matter) fuse slots. I have something similar on the way that should provide more flexibility, but until then, this is working... and I didn't have to splice into the factory wiring.
If you know what or where you want to tap electric from, go ahead.
If you have no idea and you're reading this as a step-by-step...
Pick up an Add-A-Circuit from Pep Boys or Auto Zone. You'll need the mini version.
Plug into #21, connect your power and your ground.... and turn on your car. Your light should work.
Carefully replace the bezel. You have backlit window buttons. Enjoy.
I have very little time right now, so my responses might be delayed. Hope this helps someone.
Last edited by HHR Nut; 05-06-2006 at 09:34 AM. Reason: Edited because when I uploaded, my 590 pixel wide gif of the fuse box diagram was resized to 400 pixels, making it completely illegible. Re-uploaded as .png and it looks a bit better now...


 05-08-2006, 01:25 AM
#5
Senior Member
Thread Starter
Join Date: 01-21-2006
Location: United States
Posts: 120
Originally Posted by galladanb
They got purple! They got purple.....
I'm gonna get me some... Oh wait the R's lights are green!
Darn it. But maybe if I replace all of the lights...
But, seriouslly, THX for the how to. That is what we need here!!!!!
Good job!!! Looks tremoundoussss!!! Really!
I'm gonna get me some... Oh wait the R's lights are green!
Darn it. But maybe if I replace all of the lights...
But, seriouslly, THX for the how to. That is what we need here!!!!!
Good job!!! Looks tremoundoussss!!! Really!
I saw that they have purple too... I thought about it... thought about it. Cute idea, but I know myself too well... It'd match the outside of the car okay, but it'd annoy me terribly that it was a different color than the rest of my dash.
Sooner or later, I'd be forced to pull out the purple and install the Turquoise.
I don't even want to think about the work involved changing out all the lights.
I try to do mods that don't look too far from factory... subtle design, whenever possible. Y'know... the type of mod that makes your car stand out from the crowd, but other than owners and the non-owner hhr-obsessed fans, no one would be able to point out exactly what I'd done.

 05-08-2006, 04:07 PM
#10
Senior Member
Thread Starter
Join Date: 01-21-2006
Location: United States
Posts: 120
Hey all...
Just an update-- I haven't changed anything yet, but I got my order...
I ordered a 12-pack of the miniblade version from these guys:
http://www.accessafuse.com
It's more or less similar to the Add-A-Circuit solution, but these will actually fit anywhere in the HHR's fuse box-- unlike the other.... and they are a lot cheaper-- I paid $15.95 for a dozen... $18.90 including shipping.
I don't have time to play with them right now, but they look fine and there's no reason to believe they won't work as advertised.
The ordering process was a little unusual-- their ordering page lets you place an order for however many, but when I first went to place my order I noticed there was nowhere to specify what kind I needed (the web site says 'ATC, ATO and Mini Fuses can be manufactured with the extended terminal,' so I knew the product was available). I emailed them and asked about it... they said:
I have the mini version <blah blah> ...comes in 10, 15 and 20 amp sizes. You can place an order <blah blah>--Just email me with what you actually require. When I receive confirmation from Verisign, I will know what to send you.Sooo... you might want to send them an email before you place the order.
I received my order 3 days after it was placed... as requested, 4 each of 10, 15, and 20 amp sizes.
YMMV.
Anyway, there you go. Maybe they'll update their web site one of these days so you can order what you want without sending separate emails.
Just an update-- I haven't changed anything yet, but I got my order...
I ordered a 12-pack of the miniblade version from these guys:
http://www.accessafuse.com
It's more or less similar to the Add-A-Circuit solution, but these will actually fit anywhere in the HHR's fuse box-- unlike the other.... and they are a lot cheaper-- I paid $15.95 for a dozen... $18.90 including shipping.
I don't have time to play with them right now, but they look fine and there's no reason to believe they won't work as advertised.
The ordering process was a little unusual-- their ordering page lets you place an order for however many, but when I first went to place my order I noticed there was nowhere to specify what kind I needed (the web site says 'ATC, ATO and Mini Fuses can be manufactured with the extended terminal,' so I knew the product was available).
I have the mini version <blah blah> ...comes in 10, 15 and 20 amp sizes. You can place an order <blah blah>--Just email me with what you actually require. When I receive confirmation from Verisign, I will know what to send you.
I received my order 3 days after it was placed... as requested, 4 each of 10, 15, and 20 amp sizes.
YMMV.
Anyway, there you go. Maybe they'll update their web site one of these days so you can order what you want without sending separate emails.