Camshaft Position Actuator Solenoid Valve Replacement (w. pics) - P0010/11 P0013/14
 03-25-2010, 03:22 PM
#1
Platinum Member
Thread Starter

Join Date: 04-09-2006
Location: Vancouver, BC, Canada
Posts: 7,032
Camshaft Position Actuator Solenoid Valve Replacement (w. pics) - P0010/11 P0013/14
'================================================= =================================
[SIZE="6"]IF YOU HAVE ENCOUNTERED THE T/C AND OR ENGINE CHECK LIGHT ON BE AWARE THIS VERY LIKELY WILL NOT BE THE SOLUTION TO YOUR PROBLEM! There are several other components that can cause hard shifting other than the solenoids.[/SIZE]
[SIZE="4"]Replacing these solenoids is only recommended when you have downloaded the following CEL codes:
P0010/11 which refers to the INTAKE solenoid
P0013/14 which refers to the EXHAUST solenoid[/SIZE]
================================================== ================================
[SIZE="5"]Here is a description of what is involved in the replacing of the Camshaft Position Actuator Solenoids on a 2.4L 2006 HHR (also applies with possible variations as necessary to the 2.0 Turbo in the SS, and the 2.2 with VVT, but not the early 2.2's that did not come with VVT). [/SIZE]
[SIZE="4"]PART NUMBERS As of March 2013:[/SIZE] (still valid as far as I know, as of Aug 24, 2014 - as confirmed by member John 11)
Here is a list from the Oldest to Newest GM Part numbers for the Camshaft Position Actuator Solenoid Valves:
------------------------------
Intake 12628347 = 12646783 = 12655420 = 12679099
Exhaust 12628348 = 12646784 = 12655421 = 12679100
Dorman Part Numbers: (***note: one member in Aug 2014 reported the connector at the top of the Intake solenoid was not compatible with the harness on his HHR)
917-216 for exhaust
917-215 for intake
** check the last few pages of this thread for any further updated part numbers in case this has not been updated
** some suppliers may refer to the solenoids as a "Variable Timing Solenoid" - (tip from willbratz )
NOTE #1: they are SOLENOIDS, not "sensors"!!!! they are two different things!! Several members have purchased sensors in error as advised by an auto parts store who mis-interpret the CEL diagnostic codes
NOTE #2: if you have not downloaded the CEL codes, please do so. If you have come to this posting looking for solutions to hard shifting of the transmission, be aware that there are several other components that can cause hard shifting other than the solenoids. Downloading the CEL codes will clarify where the problem is actually sourced from.
Time: 45 minutes (max.)
Tools used: screwdriver, ratchet with 6 inch extension and 10MM deep socket, small pair of needle-nose vice grips
1a) disconnect the NEGATIVE post on the car's battery (it is in the trunk) - do NOT disconnect the positive post, nor short out the negative post to the positive post - you can get seriously hurt otherwise.
1b) as the air box needs to be removed to get to the solenoids, start with undoing the MAP sensor which is located under the front leading edge of the airbox (press down on the top of the clip to release the lock, and pull gently) - lay the connector aside in a protected spot
Here is a picture of the connector, just to the right of the intake plumbing
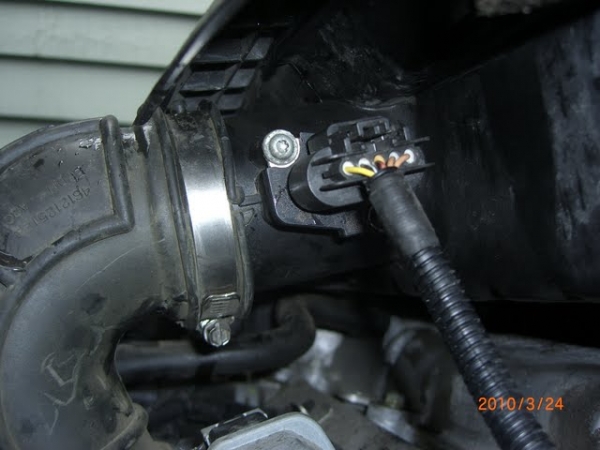
2) loosen the intake plumbing from the front of the airbox, by loosing the screw holding the clamp shown in the above picture (at the 7 o'clock position from the MAP sensor)
3) gently work and pull the now loosened pipe free of the airbox (shown here with airbox removed)

4) the airbox is held in place with two grommets at the back of the airbox and one in the front left side next to the rad fill cap. Each grommet snaps onto a short mounting bolt. I prefer to remove the front mount first as it seems more delicate and prone to breaking accidently: you can see the mounting point just to the left of the cap - grab the shaft of the mount from the airbox and pull it free by lifting straight up about an inch or so. Do NOT attempt to pull up on the whole airbox yet. (keep reading)
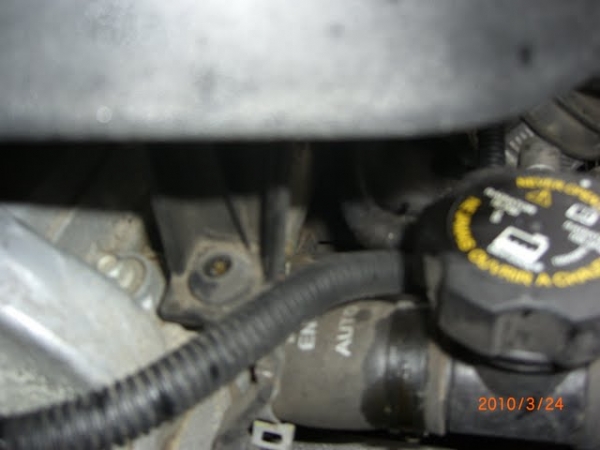
This is a shot of the grommet mounting bolt with the airbox removed:
Disconnect the rear of the airbox by lifting up on the rearside to free it from the grommets. This is what the grommet mounting posts and mounting bracket look like with the airbox removed:
Note: the grommets that hold the airbox often deteriorate over time, and may not be reusable. Gm calls this part an "Insulator". It's part #12563914, and it's current list is $3.47 as of July 2012 according to one member here.
5) The airbox should now be free of the mounting grommets, the intake plumbing and the MAP sensor, BUT will still be connected to the air intake pipe at the back left side of the airbox - loosen it's clamp and disconnect the pipe from the airbox.
Shot of the intake pipe attached to the airbox - note the clamps screw faces DOWN - Helpful hint: reverse the clamp so the screw is on top to make it easier to disconnect and reconnect with the airbox in place

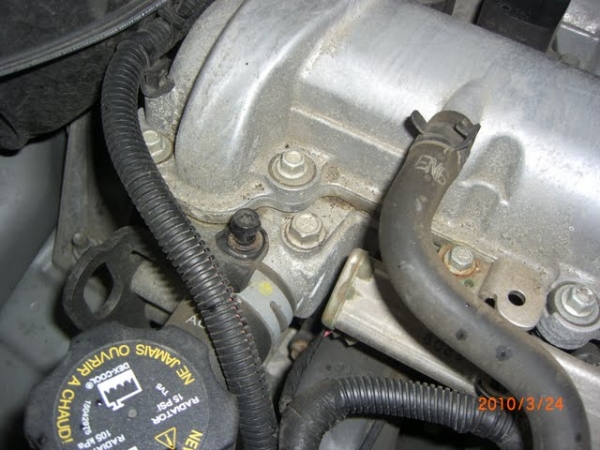
6) The top of the engine with the airbox removed should now look like this:
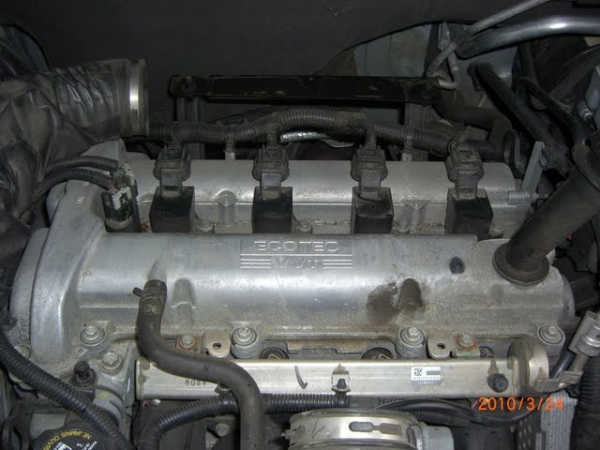
Note: the solenoids are on the left side right next to the plug coil pack
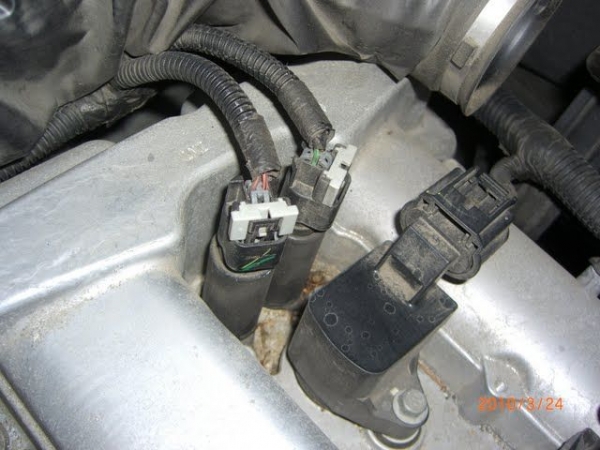
7) Remove the connectors at the top of the solenoids (remove them both to prevent accidents) by pulling up on the grey clip until you can work a small screw driver between it and the black lock and remove the grey clip - now you can depress the black lock mechanism to free the connector from the top of the solenoid. (see post #397 in this thread for HHR4dad's pictures showing the clip removal using a small screwdriver - be careful, as some people have used the wrong process and broken the clip)
Kudos to member Slide_Rite, who gave this suggestion for removing the clips, using the nozzle from a can of WD-40 as shown in this picture:

8) Use compressed air to remove any dirt/debris collected around the base of the solenoids.
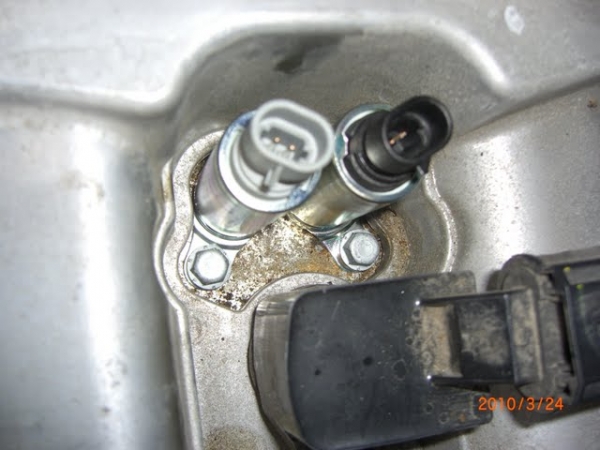
NOTE: the markings on the top of the valve cover to the left of the solenoids which indicates the location of the Intake and Exhaust solenoids
Close-up shot of the immediate area:
9) Once the area is clean, use a 10mm deep socket to remove the mounting bolt for the solenoid to be replaced. Warning: if you are replacing both solenoids, replace them one at a time to lessen the chance of dropping something down into the mounting holes.
Once the bolt is removed, you should be able to rotate/twist the solenoid SLIGHTLY to loosen it, then pull it straight up and out of the engine. I used a small pair of needle-nose vise-grips to gently get a grip on the metal part of the solenoid and carefully removed it. If you do the same, be careful not to crush the solenoid.
10) Now the solenoid is removed, inspect the cavity and remove any dirt debris that might have "accidently" dropped in - apply some oil to the shaft and o-ring of the new solenoid, and carefully insert it into the engine. Once it is properly in place you will have to give it a downward push to get it to snap into position with the o-ring. Install the retaining bolt and snug it down(sorry, I don't know the torque value - but it is probably about 7-9 ft/lbs my guess)
Edit: Correct torque spec is 89 lb in or 10nm
11) Now do the same with the other solenoid to replace it - remove mounting bolt/pull the solenoid, oil and reinsert the new solenoid
12) re-attach the electrical connectors to the top of the solenoids (make sure you use the correct connector for each one)
13) put a dab of silicone grease on the three mounting studs for the airbox, as well as on the grommets on the airbox - reinstall the airbox.
14) reattach the air intake hose at the back of the airbox and tighten the clamp
15) reattach the pipe to the front of the airbox, and tighten the clamp
16) reattach the MAP sensor to the front bottom side of the airbox.
17) reconnect the negative post on the battery
16) Almost done - now please >>> double-check the MAP sensor to make sure it is securely plugged into the front bottom side of the airbox
[SIZE="6"]IF YOU HAVE ENCOUNTERED THE T/C AND OR ENGINE CHECK LIGHT ON BE AWARE THIS VERY LIKELY WILL NOT BE THE SOLUTION TO YOUR PROBLEM! There are several other components that can cause hard shifting other than the solenoids.[/SIZE]
[SIZE="4"]Replacing these solenoids is only recommended when you have downloaded the following CEL codes:
P0010/11 which refers to the INTAKE solenoid
P0013/14 which refers to the EXHAUST solenoid[/SIZE]
================================================== ================================
[SIZE="5"]Here is a description of what is involved in the replacing of the Camshaft Position Actuator Solenoids on a 2.4L 2006 HHR (also applies with possible variations as necessary to the 2.0 Turbo in the SS, and the 2.2 with VVT, but not the early 2.2's that did not come with VVT). [/SIZE]
[SIZE="4"]PART NUMBERS As of March 2013:[/SIZE] (still valid as far as I know, as of Aug 24, 2014 - as confirmed by member John 11)
Here is a list from the Oldest to Newest GM Part numbers for the Camshaft Position Actuator Solenoid Valves:
------------------------------
Intake 12628347 = 12646783 = 12655420 = 12679099
Exhaust 12628348 = 12646784 = 12655421 = 12679100
Dorman Part Numbers: (***note: one member in Aug 2014 reported the connector at the top of the Intake solenoid was not compatible with the harness on his HHR)
917-216 for exhaust
917-215 for intake
** check the last few pages of this thread for any further updated part numbers in case this has not been updated
** some suppliers may refer to the solenoids as a "Variable Timing Solenoid" - (tip from willbratz )
NOTE #1: they are SOLENOIDS, not "sensors"!!!! they are two different things!! Several members have purchased sensors in error as advised by an auto parts store who mis-interpret the CEL diagnostic codes
NOTE #2: if you have not downloaded the CEL codes, please do so. If you have come to this posting looking for solutions to hard shifting of the transmission, be aware that there are several other components that can cause hard shifting other than the solenoids. Downloading the CEL codes will clarify where the problem is actually sourced from.
Time: 45 minutes (max.)
Tools used: screwdriver, ratchet with 6 inch extension and 10MM deep socket, small pair of needle-nose vice grips
1a) disconnect the NEGATIVE post on the car's battery (it is in the trunk) - do NOT disconnect the positive post, nor short out the negative post to the positive post - you can get seriously hurt otherwise.
1b) as the air box needs to be removed to get to the solenoids, start with undoing the MAP sensor which is located under the front leading edge of the airbox (press down on the top of the clip to release the lock, and pull gently) - lay the connector aside in a protected spot
Here is a picture of the connector, just to the right of the intake plumbing
2) loosen the intake plumbing from the front of the airbox, by loosing the screw holding the clamp shown in the above picture (at the 7 o'clock position from the MAP sensor)
3) gently work and pull the now loosened pipe free of the airbox (shown here with airbox removed)
4) the airbox is held in place with two grommets at the back of the airbox and one in the front left side next to the rad fill cap. Each grommet snaps onto a short mounting bolt. I prefer to remove the front mount first as it seems more delicate and prone to breaking accidently: you can see the mounting point just to the left of the cap - grab the shaft of the mount from the airbox and pull it free by lifting straight up about an inch or so. Do NOT attempt to pull up on the whole airbox yet. (keep reading)
This is a shot of the grommet mounting bolt with the airbox removed:
Disconnect the rear of the airbox by lifting up on the rearside to free it from the grommets. This is what the grommet mounting posts and mounting bracket look like with the airbox removed:
Note: the grommets that hold the airbox often deteriorate over time, and may not be reusable. Gm calls this part an "Insulator". It's part #12563914, and it's current list is $3.47 as of July 2012 according to one member here.
5) The airbox should now be free of the mounting grommets, the intake plumbing and the MAP sensor, BUT will still be connected to the air intake pipe at the back left side of the airbox - loosen it's clamp and disconnect the pipe from the airbox.
Shot of the intake pipe attached to the airbox - note the clamps screw faces DOWN - Helpful hint: reverse the clamp so the screw is on top to make it easier to disconnect and reconnect with the airbox in place
6) The top of the engine with the airbox removed should now look like this:
Note: the solenoids are on the left side right next to the plug coil pack
7) Remove the connectors at the top of the solenoids (remove them both to prevent accidents) by pulling up on the grey clip until you can work a small screw driver between it and the black lock and remove the grey clip - now you can depress the black lock mechanism to free the connector from the top of the solenoid. (see post #397 in this thread for HHR4dad's pictures showing the clip removal using a small screwdriver - be careful, as some people have used the wrong process and broken the clip)
Kudos to member Slide_Rite, who gave this suggestion for removing the clips, using the nozzle from a can of WD-40 as shown in this picture:
8) Use compressed air to remove any dirt/debris collected around the base of the solenoids.
NOTE: the markings on the top of the valve cover to the left of the solenoids which indicates the location of the Intake and Exhaust solenoids
Close-up shot of the immediate area:
9) Once the area is clean, use a 10mm deep socket to remove the mounting bolt for the solenoid to be replaced. Warning: if you are replacing both solenoids, replace them one at a time to lessen the chance of dropping something down into the mounting holes.
Once the bolt is removed, you should be able to rotate/twist the solenoid SLIGHTLY to loosen it, then pull it straight up and out of the engine. I used a small pair of needle-nose vise-grips to gently get a grip on the metal part of the solenoid and carefully removed it. If you do the same, be careful not to crush the solenoid.
10) Now the solenoid is removed, inspect the cavity and remove any dirt debris that might have "accidently" dropped in - apply some oil to the shaft and o-ring of the new solenoid, and carefully insert it into the engine. Once it is properly in place you will have to give it a downward push to get it to snap into position with the o-ring. Install the retaining bolt and snug it down(sorry, I don't know the torque value - but it is probably about 7-9 ft/lbs my guess)
Edit: Correct torque spec is 89 lb in or 10nm
11) Now do the same with the other solenoid to replace it - remove mounting bolt/pull the solenoid, oil and reinsert the new solenoid
12) re-attach the electrical connectors to the top of the solenoids (make sure you use the correct connector for each one)
13) put a dab of silicone grease on the three mounting studs for the airbox, as well as on the grommets on the airbox - reinstall the airbox.
14) reattach the air intake hose at the back of the airbox and tighten the clamp
15) reattach the pipe to the front of the airbox, and tighten the clamp
16) reattach the MAP sensor to the front bottom side of the airbox.
17) reconnect the negative post on the battery
16) Almost done - now please >>> double-check the MAP sensor to make sure it is securely plugged into the front bottom side of the airbox
Last edited by RJ_RS_SS_350; 11-11-2018 at 12:53 PM. Reason: Added new part number
 03-25-2010, 04:33 PM
#2
Founding Member

Join Date: 11-23-2007
Location: Texas
Posts: 8,210
Nice work! 
03-25-2010, 10:14 PM
#3
Platinum Member
Thread Starter
Join Date: 04-09-2006
Location: Vancouver, BC, Canada
Posts: 7,032
It's a pleasure ChevyMgr - and thanks for posting the pictures properly and embedding them - looks much better.
Cheers
Cheers
03-26-2010, 02:44 AM
#4
Platinum Member

Join Date: 01-09-2007
Location: SE USA
Posts: 15,855
Excellent write up & pics... 
04-12-2010, 03:51 AM
#5
Platinum Member
Thread Starter
Join Date: 04-09-2006
Location: Vancouver, BC, Canada
Posts: 7,032
Thank you - hopefully someone will get some helpful info from the write-up..
It's been a month now, and the initial problems with the hard shifting, engine check light, and codes being thrown are all gone.
However the car is in the body shop now since a tree fell on it last weekend. LOL - all one can do is laugh.
It's been a month now, and the initial problems with the hard shifting, engine check light, and codes being thrown are all gone.
However the car is in the body shop now since a tree fell on it last weekend. LOL - all one can do is laugh.
04-30-2010, 11:07 AM
#6

Join Date: 04-02-2010
Location: yabucoa,pr
Posts: 1
mines has the same problem and i did what it said here and i still haved i did this today do i have to wait 4 the computer to reset or what thanks
04-30-2010, 12:10 PM
#7
Platinum Member
Thread Starter
Join Date: 04-09-2006
Location: Vancouver, BC, Canada
Posts: 7,032
What were the codes generated by the Engine check light initially? I'm not exactly positive, but I suspect that your Engine Check light is still on? If so, you will need to reset the codes being generated. You can do that by disconnecting the battery for a minute or two and connecting it back up. That will reset the codes/lights and restore the proper operation of the transmission shifting etc.. If that does not cure it, you need to plug in a diagnostic tester to determine what the current code(s) are being generated, and start troubleshooting from there.
05-16-2010, 03:41 PM
#8

Join Date: 07-17-2009
Location: St. Louis, MO
Posts: 6
Fixed - YEAH!!!
I had P0011 error code and the CEL and T/C lights on. Replaced both intake and exhaust solenoids and now the problem is gonna and has been for 2 weeks. The parts together cost about $100 and an hour worth of my time. Thanks for the detailed procedure that made the replacement quicker.
05-17-2010, 12:29 PM
#9
Platinum Member
Thread Starter
Join Date: 04-09-2006
Location: Vancouver, BC, Canada
Posts: 7,032
I had P0011 error code and the CEL and T/C lights on. Replaced both intake and exhaust solenoids and now the problem is gonna and has been for 2 weeks. The parts together cost about $100 and an hour worth of my time. Thanks for the detailed procedure that made the replacement quicker.
05-18-2010, 09:44 AM
#10

Join Date: 05-16-2010
Location: Iowa
Posts: 4
Help!!
just joined this forum and have the TC and CEL problem and need to change the selinoids, where can I get those parts?!?! (great write up by the way!!)

