How to Remove Stock Airbox - SS
 02-11-2016, 08:10 PM
#1
Moderator
Thread Starter

Join Date: 05-01-2014
Location: California
Posts: 7,786
How to Remove Stock Airbox - SS
If you are doing this to do a compression check, cylinder leakdown test, pull the intake manifold or valve cover, or any other reason that requires that fuel not be present, perform step 1. If you're doing something simple like replacing the bypass solenoid or valve, you can probably skip step 1.
1. Pull the fuse for the fuel pump (#13) in the underhood fusebox. Start the engine, and let it run until it runs out of fuel (the engine dies).
2. The inlet hose to the turbo is held by a clamp. A flat screwdriver or a 5/16" or 8mm nutdriver or socket will do the trick. Loosen the clamp and pull back the hose.
3. Disconnect the MAF wiring connector.
4. Now you have to remove the "Wooly Worm" that brings in fresh air from the fender area. This is a PITA. I stuck a tiny flat screwdriver under the plastic, pushing the screwdriver handle down, and slightly pried away from the airbox with another screwdriver.

Then move the small screwdriver to the center and pry up the plastic, and keep prying out with the other screwdriver.

That gets the top done. The bottom could be done the same way, except you can't really see what you're doing. Mine is broken on the bottom, so I don't have to mess with it anymore. It is still secure, but much easier to remove.
5. There are 3 clips and 3 rubber grommets that secure the airbox to the torx screws that are screwed into the intake manifold and valve cover. Remove the clips. If your grommets are like mine, they are so dried out and brittle that you have to destroy the grommets to get the airbox off. If your grommets are still in good shape, soft and pliable, wiggle the airbox, with the grommets still attached to it, off the bolt heads.
I carefully destroyed only the top half of the grommets. You can try to find new grommets, but instead, I cut a small piece of metal to fit on top of what's left of one of the grommets, and under the head of the torx screw. Now it's easy to install and remove every time. I'll show you how to do this easy mod next.
EDIT: I now recommend that you just pony up and order and install new grommets. See my reply below. If you're getting new grommets, skip steps 6 through 11. The grommets will fit in the mounting holes on the airbox, and then you just push them over the screw heads when you re-install the airbox. Then re-install the clips if you wish, I find them unneeded.
6. Remove the 6 torx T25 screws for the airbox lid. This is easiest with an impact driver, but a cordless drill or even a nut driver or ratchet will do. Remove the lid, remove the air filter.
7. Take note of the position of the front driver's side airbox mount. You're going to be drilling a 1/2" hole in the bottom of the airbox for permanent access to that T30 torx screw. Now remove the airbox and turn it over. Put your 1/2" drill bit through the hole in the bottom of the mount(where the grommet was), and drill through the bottom of the airbox. Here is the airbox mounted again, and the access hole, with the torx screw barely visible through it.

8. Here is a picture of the shim I cut.

Loosen the T30 screw, and cut your shim so that it fits snug under the head of the screw. Here I've got the shim in place and am tightening the T30 screw on it.
9. I went to the hardware store and found a rubber plug that fits in the 1/2" hole nicely. It might not be necessary, but it will keep a little bit of hot air out of the intake.

To reinstall airbox.
10. Set airbox on the 3 half-grommets, set your shim in place, and snug up the T30 screw. Then put your rubber plug in place.
11. Replace the air filter and reattach the lid to the airbox with the 6 T25 screws.
12. Put the air inlet hose in place and tighten the clamp.
13. Reattach the MAF sensor wires.
14. Snap the wooly worm back in place. I would advise cutting the bottom snap off, for easy access later, but your call.
15. Replace fuse #13 and fusebox cover.
16. That's it. You're done. If you're removing the intake manifold also, Go here
1. Pull the fuse for the fuel pump (#13) in the underhood fusebox. Start the engine, and let it run until it runs out of fuel (the engine dies).
2. The inlet hose to the turbo is held by a clamp. A flat screwdriver or a 5/16" or 8mm nutdriver or socket will do the trick. Loosen the clamp and pull back the hose.
3. Disconnect the MAF wiring connector.
4. Now you have to remove the "Wooly Worm" that brings in fresh air from the fender area. This is a PITA. I stuck a tiny flat screwdriver under the plastic, pushing the screwdriver handle down, and slightly pried away from the airbox with another screwdriver.
Then move the small screwdriver to the center and pry up the plastic, and keep prying out with the other screwdriver.
That gets the top done. The bottom could be done the same way, except you can't really see what you're doing. Mine is broken on the bottom, so I don't have to mess with it anymore. It is still secure, but much easier to remove.
5. There are 3 clips and 3 rubber grommets that secure the airbox to the torx screws that are screwed into the intake manifold and valve cover. Remove the clips. If your grommets are like mine, they are so dried out and brittle that you have to destroy the grommets to get the airbox off. If your grommets are still in good shape, soft and pliable, wiggle the airbox, with the grommets still attached to it, off the bolt heads.
I carefully destroyed only the top half of the grommets. You can try to find new grommets, but instead, I cut a small piece of metal to fit on top of what's left of one of the grommets, and under the head of the torx screw. Now it's easy to install and remove every time. I'll show you how to do this easy mod next.
EDIT: I now recommend that you just pony up and order and install new grommets. See my reply below. If you're getting new grommets, skip steps 6 through 11. The grommets will fit in the mounting holes on the airbox, and then you just push them over the screw heads when you re-install the airbox. Then re-install the clips if you wish, I find them unneeded.
6. Remove the 6 torx T25 screws for the airbox lid. This is easiest with an impact driver, but a cordless drill or even a nut driver or ratchet will do. Remove the lid, remove the air filter.
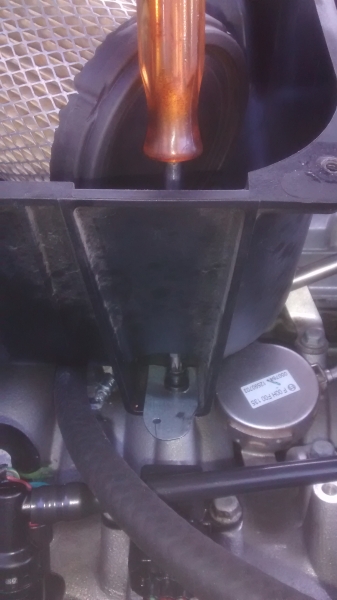
7. Take note of the position of the front driver's side airbox mount. You're going to be drilling a 1/2" hole in the bottom of the airbox for permanent access to that T30 torx screw. Now remove the airbox and turn it over. Put your 1/2" drill bit through the hole in the bottom of the mount(where the grommet was), and drill through the bottom of the airbox. Here is the airbox mounted again, and the access hole, with the torx screw barely visible through it.
8. Here is a picture of the shim I cut.
Loosen the T30 screw, and cut your shim so that it fits snug under the head of the screw. Here I've got the shim in place and am tightening the T30 screw on it.
9. I went to the hardware store and found a rubber plug that fits in the 1/2" hole nicely. It might not be necessary, but it will keep a little bit of hot air out of the intake.
To reinstall airbox.
10. Set airbox on the 3 half-grommets, set your shim in place, and snug up the T30 screw. Then put your rubber plug in place.
11. Replace the air filter and reattach the lid to the airbox with the 6 T25 screws.
12. Put the air inlet hose in place and tighten the clamp.
13. Reattach the MAF sensor wires.
14. Snap the wooly worm back in place. I would advise cutting the bottom snap off, for easy access later, but your call.
15. Replace fuse #13 and fusebox cover.
16. That's it. You're done. If you're removing the intake manifold also, Go here
Last edited by RJ_RS_SS_350; 06-05-2018 at 11:24 AM. Reason: New recommendation

 03-15-2017, 01:21 PM
#3
Moderator
Thread Starter
Join Date: 05-01-2014
Location: California
Posts: 7,786
Well, that was a fun experiment, it lasted about a year. What was left of the rear grommet(insulator) crumbled away, so I have purchased and installed 3 new insulators.
GM part # 25920906, ordered from my local dealer for $5.03 each, $16.26 including tax. The cheapest I found online was around $19 with tax and shipping. I'll edit the how-to, recommending to just replace the insulators.
GM part # 25920906, ordered from my local dealer for $5.03 each, $16.26 including tax. The cheapest I found online was around $19 with tax and shipping. I'll edit the how-to, recommending to just replace the insulators.
03-16-2017, 10:56 AM
#6
Senior Member

Join Date: 01-26-2016
Location: Saint Louis, MO
Posts: 166
Hmmmmmm.... may have been a case of dyslexic grommets. I haven't checked my invoice, but it may be that they were $3.25 each and I remembered $2.35.
...warm enough to head out and put these on today!
...warm enough to head out and put these on today!

Thread
Thread Starter
Forum
Replies
Last Post

