Custom Made Trunk Storage Organizer
 01-31-2016, 05:25 PM
#1
Senior Member
Thread Starter

Join Date: 12-26-2015
Location: Central Florida
Posts: 118
Custom Made Trunk Storage Organizer
This seems like the most appropriate forum for this:
Decided to make my own trunk storage organizer... I looked at several different ones available online & found a few that I liked but ultimately, they were all lacking what I was after.
So I decided to build my own organizer.
To start with I purchased a full sheet of 1/2" cabinet grade plywood. Unfortunately, I didn't realize that the face veneer isn't thick enough to sand even minor imperfections without sanding through the veneer. This means that I'll be painting the organizer black when it's completed, instead of staining it ebony as I originally planned.
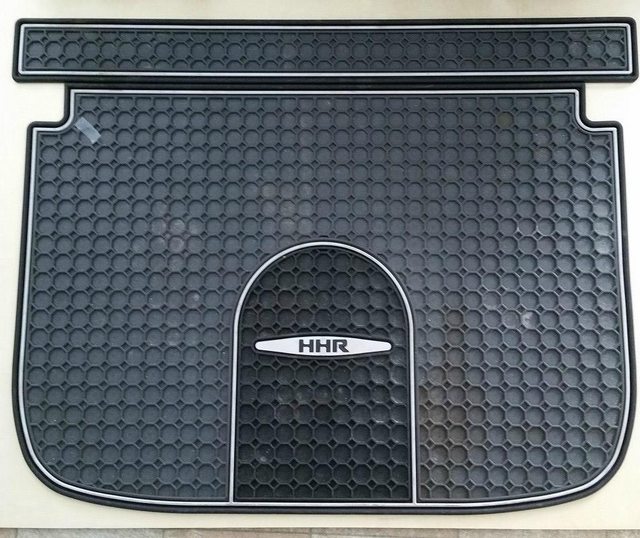
I had the plywood cut to a rough fit at the store for easy transport. Once home I then laid out the rubber mat on the 3' x 4' piece to trace a rough outline.
Next I laminated four pieces of the plywood into a 7" wide by 80" long piece that is 1" thick. These were then cut down to make the rear compartment of the organizer which I intend mainly for use in transporting gasoline for riding mower & backup generator. So I grabbed an empty 5 gallon gas can to see how much of the organizer two of them would take up.
I then went to my bandsaw & proceeded with the rough cutting.
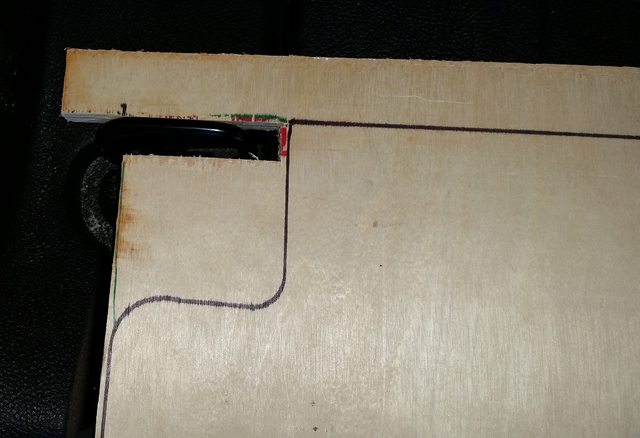
I also decided to use the 4 tie down points on the bed to hold the organizer in place. So I cut out two notches to fit around the rear tie down points. I'll cut those overhanging ears off when it's finished.
To hold the orgaizer down, I ordered 15 feet of 1.5" nylon strapping & two 1.5" cam buckles. When they came in I did a quick layout to see what would work & what wouldn't. Originally, I wanted to connect the strapping to the organizer & run it through the rear hold down & attach the buckle near the front of the organizer where I would run the strap through the front hold down & loop it around into the jaws of the buckle to secure it tightly.
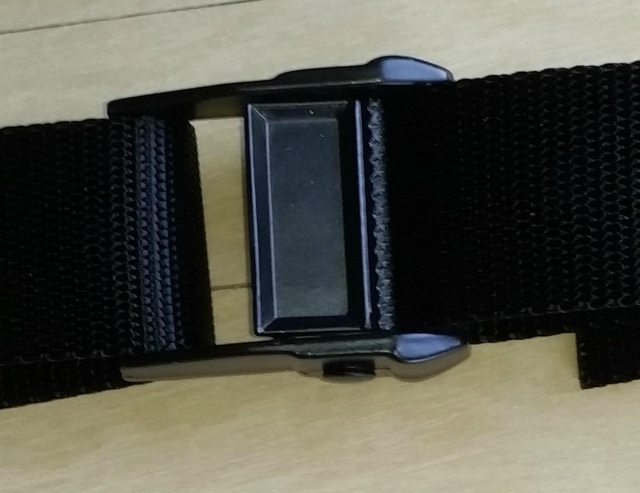
Those teeth on that buckle will prevent it from coming loose until the cam arm is pressed down!!!
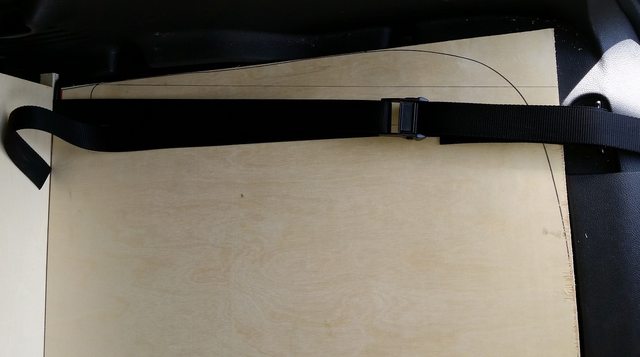
Unfortunately, the rear tie down points aren't tall enough to give clearance to easily run the strapping through them when strapping is attached to the organizer. So I decided to permanently attach one section of strapping to the rear hold down & another shorter piece to the front hold down - though I may change my mind & use high strength velcro for a less permanent solution....
Just a mock up, but hopefully you get the idea.
I'll also put a section of velcro on the rear straps to make them easily adjustable for use with other tie down needs when not using the organizer.
Originally, I had planned to use Oak dowel rod & glue to secure the outer frame to the base, but in the end I decided on just using stainless steel screws to hold it all together. This has the advantage of making it easy to take down & put back together for painting, & future changes.
Just got the easy part finished this afternoon & here it is:
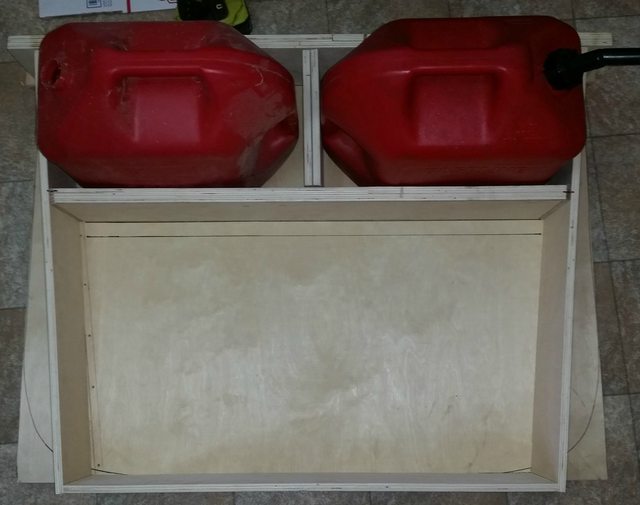
The divider between the two cans is not assembled or installed just two pieces thrown in there to see how it'll all go together. I'll glue them together tonight & install them tomorrow.
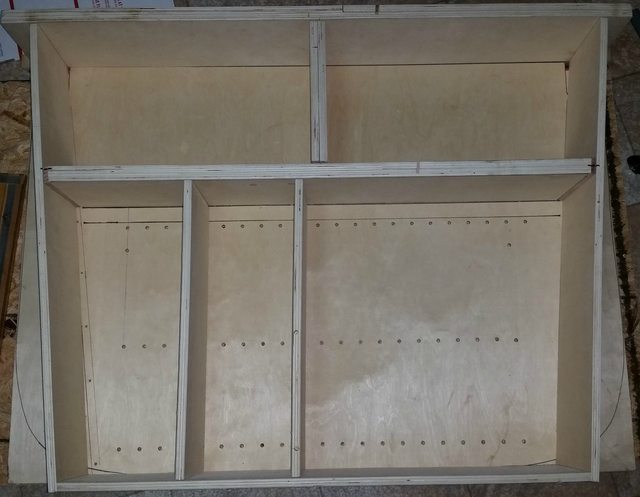
Then the hard part begins. I plan on making adjustable dividers for the large front section. To do so, I'll be using 1/4" dowel pins set into the bottom of the dividers & drilling a series of adjustment holes in the base. Kind of like adjustable shelves in a book case or kitchen cabinet. This will actually be very tricky because I don't have most of the right tools to do it properly, so hopefully I get it right on the first try!!!
Fortunately, I do have a lot of wood, a bit of skill, & one of the right tool for the job...
I just have to adapt it ( using wood I have laying around) to work inside this space... it's meant to work from the edge of a piece of wood, not on top of it.
Managed to even get the perfect angle cut on the inside frame pieces.
But it would have been better if the front tie down points were on the same line with the rear so that I didn't have that angle to mess with.
Unfortunately, thought the front was perfect, I cut the angle for the gas can retaining wall in the opposite direction, & had to recut which left the piece short. Instead of wasting wood. I decided just to cut some 1/4" oak pieces as gap fillers.
When it's all finished & painted, they won't even be noticeable anyway.
I'll also do some cutouts around the frame for weight reduction & internal tie points for securing odd-shaped items that won't let me use the dividers easily.
Stats:
Fully assembled height = 7" (to make sure those gas cans cannot fall over)
current weight = about 16 pounds
est weight with added dividers = 18 pounds (planned cutouts should drop it to about 12lbs)
main storage compartment without dividers = 17" front to back - width = 28.875" at front & 32.375" at back (+/- 1/16")
Total out-of-pocket = about $48
Hm... this also gives me an idea for full-sized spare storage.... but that's for another time :)
Decided to make my own trunk storage organizer... I looked at several different ones available online & found a few that I liked but ultimately, they were all lacking what I was after.
So I decided to build my own organizer.
To start with I purchased a full sheet of 1/2" cabinet grade plywood. Unfortunately, I didn't realize that the face veneer isn't thick enough to sand even minor imperfections without sanding through the veneer. This means that I'll be painting the organizer black when it's completed, instead of staining it ebony as I originally planned.
I had the plywood cut to a rough fit at the store for easy transport. Once home I then laid out the rubber mat on the 3' x 4' piece to trace a rough outline.
Next I laminated four pieces of the plywood into a 7" wide by 80" long piece that is 1" thick. These were then cut down to make the rear compartment of the organizer which I intend mainly for use in transporting gasoline for riding mower & backup generator. So I grabbed an empty 5 gallon gas can to see how much of the organizer two of them would take up.
I then went to my bandsaw & proceeded with the rough cutting.
I also decided to use the 4 tie down points on the bed to hold the organizer in place. So I cut out two notches to fit around the rear tie down points. I'll cut those overhanging ears off when it's finished.
To hold the orgaizer down, I ordered 15 feet of 1.5" nylon strapping & two 1.5" cam buckles. When they came in I did a quick layout to see what would work & what wouldn't. Originally, I wanted to connect the strapping to the organizer & run it through the rear hold down & attach the buckle near the front of the organizer where I would run the strap through the front hold down & loop it around into the jaws of the buckle to secure it tightly.
Those teeth on that buckle will prevent it from coming loose until the cam arm is pressed down!!!
Unfortunately, the rear tie down points aren't tall enough to give clearance to easily run the strapping through them when strapping is attached to the organizer. So I decided to permanently attach one section of strapping to the rear hold down & another shorter piece to the front hold down - though I may change my mind & use high strength velcro for a less permanent solution....
Just a mock up, but hopefully you get the idea.
I'll also put a section of velcro on the rear straps to make them easily adjustable for use with other tie down needs when not using the organizer.
Originally, I had planned to use Oak dowel rod & glue to secure the outer frame to the base, but in the end I decided on just using stainless steel screws to hold it all together. This has the advantage of making it easy to take down & put back together for painting, & future changes.
Just got the easy part finished this afternoon & here it is:
The divider between the two cans is not assembled or installed just two pieces thrown in there to see how it'll all go together. I'll glue them together tonight & install them tomorrow.
Then the hard part begins. I plan on making adjustable dividers for the large front section. To do so, I'll be using 1/4" dowel pins set into the bottom of the dividers & drilling a series of adjustment holes in the base. Kind of like adjustable shelves in a book case or kitchen cabinet. This will actually be very tricky because I don't have most of the right tools to do it properly, so hopefully I get it right on the first try!!!
Fortunately, I do have a lot of wood, a bit of skill, & one of the right tool for the job...
I just have to adapt it ( using wood I have laying around) to work inside this space... it's meant to work from the edge of a piece of wood, not on top of it.
Managed to even get the perfect angle cut on the inside frame pieces.
But it would have been better if the front tie down points were on the same line with the rear so that I didn't have that angle to mess with.
Unfortunately, thought the front was perfect, I cut the angle for the gas can retaining wall in the opposite direction, & had to recut which left the piece short. Instead of wasting wood. I decided just to cut some 1/4" oak pieces as gap fillers.
When it's all finished & painted, they won't even be noticeable anyway.
I'll also do some cutouts around the frame for weight reduction & internal tie points for securing odd-shaped items that won't let me use the dividers easily.
Stats:
Fully assembled height = 7" (to make sure those gas cans cannot fall over)
current weight = about 16 pounds
est weight with added dividers = 18 pounds (planned cutouts should drop it to about 12lbs)
main storage compartment without dividers = 17" front to back - width = 28.875" at front & 32.375" at back (+/- 1/16")
Total out-of-pocket = about $48
Hm... this also gives me an idea for full-sized spare storage.... but that's for another time :)
Last edited by chaosdsm; 02-01-2016 at 11:45 AM.
 01-31-2016, 06:15 PM
#2
Senior Member

Join Date: 05-29-2015
Location: Cleveland, OH
Posts: 542
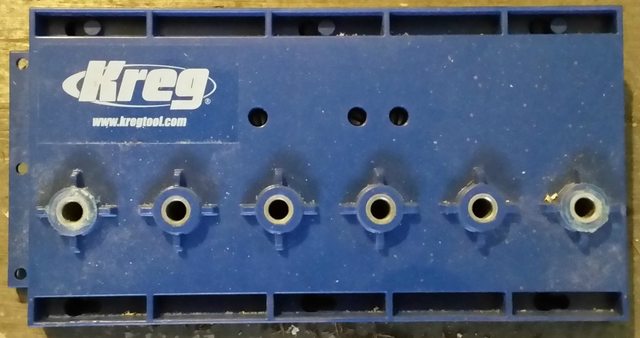
Very cool project there Chaos! The Kreg tools make working with wood much easier! Especially for someone like me who would rather grind and weld. My projects tend to weigh more than they're suppose to, but I know they'll never fall apart either!
 02-06-2016, 02:43 PM
#4
Senior Member
Thread Starter
Join Date: 12-26-2015
Location: Central Florida
Posts: 118
RE: Kreg... I have a love hate relationship there.... I love the functionality, but hate the cost for what you get.... Would be a lot better if they were made of aluminum so that they wouldn't break....
I did put much more forethought & planning into this project than many of my other projects. Maybe that's why I'm almost done with it!!!
Just got to make a couple more dividers, install the straps, & wait for decent weather so I can paint it. I'll cut out the weight reduction holes later, after I decide on a design I want for them.
Put it to use today on my trip to Sam's Club to pick up a couple essentials for work & home.
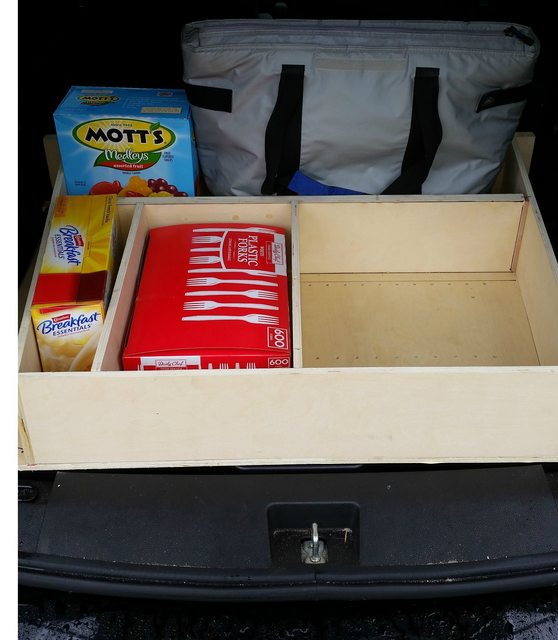
Even without the straps installed, it didn't move around, at least not that I could notice anyway. But I wouldn't be very confident in it staying put with a heavier load if I had an emergency braking scenario come up.
I did put much more forethought & planning into this project than many of my other projects. Maybe that's why I'm almost done with it!!!
Just got to make a couple more dividers, install the straps, & wait for decent weather so I can paint it. I'll cut out the weight reduction holes later, after I decide on a design I want for them.
Put it to use today on my trip to Sam's Club to pick up a couple essentials for work & home.
Even without the straps installed, it didn't move around, at least not that I could notice anyway. But I wouldn't be very confident in it staying put with a heavier load if I had an emergency braking scenario come up.
 02-15-2016, 05:40 PM
#6
Senior Member
Thread Starter
Join Date: 12-26-2015
Location: Central Florida
Posts: 118
Haven't really been able to do much with this project since last post, due to horrible weather conditions... to cold, rainy, humid, etc... I did get a small break in the weather this past Friday, just enough to get the first coat of primer applied & let it touch dry, but it has been in the house for proper drying since.
In the meantime, I've been using SketchUp to plan out the weight reduction holes. For most of them, I'm just going to go with a simple oval design spaced about 1 1/2" apart, with the ovals being roughly 3 1/2" high by 1 1/2" wide for the 1/2" thick boards, & 4" high by 2" wide for the 1" thick boards.
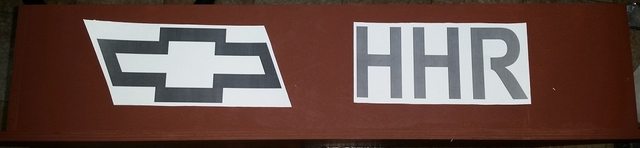
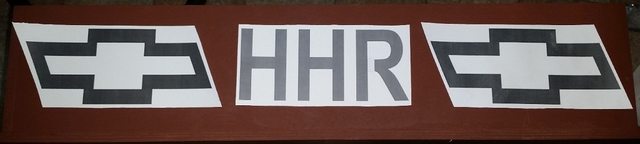
I also decided I don't want the ovals on the front board, but I still want the extra weight reduction, & I want to stay relatively simple for this project, so I'm thinking bowtie + HHR & this is what I came up with, but haven't decided between the two....
My last jigsaw blade for wood broke, so gotta wait till payday before I can even think about starting to cut anything anyway.
In the meantime, I've been using SketchUp to plan out the weight reduction holes. For most of them, I'm just going to go with a simple oval design spaced about 1 1/2" apart, with the ovals being roughly 3 1/2" high by 1 1/2" wide for the 1/2" thick boards, & 4" high by 2" wide for the 1" thick boards.
I also decided I don't want the ovals on the front board, but I still want the extra weight reduction, & I want to stay relatively simple for this project, so I'm thinking bowtie + HHR & this is what I came up with, but haven't decided between the two....
My last jigsaw blade for wood broke, so gotta wait till payday before I can even think about starting to cut anything anyway.
03-19-2016, 04:12 PM
#7
Senior Member
Thread Starter
Join Date: 12-26-2015
Location: Central Florida
Posts: 118
For the front, I decided I'm going to just go with the one emblem & HHR instead of the two emblems.
Haven't really done a whole lot with this lately since my rubber sanding spindle covers had dry rotted I ordered 3/4" & 1" diameter replacements which should be here in a day or two, and will let me sand out the ovals into nice smooth shapes.
Speaking of the ovals, I just went with the easiest method I could think of. I determined how much material I wanted to leave at top & bottom (1/2" to 3/4"), did some quick calculations then did a quick layout on the board.
Went to drill press & went to work with a 1 1/2" diameter hole saw.

Drilled 3 holes at each weight reduction location.

Then tried a few different methods of removing additional waste material before picking up a thin pull saw.

Sounds like a lot of work so far... but only took about an hour to get this far:

My oscillating drum sander will make quick work of finishing up those oval cutouts once I get those rubber sleeves in! Then just a matter of final priming & painting!
Haven't really done a whole lot with this lately since my rubber sanding spindle covers had dry rotted
I ordered 3/4" & 1" diameter replacements which should be here in a day or two, and will let me sand out the ovals into nice smooth shapes.Speaking of the ovals, I just went with the easiest method I could think of. I determined how much material I wanted to leave at top & bottom (1/2" to 3/4"), did some quick calculations then did a quick layout on the board.
Went to drill press & went to work with a 1 1/2" diameter hole saw.
Drilled 3 holes at each weight reduction location.
Then tried a few different methods of removing additional waste material before picking up a thin pull saw.
Sounds like a lot of work so far... but only took about an hour to get this far:
My oscillating drum sander will make quick work of finishing up those oval cutouts once I get those rubber sleeves in! Then just a matter of final priming & painting!

Thread
Thread Starter
Forum
Replies
Last Post