Installing a doggie seat cover in back seat
 03-04-2017, 02:10 PM
#1
Moderator
Thread Starter

Join Date: 05-01-2014
Location: California
Posts: 7,805
Installing a doggie seat cover in back seat
As usual, I went overboard researching this. I looked at every seat cover on Amazon and picked, I think, the best one.
This had all the features I wanted.
*water resistant
*slots for the seat belts
*straps to go around each of the 4 headrests
*good reinforced stitching for the headrest straps
*Section of PVC pipe that slips between the upper and lower seat, and rubberized backing on the lower section, to keep the cover from sliding around
*4 walls to keep most of the dog hair inside
*NO zipper in the middle of the front wall(these tend to unzip if the dog puts weight on the front wall)
*and the extremely rare - 2 loops and hooks, on the walls that protect the doors. I feel this may be more stable than just 1.
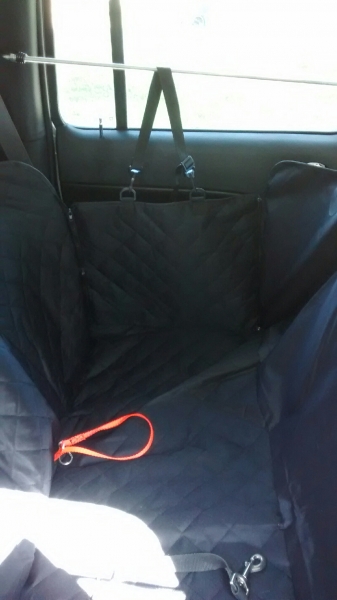
I installed the seat cover. I needed to hang the side walls on something for support. I didn't like attaching to the coat hook, it was designed to hold a couple shirts, don't trust it to hold my 25-30 lb. dog.
Now for the mod.
I had a couple of bungee cords that were rotting out, so I cut the cords off and used the 4 hooks for this project. I went to the big orange box and bought 2 sections of 3/8" all thread, 3' long each, and 4 nuts and split washers(the flat washers were too big, outside diameter, would have caused interference). I spent $7 and some change.
EDIT: purchased 4 more nuts - see red letters below
I cut the all thread to 30" each(31" would be better), cleaned up the cut so the nut would thread easily. I hooked the bungee hooks as shown in the first pic, threaded a nut on each end of the all thread, about 3" in, then inserted the all thread into the hooks. Installed the washers and nuts, just hand tight. Mod complete!
The reason for the edit: the slot in the front, upper seat belt anchor, which the seat belt slides through, was too close to horizontal. The seat belt was binding. This edit allows you to adjust the effective length of the all thread, pivoting the seat belt anchor forward, changing the angle of the slot to off horizontal.
I looped the strap around the all thread, adjusted and done! Now, the all thread is a bit obtrusive, but I think it will deter the dogs from trying to put their feet up on the window sills

Now some of you might be thinking "you shouldn't attach to the seat belt upper anchors like that", but it's really next to nothing attached to it.
I attached the dog tie-downs to the child lower LATCH points. There are also available, tie-downs that clip right into the seat belt receptacle. My dogs will be in harnesses for this. I tucked the seat belt receptacles out of the way, under the seat.
This had all the features I wanted.
*water resistant
*slots for the seat belts
*straps to go around each of the 4 headrests
*good reinforced stitching for the headrest straps
*Section of PVC pipe that slips between the upper and lower seat, and rubberized backing on the lower section, to keep the cover from sliding around
*4 walls to keep most of the dog hair inside
*NO zipper in the middle of the front wall(these tend to unzip if the dog puts weight on the front wall)
*and the extremely rare - 2 loops and hooks, on the walls that protect the doors. I feel this may be more stable than just 1.
I installed the seat cover. I needed to hang the side walls on something for support. I didn't like attaching to the coat hook, it was designed to hold a couple shirts, don't trust it to hold my 25-30 lb. dog.
Now for the mod.
I had a couple of bungee cords that were rotting out, so I cut the cords off and used the 4 hooks for this project. I went to the big orange box and bought 2 sections of 3/8" all thread, 3' long each, and 4 nuts and split washers(the flat washers were too big, outside diameter, would have caused interference). I spent $7 and some change.
EDIT: purchased 4 more nuts - see red letters below
I cut the all thread to 30" each(31" would be better), cleaned up the cut so the nut would thread easily. I hooked the bungee hooks as shown in the first pic, threaded a nut on each end of the all thread, about 3" in, then inserted the all thread into the hooks. Installed the washers and nuts, just hand tight. Mod complete!
The reason for the edit: the slot in the front, upper seat belt anchor, which the seat belt slides through, was too close to horizontal. The seat belt was binding. This edit allows you to adjust the effective length of the all thread, pivoting the seat belt anchor forward, changing the angle of the slot to off horizontal.
I looped the strap around the all thread, adjusted and done! Now, the all thread is a bit obtrusive, but I think it will deter the dogs from trying to put their feet up on the window sills
Now some of you might be thinking "you shouldn't attach to the seat belt upper anchors like that", but it's really next to nothing attached to it.
I attached the dog tie-downs to the child lower LATCH points. There are also available, tie-downs that clip right into the seat belt receptacle. My dogs will be in harnesses for this. I tucked the seat belt receptacles out of the way, under the seat.
Last edited by RJ_RS_SS_350; 03-04-2017 at 05:41 PM.


Thread
Thread Starter
Forum
Replies
Last Post
Ls2_HHRss
Problems/Service/Repairs
10
02-10-2017 12:06 AM
sbmike
2.0L Performance Tech
47
06-11-2009 07:17 PM