Official TSB and Recall Thread
 01-07-2009, 08:42 AM
#21
Founding Member
Thread Starter

Join Date: 11-23-2007
Location: Texas
Posts: 8,210
09-08-67-001
#09-08-67-001: Sunroof Frame Tox Rivet Rattle (Install Flocking Tape) - (Jan 6, 2009)
Subject: Sunroof Frame Tox Rivet Rattle (Install Flocking Tape)
Models: 2006-2009 Buick Lucerne
2003-2007 Cadillac CTS
2005-2009 Cadillac STS
2006-2009 Cadillac DTS
2005-2009 Chevrolet Cobalt, Equinox
2006-2009 Chevrolet HHR
2006-2009 Pontiac Torrent
2007-2009 Pontiac G5
2004-2007 Saturn VUE
--------------------------------------------------------------------------------
Condition
Some customers may comment of a rattling noise coming from the sunroof or roof area.
Cause
This condition may be caused by the inboard tox rivets, which retain the sunroof center support beam to the side rails, pulling through the side rail track on one or both sides. This may cause the support beam to rattle against the side rail track.
Correction
Important: Once the sunroof module is bolted into the roof ring of the vehicle, the support provided by the center beam is no longer necessary. DO NOT replace the sunroof frame when the above condition is noted.
Install flocking tape between the sunroof center support beam and the side rail track.
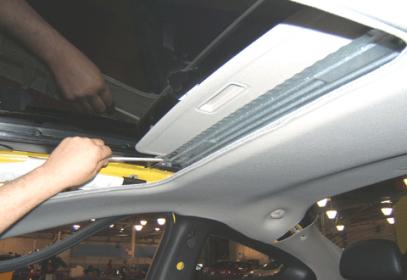
Following SI, lower the front portion of the headliner enough to gain access to the sunroof module center support beam through the opening in the headliner.
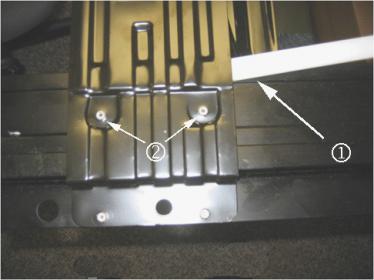
Check both sides of the center support beam for loose rivets (2) by inserting a trim stick (1) between the center support and the side rail track
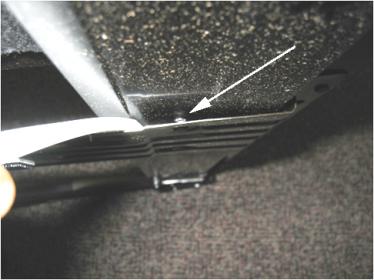
Look for separation of the center support beam and the side rail track.
Cut a piece of Kent-Automotive � 30 mm wide BRS Flocking tape, or equivalent, approximately 152 mm (6 in) in length.
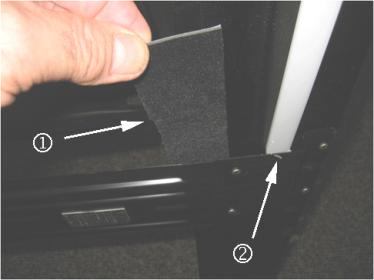
install the flocking tape (1) underneath the center support beam using the trim stick (2) to separate the center support beam and the side rail track.

Ensure that the flocking tape is positioned underneath the complete width of the center support beam.
Reinstall the headliner.
Parts Information
BRS Flocking tape is available from Kent Automotive at 1-888-YES-KENT or online at www.kent-automitive.com.
Part Number Description
KT 13486 BRS Tape (Flocking Tape)
Subject: Sunroof Frame Tox Rivet Rattle (Install Flocking Tape)
Models: 2006-2009 Buick Lucerne
2003-2007 Cadillac CTS
2005-2009 Cadillac STS
2006-2009 Cadillac DTS
2005-2009 Chevrolet Cobalt, Equinox
2006-2009 Chevrolet HHR
2006-2009 Pontiac Torrent
2007-2009 Pontiac G5
2004-2007 Saturn VUE
--------------------------------------------------------------------------------
Condition
Some customers may comment of a rattling noise coming from the sunroof or roof area.
Cause
This condition may be caused by the inboard tox rivets, which retain the sunroof center support beam to the side rails, pulling through the side rail track on one or both sides. This may cause the support beam to rattle against the side rail track.
Correction
Important: Once the sunroof module is bolted into the roof ring of the vehicle, the support provided by the center beam is no longer necessary. DO NOT replace the sunroof frame when the above condition is noted.
Install flocking tape between the sunroof center support beam and the side rail track.
Following SI, lower the front portion of the headliner enough to gain access to the sunroof module center support beam through the opening in the headliner.
Check both sides of the center support beam for loose rivets (2) by inserting a trim stick (1) between the center support and the side rail track
Look for separation of the center support beam and the side rail track.
Cut a piece of Kent-Automotive � 30 mm wide BRS Flocking tape, or equivalent, approximately 152 mm (6 in) in length.
install the flocking tape (1) underneath the center support beam using the trim stick (2) to separate the center support beam and the side rail track.
Ensure that the flocking tape is positioned underneath the complete width of the center support beam.
Reinstall the headliner.
Parts Information
BRS Flocking tape is available from Kent Automotive at 1-888-YES-KENT or online at www.kent-automitive.com.
Part Number Description
KT 13486 BRS Tape (Flocking Tape)
Last edited by ChevyMgr; 06-03-2009 at 09:34 AM.
 01-07-2009, 09:39 AM
#22
Founding Member
Thread Starter
Join Date: 11-23-2007
Location: Texas
Posts: 8,210
09-08-58-001
#09-08-58-001: Outside Rearview Mirror Wind Noise (Install Flocking Tape and Shim Stock) - (Jan 6, 2009)
Subject: Outside Rearview Mirror Wind Noise (Install Flocking Tape and Shim Stock)
Models: 2006-2009 HHR
--------------------------------------------------------------------------------
Condition
Some customers may comment about a more than desirable amount of wind noise coming from the outside rearview mirror(s).
Cause
Air intrusion may be occurring between the outside rearview mirror cover and the mirror housing, which may create a noise when the air passes over the holes in the mirror housing.
Correction
Install flocking tape and adhesive back shim stock to the outside rearview mirror housing. The pattern is noted in the steps below:
Using a trim stick, or suitable tool, carefully remove the outside rearview mirror cover.
Important: The mirror cover has retaining tabs and features that must be positioned into the hole locations noted above. Do NOT cover any of these holes with the tape or shim stock.
Install a 1/2 width piece of 5/8" x 1/8" Kent Automotive™ Adhesive Back Shim Stock (1), or equivalent, around the outside of the larger rectangular hole in the mirror housing.
Install 1/2 width pieces of Kent Automotive ™ 30 mm wide BRS Flocking tape, or equivalent, around the perimeter and underside of the mirror housing.
3.1. Install pieces of flocking tape to the top, sides, and bottom of the back rounded surface of the mirror housing.
Tip
Install the tape just inside the outer edge of the back rounded surface.

3.2. Install another piece of flocking tape between the shim stock and the side tape, being sure to avoid the retainer hole locations.
3.3. Install pieces of flocking tape starting at the shim stock, and wrapping around to the underside of the mirror housing. Ensure the tape is inboard of the retainer hole locations.
Carefully position the outside rearview mirror cover to the mirror housing and push to engage the retaining tabs. Ensure all the retainers are fully seated.
Parts Information
Flocking Tape and Shim Stock is available from Kent Automotive at 1-888-YES-KENT or online at www.kent-automotive.com.
Part Number Description
KT 13486 BRS Tape (Flocking Tape)
P40100 Adhesive Back Shim Stock
Subject: Outside Rearview Mirror Wind Noise (Install Flocking Tape and Shim Stock)
Models: 2006-2009 HHR
--------------------------------------------------------------------------------
Condition
Some customers may comment about a more than desirable amount of wind noise coming from the outside rearview mirror(s).
Cause
Air intrusion may be occurring between the outside rearview mirror cover and the mirror housing, which may create a noise when the air passes over the holes in the mirror housing.
Correction
Install flocking tape and adhesive back shim stock to the outside rearview mirror housing. The pattern is noted in the steps below:
Using a trim stick, or suitable tool, carefully remove the outside rearview mirror cover.
Important: The mirror cover has retaining tabs and features that must be positioned into the hole locations noted above. Do NOT cover any of these holes with the tape or shim stock.
Install a 1/2 width piece of 5/8" x 1/8" Kent Automotive™ Adhesive Back Shim Stock (1), or equivalent, around the outside of the larger rectangular hole in the mirror housing.
Install 1/2 width pieces of Kent Automotive ™ 30 mm wide BRS Flocking tape, or equivalent, around the perimeter and underside of the mirror housing.
3.1. Install pieces of flocking tape to the top, sides, and bottom of the back rounded surface of the mirror housing.
Tip
Install the tape just inside the outer edge of the back rounded surface.
3.2. Install another piece of flocking tape between the shim stock and the side tape, being sure to avoid the retainer hole locations.
3.3. Install pieces of flocking tape starting at the shim stock, and wrapping around to the underside of the mirror housing. Ensure the tape is inboard of the retainer hole locations.
Carefully position the outside rearview mirror cover to the mirror housing and push to engage the retaining tabs. Ensure all the retainers are fully seated.
Parts Information
Flocking Tape and Shim Stock is available from Kent Automotive at 1-888-YES-KENT or online at www.kent-automotive.com.
Part Number Description
KT 13486 BRS Tape (Flocking Tape)
P40100 Adhesive Back Shim Stock
Last edited by ChevyMgr; 06-03-2009 at 09:34 AM.
01-07-2009, 09:46 AM
#23
Founding Member
Thread Starter
Join Date: 11-23-2007
Location: Texas
Posts: 8,210
08-07-29-001c
#08-07-29-001C: EI08046-Manual Transmission Grinds in Either Third or Fourth Gear When Clutch is Fully Disengaged (Replace 3rd and 4th Gear Blocker Rings) - (Jan 5, 2009)
Subject: EI08046 - Manual Transmission Grinds in Either Third or Fourth Gear When Clutch is Fully Disengaged (Replace 3rd and 4th Gear Blocker Rings)
Models: 2008 Chevrolet Cobalt, HHR
2008 Pontiac G5
Equipped with Manual Transmission (RPO M86)
Prior to the Serial Numbers Shown Below
--------------------------------------------------------------------------------
This bulletin is being revised to include a Transmission Serial Number breakpoint. Please discard Corporate Bulletin Number 08-07-29-001B (Section 07- Transmissions)
--------------------------------------------------------------------------------
Models
Transmission P/N Transmission Serial Number
Cobalt XFE 24248018 61 YEH 08058387
Cobalt, G5 (STD) 24241747 61 YED 08083169
HHR 24241746 61 YEC 08062188
Condition
Some customers may comment on a grinding noise in third or fourth gear when the clutch is fully disengaged.
Cause
Based on feedback provided by dealer technicians, engineering was able to determine the manual transmission grinding in 3rd or 4th gear. It is possible to correct the condition by replacing the 3rd and 4th gear blocker rings.
Correction
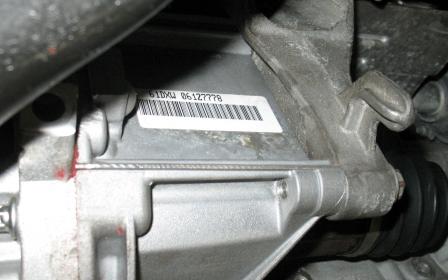
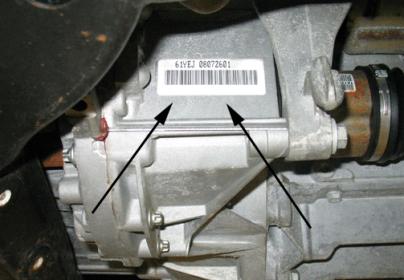
Check the Transmission Serial Number label to determine if the transmission is built prior to the chart above. The Transmission Serial Number label is located on the back side of the transmission between the halfshafts. If the transmission is built prior to the chart above, then replace the 3rd and 4th gear ring blocker, GM P/N 192076072.
Parts Information**Parts Description**Quantity
19207672**Ring, Blocker**2
Subject: EI08046 - Manual Transmission Grinds in Either Third or Fourth Gear When Clutch is Fully Disengaged (Replace 3rd and 4th Gear Blocker Rings)
Models: 2008 Chevrolet Cobalt, HHR
2008 Pontiac G5
Equipped with Manual Transmission (RPO M86)
Prior to the Serial Numbers Shown Below
--------------------------------------------------------------------------------
This bulletin is being revised to include a Transmission Serial Number breakpoint. Please discard Corporate Bulletin Number 08-07-29-001B (Section 07- Transmissions)
--------------------------------------------------------------------------------
Models
Transmission P/N Transmission Serial Number
Cobalt XFE 24248018 61 YEH 08058387
Cobalt, G5 (STD) 24241747 61 YED 08083169
HHR 24241746 61 YEC 08062188
Condition
Some customers may comment on a grinding noise in third or fourth gear when the clutch is fully disengaged.
Cause
Based on feedback provided by dealer technicians, engineering was able to determine the manual transmission grinding in 3rd or 4th gear. It is possible to correct the condition by replacing the 3rd and 4th gear blocker rings.
Correction
Check the Transmission Serial Number label to determine if the transmission is built prior to the chart above. The Transmission Serial Number label is located on the back side of the transmission between the halfshafts. If the transmission is built prior to the chart above, then replace the 3rd and 4th gear ring blocker, GM P/N 192076072.
Parts Information**Parts Description**Quantity
19207672**Ring, Blocker**2
Last edited by ChevyMgr; 06-03-2009 at 09:34 AM.
01-07-2009, 09:48 AM
#24
Founding Member
Thread Starter
Join Date: 11-23-2007
Location: Texas
Posts: 8,210
Pic5064
Document ID: 2220636
--------------------------------------------------------------------------------
#PIC5064: iTouch Issues On Panasonic Radios - (Jan 6, 2009)
Subject: iTouch issue on Panasonic radios
Models: 2009 Chevrolet HHR, Malibu
2009 Pontiac Solstice, Solstice Coupe
2009 Opel GT
2009 Saturn Aura, Sky
--------------------------------------------------------------------------------
The following diagnosis might be helpful if the vehicle exhibits the symptom(s) described in this PI.
Condition/Concern:
Some customers may comment that their Apple iPhone or iTouch device may not work as desired. If the customer has an Apple iPhone or iTouch with firmware version 2.1 the device may experience the following operating condition when it is plugged into the USB port on the radio. The device will connect and operate initially. After a short period of time the radio may display no USB device. The customer may disconnect and reconnect the device and the radio does not recognize the device. This condition may not go away with cycling the ignition or rebooting the device.
Recommendation/Instructions:
A software anomaly exists between the radio and the connected device resulting in the described operating condition when using software version 2.1 on the device.
The customer should upgrade the Apple iPhone or iTouch with firmware version 2.2. to resolve this condition.
--------------------------------------------------------------------------------
#PIC5064: iTouch Issues On Panasonic Radios - (Jan 6, 2009)
Subject: iTouch issue on Panasonic radios
Models: 2009 Chevrolet HHR, Malibu
2009 Pontiac Solstice, Solstice Coupe
2009 Opel GT
2009 Saturn Aura, Sky
--------------------------------------------------------------------------------
The following diagnosis might be helpful if the vehicle exhibits the symptom(s) described in this PI.
Condition/Concern:
Some customers may comment that their Apple iPhone or iTouch device may not work as desired. If the customer has an Apple iPhone or iTouch with firmware version 2.1 the device may experience the following operating condition when it is plugged into the USB port on the radio. The device will connect and operate initially. After a short period of time the radio may display no USB device. The customer may disconnect and reconnect the device and the radio does not recognize the device. This condition may not go away with cycling the ignition or rebooting the device.
Recommendation/Instructions:
A software anomaly exists between the radio and the connected device resulting in the described operating condition when using software version 2.1 on the device.
The customer should upgrade the Apple iPhone or iTouch with firmware version 2.2. to resolve this condition.
Last edited by ChevyMgr; 06-03-2009 at 09:34 AM.
01-07-2009, 09:50 AM
#25
Founding Member
Thread Starter
Join Date: 11-23-2007
Location: Texas
Posts: 8,210
Pic5002a
Bluetooth and Apple iPhone
#PIC5002A: Bluetooth Issues With Apple iPhone V2.1 - keywords audio call drop onstar UPF - (Jan 5, 2009)
Subject: Bluetooth� issues with Apple iPhone V2.1
Models: 2008 - 2009 Cadillac CTS, CTS-V
2009 Buick Enclave, Lacrosse, Lucerne
2009 Cadillac DTS, Escalade, Escalade ESV, Escalade EXT, SRX, STS, XLR
2009 Chevrolet Cobalt, Corvette, Equinox, HHR, Impala, Malibu, Silverado, Suburban, Tahoe, Trailblazer, Traverse
2009 GMC Acadia, Envoy, Sierra, Yukon, Yukon XL
2009 Hummer H2. H3
2009 Pontiac G5, G6, Solstice, Torrent
2009 SAAB 9-3, 9-7x
2009 Saturn Aura, Outlook, Sky, Vue
--------------------------------------------------------------------------------
This PI was superseded to update repair information due to release of V2.2 software. Please discard PIC5002.
--------------------------------------------------------------------------------
The following diagnosis might be helpful if the vehicle exhibits the symptom(s) described in this PI.
Condition/Concern:
Customers may report various issues when trying to use an Apple iPhone with the embedded Bluetooth� system that is part of the GEN8 OnStar system. They may state that the system had been working properly and recently developed the issue.
Recommendation/Instructions:
DO NOT replace the radio or OnStar VCIM for this condition.
An issue has been identified with the Apple iPhone software version 2.1 released September 12, 2008. The customer would have received this software update upon connecting to iTunes and saying yes to the update after 9/12/08. This may cause such issues as inability to hear incoming/outgoing calls, or dropped calls while using the Bluetooth�.
Apple iPhone software version 2.2 was released on 11/21/08 and does resolve this issue. Customers should connect to Apple via their phone and update the software then retest the operation.
Last edited by ChevyMgr; 06-03-2009 at 09:35 AM.
01-07-2009, 09:53 AM
#26
Founding Member
Thread Starter
Join Date: 11-23-2007
Location: Texas
Posts: 8,210
Pip4548
#PIP4548C: Repeat DTC P0016 And P0017 - keywords cam camshaft correlation crankshaft CKP CMP code exhaust intake L61 LAP LAT LE5 LE8 MIL position SES solenoid timing unwanted - (Feb 8, 2011)
Subject: Repeat DTC P0016 and P0017
Models: 2008-2009 Chevrolet Cobalt SS
2006-2009 Chevrolet Cobalt
2006-2009 Chevrolet HHR
2008-2009 Chevrolet HHR SS
2008-2009 Chevrolet Malibu
2007-2009 Pontiac G5
2008-2009 Pontiac G6
2006-2009 Pontiac Pursuit (Canada Only)
2007-2009 Saturn Aura
2006-2007 Saturn Ion
2006-2009 Saturn Vue
OR
Equipped with the following engines
2007-2010 2.0L (RPO LNF)
2007-2011 2.2L (RPO L61/LAP/LE8)
2006-2011 2.4L (RPO LE5/LE9/LAT/LAF)
--------------------------------------------------------------------------------
The following diagnosis might be helpful if the vehicle exhibits the symptom(s) described in this PI.
Condition/Concern:
These DTCs may be caused by a camshaft reluctor that has moved on the cam.
Recommendation/Instructions:
This condition is more prevalent if the engine has been overheated. The camshaft reluctor may have moved on the cam causing this DTC. The CMP phaser and or the actuator solenoid may have been replaced with no change after following SI diagnostic for this code. Additionally the tech may state that the engine is timed correctly and all timing indicators line up correctly.
Note: Each of the procedures below may not detect a small movement in the reluctor, it may be necessary to compare to another like vehicle. Also note that the rocker cover gasket surface does not line up with the same face or slot on the intake and exhaust reluctor.
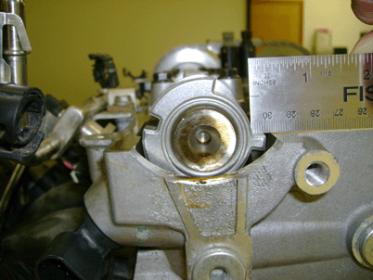
To check the Exhaust Cam reluctor position:
With the exhaust camshaft positioned so that the valves for #4 cylinder are at maximum lift (fully opened valves), the reluctor should be flush/parallel to the rocker cover gasket surface as shown in the attached pictures. After comparing the camshaft reluctor position to the illustration and the reluctor does not line up correctly the camshaft must be replaced. The reluctor is press fit and is not indexed/keyed to the camshaft, it is an interference type fit. An overheat condition may contribute to the concern, causing the reluctor to spin on the camshaft when hot.
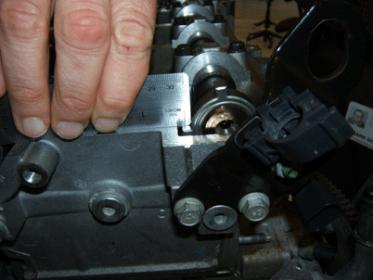
To check the Intake Cam reluctor position:
With the Intake camshaft positioned so that the valves for #1 cylinder are at maximum lift (fully opened valves), the reluctor should be flush/parallel to the rocker cover gasket surface as shown in the attached pictures. After comparing the camshaft reluctor position to the illustration and the reluctor does not line up correctly the camshaft must be replaced. The reluctor is press fit and is not indexed/keyed to the camshaft, it is an interference type fit. An overheat condition may contribute to the concern, causing the reluctor to spin on the camshaft when hot.
Subject: Repeat DTC P0016 and P0017
Models: 2008-2009 Chevrolet Cobalt SS
2006-2009 Chevrolet Cobalt
2006-2009 Chevrolet HHR
2008-2009 Chevrolet HHR SS
2008-2009 Chevrolet Malibu
2007-2009 Pontiac G5
2008-2009 Pontiac G6
2006-2009 Pontiac Pursuit (Canada Only)
2007-2009 Saturn Aura
2006-2007 Saturn Ion
2006-2009 Saturn Vue
OR
Equipped with the following engines
2007-2010 2.0L (RPO LNF)
2007-2011 2.2L (RPO L61/LAP/LE8)
2006-2011 2.4L (RPO LE5/LE9/LAT/LAF)
--------------------------------------------------------------------------------
The following diagnosis might be helpful if the vehicle exhibits the symptom(s) described in this PI.
Condition/Concern:
These DTCs may be caused by a camshaft reluctor that has moved on the cam.
Recommendation/Instructions:
This condition is more prevalent if the engine has been overheated. The camshaft reluctor may have moved on the cam causing this DTC. The CMP phaser and or the actuator solenoid may have been replaced with no change after following SI diagnostic for this code. Additionally the tech may state that the engine is timed correctly and all timing indicators line up correctly.
Note: Each of the procedures below may not detect a small movement in the reluctor, it may be necessary to compare to another like vehicle. Also note that the rocker cover gasket surface does not line up with the same face or slot on the intake and exhaust reluctor.
To check the Exhaust Cam reluctor position:
With the exhaust camshaft positioned so that the valves for #4 cylinder are at maximum lift (fully opened valves), the reluctor should be flush/parallel to the rocker cover gasket surface as shown in the attached pictures. After comparing the camshaft reluctor position to the illustration and the reluctor does not line up correctly the camshaft must be replaced. The reluctor is press fit and is not indexed/keyed to the camshaft, it is an interference type fit. An overheat condition may contribute to the concern, causing the reluctor to spin on the camshaft when hot.
To check the Intake Cam reluctor position:
With the Intake camshaft positioned so that the valves for #1 cylinder are at maximum lift (fully opened valves), the reluctor should be flush/parallel to the rocker cover gasket surface as shown in the attached pictures. After comparing the camshaft reluctor position to the illustration and the reluctor does not line up correctly the camshaft must be replaced. The reluctor is press fit and is not indexed/keyed to the camshaft, it is an interference type fit. An overheat condition may contribute to the concern, causing the reluctor to spin on the camshaft when hot.
Last edited by ChevyMgr; 06-03-2009 at 09:35 AM.
01-07-2009, 09:55 AM
#27
Founding Member
Thread Starter
Join Date: 11-23-2007
Location: Texas
Posts: 8,210
Pip4549A
#PIP4549A: Various Intermittent DTCs Or Electrical / Communication Concerns - keywords bare battery bracket CEL chaff circuit class2 connection controls crank data DTC ECM engine ground harness high intermittent - (Jan 5, 2009)
Subject: Various Intermittent DTC's or Electrical/Communication Concerns
Models: 2005-2009 Chevrolet Cobalt SS
2005-2009 Chevrolet Cobalt
2006-2009 Chevrolet HHR
2008-2009 Chevrolet HHR SS
2008-2009 Chevrolet Malibu
2007-2009 Pontiac G5
2008-2009 Pontiac G6
2005-2009 Pontiac Pursuit (Canada Only)
2007-2009 Saturn Aura
2005-2007 Saturn Ion
2004-2007 Saturn Ion Redline
2002-2009 Saturn Vue
With any of the following ECOTEC engines:
2.0L Engine (RPO LSJ/LNF)
2.2L Engine (RPO L61/LAP)
2.4L Engine (RPO LE5/LE9/LAT)
--------------------------------------------------------------------------------
The following diagnosis might be helpful if the vehicle exhibits the symptom(s) described in this PI.
Condition/Concern:
A technician may comment of intermittent CEL, DTC's or No communication with various modules. This may be caused by a short to ground of the vehicle wiring in the engine harness.
Recommendation/Instructions:
The harness may chaff in the area of the Canister Purge Solenoid attachment bracket, causing an intermittent shorting to ground. The harness routing forces the harness into the edge of the bracket. This bracket is present with any Ecotec engine. The Purge Solenoid bracket may have a sharp edge from the manufacturing/shearing operation. If any DTCs are setting consistently, perform the eSI diagnostics and repair as necessary. If the eSI diagnostics do not isolate the concern, inspect the engine harness for potential shorts to ground at the EVAP purge valve bracket on the side of the cylinder head. Then repair and reposition the circuits/harness as necessary.
Note: To prevent future chaffing remove the sharp edge from the purge solenoid bracket and add conduit to the engine harness at the ECM and Purge Solenoid harness breakout.

This PI applies to all DTCs Listed below:
P0326 P0335 P060E P0561 P0651 P2120 P2122 P2123 P2125 P2127 P2128 P2135 P2138 U1863 U1886 U1899 U2105 U2106 U2107 U2143
Subject: Various Intermittent DTC's or Electrical/Communication Concerns
Models: 2005-2009 Chevrolet Cobalt SS
2005-2009 Chevrolet Cobalt
2006-2009 Chevrolet HHR
2008-2009 Chevrolet HHR SS
2008-2009 Chevrolet Malibu
2007-2009 Pontiac G5
2008-2009 Pontiac G6
2005-2009 Pontiac Pursuit (Canada Only)
2007-2009 Saturn Aura
2005-2007 Saturn Ion
2004-2007 Saturn Ion Redline
2002-2009 Saturn Vue
With any of the following ECOTEC engines:
2.0L Engine (RPO LSJ/LNF)
2.2L Engine (RPO L61/LAP)
2.4L Engine (RPO LE5/LE9/LAT)
--------------------------------------------------------------------------------
The following diagnosis might be helpful if the vehicle exhibits the symptom(s) described in this PI.
Condition/Concern:
A technician may comment of intermittent CEL, DTC's or No communication with various modules. This may be caused by a short to ground of the vehicle wiring in the engine harness.
Recommendation/Instructions:
The harness may chaff in the area of the Canister Purge Solenoid attachment bracket, causing an intermittent shorting to ground. The harness routing forces the harness into the edge of the bracket. This bracket is present with any Ecotec engine. The Purge Solenoid bracket may have a sharp edge from the manufacturing/shearing operation. If any DTCs are setting consistently, perform the eSI diagnostics and repair as necessary. If the eSI diagnostics do not isolate the concern, inspect the engine harness for potential shorts to ground at the EVAP purge valve bracket on the side of the cylinder head. Then repair and reposition the circuits/harness as necessary.
Note: To prevent future chaffing remove the sharp edge from the purge solenoid bracket and add conduit to the engine harness at the ECM and Purge Solenoid harness breakout.
This PI applies to all DTCs Listed below:
P0326 P0335 P060E P0561 P0651 P2120 P2122 P2123 P2125 P2127 P2128 P2135 P2138 U1863 U1886 U1899 U2105 U2106 U2107 U2143
Last edited by ChevyMgr; 06-03-2009 at 09:35 AM. Reason: added Codes
01-08-2009, 08:57 AM
#28
Founding Member
Thread Starter
Join Date: 11-23-2007
Location: Texas
Posts: 8,210
Pip4551
#PIP4551: Installation Tips Stage 1 Turbo Upgrade - keywords accessory air boost CAC cal calibration cel charge control cooler driveability DTC ECM engine gas leak inf low MAF MAP MIL P0642 P0193 performance - (Jan 7, 2009)
Subject: Installation Tips Stage 1 Turbo Upgrade
Models: 2008-2009 Chevrolet HHR SS
--------------------------------------------------------------------------------
The following diagnosis might be helpful if the vehicle exhibits the symptom(s) described in this PI.
Condition/Concern:
A technician may comment that DTC's (P0642 / P0193) may set after installing the Performance Parts accessory upgrade Stage I Turbo kit. They may report the vehicles will crank but not start and they have rechecked their installation with no problems found.
Recommendation/Instructions:
Due to differences in the new sensors and wiring harness colors between vehicle models some confusion may occur when installing the new TMAP sensors. The following may help.
The technician may mistake the intake manifold TMAP sensor with the Charge air pipe TMAP sensor which is located on the charge air pipe from the turbocharger. This may lead to the technician rewiring the sensor for the wrong location.
The technician may be confused at steps #4 and #10 where they are to rewire the new sensors. Due to production differences the wire colors do not correspond to those found on the vehicle. In addition eSI documents for the 2008-09 HHR may not be correct for these circuits. (eSI change request has been submitted) This may cause the technician to install the pigtail incorrectly. To remedy this concern match the production terminal to the provided terminal. (Pin to pin) Follow these charts below from the installation instructions for reference. (Production wire colors omitted)
INTAKE MANIFOLD TMAP SENSOR WIRING
Production Terminal Location
New Wire Color
New Terminal Location
A/1 White 3
B/2 White 1
C/3 White 4
Pin # 2 is not used; cover and tape back the white wire.
CHARGE AIR PIPE TMAP SENSOR WIRING
Production Terminal Location
New Wire Color New Terminal Location
A White 1
B White 2
C White 3
D White 4
Note: When installing the TMAP sensor on the Charge air pipe the technician may notice interference between the pipe and the new sensor. This has been addressed in PIC5062, which details removing a boss from the sensor to allow proper alignment.
Last edited by ChevyMgr; 06-03-2009 at 09:36 AM.
01-12-2009, 09:06 AM
#29
Founding Member
Thread Starter
Join Date: 11-23-2007
Location: Texas
Posts: 8,210
Pic4108G
#PIC4108G: Battery Draw From The BCM 2 Fuse - (May 11, 2009)
Subject: Battery Draw From The BCM 2 Fuse
Models: 2005-2009 Chevrolet Cobalt
2006-2009 Chevrolet HHR
2007-2009 Pontiac G5
--------------------------------------------------------------------------------
This PI was superseded to correct module reference. Please discard PIC4108F.
--------------------------------------------------------------------------------
The following diagnosis might be helpful if the vehicle exhibits the symptom(s) described in this PI.
Condition/Concern:
Customers may report a battery drain on their vehicle. Upon inspection technicians may see a battery draw of 100-170 mA on the battery. Typically when the BCM 2 fuse in the UBEC is pulled, the draw goes away. When looking at the wiring schematics you will NOT see the microprocessor (inside the BCM) that is powered by this fuse. This Microprocessor is sending small amounts of voltage out on the door lock input circuit #682 (White, BCM X1 pin 7) and the dome lamp output circuit #149 (D-BU/WHT, BCM X3 pin A3), Either of these circuits could be pulled low and will cause this condition.
Recommendation/Instructions:
Install the Tech-2/Candi module and look at the door lock switch status in the BCM data section. Status should be reading "Idle". If it reads Unlock or Lock, then check for a possible short to ground in circuit #682 (White) or a possible door lock switch concern. If those check out OK then remove circuit #149 from the BCM and wait to see if your draw times out in 20 minutes. If it does then check for a STG in circuit #149 (D-BU/WHT).
Last edited by ChevyMgr; 06-03-2009 at 09:36 AM.
01-14-2009, 11:41 AM
#30
Founding Member
Thread Starter
Join Date: 11-23-2007
Location: Texas
Posts: 8,210
Pip4559
#PIP4559: DTC P2227 After Turbo Upgrade Kit Installation - keywords accessory air boost cal calibration cel charge control cooler driveability DTC ECM engine gas leak inf low MAF MAP MIL PCM performance power - (Jan 13, 2009)
Subject: DTC P2227 After Turbo Upgrade Kit Installation
Models: 2008-2009 Chevrolet HHR SS
2008-2009 Chevrolet Cobalt SS
2007-2009 Pontiac Solstice GXP
2007-2009 Saturn Sky Redline
With 2.0L RPO LNF
--------------------------------------------------------------------------------
The following diagnosis might be helpful if the vehicle exhibits the symptom(s) described in this PI.
Condition/Concern:
A technician may comment that DTC P2227: Barometric Pressure (BARO) Sensor Performance has set after installation of the Accessory/Performance Parts Turbo Upgrade kit for the 2.0L RPO LNF Turbocharged engine.
Recommendation/Instructions:
The DTC P2227: Barometric Pressure (BARO) Sensor Performance will only set if the calibration was not completed correctly or was not installed. This is a Type-B DTC and will only set upon a second drive cycle after the diagnostic runs and fails. This calibration installation can be verified by checking the calibration/SW part numbers using the Tech2 after the new cal is flashed. Those can then be checked against what should be flashed to confirm the correct calibration was actually installed.
Note: Anytime an ECM/PCM is replaced, has DTCs cleared, an updated cal installed or is SPS programmed, the technician should drive the vehicle at least 2 drive cycles to verify the service/repair.
Last edited by ChevyMgr; 06-03-2009 at 09:36 AM.

