Official TSB and Recall Thread
 03-19-2009, 09:22 AM
#41
Founding Member
Thread Starter

Join Date: 11-23-2007
Location: Texas
Posts: 8,210
How will they live without this???
-------------------------------------------------------------------------------
Date: 03/19/2009 Ref. number: Service / Service Operations / G_0000024352
Subject: Rear Console Cup Holder Liner Removed 2009 Chevrolet HHR
--------------------------------------------------------------------------------
GM SERVICE AND PARTS OPERATIONS
GMSO19
URGENT - DISTRIBUTE IMMEDIATELY
Date: March18, 2009
Subject: Rear Console cup holder liner removed
Models: 2009 Chevrolet HHR
To: Chevrolet Dealers in U.S.A
Attention: Sales & Service Managers
ANNOUNCEMENT:
General Motors is announcing that the rear of console cup holder liner has been removed on all Chevrolet HHR’s built after March16, 2009. Please share this information with all sales staff and service technicians.
Last edited by ChevyMgr; 04-17-2009 at 12:08 PM.
 03-24-2009, 07:38 AM
#42
Founding Member
Thread Starter
Join Date: 11-23-2007
Location: Texas
Posts: 8,210
#PIP4609: Coolant Leak From Water Pump O-Ring - (Mar 23, 2009)
Subject: Coolant Leak From Water Pump O-ring
Models: 2009 Chevrolet Cobalt SS
2009 Chevrolet HHR SS
2009 Saturn Sky Redline
2009 Pontiac Solstice GXP
With 2.0L RPO LNF
2009 Chevrolet Cobalt (Including XFE)
2009 Pontiac G5 (Including XFE)
With 2.2L RPO LAP
2009 Chevrolet Malibu BAS Hybrid
2009 Saturn Vue BAS Hybrid
With 2.4L RPO LAT
2009 Chevrolet HHR
2009 Chevrolet Malibu
2009 Pontiac G6
2009 Pontiac Solstice
2009 Saturn Sky
2009 Saturn Aura
2009 Saturn Vue
With 2.4L RPO LE5
2009 Chevrolet HHR
With 2.2L RPO LE8
2009 Chevrolet HHR
With 2.4L RPO LE9
--------------------------------------------------------------------------------
The following diagnosis might be helpful if the vehicle exhibits the symptom(s) described in this PI.
Condition/Concern:
A technician may comment of coolant loss in the water pump area, usually at PDI. The leak may be more prevalent with cold ambient temperatures.
Recommendation/Instructions:
Confirm coolant leak at water pump to block interface.
Run vehicle to operating temperature and let cool; repeat this procedure 2 times. Inspect area for leakage.
• a. If the suspected leak has stopped no further action is needed. Return vehicle to service.
• b. If the concern is still present continue to step #3.
Caution: HOT COOLANT COULD SPRAY IF CAP IS FULLY REMOVED.
Carefully Loosen coolant cap to relieve pressure, tighten cap after pressure relief.
Loosen the four bolts (two on front of engine, two on rear of pump) on the water pump (approx 360�) but do not fully remove.
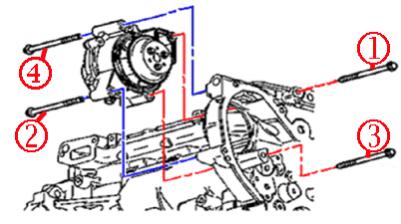
Torque the bolts to 25nm +/- 4nm (18.5 FT/LB +/- 3 ft. lbs) in the following sequence.
• 1. Top bolt on front of engine.
• 2. Lower bolt on rear of water pump.
• 3. Lower bolt on front of engine.
• 4. Upper bolt on rear of water pump.
Note: A crows foot may be used (where required) to ensure the torque value is met.
Top coolant in surge tank to cold full mark.
Clean and ensure all residual evidence of leaks is removed from top and lower section of water pump.
Pressure check and run vehicle to operating temperature to check for coolant leak at water pump to block joint. Let vehicle cool and heat cycle 2 additional times.
• a. If the suspected leak has stopped no further action is needed. Return vehicle to service.
• b. If a leak is still present from the o-ring area after the re-torque of the water pump, the water pump o-ring will need to be replaced. Make sure to follow the sequential torque procedure listed above when replacing the o-ring.
Subject: Coolant Leak From Water Pump O-ring
Models: 2009 Chevrolet Cobalt SS
2009 Chevrolet HHR SS
2009 Saturn Sky Redline
2009 Pontiac Solstice GXP
With 2.0L RPO LNF
2009 Chevrolet Cobalt (Including XFE)
2009 Pontiac G5 (Including XFE)
With 2.2L RPO LAP
2009 Chevrolet Malibu BAS Hybrid
2009 Saturn Vue BAS Hybrid
With 2.4L RPO LAT
2009 Chevrolet HHR
2009 Chevrolet Malibu
2009 Pontiac G6
2009 Pontiac Solstice
2009 Saturn Sky
2009 Saturn Aura
2009 Saturn Vue
With 2.4L RPO LE5
2009 Chevrolet HHR
With 2.2L RPO LE8
2009 Chevrolet HHR
With 2.4L RPO LE9
--------------------------------------------------------------------------------
The following diagnosis might be helpful if the vehicle exhibits the symptom(s) described in this PI.
Condition/Concern:
A technician may comment of coolant loss in the water pump area, usually at PDI. The leak may be more prevalent with cold ambient temperatures.
Recommendation/Instructions:
Confirm coolant leak at water pump to block interface.
Run vehicle to operating temperature and let cool; repeat this procedure 2 times. Inspect area for leakage.
• a. If the suspected leak has stopped no further action is needed. Return vehicle to service.
• b. If the concern is still present continue to step #3.
Caution: HOT COOLANT COULD SPRAY IF CAP IS FULLY REMOVED.
Carefully Loosen coolant cap to relieve pressure, tighten cap after pressure relief.
Loosen the four bolts (two on front of engine, two on rear of pump) on the water pump (approx 360�) but do not fully remove.
Torque the bolts to 25nm +/- 4nm (18.5 FT/LB +/- 3 ft. lbs) in the following sequence.
• 1. Top bolt on front of engine.
• 2. Lower bolt on rear of water pump.
• 3. Lower bolt on front of engine.
• 4. Upper bolt on rear of water pump.
Note: A crows foot may be used (where required) to ensure the torque value is met.
Top coolant in surge tank to cold full mark.
Clean and ensure all residual evidence of leaks is removed from top and lower section of water pump.
Pressure check and run vehicle to operating temperature to check for coolant leak at water pump to block joint. Let vehicle cool and heat cycle 2 additional times.
• a. If the suspected leak has stopped no further action is needed. Return vehicle to service.
• b. If a leak is still present from the o-ring area after the re-torque of the water pump, the water pump o-ring will need to be replaced. Make sure to follow the sequential torque procedure listed above when replacing the o-ring.
Last edited by ChevyMgr; 06-03-2009 at 09:38 AM.
03-25-2009, 07:53 AM
#43
Founding Member
Thread Starter
Join Date: 11-23-2007
Location: Texas
Posts: 8,210
09-08-50-007
#09-08-50-007: Toe Kick Panel of Front Seat Cushion Cover Loose or Hanging Unsecured (Reattach with Tie Straps) - (Mar 24, 2009)
Subject: Toe Kick Panel of Front Seat Cushion Cover Loose or Hanging Unsecured (Reattach with Tie Straps)
Models: 2006-2009 Chevrolet HHR
--------------------------------------------------------------------------------
Condition
Some customers may comment that the toe kick panel of the driver or passenger front seat cushion cover is loose or hanging unsecured.
Cause
This condition may be caused by the J-channel clips, which retain the toe kick panel to the seat cushion frame, releasing from the frame. The retention strength of the clip may not be sufficient enough to keep it securely retained.
Correction
Important: The toe kick panel of the front seat cushion cover may be one of two designs. Visually verify which design the seat cover has. If the toe kick panel is the "strap and hook" design (shown above), and exhibits damage, the seat cushion cover would have to be replaced. The following repair is specific to toe kick panels with the J-channel design.
Important: If the above condition is noted on a front seat cushion cover with J-channels, repair following the steps below. DO NOT replace the front seat cushion cover.
Drill holes through the toe kick panel J-channels (one each side) and re-secure the panel with tie straps using the following steps:
Slide the seat fully forward.
Disengage the toe kick cover panel from the seat cushion frame, and flip the panel over to expose the J-channels (1).
Drill a 6.35 mm (1/4 in) diameter hole through the J-channel and fabric on each side. Ensure that the hole is centered in the J-channel as shown above.
Tip
Once installed and trimmed, the tie strap length is much shorter than the starting 355 mm (14 in) length. A shorter tie strap can be used, however the longer tie strap may be easier to get in position while working under the seat.
Insert a tie strap, obtained locally, into each hole in the toe kick panel. Approximate size of the tie strap should be 4.75 mm (0.187 in) width and 355 mm (14 in) length.
Reposition the toe kick panel and secure the two tie straps to the underside of the seat cushion.
Important: The seat cushion above has been removed for illustration purposes.
5.1. Slide each tie strap under the suspension wire of the seat cushion as shown above. Tighten the tie straps, ensuring that the toe kick panel fabric is straight and taut.
5.2. Clip off the excess strap with wire snips.
Last edited by ChevyMgr; 06-03-2009 at 09:38 AM.
03-27-2009, 09:30 AM
#44
Founding Member
Thread Starter
Join Date: 11-23-2007
Location: Texas
Posts: 8,210
08-07-29-001d
#08-07-29-001D: EI08046 - Manual Transmission Grinds in Either Third or Fourth Gear When Clutch is Fully Disengaged (Replace 3rd and 4th Gear Sleeve Hub Assembly, Speed Gear Assemblies and Shift Fork) - (Mar 26, 2009)
Subject: EI08046 - Manual Transmission Grinds in Either Third or Fourth Gear When Clutch is Fully Disengaged (Replace 3rd and 4th Gear Sleeve Hub Assembly, Speed Gear Assemblies, and Shift Fork)
Models: 2008 Chevrolet Cobalt, HHR
2008 Pontiac G5
Equipped with Manual Transmission (RPO M86)
Prior to the Serial Numbers Shown Below
--------------------------------------------------------------------------------
This bulletin is being revised to update service procedure and include additional service parts. Please discard Corporate Bulletin Number 08-07-29-001C (Section 07- Transmissions)
--------------------------------------------------------------------------------
Models
Transmission P/N Transmission Serial Number
Cobalt XFE 24248018 61 YEH 08058387
Cobalt, G5 (STD) 24241747 61 YED 08083169
HHR 24241746 61 YEC 08062188
Condition
Some customers may comment on a grinding noise in third or fourth gear when the clutch is fully disengaged.
Cause
Based on feedback provided by dealer technicians, engineering was able to determine the manual transmission grinding in 3rd or 4th gear. It is possible to correct the condition by replacing the 3rd and 4th Gear Sleeve Hub Assembly, Speed Gear Assemblies, and Shift Fork
Correction

Check the Transmission Serial Number label to determine if the transmission is built prior to the chart above. The Transmission Serial Number label is located on the back side of the transmission between the halfshafts. If the transmission is built prior to the chart above, then replace the 3rd and 4th Gear Sleeve Hub Assembly, Speed Gear Assemblies, and Shift Fork.
Parts Information
Part Number Description
89060051 HUB ASM, 3RD & 4TH GR SYN
93321261 GEAR ASM, 3RD
93321267 GEAR ASM, 4TH
93368559 FORK ASM, 3RD & 4TH SHFT
19207672 RING, BLOCKER (Qty 2)
Subject: EI08046 - Manual Transmission Grinds in Either Third or Fourth Gear When Clutch is Fully Disengaged (Replace 3rd and 4th Gear Sleeve Hub Assembly, Speed Gear Assemblies, and Shift Fork)
Models: 2008 Chevrolet Cobalt, HHR
2008 Pontiac G5
Equipped with Manual Transmission (RPO M86)
Prior to the Serial Numbers Shown Below
--------------------------------------------------------------------------------
This bulletin is being revised to update service procedure and include additional service parts. Please discard Corporate Bulletin Number 08-07-29-001C (Section 07- Transmissions)
--------------------------------------------------------------------------------
Models
Transmission P/N Transmission Serial Number
Cobalt XFE 24248018 61 YEH 08058387
Cobalt, G5 (STD) 24241747 61 YED 08083169
HHR 24241746 61 YEC 08062188
Condition
Some customers may comment on a grinding noise in third or fourth gear when the clutch is fully disengaged.
Cause
Based on feedback provided by dealer technicians, engineering was able to determine the manual transmission grinding in 3rd or 4th gear. It is possible to correct the condition by replacing the 3rd and 4th Gear Sleeve Hub Assembly, Speed Gear Assemblies, and Shift Fork
Correction
Check the Transmission Serial Number label to determine if the transmission is built prior to the chart above. The Transmission Serial Number label is located on the back side of the transmission between the halfshafts. If the transmission is built prior to the chart above, then replace the 3rd and 4th Gear Sleeve Hub Assembly, Speed Gear Assemblies, and Shift Fork.
Parts Information
Part Number Description
89060051 HUB ASM, 3RD & 4TH GR SYN
93321261 GEAR ASM, 3RD
93321267 GEAR ASM, 4TH
93368559 FORK ASM, 3RD & 4TH SHFT
19207672 RING, BLOCKER (Qty 2)
Last edited by ChevyMgr; 06-03-2009 at 09:39 AM.
03-27-2009, 09:38 AM
#45
Founding Member
Thread Starter
Join Date: 11-23-2007
Location: Texas
Posts: 8,210
#PIP4611: Misfire Smoking And/Or No Heat With Loss Of Coolant - (Mar 25, 2009)
Subject: Misfire, Smoking and/or No Heat With Loss of Coolant
Models: 2009 Chevrolet Malibu and HHR
2009 Pontiac G6 and Solstice
2009 Saturn Aura and Sky
Equipped With 4 Cylinder Ecotec Engine RPO's LE5 and LE9
--------------------------------------------------------------------------------
The following diagnosis might be helpful if the vehicle exhibits the symptom(s) described in this PI.
Condition/Concern:
On rare occasions, a low coolant light may be experienced due to a low coolant level. However, no visible leaks will be present upon inspection. A brief engine misfire and DTC P0300 or P0304 may also be experienced immediately after the engine is started. If the coolant level is low enough, a loss of heat from the HVAC may be experienced and DTCs P0117 or P0128 may be stored.
Recommendation/Instructions:
If this concern is experienced with no sign of an external leak, perform each step of the SI diagnostics for "Loss of Coolant" and repair as necessary. If there is no problem found after following the diagnostics, pressurize the cooling system again and allow the engine to hot soak for up to 2 hours. If the pressure decays, remove the #4 spark plug and use a bore scope to inspect the top of the piston for any sign of coolant. If a bore scope is not available, place the piston at bottom dead center and inspect the visible area of the piston top through the spark plug hole using a pen light. If there is any sign of coolant on the top of the piston, remove the cylinder head and inspect the face for damage in the area around the #4 cylinder fire ring. If damage is found replace the cylinder head. See illustration callout #1 below for location/example of damage.
Last edited by ChevyMgr; 06-03-2009 at 09:39 AM.
04-01-2009, 01:34 PM
#46
Founding Member
Thread Starter
Join Date: 11-23-2007
Location: Texas
Posts: 8,210
08-09-41-006b
#08-09-41-006B: SIR/Airbag Light Illuminated, DTC B0081 (Passenger Presence System (PPS) Code) Stored (Inspect PPS System Connectors) - (Mar 27, 2009)
Subject: SIR/Airbag Light Illuminated, DTC B0081 (Passenger Presence System (PPS) Code) Stored (Inspect PPS System Connectors)
Models: 2006-2009 Chevrolet Cobalt, HHR
2006 Pontiac Pursuit (Canada Only)
2007-2009 Pontiac G5
--------------------------------------------------------------------------------
This bulletin is being updated to correct the component location. Please discard Corporate Bulletin Number 08-09-41-006A (Section 09 - Restraints).
--------------------------------------------------------------------------------
Condition
Some customers may comment that the SIR light is illuminated.
Upon investigation, the technician may find the following Passenger Presence System codes stored:
• DTC B0081 3A: Passenger Presence System Incorrect Component Installed
• DTC B0081 39: Passenger Presence System Internal Electronic Failure
• DTC B0081 71: Passenger Presence System Invalid Serial Data Received
With Passenger Presence System (PPS) Flash Code of DTC 023
Note: You will only find DTC 023 by going through the (PPS) menu
Correction
Technicians are to inspect the electrical connections to all the PPS components.
Inspect the PPS module connector, the pressure sensor connector and the seat connector (all located under the front passenger seat).
Inspect the connector of the belt tension sensor (BTS) that is part of the retractor assembly (Located under the trim near the bottom of the center pillar on the passenger side of vehicle).
Clear the codes.
Verify that the DTC does not reset.
Last edited by ChevyMgr; 06-03-2009 at 09:39 AM.
04-01-2009, 01:37 PM
#47
Founding Member
Thread Starter
Join Date: 11-23-2007
Location: Texas
Posts: 8,210
09-08-44-009a
#09-08-44-009A: Radio Will Not Display Accurate XM Station/Song/Artist Information (Replace Radio) - (Apr 16, 2009)
Subject: Radio Will Not Display Accurate XM Station/Song/Artist Information (Replace Radio)
Models: 2009 Chevrolet HHR
Equipped with Radio (RPO UUI)
Please Refer to GMVIS
Attention: This condition only affects the following radio part numbers: 25964501 or 25964502. If the radio does not have either of these part numbers, this bulletin is not applicable.
--------------------------------------------------------------------------------
This bulletin is being revised to add an Attention statement. Please discard Corporate Bulletin Number 09-08-44-009 (Section 08 -- Body and Accessories).
--------------------------------------------------------------------------------
Condition
Some customers may comment that when the radio is in XM mode, the station name, artist and song display information is intermittent or not available.
They may also comment that when they select a different station, the information displayed does not change.
Cause
This condition may be caused by an internal software anomaly that prevents the radio from receiving the information from the XM module.
Correction
A radio with revised software has been released to address this condition. Technicians are to remove and replace the radio if this condition is present. Refer to Radio Replacement in SI.
Parts Information
DO NOT OBTAIN PARTS FROM GMSPO. Contact an authorized Electronic Service Center to obtain the radio. Refer to Corporate Bulletin Number 08-08-44-029A - Updated Warranty and Goodwill Exchange Program for Electronic Products.
Part Number Description
20788673 Radio, AM/FM Stereo & Clk & MP3 Player & Aux In & USB (2nd Des) (incls 5-8) (Ebony)
20788674 Radio, AM/FM Stereo & Clk & MP3 Player & Aux In & USB (2nd Des) (incls 5-8) (Gray)
Last edited by ChevyMgr; 06-03-2009 at 09:40 AM.
04-02-2009, 03:45 PM
#48
Founding Member
Thread Starter
Join Date: 11-23-2007
Location: Texas
Posts: 8,210
09-06-01-004
#09-06-01-004: Clicking/Ticking Sound/Noise Heard from Rear of Engine (Install Sound Isolation Cover Over High Pressure Fuel Pump) - (Apr 1, 2009)
Subject: Clicking/Ticking Sound/Noise Heard From Rear of Engine (Install Sound Isolation Cover Over High Pressure Fuel Pump)
Models: 2008-2009 Chevrolet Cobalt, Cobalt SS, HHR, HHR SS
2007-2009 Pontiac Solstice GXP
2007-2009 Saturn SKY Redline
2007-2009 Opel GT
2007-2009 Daewoo G2X
Equipped with 2.0L Engine (VIN X -- RPO LNF)
--------------------------------------------------------------------------------
Condition
Some customers may comment on a ticking sound from the rear of the engine. Upon investigation, the technician may find the sound coming from the high pressure fuel pump and/or the injectors.
Cause
The 2.0L turbo engine (VIN X - RPO LNF) uses a direct injection fuel system that operates at very high fuel pressures. A direct injection fuel system produces a rapid, clicking/ticking sound that can be heard from the engine compartment. The sound is more evident when outside around the vehicle or when the hood is open. The sound is more noticeable during idle, and is more frequent during a cold start but lessens once the engine is warm. The rapid ticking noise on cold start up is the fuel pump (located on the rear of the cylinder head) building up high fuel pressure. When the engine warm-up is completed, the high pressure fuel pump will continue to tick at a lower rate of approximately one tick per second during idle. The clicking sound is the fuel injectors pulsing on and off under higher fuel pressures. These sounds are the results of a normal direct injection fuel system operating properly.
Correction
Install a sound isolation cover over the high pressure fuel pump following the procedure below. This will make the sound coming from the high pressure fuel pump less noticeable, but it will not completely eliminate it.
Important: DO NOT attempt to replace any parts for this kind of clicking or ticking concern.
Verify the noise is coming from the high pressure fuel pump.
Remove the air inlet grille panel. Refer to Air Inlet Grille Panel Replacement in SI.
Disconnect the engine wiring harness electrical connector from the high pressure fuel pump.
Remove the engine wiring harness from the high pressure fuel pump cover bracket.

Remove the high pressure fuel pump cover bolts (1).
Remove the high pressure fuel pump cover bracket.
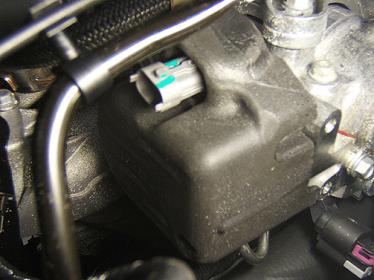
Remove the old design cover and install the new high pressure fuel pump insulator, GM P/N 12628069.
Position the high pressure fuel pump cover bracket. Install the high pressure fuel pump cover bolts.
Tighten
Tighten the bolts to 10 N�m (89 lb in).
Connect the engine wiring harness electrical connector to the high pressure fuel pump.
Attach the engine wiring harness to the fuel pump cover bracket using a zip tie.
Install the air inlet grille panel. Refer to Air Inlet Grille Panel Replacement in SI.
Parts Information
Part Number Description Qty
12628069 Insulator/PMP 1
Subject: Clicking/Ticking Sound/Noise Heard From Rear of Engine (Install Sound Isolation Cover Over High Pressure Fuel Pump)
Models: 2008-2009 Chevrolet Cobalt, Cobalt SS, HHR, HHR SS
2007-2009 Pontiac Solstice GXP
2007-2009 Saturn SKY Redline
2007-2009 Opel GT
2007-2009 Daewoo G2X
Equipped with 2.0L Engine (VIN X -- RPO LNF)
--------------------------------------------------------------------------------
Condition
Some customers may comment on a ticking sound from the rear of the engine. Upon investigation, the technician may find the sound coming from the high pressure fuel pump and/or the injectors.
Cause
The 2.0L turbo engine (VIN X - RPO LNF) uses a direct injection fuel system that operates at very high fuel pressures. A direct injection fuel system produces a rapid, clicking/ticking sound that can be heard from the engine compartment. The sound is more evident when outside around the vehicle or when the hood is open. The sound is more noticeable during idle, and is more frequent during a cold start but lessens once the engine is warm. The rapid ticking noise on cold start up is the fuel pump (located on the rear of the cylinder head) building up high fuel pressure. When the engine warm-up is completed, the high pressure fuel pump will continue to tick at a lower rate of approximately one tick per second during idle. The clicking sound is the fuel injectors pulsing on and off under higher fuel pressures. These sounds are the results of a normal direct injection fuel system operating properly.
Correction
Install a sound isolation cover over the high pressure fuel pump following the procedure below. This will make the sound coming from the high pressure fuel pump less noticeable, but it will not completely eliminate it.
Important: DO NOT attempt to replace any parts for this kind of clicking or ticking concern.
Verify the noise is coming from the high pressure fuel pump.
Remove the air inlet grille panel. Refer to Air Inlet Grille Panel Replacement in SI.
Disconnect the engine wiring harness electrical connector from the high pressure fuel pump.
Remove the engine wiring harness from the high pressure fuel pump cover bracket.
Remove the high pressure fuel pump cover bolts (1).
Remove the high pressure fuel pump cover bracket.
Remove the old design cover and install the new high pressure fuel pump insulator, GM P/N 12628069.
Position the high pressure fuel pump cover bracket. Install the high pressure fuel pump cover bolts.
Tighten
Tighten the bolts to 10 N�m (89 lb in).
Connect the engine wiring harness electrical connector to the high pressure fuel pump.
Attach the engine wiring harness to the fuel pump cover bracket using a zip tie.
Install the air inlet grille panel. Refer to Air Inlet Grille Panel Replacement in SI.
Parts Information
Part Number Description Qty
12628069 Insulator/PMP 1
Last edited by ChevyMgr; 06-03-2009 at 09:40 AM.
04-09-2009, 08:04 AM
#49
Founding Member
Thread Starter
Join Date: 11-23-2007
Location: Texas
Posts: 8,210
07-07-30-005c
#07-07-30-005C: 4T45 Transmission, MIL/SES On, DTC P1818, Power Door Locks, Cruise Control, Shift Interlock or Retractable Hardtop Inoperative, Engine Speed Revs Limited, Hybrids-Autostop Regen or Boost Inoperative - (Apr 8, 2009)
Subject: 4T45 Transmission, MIL/SES On, DTC P1818, Power Door Locks, Cruise Control, Shift Interlock or Retractable Hardtop Inoperative, Engine Speed Revs Limited, Hybrids-Autostop, Regen or Boost Inoperative (Reprogram TCM)
Models: 2006-2007 Chevrolet Cobalt, HHR
2007 Chevrolet Malibu
2006 Pontiac Pursuit (Canada)
2006-2007 Pontiac G6
2007 Pontiac G5
2007 Saturn AURA, ION, VUE, VUE Hybrid
with 4T45 Automatic Transmission (RPOs MN5, ME7)
--------------------------------------------------------------------------------
This bulletin is being revised to add the 2006 model year for Cobalt, Pursuit, G6, and HHR. Please discard Corporate Bulletin Number 07-07-30-005B (Section 07-Transmission/Transaxle).
--------------------------------------------------------------------------------
Condition
Some customers may comment on the illumination of the Malfunction Indicator Lamp (MIL) or the Service Engine Soon (SES) light, the power door locks, cruise control, shift interlock, retractable hardtop being inoperative and engine speed revs limited to 4,000 RPM in first gear after a cold start or cold soak with temperatures between 0� to 10�C (32�F to 50�F).
Customers with hybrid vehicles may also comment on the following conditions:
-- Hybrid Autostop, regen or boost inoperative
Cause
These conditions may be caused by the TCM setting a false DTC P1818 (Transmission Fluid Pressure (TFP) Valve Position Switch Indicates Drive without Drive Ratio).
Correction
Verify the conditions and reprogram the transmission control module (TCM) with the new updated calibration using the procedure below.
Check for DTCs.
Clear DTC P1818.
Start the engine.
Apply the brake pedal.
Place the transmission in reverse.
With a Tech 2�, monitor the transmission fluid pressure (TFP) switch parameter.
• If the TFP parameter indicates Reverse, reprogram the TCM with the updated calibration.
• If the TFP parameter indicates Park/Neutral, refer to DTC P1818 in SI for further diagnosis.
Important: Confirm the newest calibration includes the "false P1818 fix".
An updated TCM calibration is now available to address this concern. This calibration, or any that follow, is designed to address this concern. Reprogram the TCM with the software now available in the TIS2WEB using the Service Programming System (SPS).
If you cannot access the calibration, call the Techline Customer Support Center at 1-800-828-6860 (English) or 1-800-503-3222 (French) and it will be provided. As always, make sure your Tech 2� Diagnostic Scan Tool is updated with the latest software version.
Clear any codes and verify the condition has been fixed.
Last edited by ChevyMgr; 06-03-2009 at 09:40 AM.
04-09-2009, 08:05 AM
#50
Founding Member
Thread Starter
Join Date: 11-23-2007
Location: Texas
Posts: 8,210
09-07-30-009
#09-07-30-009: EI09082 - Transmission Will Not Move, No Reverse or Slips (Engineering Information) - (Apr 7, 2009)
Subject: EI09082 -- Transmission Will Not Move, No Reverse or Slips (Engineering Information)
Models: 2008-2009 Chevrolet Cobalt, HHR, Malibu
2008-2009 Pontiac G5, G6
2008-2009 Saturn AURA, VUE
All Equipped with 4T45-E Automatic Transmission (RPO MN5 or ME7)
Attention: Proceed with this bulletin ONLY if the customer has commented about this concern AND the EI number is listed in GMVIS. If the customer has not commented about this condition or the EI does not show in GMVIS, disregard the bulletin and proceed with diagnostics found in published service information. THIS IS NOT A RECALL -- refer to Service Bulletin 04-00-89-053B for more details on the use of Engineering Information bulletins.
--------------------------------------------------------------------------------
Condition
Important: If the customer did not bring their vehicle in for this concern, DO NOT proceed with this bulletin.
Some customers may comment on an automatic transmission concern of no movement, no reverse or slipping.
These concerns may be due to an issue with the direct clutch.
Cause
GM Engineering is attempting to determine the root cause of the transmission direct clutch concerns. Engineering has a need to gather information on vehicles, PRIOR to repair, that may exhibit these conditions. As a result, this information will be used to "root cause" the customer's concern and develop/validate a field fix.
Instructions
If a vehicle is encountered with a transmission condition of no movement, no reverse, or slipping, verify the concern. Prior to any vehicle disassembly, please contact the engineering listed below for additional instructions related to diagnosis and repair. After the repair, engineering may request parts back. Parts will be requested back using the WPC return process. Do ship until a request form has been received from WPC.
The engineer may also want to visit dealerships that are located near Detroit, Michigan.
Contact Information
Chris Preston @
If the engineer is unable to take your call, please leave the following information in a message:
• Technician Name
• Dealer Name, City, State and Phone Number
• Complete VIN and Repair Order Number
If you do not receive a response from engineering within two hours, proceed to repair the vehicle according to SI.
� 2009 General Motors Corporation. All rights reserved.
Last edited by ChevyMgr; 06-03-2009 at 09:41 AM.