Installing running boards
 03-11-2006, 08:53 PM
#1
New Member
Thread Starter

Join Date: 03-05-2006
Location: Burbank CA
Posts: 10
Installing running boards
I installed a set of running boards today. Instructions and all needed parts are included with the kit. There is no mention of how to remove the old molding, which is cliped on at the top, and slides forward once the top clips and the screws at each end are removed. On mine even with the clips popped out, it still did not budge. I ended up using force, breaking some of the old moldings clips. But it was getting replaced anyway.....
Price of the moldings was $445.00 with the trade (wholesale) discount. I recall that I saw a dealer advertising them for this price as well.
You will need several metric sockets and wrenches, plus a deep 13mm and a 30 torx socket, all can be had at any hardware/automotive store.
You can do this in your driveway, there is no need to lift the vehicle.
See my post on page 2 for more information and pictures of the removed molding
Last edited by CZ17; 03-12-2006 at 01:08 PM.
 03-12-2006, 12:21 PM
#2
New Member
Thread Starter
Join Date: 03-05-2006
Location: Burbank CA
Posts: 10
I really don't think there is a need to post the instructions or pictures of the installation as the instructions, which come in the box, are excellent, complete with drawings, and will be able to guide anybody with any mechanical skills through the job. Also in the box are all the parts you will need. One note: make sure you properly identify each bracket, as they all look the same, but there are actually 3 different ones. The instructions also point this out.
Of course, if you are one of those that cannot use a screw driver without hurting yourself, don't continue.
I am posting 2 more pictures of the removed molding, as the instructions just say to remove it, with a reference to a GM operation which we don't have.

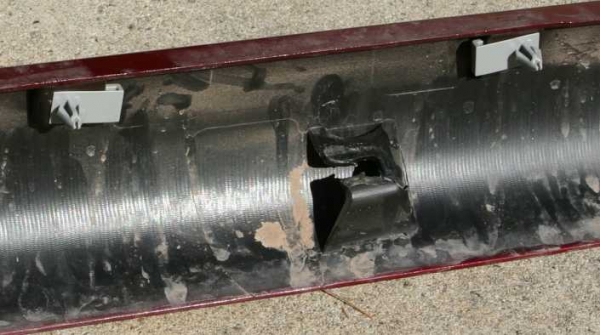
The top picture is of the back of the drivers side, front to the right, sill molding that must be removed. The top clips (green) pop out by putting a wedge between the body and the molding and prying outward.
Note: no metal prybars, screw drivers, etc. Use a plastic wedge or a piece of wood. The way I did the drivers side was to remove the 2 screws (see above blue arrow) then from the front pulled the molding away from the body. It bent and twisted, but then relented and came off.
The blue arrows point to the 2 screws that need to be removed in both wheel wells, and the bottom arrows (red) point to the locations of the sliding brackets that are suppose to slide forwards. As I stated in my original post, they did not slide, and several ended up broken when I showed it who was boss. If they break it doesn't matter as they won't be used anyway.
Tool list:
15mm wrench
10 and 13mm socket. Helps if 13 is a deep socket.
T30 torx bit
I decided to leave the plastic fender guards just for insurance. It is much simpler to mask off and just paint it in case that one stray rock makes it past the running boards
Of course, if you are one of those that cannot use a screw driver without hurting yourself, don't continue.
I am posting 2 more pictures of the removed molding, as the instructions just say to remove it, with a reference to a GM operation which we don't have.
The top picture is of the back of the drivers side, front to the right, sill molding that must be removed. The top clips (green) pop out by putting a wedge between the body and the molding and prying outward.
Note: no metal prybars, screw drivers, etc. Use a plastic wedge or a piece of wood. The way I did the drivers side was to remove the 2 screws (see above blue arrow) then from the front pulled the molding away from the body. It bent and twisted, but then relented and came off.
The blue arrows point to the 2 screws that need to be removed in both wheel wells, and the bottom arrows (red) point to the locations of the sliding brackets that are suppose to slide forwards. As I stated in my original post, they did not slide, and several ended up broken when I showed it who was boss. If they break it doesn't matter as they won't be used anyway.
Tool list:
15mm wrench
10 and 13mm socket. Helps if 13 is a deep socket.
T30 torx bit
I decided to leave the plastic fender guards just for insurance. It is much simpler to mask off and just paint it in case that one stray rock makes it past the running boards
03-12-2006, 10:53 PM
#4
New Member
Thread Starter
Join Date: 03-05-2006
Location: Burbank CA
Posts: 10
If that is the factory orange, get your wallet out, part number is 17800496 (they come pre painted for all the colors). Now you just have to get them wholesale...
Check out this site, they have them for wholesale.
http://www.chevrolet-parts-dealer.com/accessories.htm
Check out this site, they have them for wholesale.
http://www.chevrolet-parts-dealer.com/accessories.htm
03-12-2006, 11:07 PM
#5
Senior Member

Join Date: 09-11-2005
Location: McLoud, Oklahoma
Posts: 829
03-12-2006, 11:24 PM
#6
New Member
Thread Starter
Join Date: 03-05-2006
Location: Burbank CA
Posts: 10
Well, I ordered mine by the description "red" even though the sales people call it "Sport Red Metalic". I don't see very many versions of Orange, so I would go with "Sunburst Orange" being "Orange" in the accessory catalog.
If you have doubts, go by your local dealer, ask them if that is the orange for your car. You could also check out a new car broucher as they will list all the colors.
If you have doubts, go by your local dealer, ask them if that is the orange for your car. You could also check out a new car broucher as they will list all the colors.
03-18-2006, 08:09 AM
#7
Senior Member

Join Date: 01-13-2006
Location: Superior, WI - Over the Hill Warranty Club member
Posts: 2,999
The part number for each color is on the item pick list, 17800496 is the orange. Cost is $445.63
Here is the complete list at http://www.chevrolet-parts-dealer.com/accessories.htm
17800497 - Amethyst
12499242 Cashmere
12499501 Black
12499502 Red
12499503 Silver (Light)
12499504 Blue
17800494 Silver (Dark)
17800495 White
17800496 Orange
Here is the complete list at http://www.chevrolet-parts-dealer.com/accessories.htm
17800497 - Amethyst
12499242 Cashmere
12499501 Black
12499502 Red
12499503 Silver (Light)
12499504 Blue
17800494 Silver (Dark)
17800495 White
17800496 Orange
03-18-2006, 09:54 PM
#8
Senior Member
Join Date: 01-13-2006
Location: Superior, WI - Over the Hill Warranty Club member
Posts: 2,999
Jeepers this Chevy parts place marked theirs down. Hmmm I wonder why? From $524.81 to $456.18
http://chevrolet.autowebaccessories....at691_1550.php
http://chevrolet.autowebaccessories....at691_1550.php
04-19-2007, 01:13 PM
#9
Senior Member

Join Date: 08-17-2006
Location: Ottawa, Ontario
Posts: 1,851
Note: no metal prybars, screw drivers, etc. Use a plastic wedge or a piece of wood. The way I did the drivers side was to remove the 2 screws (see above blue arrow) then from the front pulled the molding away from the body. It bent and twisted, but then relented and came off.
Plan on installing them this weekend, so any pointers on a non-metal wedge would be greatly appreciated.
04-19-2007, 01:21 PM
#10
Member

Join Date: 02-20-2007
Location: Virginia
Posts: 47
My husband installed ours a couple weeks ago and he did not use a wedge he just pulled realy hard, yes it did brake some clips but they are not needed anymore.. Good Luck it took him about 2 1/2 hours to 3 but once he got one side done the other was easy only took him 15 minutes.