Official TSB and Recall Thread
 05-23-2011, 01:41 PM
#161
Founding Member
Thread Starter

Join Date: 11-23-2007
Location: Texas
Posts: 8,210
#PI0470: Engine Oil Weep from Behind Exhaust Manifold - (May 13, 2011)
Subject: Engine Oil Weep from Behind Exhaust Manifold
Models: 2011 Chevrolet HHR, Malibu
Equipped with Engine RPOs LE5 or LE9
--------------------------------------------------------------------------------
Condition/Concern
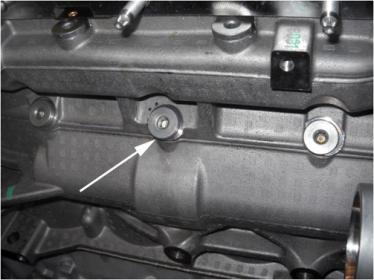
Some customers may comment on a slight oil weep or seep from the back side of the engine, behind the exhaust manifold.
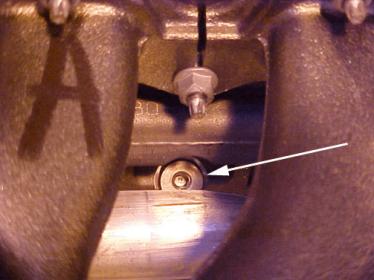
Further inspection will show that the oil leak is coming from the center oil galley plug.
Recommendation/Instructions
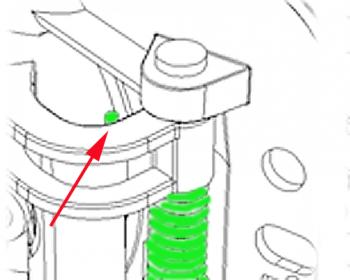
The center oil galley plug may have been damaged during installation when the engine was built.
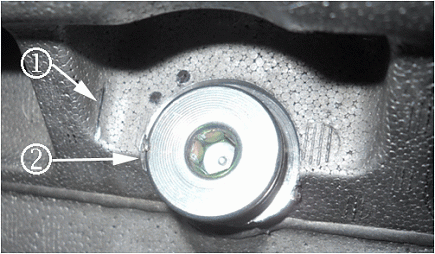
There may be a witness mark (1) and damage to the galley plug (2).
Replace the oil galley plug.
Remove the exhaust manifold. Refer to the current procedure in SI for removal.
Remove and replace the center oil galley plug. The plug should be tightened to 35 N�m (26 lb ft).
Install the exhaust manifold.
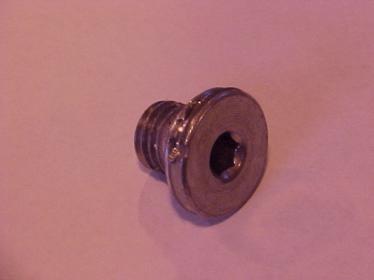
Parts Information
Part Number Description Qty
11588547 Oil Galley Plug 1
Subject: Engine Oil Weep from Behind Exhaust Manifold
Models: 2011 Chevrolet HHR, Malibu
Equipped with Engine RPOs LE5 or LE9
--------------------------------------------------------------------------------
Condition/Concern
Some customers may comment on a slight oil weep or seep from the back side of the engine, behind the exhaust manifold.
Further inspection will show that the oil leak is coming from the center oil galley plug.
Recommendation/Instructions
The center oil galley plug may have been damaged during installation when the engine was built.
There may be a witness mark (1) and damage to the galley plug (2).
Replace the oil galley plug.
Remove the exhaust manifold. Refer to the current procedure in SI for removal.
Remove and replace the center oil galley plug. The plug should be tightened to 35 N�m (26 lb ft).
Install the exhaust manifold.
Parts Information
Part Number Description Qty
11588547 Oil Galley Plug 1
 11-02-2011, 10:10 AM
#162
Founding Member
Thread Starter
Join Date: 11-23-2007
Location: Texas
Posts: 8,210
Pi0568
#PI0568: Inadvertent Horn, Light, Remote Start, Lock/Unlock Activation or Charging Schedule Change - (Sep 19, 2011)
Subject: Inadvertent Horn, Light, Remote Start, Lock/Unlock Activation or Charging Schedule Change
Models: 2010-2011 Buick Lucerne
2010-2012 Buick Enclave
2011-2012 Buick LaCrosse, Regal
2010-2011 Cadillac DTS
2010-2012 Cadillac CTS, Escalade
2011-2012 Cadillac SRX
2010-2011 Chevrolet HHR
2010-2012 Chevrolet Avalanche, Impala, Suburban, Tahoe, Traverse
2011-2012 Chevrolet Camaro, Cruze, Equinox, Express, Malibu, Silverado
2012 Chevrolet Volt
2010-2012 GMC Acadia, Yukon
2011-2012 GMC Savana, Sierra, Terrain
Equipped with OnStar�
-------------------------------------------------------------------------------
Condition/Concern
Some customers may comment on an inadvertent horn and light activation, inadvertent vehicle remote starting, inadvertent vehicle unlock/lock or Volt charging schedule inadvertently changing. Remote start will not activate if the hood latch switch is open.
Unwanted commands may be sent via OnStar Remote Link Mobile Apps source. Volt owners may also experience unwanted commands from www.myvolt.com.
Recommendation/Instructions
If inadvertent commands to the vehicle are suspected, call TAC (Technical Assistance Center) for further instructions. Otherwise continue with vehicle diagnostics.
04-19-2012, 09:02 AM
#163
Founding Member
Thread Starter
Join Date: 11-23-2007
Location: Texas
Posts: 8,210
12045
#12045 Customer Satisfaction
SUBJECT: Ignition Lock Cylinder May Bind - Replace Ignition Lock Cylinder
MODELS:
2009 Chevrolet Cobalt
2009-2010 Chevrolet HHR
2009 Pontiac G5
THIS PROGRAM IS IN EFFECT UNTIL MAY 31, 2014.
CONDITION
Certain 2009 model year Chevrolet Cobalt and Pontiac G5 vehicles, and 2009-2010 model year Chevrolet HHR vehicles may develop a binding condition between the ignition lock cylinder and the housing. If this occurs, it may be difficult to turn the ignition key and/or remove it from the ignition. If the vehicle is running, the driver may not be able to turn the vehicle off.
CORRECTION
Dealers are to replace the ignition lock cylinder.
VEHICLES INVOLVED
All involved vehicles are identified by Vehicle Identification Number on the Investigate Vehicle History screen in GM Global Warranty Management system. Dealership service personnel should always check this site to confirm vehicle involvement prior to beginning any required inspections and/or repairs.
PART INFORMATION
Parts required to complete this program are to be obtained from General Motors Customer Care and Aftersales (GMCC&A). Please refer to your “involved vehicles listing” before ordering parts.
CUSTOMER REIMBURSEMENT - For US
Customer requests for reimbursement of previously paid repairs for the recall condition are to be submitted to the dealer by May 31, 2013, unless otherwise specified by state law. If this is not convenient for the customer, they may mail the completed Customer Reimbursement Request Form and all required documents to the GM Customer Assistance Center. All reasonable and customary costs to correct the condition described in this bulletin
should be considered for reimbursement. Any questions or concerns should be
reviewed with your District Service Manager – Aftersales prior to processing the request. When a customer requests reimbursement, they must provide the following:
A completed Customer Reimbursement Request Form. This form is mailed to the customer or can be obtained through GM GlobalConnect.
The name and address of the person who paid for the repair.
Paid receipt confirming the amount of the repair expense, a description of the repair, and the person or entity performing the repair.
CUSTOMER REIMBURSEMENT - For Canada and Export
Customer requests for reimbursement of previously paid repairs to correct the condition described in this bulletin are to be submitted to the dealer prior to or by May 31, 2013.
When a customer requests reimbursement, they must provide the following:
- Proof of ownership at time of repair.
- Original paid receipt confirming the amount of unreimbursed repair expense(s) (including Service Contract deductibles), a description of the repair, and the person or entity performing the repair.
If the work was done by someone other than a GM dealership, the amount of reimbursement will be limited to the amount that the repair would have cost GM to have it completed by a GM dealership.
04-19-2012, 10:56 AM
#164
Founding Member
Thread Starter
Join Date: 11-23-2007
Location: Texas
Posts: 8,210
12089
Special Coverage
MODELS: 2007-2008 Chevrolet Cobalt
2008-2009 Chevrolet HHR
2007-2008 Pontiac G5
CONDITION
On some 2007-2008 model year Chevrolet Cobalt and Pontiac G5, and 2008-2009 Chevrolet HHR vehicles may develop a binding condition between the ignition lock cylinder and the housing. If this occurs, it may be difficult to turn the ignition key and/or remove it from the ignition. If the vehicle is running, the driver may not be able to turn the vehicle off.
SPECIAL COVERAGE ADJUSTMENT
This special coverage covers the condition described above for a period of 10 years or 120,000 miles (193,000 km), whichever occurs first, from the date the vehicle was originally placed in service, regardless of ownership. Dealers are to replace the ignition lock cylinder. The repairs will be made at no charge to the customer. For vehicles covered by Vehicle Service Contracts, all eligible claims with repair orders on or after April 19, 2012 are covered by this special coverage and must be submitted using the labor operation codes provided with this bulletin. Claims with repair orders prior to April 19, 2012 must be submitted to the Service Contract provider.
Last edited by ChevyMgr; 04-19-2012 at 10:58 AM. Reason: 12089
07-19-2012, 09:07 AM
#165
Founding Member
Thread Starter
Join Date: 11-23-2007
Location: Texas
Posts: 8,210
09-04-95-001d
#09-04-95-001D: Clicking Type Noise from Front or Rear of Vehicle When Shifting Between Reverse and Drive or on Hard Acceleration (Add Washer to Wheel Drive Shaft) - (Jul 16, 2012)
Subject: Clicking Type Noise from Front or Rear of Vehicle When Shifting Between Reverse and Drive or on Hard Acceleration (Add Washer to Wheel Drive Shaft)
Models: 2010-2011 Buick LaCrosse
2011 Buick Regal
2008-2011 Cadillac CTS, CTS Wagon, Coupe (Includes V Series)
2010-2011 Cadillac SRX
2009-2011 Chevrolet HHR
2010 Chevrolet Camaro Built Prior to June 1, 2009 (V8 Engine (All) and V6 Engine (Manual)) or February 17, 2010 (V6 Engine (Automatic))
2010-2011 Chevrolet Equinox
2011 Chevrolet Cruze
2010-2011 GMC Terrain
--------------------------------------------------------------------------------
This bulletin is being revised to add the HHR model. Please discard Corporate Bulletin 09-04-95-001C (Section 04 � Driveline/Axle).
--------------------------------------------------------------------------------
Condition (Cruze, Equinox, HHR, LaCrosse, Regal, SRX, Terrain)
Some customers may comment on a clicking type noise coming from the front of the vehicle when shifting between reverse and drive or on a hard acceleration.
Correction (Cruze, Equinox, HHR, LaCrosse, Regal, SRX, Terrain)
Add a washer between the front wheel drive shaft and the bearing hub assembly using the procedure listed below.
Note: � Some vehicles may have been built with the washer. If there is a washer already installed, remove and discard the washer. DO NOT re-use the washer, replace with NEW only.
� Anytime the wheel drive shaft is separated from the steering knuckle, the washer must be replaced with a NEW washer only.
1. Remove the front wheel bearing and hub assembly. Refer to Front Wheel Bearing and Hub Replacement procedure in SI.
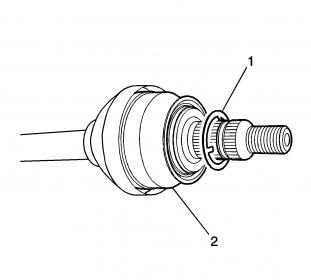
2. Install the washer (1) onto the front wheel drive shaft (2) as shown above.
Note: For Cruze, Equinox and Terrain, DO NOT reuse wheel drive shaft nut. Discard and replace with a NEW nut only.
3. Install the front wheel bearing and hub assembly. Refer to Front Wheel Bearing and Hub Replacement procedure in SI.
4. Repeat Steps 1 through 3 for the opposite side.
Condition (CTS, Camaro)
Some customers may comment on a clicking type noise coming from the rear of the vehicle when shifting between reverse and drive or on a hard acceleration.
Correction (CTS, Camaro)
Add a washer between the rear wheel drive shaft and the bearing hub assembly using the procedure listed below.
Note: � Some vehicles may have been built with the washer. If there is a washer already installed, remove and discard the washer. DO NOT re-use the washer, replace with a NEW washer only.
� Anytime the wheel drive shaft is separated from the steering knuckle, the washer must be replaced with a NEW washer only.
1. Remove the rear wheel bearing and hub assembly. Refer to Rear Wheel Bearing and Hub Replacement procedure in SI.
2. Install the washer (1) onto the rear wheel drive shaft (2) as shown above.
Note: DO NOT reuse wheel drive shaft nut. Discard and replace with a NEW nut only.
3. Install the rear wheel bearing and hub assembly. Refer to Rear Wheel Bearing and Hub Replacement procedure in SI.
4. Repeat Steps 1 through 3 for the opposite side.
Parts Information:
Part Number * Usage * Description * Qty
11611964 * HHR * Washer, Front Wheel Drive Shaft * 2
Subject: Clicking Type Noise from Front or Rear of Vehicle When Shifting Between Reverse and Drive or on Hard Acceleration (Add Washer to Wheel Drive Shaft)
Models: 2010-2011 Buick LaCrosse
2011 Buick Regal
2008-2011 Cadillac CTS, CTS Wagon, Coupe (Includes V Series)
2010-2011 Cadillac SRX
2009-2011 Chevrolet HHR
2010 Chevrolet Camaro Built Prior to June 1, 2009 (V8 Engine (All) and V6 Engine (Manual)) or February 17, 2010 (V6 Engine (Automatic))
2010-2011 Chevrolet Equinox
2011 Chevrolet Cruze
2010-2011 GMC Terrain
--------------------------------------------------------------------------------
This bulletin is being revised to add the HHR model. Please discard Corporate Bulletin 09-04-95-001C (Section 04 � Driveline/Axle).
--------------------------------------------------------------------------------
Condition (Cruze, Equinox, HHR, LaCrosse, Regal, SRX, Terrain)
Some customers may comment on a clicking type noise coming from the front of the vehicle when shifting between reverse and drive or on a hard acceleration.
Correction (Cruze, Equinox, HHR, LaCrosse, Regal, SRX, Terrain)
Add a washer between the front wheel drive shaft and the bearing hub assembly using the procedure listed below.
Note: � Some vehicles may have been built with the washer. If there is a washer already installed, remove and discard the washer. DO NOT re-use the washer, replace with NEW only.
� Anytime the wheel drive shaft is separated from the steering knuckle, the washer must be replaced with a NEW washer only.
1. Remove the front wheel bearing and hub assembly. Refer to Front Wheel Bearing and Hub Replacement procedure in SI.
2. Install the washer (1) onto the front wheel drive shaft (2) as shown above.
Note: For Cruze, Equinox and Terrain, DO NOT reuse wheel drive shaft nut. Discard and replace with a NEW nut only.
3. Install the front wheel bearing and hub assembly. Refer to Front Wheel Bearing and Hub Replacement procedure in SI.
4. Repeat Steps 1 through 3 for the opposite side.
Condition (CTS, Camaro)
Some customers may comment on a clicking type noise coming from the rear of the vehicle when shifting between reverse and drive or on a hard acceleration.
Correction (CTS, Camaro)
Add a washer between the rear wheel drive shaft and the bearing hub assembly using the procedure listed below.
Note: � Some vehicles may have been built with the washer. If there is a washer already installed, remove and discard the washer. DO NOT re-use the washer, replace with a NEW washer only.
� Anytime the wheel drive shaft is separated from the steering knuckle, the washer must be replaced with a NEW washer only.
1. Remove the rear wheel bearing and hub assembly. Refer to Rear Wheel Bearing and Hub Replacement procedure in SI.
2. Install the washer (1) onto the rear wheel drive shaft (2) as shown above.
Note: DO NOT reuse wheel drive shaft nut. Discard and replace with a NEW nut only.
3. Install the rear wheel bearing and hub assembly. Refer to Rear Wheel Bearing and Hub Replacement procedure in SI.
4. Repeat Steps 1 through 3 for the opposite side.
Parts Information:
Part Number * Usage * Description * Qty
11611964 * HHR * Washer, Front Wheel Drive Shaft * 2
08-08-2012, 09:43 AM
#166
Founding Member
Thread Starter
Join Date: 11-23-2007
Location: Texas
Posts: 8,210
12-03-08-001
#12-03-08-001: Clunk or Thump Type Noise from Front Suspension - (Aug 6, 2012)
Subject: Clunk or Thump Type Noise from Front Suspension
Models: 2008-2009 Buick Allure (Canada)
2008-2011 Buick Enclave, LaCrosse, Lucerne
2011-2012 Buick Regal
2005-2010 Chevrolet Cobalt (Including SS)
2006-2011 Chevrolet HHR (Including SS)
2008-2009 Chevrolet Uplander
2008-2011 Chevrolet Aveo
2008-2012 Chevrolet Equinox, Impala, Malibu
2009-2012 Chevrolet Traverse
2010-2012 Chevrolet Camaro
2011-2012 Chevrolet Cruze, Volt
2008-2012 GMC Acadia
2010-2012 GMC Terrain
2005-2006 Pontiac Pursuit (Canada)
2007-2010 Pontiac G5
2008 Pontiac Grand Prix
2008-2009 Pontiac Montana SV6, Torrent
2008-2010 Pontiac G3, G6, Vibe, Wave
--------------------------------------------------------------------------------
Condition
Some customers may comment on a clunk or thump noise coming from the front suspension while driving over rough road surfaces. This noise will typically occur when the front suspension is returning to the upward position after a hard downward stroke, such as after driving through a large rut or pothole.
Cause
This condition may be caused by the jounce bumper slamming into the upper spring seat because it is not retained in the correct up position. The jounce bumper loses position due to oil being deposited onto its retention fingers. The oil is from the strut leaking.
Correction
Inspect the front strut(s) for evidence of oil. The leak may be slight but will still cause the concern. If oil is present, replace the affected strut, jounce bumper and dust boot (shield). Before reassembling the strut assembly, glue the new jounce bumper and new dust boot (shield) to the upper spring seat using the steps listed below. To further confirm this concern, the shield/bumper will easily slide up and down the strut shaft.

1. Clean the surface area of the upper spring seat using fine sandpaper.
2. Apply a light coat of *3M� Automotive Adhesion Promoter, P/N 06396 or equivalent, to the top of the dust boot (shield) on the inside edge and to the top of the bumper. Allow to dry 10 minutes.

3. Glue the bumper to the inside of the dust boot (shield) as shown. Use *3M� Duramix� Super Fast Adhesive, P/N 04747 or equivalent. Allow to cure thoroughly 5-10 minutes at room temperature.
4. Apply a light coat of *3M� Automotive Adhesion Promoter, P/N 06396 or equivalent, to the top of the dust boot (shield) and to the upper spring seat surface. Allow to dry 10 minutes.
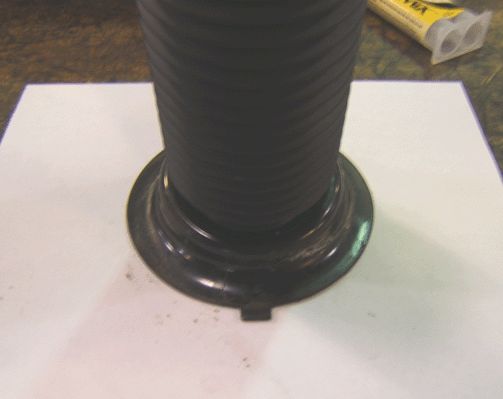
5. Glue the dust boot (shield) to the upper spring seat as shown using the above recommended adhesive. Allow to cure thoroughly.
*We believe this source and their products to be reliable. There may be additional manufacturers of such products. General Motors does not endorse, indicate any preference for or assume any responsibility for the products from this firm or for any such items which may be available from other sources.
Parts Information
Part Number * Description * Qty
04747 * 3M� Duramix� Super Fast Adhesive * 1
06396 * 3M� Automotive Adhesion Promoter *2
For part numbers and usage of the strut, see Strut Kit in Group 07.345 of the appropriate Parts Catalog.
For part numbers and usage of the boot/shield, see Strut Boot/Shield in Group 07.371 of the appropriate Parts Catalog.
For part numbers and usage of the bumper, see Strut Bumper in Group 07.395 of the appropriate Parts Catalog.
Subject: Clunk or Thump Type Noise from Front Suspension
Models: 2008-2009 Buick Allure (Canada)
2008-2011 Buick Enclave, LaCrosse, Lucerne
2011-2012 Buick Regal
2005-2010 Chevrolet Cobalt (Including SS)
2006-2011 Chevrolet HHR (Including SS)
2008-2009 Chevrolet Uplander
2008-2011 Chevrolet Aveo
2008-2012 Chevrolet Equinox, Impala, Malibu
2009-2012 Chevrolet Traverse
2010-2012 Chevrolet Camaro
2011-2012 Chevrolet Cruze, Volt
2008-2012 GMC Acadia
2010-2012 GMC Terrain
2005-2006 Pontiac Pursuit (Canada)
2007-2010 Pontiac G5
2008 Pontiac Grand Prix
2008-2009 Pontiac Montana SV6, Torrent
2008-2010 Pontiac G3, G6, Vibe, Wave
--------------------------------------------------------------------------------
Condition
Some customers may comment on a clunk or thump noise coming from the front suspension while driving over rough road surfaces. This noise will typically occur when the front suspension is returning to the upward position after a hard downward stroke, such as after driving through a large rut or pothole.
Cause
This condition may be caused by the jounce bumper slamming into the upper spring seat because it is not retained in the correct up position. The jounce bumper loses position due to oil being deposited onto its retention fingers. The oil is from the strut leaking.
Correction
Inspect the front strut(s) for evidence of oil. The leak may be slight but will still cause the concern. If oil is present, replace the affected strut, jounce bumper and dust boot (shield). Before reassembling the strut assembly, glue the new jounce bumper and new dust boot (shield) to the upper spring seat using the steps listed below. To further confirm this concern, the shield/bumper will easily slide up and down the strut shaft.
1. Clean the surface area of the upper spring seat using fine sandpaper.
2. Apply a light coat of *3M� Automotive Adhesion Promoter, P/N 06396 or equivalent, to the top of the dust boot (shield) on the inside edge and to the top of the bumper. Allow to dry 10 minutes.
3. Glue the bumper to the inside of the dust boot (shield) as shown. Use *3M� Duramix� Super Fast Adhesive, P/N 04747 or equivalent. Allow to cure thoroughly 5-10 minutes at room temperature.
4. Apply a light coat of *3M� Automotive Adhesion Promoter, P/N 06396 or equivalent, to the top of the dust boot (shield) and to the upper spring seat surface. Allow to dry 10 minutes.
5. Glue the dust boot (shield) to the upper spring seat as shown using the above recommended adhesive. Allow to cure thoroughly.
*We believe this source and their products to be reliable. There may be additional manufacturers of such products. General Motors does not endorse, indicate any preference for or assume any responsibility for the products from this firm or for any such items which may be available from other sources.
Parts Information
Part Number * Description * Qty
04747 * 3M� Duramix� Super Fast Adhesive * 1
06396 * 3M� Automotive Adhesion Promoter *2
For part numbers and usage of the strut, see Strut Kit in Group 07.345 of the appropriate Parts Catalog.
For part numbers and usage of the boot/shield, see Strut Boot/Shield in Group 07.371 of the appropriate Parts Catalog.
For part numbers and usage of the bumper, see Strut Bumper in Group 07.395 of the appropriate Parts Catalog.
09-28-2012, 12:14 PM
#167
Founding Member
Thread Starter
Join Date: 11-23-2007
Location: Texas
Posts: 8,210
#12-08-64-003: Interior Door Handle Replacement Kit - (Sep 14, 2012)
Subject: Interior Door Handle Replacement Kit
Models: 2006-2011 Chevrolet HHR
--------------------------------------------------------------------------------
Condition
Some customers may comment the interior door handle is inoperative or that the chrome finish is peeling.
Cause
This condition may be caused by a fracture in the chrome portion of the door handle assembly where it attaches to the inside handle cable.
Correction
Important: Do Not replace the interior door trim panel to correct the condition. Use the kit listed below to service the chrome handle portion of the handle assembly.
Use the following steps to install the door handle repair kit. Each kit services one door and contains one handle, pin and spring.
Note: The drivers side handle is shown in the following steps. The procedure applies to both driver and passenger side handles.
1. Remove the interior trim panel on the effected door. Refer to Side Door Trim Panel Replacement in SI.
2. Place the trim panel on a suitable work table. Use care to not damage or scuff the interior side of the panel.
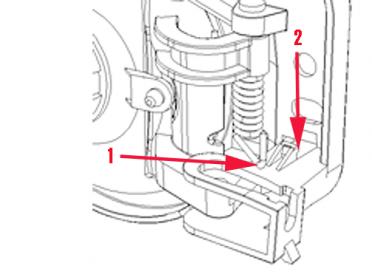
3. Release tension on the handle�s return spring by removing the end of the spring (1) from the spring land on the housing (2).
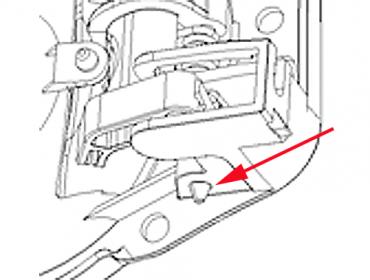
4. Using a pair of wire cutters, or similar tool, cut the retaining barbs off the end of the plastic pin, allowing the pin to be removed. Use care to not damage the black plastic handle housing.
5. Taking note of the original configuration, remove the pin, handle, and spring from the housing.
6. Install the new handle and spring into the housing in the original configuration. The end of the spring must be installed behind the arm of the chrome handle, as shown, or it will not function properly.
7. Insert the new pin through the housing, handle, and center of the spring. The head of the pin should be fully seated. When it is installed properly, the retaining barbs will not allow the pin be removed once installed.

8. Restore tension to the spring by hooking the exposed end of the spring (1) under the spring land on the black housing (2).
9. Reinstall the interior trim panel on the affected door. Refer to Side Door Trim Panel Replacement in SI. Verify correct operation of the handle.
Parts Information
Note: The kit will service either the front or rear door. The kits are handed (left or right).
Part Number - Description
19299613 - Side Door Inside Handle Kit (RH)
19299614 - Side Door Inside Handle Kit (LH)
Subject: Interior Door Handle Replacement Kit
Models: 2006-2011 Chevrolet HHR
--------------------------------------------------------------------------------
Condition
Some customers may comment the interior door handle is inoperative or that the chrome finish is peeling.
Cause
This condition may be caused by a fracture in the chrome portion of the door handle assembly where it attaches to the inside handle cable.
Correction
Important: Do Not replace the interior door trim panel to correct the condition. Use the kit listed below to service the chrome handle portion of the handle assembly.
Use the following steps to install the door handle repair kit. Each kit services one door and contains one handle, pin and spring.
Note: The drivers side handle is shown in the following steps. The procedure applies to both driver and passenger side handles.
1. Remove the interior trim panel on the effected door. Refer to Side Door Trim Panel Replacement in SI.
2. Place the trim panel on a suitable work table. Use care to not damage or scuff the interior side of the panel.
3. Release tension on the handle�s return spring by removing the end of the spring (1) from the spring land on the housing (2).
4. Using a pair of wire cutters, or similar tool, cut the retaining barbs off the end of the plastic pin, allowing the pin to be removed. Use care to not damage the black plastic handle housing.
5. Taking note of the original configuration, remove the pin, handle, and spring from the housing.
6. Install the new handle and spring into the housing in the original configuration. The end of the spring must be installed behind the arm of the chrome handle, as shown, or it will not function properly.
7. Insert the new pin through the housing, handle, and center of the spring. The head of the pin should be fully seated. When it is installed properly, the retaining barbs will not allow the pin be removed once installed.
8. Restore tension to the spring by hooking the exposed end of the spring (1) under the spring land on the black housing (2).
9. Reinstall the interior trim panel on the affected door. Refer to Side Door Trim Panel Replacement in SI. Verify correct operation of the handle.
Parts Information
Note: The kit will service either the front or rear door. The kits are handed (left or right).
Part Number - Description
19299613 - Side Door Inside Handle Kit (RH)
19299614 - Side Door Inside Handle Kit (LH)
02-26-2013, 11:05 AM
#168
Founding Member
Thread Starter
Join Date: 11-23-2007
Location: Texas
Posts: 8,210
#PIC5346A: Normal Characteristic - Unable To Answer a Second Incoming Bluetooth call or Continues To Ring After Answering a Second Incoming Call - (Jan 31, 2013)
Subject:
Normal Characteristic - Unable To Answer a Second Incoming Bluetooth call or Continues To Ring After Answering a Second Incoming Call
Models:
2008 - 2010 Cadillac CTS
2009 Buick Enclave
2009 Cadillac Escalade, SRX, XLR
2009 Chevrolet Equinox, HHR, Silverado, Suburban, Tahoe, Traverse
2009 GMC Acadia, Sierra, Yukon, Yukon XL
2009 Pontiac G5, G8, Solstice, Torrent
2009 Saturn Outlook, Sky, VUE
2009 - 2011 Cadillac STS
2009 - 2010 Chevrolet Cobalt, Corvette
2010 Chevrolet Silverado (Except Silao built)
2010 GMC Sierra (Except Silao built)
Equipped with Bluetooth (RPO UPF or UWE)
--------------------------------------------------------------------------------
--------------------------------------------------------------------------------
This PI was superseded to update recommended field and add Customer Info section. Please discard PIC5346.
--------------------------------------------------------------------------------
Condition/Concern
In rare instances, if a Bluetooth call is transferred from the vehicle to the phone and, while on that call, a second Bluetooth call comes in, the customer will hear ringing in the vehicle. Pressing the Push to Talk button on the steering wheel controls will stop the ringing, but will not answer the second call. If the call is answered from the phone, the ringing will not stop.
Recommendation/Instructions
The concern has been identified as normal operation. Do NOT replace any parts for this concern.
When a Bluetooth call has been transferred to the handset the VCIM will send incoming ringing from a subsequent call to the radio. The call must be answered from the handset and the SWC pressed to stop the ringing. Ending the first call or disconnecting the Bluetooth will also solve the concern.
Customer Information
Please communicate to the customer this condition is a normal operating characteristic of their vehicle. It will not impact the designed performance or reliability of the vehicle. Please share this information with the customer, including a copy of this message.
02-26-2013, 11:27 AM
#169
Founding Member
Thread Starter
Join Date: 11-23-2007
Location: Texas
Posts: 8,210
#PIP5029B: Engine Misfires Due To Major Carbon Deposits On The Intake And Or Exhaust Valves - (Sep 24, 2012)
Subject:
Engine Misfires Due To Major Carbon Deposits On The Intake And Or Exhaust Valves
Models:
2009 - 2013 Buick Enclave
2009 - 2013 Buick Lacrosse
2008 - 2013 Cadillac CTS, STS
2010 - 2013 Cadillac SRX
2013 Cadillac ATS, XTS
2008 - 2010 Chevrolet Cobalt SS, HHR SS
2009 - 2013 Chevrolet Traverse
2010 - 2013 Chevrolet Camaro, Equinox
2012 - 2013 Chevrolet Impala
2009 - 2013 GMC Acadia
2010 - 2013 GMC Terrain
2007 - 2010 Pontiac Solstice GXP
2009 - 2010 Saturn Outlook
2007 - 2010 Saturn Sky Redline
With any of the Following Direct Injected Gasoline Engines:
2.0 (RPO LNF)
2.4L (RPO LAF, LEA, or LUK)
2.8L (RPO LAU)
3.0L (RPO LF1 or LFW)
3.6L (RPO LFX or LLT)
--------------------------------------------------------------------------------
--------------------------------------------------------------------------------
This PI was superseded to update photo and part numbers. Please discard PIP5029A.
--------------------------------------------------------------------------------
The following diagnosis might be helpful if the vehicle exhibits the symptom(s) described in this PI.
Condition/Concern
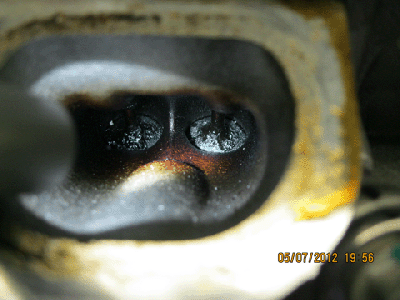
Some customers may complain of a MIL and engine misfire. In some cases, the misfire may be more apparent on a cold start, may count on a single cylinder or several cylinders, and may or may not be felt by the driver. Upon inspection, the technician will find one or more misfire codes (DTC P0300-P0306) stored in the ECM and SI diagnosis may or may not isolate the cause of the misfire depending on whether the intake/exhaust valves are sticking at the time of the diagnosis.
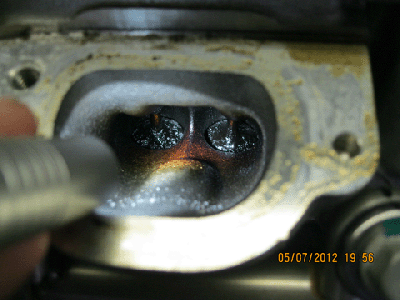
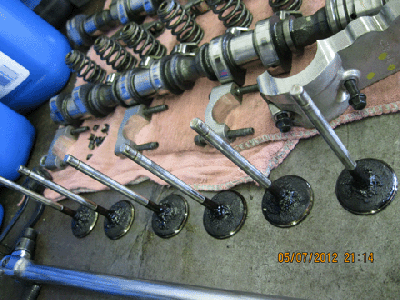
This may be the result of major carbon build up on the intake and/or exhaust valves as shown below so the misfires should not have appeared until at least 5,000 miles or more.

Recommendation/Instructions
If this concern is encountered, perform SI diagnosis. If SI diagnosis isolates a valve sealing concern and/or eliminates everything else external to the engine, decarbon the engine with Upper Engine and Fuel Injector Cleaner by following the guidelines below:
Important: Extreme care must be taken not to hydro lock the engine when inducing the cleaner, especially if it is induced without Kent Moore Tool # J-45076 / J-35800-A or equivalent. If too much cleaner is induced at too low of a RPM, or if you force the engine to stall by inducing too much cleaner at once, the engine may hydro lock and bend a connecting rod(s).
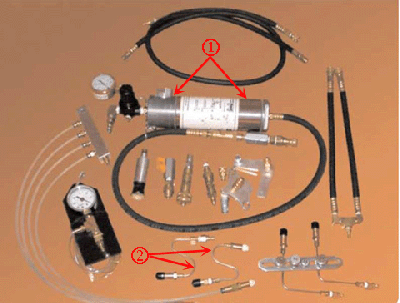
1. In a well-ventilated area with the engine at operating temperature, slowly/carefully induce a bottle of GM Upper Engine and Fuel Injection Cleaner into the engine with RPM off of idle enough to prevent the engine from stalling (typically around 2,000 RPM or so). Depending on the engine configuration, induce the cleaner through the throttle body or an engine vacuum hose/pipe. For best results, it is suggested to induce the cleaner through the throttle body with Kent Moore Tool # J-45076 / J-35800-A or equivalent (shown below).
2. Turn the engine off after inducing the cleaner and allow the cleaner to soak with the engine off for 2.5 to 3 hours (Do not let cleaner soak for more than 3 hours as remaining deposits may start to harden back up again).
3. Add a bottle of GM Fuel System Treatment Plus to the fuel tank and fill the vehicle with one of the Top Tier gasolines listed at http://www.toptiergas.com and/or in the latest version of 04-06-04-047 (USA) or 05-06-04-022 (Canada). See Bulletin 05-00-89-078 for more details on GM Fuel System Treatment Plus.
4. Test drive the vehicle extensively to circulate the GM Fuel System Treatment Plus.
5. Re-evaluate the concern to determine if it is repaired or improved at all. If the concern is improved but not repaired, it may be necessary to perform the above decarboning process a 2nd time.
6. To complete the repairs, advise the customer to only use one of the Top Tier Gasolines listed at http://www.toptiergas.com and/or in the latest version of 04-06-04-047 (USA) or 05-06-04-022 (Canada) to minimize future deposits. It can also be recommended to add a bottle of GM Fuel System Treatment Plus at every oil change as mentioned in the latest version of 04-06-04-051.
Kent Moore Tool Kit # J-45076
1. Pressurized Canister from J-45076 is shown - J-35800-A is similar
2. Throttle Body Cleaning Adapters J-45076-46 and J-45076-55 Shown (Equivalent Adapters Acceptable)
Notice: J-45076 was originally released to Cadillac dealers for decarboning Northstar engines but it has since been discontinued. This kit came with the pressurized canister and throttle body cleaning adapters shown above. As mentioned above, the J-35800-A is another pressurized canister that can be used. It was originally released in the 1990s for cleaning fuel injectors on the 4.3L, 5.0L, and 5.7L truck engines. If these tools are not available, it is also acceptable to use equivalent tools to perform this decarboning procedure.
Parts Information
Upper Engine and Fuel Injector Cleaner
1 - 88861013 Fuel System Treatment Plus
P0301 P0302 P0303 P0304 P0305
Subject:
Engine Misfires Due To Major Carbon Deposits On The Intake And Or Exhaust Valves
Models:
2009 - 2013 Buick Enclave
2009 - 2013 Buick Lacrosse
2008 - 2013 Cadillac CTS, STS
2010 - 2013 Cadillac SRX
2013 Cadillac ATS, XTS
2008 - 2010 Chevrolet Cobalt SS, HHR SS
2009 - 2013 Chevrolet Traverse
2010 - 2013 Chevrolet Camaro, Equinox
2012 - 2013 Chevrolet Impala
2009 - 2013 GMC Acadia
2010 - 2013 GMC Terrain
2007 - 2010 Pontiac Solstice GXP
2009 - 2010 Saturn Outlook
2007 - 2010 Saturn Sky Redline
With any of the Following Direct Injected Gasoline Engines:
2.0 (RPO LNF)
2.4L (RPO LAF, LEA, or LUK)
2.8L (RPO LAU)
3.0L (RPO LF1 or LFW)
3.6L (RPO LFX or LLT)
--------------------------------------------------------------------------------
--------------------------------------------------------------------------------
This PI was superseded to update photo and part numbers. Please discard PIP5029A.
--------------------------------------------------------------------------------
The following diagnosis might be helpful if the vehicle exhibits the symptom(s) described in this PI.
Condition/Concern
Some customers may complain of a MIL and engine misfire. In some cases, the misfire may be more apparent on a cold start, may count on a single cylinder or several cylinders, and may or may not be felt by the driver. Upon inspection, the technician will find one or more misfire codes (DTC P0300-P0306) stored in the ECM and SI diagnosis may or may not isolate the cause of the misfire depending on whether the intake/exhaust valves are sticking at the time of the diagnosis.
This may be the result of major carbon build up on the intake and/or exhaust valves as shown below so the misfires should not have appeared until at least 5,000 miles or more.
Recommendation/Instructions
If this concern is encountered, perform SI diagnosis. If SI diagnosis isolates a valve sealing concern and/or eliminates everything else external to the engine, decarbon the engine with Upper Engine and Fuel Injector Cleaner by following the guidelines below:
Important: Extreme care must be taken not to hydro lock the engine when inducing the cleaner, especially if it is induced without Kent Moore Tool # J-45076 / J-35800-A or equivalent. If too much cleaner is induced at too low of a RPM, or if you force the engine to stall by inducing too much cleaner at once, the engine may hydro lock and bend a connecting rod(s).
1. In a well-ventilated area with the engine at operating temperature, slowly/carefully induce a bottle of GM Upper Engine and Fuel Injection Cleaner into the engine with RPM off of idle enough to prevent the engine from stalling (typically around 2,000 RPM or so). Depending on the engine configuration, induce the cleaner through the throttle body or an engine vacuum hose/pipe. For best results, it is suggested to induce the cleaner through the throttle body with Kent Moore Tool # J-45076 / J-35800-A or equivalent (shown below).
2. Turn the engine off after inducing the cleaner and allow the cleaner to soak with the engine off for 2.5 to 3 hours (Do not let cleaner soak for more than 3 hours as remaining deposits may start to harden back up again).
3. Add a bottle of GM Fuel System Treatment Plus to the fuel tank and fill the vehicle with one of the Top Tier gasolines listed at http://www.toptiergas.com and/or in the latest version of 04-06-04-047 (USA) or 05-06-04-022 (Canada). See Bulletin 05-00-89-078 for more details on GM Fuel System Treatment Plus.
4. Test drive the vehicle extensively to circulate the GM Fuel System Treatment Plus.
5. Re-evaluate the concern to determine if it is repaired or improved at all. If the concern is improved but not repaired, it may be necessary to perform the above decarboning process a 2nd time.
6. To complete the repairs, advise the customer to only use one of the Top Tier Gasolines listed at http://www.toptiergas.com and/or in the latest version of 04-06-04-047 (USA) or 05-06-04-022 (Canada) to minimize future deposits. It can also be recommended to add a bottle of GM Fuel System Treatment Plus at every oil change as mentioned in the latest version of 04-06-04-051.
Kent Moore Tool Kit # J-45076
1. Pressurized Canister from J-45076 is shown - J-35800-A is similar
2. Throttle Body Cleaning Adapters J-45076-46 and J-45076-55 Shown (Equivalent Adapters Acceptable)
Notice: J-45076 was originally released to Cadillac dealers for decarboning Northstar engines but it has since been discontinued. This kit came with the pressurized canister and throttle body cleaning adapters shown above. As mentioned above, the J-35800-A is another pressurized canister that can be used. It was originally released in the 1990s for cleaning fuel injectors on the 4.3L, 5.0L, and 5.7L truck engines. If these tools are not available, it is also acceptable to use equivalent tools to perform this decarboning procedure.
Parts Information
Upper Engine and Fuel Injector Cleaner
1 - 88861013 Fuel System Treatment Plus
P0301 P0302 P0303 P0304 P0305
02-26-2013, 11:57 AM
#170
Founding Member
Thread Starter
Join Date: 11-23-2007
Location: Texas
Posts: 8,210
#PIP4495D: Cylinder Head Tick Noise And/Or Damage - Possible Plugged Oil Feed Orifice - (Jan 4, 2013)
Subject:
Cylinder Head Tick Noise And/Or Damage - Possible Plugged Oil Feed Orifice
Models:
2010 Buick Allure (Canada Only)
2010-2013 Buick LaCrosse
2011-2013 Buick Regal
2012-2013 Buick Verano
2012-2013 Chevrolet Captiva Sport
2002-2005 Chevrolet Cavalier
2005-2010 Chevrolet Cobalt, Cobalt SS
2010-2013 Chevrolet Equinox
2006-2011 Chevrolet HHR
2008-2010 Chevrolet HHR SS
2004-2013 Chevrolet Malibu
2004-2005 Chevrolet Malibu Classic
2010-2013 GMC Terrain
2002-2004 Oldsmobile Alero
2007-2010 Pontiac G5
2006-2010 Pontiac G6
2002-2005 Pontiac Grand Am, Sunfire
2005-2006 Pontiac Pursuit (Canada Only)
2006-2010 Pontiac Solstice
2007-2010 Pontiac Solstice GXP
2007-2010 Saturn Aura, Aura Hybrid
2003-2007 Saturn Ion
2004-2007 Saturn Ion Redline
2001-2005 Saturn L Series
2007-2010 Saturn Sky, Sky Redline
2002-2010 Saturn Vue
2007-2010 Saturn Vue Hybrid
With any of the following engines:
2.0L Engine (RPO LHU, LNF or LSJ)
2.2L Engine (RPO L61, LAP or LE8
2.4L Engine (RPO LAF, LAT, LE5, LE9, LEA or LUK)
--------------------------------------------------------------------------------
--------------------------------------------------------------------------------
This PI was superseded to update recommended field. Please discard PIP4495C.
--------------------------------------------------------------------------------
The following diagnosis might be helpful if the vehicle exhibits the symptom(s) described in this PI.
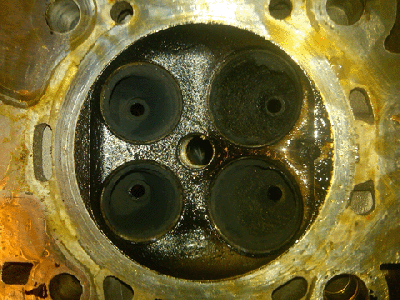
Condition/Concern
Some customers may complain of a loud tick/rattle noise under the hood at all operating conditions. In some cases, the noise may have started shortly after an oil change or previous internal engine repairs. During diagnosis, the technician will find that the noise is coming from the cylinder head area and believes that several/all of the valve lash adjusters (lifters) are making noise.
The cylinder head is equipped with oil feed orifice (2) that may become plugged with debris, such as excessive RTV/sealer or broken down oil filter material. If this occurs, this noise may occur as a result of no/low oil pressure to the valve train.
Recommendation/Instructions
If a major valve train noise is encountered that sounds like several/all valve lash adjusters (lifters), it is suggested to compare the lower end oil pressure to the upper end oil pressure as outlined below:
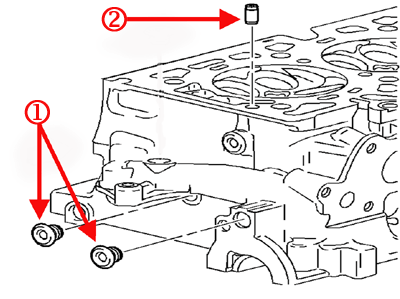
1. Check the lower end oil pressure by attaching an oil pressure gauge to the oil pressure sender port or to one of the gallery plug ports in the engine block.
2. Check the upper end oil pressure by attaching another oil pressure gauge to one of the oil gallery plug ports on the back of the cylinder head (1).
3. Start the engine and note the oil pressure gauge readings from both locations while at the same engine RPM and engine temperature.
4. Turn the engine off.
5. Compare the oil pressure readings.
5.1 If the lower end oil pressure is below SI specification, this PI does not apply so normal SI diagnosis should be followed to diagnose and repair the noise.
5.2 If the upper end oil pressure is near 0 PSI/KPA but the lower end oil pressure is within SI specification, the oil feed orifice (2) is most likely plugged with debris. Please note that it is not uncommon for the upper end oil pressure of a normally functioning engine at idle to measure as much 35% less than the bottom end oil pressure. This is due to the large amount of oil pressure bleed off that normally occurs in the valve train, combined with the small size of the oil feed orifice (2).
If you suspect a plugged oil feed orifice after performing the test above, remove the cylinder head and visually inspect the oil feed orifice (2) for debris. If debris is present, it can normally be cleaned out to repair the noise. Please note that the orifice is not available separate from the cylinder head and cannot be inspected/cleaned without cylinder head removal.
Important: To prevent future concerns, care must be taken not to use excessive amounts of engine sealant during internal engine repairs, use the proper oil filter that is listed in the parts catalog, and change the engine oil/filter according to the schedule in the owner's manual.
Notice: The oil gallery plug port threads (1) on the back of the cylinder head are M12x1.75 and it is unlikely that a related oil pressure gauge adapter will be found at a hardware or auto parts store. The 509376 Kent Moore Fitting that comes with the Engine Preluber Kit (EN-45299/J-45299) will screw into the head and may be adapted to some oil pressure gauges. Or, there are also several online retailers that can supply a fitting that will work as an adapter - the male end has to be M12x1.75 while the female end has to be 1/8"x27 NPTF so a standard oil pressure gauge hose can screw into it. It has also been found that some automotive gauge companies, such as Auto Meter, offer the necessary adapter/fitting (M12x1.75 / 1/8"x27 NPTF) for $5-$20. Some technicians have also reported success in making a temporary fitting out of an oil pressure sender body.
KEYWORDS:
adjuster cam camshaft follower installation lash lifter replacement valve
Subject:
Cylinder Head Tick Noise And/Or Damage - Possible Plugged Oil Feed Orifice
Models:
2010 Buick Allure (Canada Only)
2010-2013 Buick LaCrosse
2011-2013 Buick Regal
2012-2013 Buick Verano
2012-2013 Chevrolet Captiva Sport
2002-2005 Chevrolet Cavalier
2005-2010 Chevrolet Cobalt, Cobalt SS
2010-2013 Chevrolet Equinox
2006-2011 Chevrolet HHR
2008-2010 Chevrolet HHR SS
2004-2013 Chevrolet Malibu
2004-2005 Chevrolet Malibu Classic
2010-2013 GMC Terrain
2002-2004 Oldsmobile Alero
2007-2010 Pontiac G5
2006-2010 Pontiac G6
2002-2005 Pontiac Grand Am, Sunfire
2005-2006 Pontiac Pursuit (Canada Only)
2006-2010 Pontiac Solstice
2007-2010 Pontiac Solstice GXP
2007-2010 Saturn Aura, Aura Hybrid
2003-2007 Saturn Ion
2004-2007 Saturn Ion Redline
2001-2005 Saturn L Series
2007-2010 Saturn Sky, Sky Redline
2002-2010 Saturn Vue
2007-2010 Saturn Vue Hybrid
With any of the following engines:
2.0L Engine (RPO LHU, LNF or LSJ)
2.2L Engine (RPO L61, LAP or LE8
2.4L Engine (RPO LAF, LAT, LE5, LE9, LEA or LUK)
--------------------------------------------------------------------------------
--------------------------------------------------------------------------------
This PI was superseded to update recommended field. Please discard PIP4495C.
--------------------------------------------------------------------------------
The following diagnosis might be helpful if the vehicle exhibits the symptom(s) described in this PI.
Condition/Concern
Some customers may complain of a loud tick/rattle noise under the hood at all operating conditions. In some cases, the noise may have started shortly after an oil change or previous internal engine repairs. During diagnosis, the technician will find that the noise is coming from the cylinder head area and believes that several/all of the valve lash adjusters (lifters) are making noise.
The cylinder head is equipped with oil feed orifice (2) that may become plugged with debris, such as excessive RTV/sealer or broken down oil filter material. If this occurs, this noise may occur as a result of no/low oil pressure to the valve train.
Recommendation/Instructions
If a major valve train noise is encountered that sounds like several/all valve lash adjusters (lifters), it is suggested to compare the lower end oil pressure to the upper end oil pressure as outlined below:
1. Check the lower end oil pressure by attaching an oil pressure gauge to the oil pressure sender port or to one of the gallery plug ports in the engine block.
2. Check the upper end oil pressure by attaching another oil pressure gauge to one of the oil gallery plug ports on the back of the cylinder head (1).
3. Start the engine and note the oil pressure gauge readings from both locations while at the same engine RPM and engine temperature.
4. Turn the engine off.
5. Compare the oil pressure readings.
5.1 If the lower end oil pressure is below SI specification, this PI does not apply so normal SI diagnosis should be followed to diagnose and repair the noise.
5.2 If the upper end oil pressure is near 0 PSI/KPA but the lower end oil pressure is within SI specification, the oil feed orifice (2) is most likely plugged with debris. Please note that it is not uncommon for the upper end oil pressure of a normally functioning engine at idle to measure as much 35% less than the bottom end oil pressure. This is due to the large amount of oil pressure bleed off that normally occurs in the valve train, combined with the small size of the oil feed orifice (2).
If you suspect a plugged oil feed orifice after performing the test above, remove the cylinder head and visually inspect the oil feed orifice (2) for debris. If debris is present, it can normally be cleaned out to repair the noise. Please note that the orifice is not available separate from the cylinder head and cannot be inspected/cleaned without cylinder head removal.
Important: To prevent future concerns, care must be taken not to use excessive amounts of engine sealant during internal engine repairs, use the proper oil filter that is listed in the parts catalog, and change the engine oil/filter according to the schedule in the owner's manual.
Notice: The oil gallery plug port threads (1) on the back of the cylinder head are M12x1.75 and it is unlikely that a related oil pressure gauge adapter will be found at a hardware or auto parts store. The 509376 Kent Moore Fitting that comes with the Engine Preluber Kit (EN-45299/J-45299) will screw into the head and may be adapted to some oil pressure gauges. Or, there are also several online retailers that can supply a fitting that will work as an adapter - the male end has to be M12x1.75 while the female end has to be 1/8"x27 NPTF so a standard oil pressure gauge hose can screw into it. It has also been found that some automotive gauge companies, such as Auto Meter, offer the necessary adapter/fitting (M12x1.75 / 1/8"x27 NPTF) for $5-$20. Some technicians have also reported success in making a temporary fitting out of an oil pressure sender body.
KEYWORDS:
adjuster cam camshaft follower installation lash lifter replacement valve

Thread
Thread Starter
Forum
Replies
Last Post
1Panel2NV
Picture & Media
48
12-03-2011 10:31 PM

