How to Remove Intake Manifold -SS
 02-11-2016, 11:03 PM
#1
Moderator
Thread Starter

Join Date: 05-01-2014
Location: California
Posts: 7,791
How to Remove Intake Manifold -SS
First up, I gotta give credit to Wired over at css forums. He made a walkthrough over there that was great and helped me out a lot. But there were a few things that are different for the HHR or were more difficult than I expected them to be. Here is Wired's thread in case I don't provide a good picture or explain good enough.
1. If your stock airbox is still in use, Remove it, here. If not, pull fuse #13 from the underhood fusebox, start the engine, run it until it dies from fuel starvation. Then remove whatever aftermarket air intake system you have.
2. Open the rear hatch. (What? I thought the intake manifold was up in front!) Relax, we've got to disconnect the battery. Remove the rear shelf and the spare tire cover. There's the battery!! With a 10mm socket(or wrench), loosen the nut on the NEGATIVE terminal, then wiggle the terminal off and tuck it away down to the right. Place a folded towel on the latch(on the sill) for the rear hatch. This is so the rear hatch does not get inadvertently closed, with the battery disconnected. Save yourself a headache later.
3. Go back up front now, and start removing parts from on top of the intake manifold. Remove the electrical connectors first. Then the bypass solenoid(you can leave the vacuum lines attached, and kind of wrap it over the radiator cap or coolant reservoir), the vacuum line next to it from the vacuum tank, the evap purge solenoid(you can leave this line attached, too), and the brake booster vacuum line.
4. You've already relieved the fuel pressure and disconnected the battery, so you can take your 17mm open end wrench and remove the nut for the fuel pump line, and 10mm bolts for the fuel pulse dampener (the metal disk). Push this and the evap purge solenoid out of the way, over the valve cover works. Everything should be off the top of the manifold now.
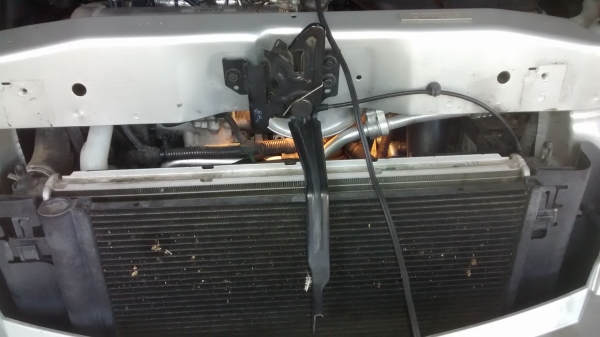
5. You'll have an easier time if you remove the horizontal shroud over the radiator. there's a bracket on each side(outside the engine bay), attached with a 10mm bolt. Take the brackets off, and work the shroud out towards the passenger side.
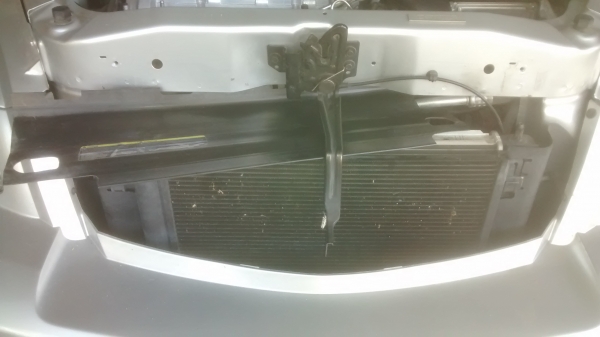
Now that it's out of the way, you'll be able to get to a few things easier.
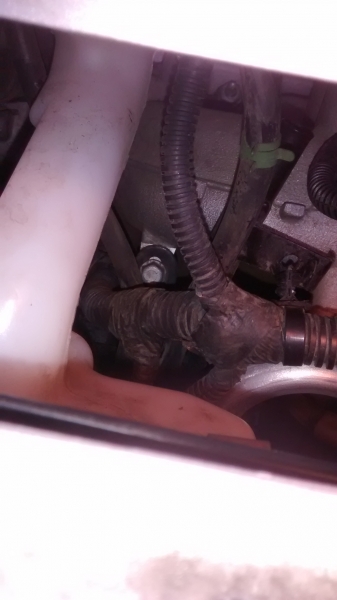
6. There's a Christmas tree/wire harness anchored to the bracket for the air conditioning hard line, towards the driver's side. There was no zip tie on mine like Wired had, you've got to remove the anchor from the bracket. With the wire bundle out of the way a bit, you can now get to the 10mm bolt(with a u-joint)for the bracket.
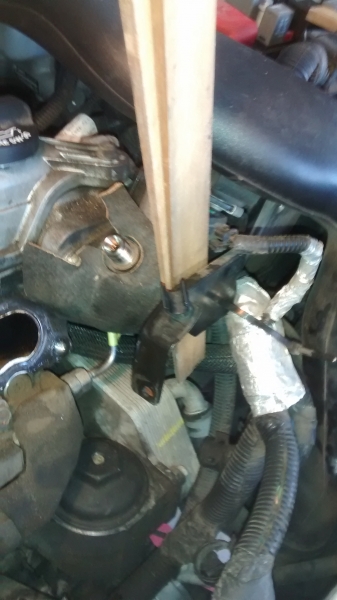
7. Similar situation on the passenger side for the dipstick tube. I had a heck of a time finding this bolt. This time there was a zip tie anchor, you can cut it if you wish, and replace it later, easier than extracting another Christmas tree anchor. The bolt is near the center of the pic. Remove it, 10mm and u-joint. This view is between the radiator and support.
8. The fuel pump has a heavy metal shield around it. It is bolted to the manifold with a 10mm bolt, remove that bolt.
9. There is a brace with a 13mm bolt, right next to that bolt you removed for the air conditioning line, remove it with a u-joint. At the other end of the brace is a nut, I think it was also 13mm. It is very near to the starter electrical leads, this is the main reason we disconnected the battery. Wired got to the nut from above, I put the car on jackstands and got it from underneath. You just have to loosen this so that the brace can pivot over towards the driver's side.
10. Disconnect the electrical connector for the throttle body. This is the same type of plug as the Camshaft Position Actuator Solenoid Valves, which are in the middle of the valve cover, on the passenger side. You can practice your technique on these. Check out Wired's thread the third picture down.
11. There is a clamp where the charge pipe meets the throttle body. It is 8mm or 5/16" Wired used a flexible snake-type extension. Mine is broken, so I struggled with this. Loosen that clamp up a lot, removing the hose was one of the hardest parts of this operation.
I shoved screwdrivers and such between the hose and the nipple, but it was really stuck on there. I had some diluted dish soap that I was using to test my air compressor for leaks. I dribbled a little of that down in there and worked it again, and that loosened it up a little more. Back under the car, reached up and grabbed the top lip of the hose, and finally broke it loose!!
Edit: I discovered another method of removing the charge pipe from the throttle body. This way was easier for me.
A) Disconnect the electrical connectors at the throttle body and lower TMAP sensor.
B) Remove passenger side splash guard for access to clamp on charge pipe to intercooler.
C) Loosen clamp and remove charge pipe from the intercooler.
D) Remove 4 bolts that attached the throttle body to the intake manifold.
E) Remove charge pipe/throttle body assembly from vehicle.
12. Place some shims(wedges) between the fuel pump and the shield. You'll need at least 1/4". This will make removal of the intake much easier.
13. I bent out that air conditioning line about 1/2" so I could get the manifold out. When you're ready to re-assemble, I would advise that you go to the hardware store, get a longer bolt and a spacer rather than try to bend it back.
14. Now you should be ready to remove the manifold nuts and bolts. They are 13mm. Once the manifold can get clear of the studs, you have to tip the driver's side up first. The fuel pump shield will be arguing with you, but don't quit. Shove that wedge in a little further if you need to and try again.
If you're doing this in preparation for Shell Blasting, Head on over here.
Re-assembly
15. Everything should go back on in reverse order, except this: I waited until the manifold was bolted back on before I tried to reattach the charge hose to the throttle body. It was quite difficult. If I had it to do over, I would try to slip the hose on the throttle body while the manifold could still move around a bit.
16. Clean up the gasket mating surfaces, and put on a new intake manifold gasket. The auto parts stores didn't show a listing, I had to go to the dealer for the gasket. The bolts and nuts torque to 16 lbs. ft., working from the center out. All the 10mm bolts torque to 71 to 89 lbs inch. take note: inch lbs! torque specs at css
17. I hope I haven't left anything out. I wish I had taken more pics for you, but between this how-to and the one Wired put together, you'll be able to do this task.
1. If your stock airbox is still in use, Remove it, here. If not, pull fuse #13 from the underhood fusebox, start the engine, run it until it dies from fuel starvation. Then remove whatever aftermarket air intake system you have.
2. Open the rear hatch. (What? I thought the intake manifold was up in front!) Relax, we've got to disconnect the battery. Remove the rear shelf and the spare tire cover. There's the battery!! With a 10mm socket(or wrench), loosen the nut on the NEGATIVE terminal, then wiggle the terminal off and tuck it away down to the right. Place a folded towel on the latch(on the sill) for the rear hatch. This is so the rear hatch does not get inadvertently closed, with the battery disconnected. Save yourself a headache later.
3. Go back up front now, and start removing parts from on top of the intake manifold. Remove the electrical connectors first. Then the bypass solenoid(you can leave the vacuum lines attached, and kind of wrap it over the radiator cap or coolant reservoir), the vacuum line next to it from the vacuum tank, the evap purge solenoid(you can leave this line attached, too), and the brake booster vacuum line.
4. You've already relieved the fuel pressure and disconnected the battery, so you can take your 17mm open end wrench and remove the nut for the fuel pump line, and 10mm bolts for the fuel pulse dampener (the metal disk). Push this and the evap purge solenoid out of the way, over the valve cover works. Everything should be off the top of the manifold now.
5. You'll have an easier time if you remove the horizontal shroud over the radiator. there's a bracket on each side(outside the engine bay), attached with a 10mm bolt. Take the brackets off, and work the shroud out towards the passenger side.
Now that it's out of the way, you'll be able to get to a few things easier.
6. There's a Christmas tree/wire harness anchored to the bracket for the air conditioning hard line, towards the driver's side. There was no zip tie on mine like Wired had, you've got to remove the anchor from the bracket. With the wire bundle out of the way a bit, you can now get to the 10mm bolt(with a u-joint)for the bracket.
7. Similar situation on the passenger side for the dipstick tube. I had a heck of a time finding this bolt. This time there was a zip tie anchor, you can cut it if you wish, and replace it later, easier than extracting another Christmas tree anchor. The bolt is near the center of the pic. Remove it, 10mm and u-joint. This view is between the radiator and support.
8. The fuel pump has a heavy metal shield around it. It is bolted to the manifold with a 10mm bolt, remove that bolt.
9. There is a brace with a 13mm bolt, right next to that bolt you removed for the air conditioning line, remove it with a u-joint. At the other end of the brace is a nut, I think it was also 13mm. It is very near to the starter electrical leads, this is the main reason we disconnected the battery. Wired got to the nut from above, I put the car on jackstands and got it from underneath. You just have to loosen this so that the brace can pivot over towards the driver's side.
10. Disconnect the electrical connector for the throttle body. This is the same type of plug as the Camshaft Position Actuator Solenoid Valves, which are in the middle of the valve cover, on the passenger side. You can practice your technique on these. Check out Wired's thread the third picture down.
11. There is a clamp where the charge pipe meets the throttle body. It is 8mm or 5/16" Wired used a flexible snake-type extension. Mine is broken, so I struggled with this. Loosen that clamp up a lot, removing the hose was one of the hardest parts of this operation.
I shoved screwdrivers and such between the hose and the nipple, but it was really stuck on there. I had some diluted dish soap that I was using to test my air compressor for leaks. I dribbled a little of that down in there and worked it again, and that loosened it up a little more. Back under the car, reached up and grabbed the top lip of the hose, and finally broke it loose!!
Edit: I discovered another method of removing the charge pipe from the throttle body. This way was easier for me.
A) Disconnect the electrical connectors at the throttle body and lower TMAP sensor.
B) Remove passenger side splash guard for access to clamp on charge pipe to intercooler.
C) Loosen clamp and remove charge pipe from the intercooler.
D) Remove 4 bolts that attached the throttle body to the intake manifold.
E) Remove charge pipe/throttle body assembly from vehicle.
12. Place some shims(wedges) between the fuel pump and the shield. You'll need at least 1/4". This will make removal of the intake much easier.
13. I bent out that air conditioning line about 1/2" so I could get the manifold out. When you're ready to re-assemble, I would advise that you go to the hardware store, get a longer bolt and a spacer rather than try to bend it back.
14. Now you should be ready to remove the manifold nuts and bolts. They are 13mm. Once the manifold can get clear of the studs, you have to tip the driver's side up first. The fuel pump shield will be arguing with you, but don't quit. Shove that wedge in a little further if you need to and try again.
If you're doing this in preparation for Shell Blasting, Head on over here.
Re-assembly
15. Everything should go back on in reverse order, except this: I waited until the manifold was bolted back on before I tried to reattach the charge hose to the throttle body. It was quite difficult. If I had it to do over, I would try to slip the hose on the throttle body while the manifold could still move around a bit.
16. Clean up the gasket mating surfaces, and put on a new intake manifold gasket. The auto parts stores didn't show a listing, I had to go to the dealer for the gasket. The bolts and nuts torque to 16 lbs. ft., working from the center out. All the 10mm bolts torque to 71 to 89 lbs inch. take note: inch lbs! torque specs at css
17. I hope I haven't left anything out. I wish I had taken more pics for you, but between this how-to and the one Wired put together, you'll be able to do this task.
Last edited by RJ_RS_SS_350; 08-13-2020 at 11:32 AM.


 08-01-2016, 11:43 AM
#4
Moderator
Thread Starter
Join Date: 05-01-2014
Location: California
Posts: 7,791
Minor correction: in step 10, I make a reference to cam position sensors. I have since learned that they are called Camshaft Position Actuator Solenoid Valves. Not something we're dealing with in this procedure, but might have confused someone, hence the correction.


Thread
Thread Starter
Forum
Replies
Last Post