Adding radio buttons on steering wheel


 05-14-2006, 02:41 PM
#32
Senior Member

Join Date: 04-19-2006
Location: Arvada CO
Posts: 5,065
Edit: 7/10/06 to put in instructions for blondes like me. 
Kudos to CH and MikeX for answering my dumb questions during install.
Kudos to CH and MikeX for answering my dumb questions during install.
Before starting, you may want to disconnect the negative battery cable, but that is a personal decision.
1. Eat your wheaties and take 2 of these before starting.

If you smoke...take your cigarettes with you...you're gonna need them to calm your nerves.

2. Put the switch assembly into the new cover and make sure everything snaps into place.
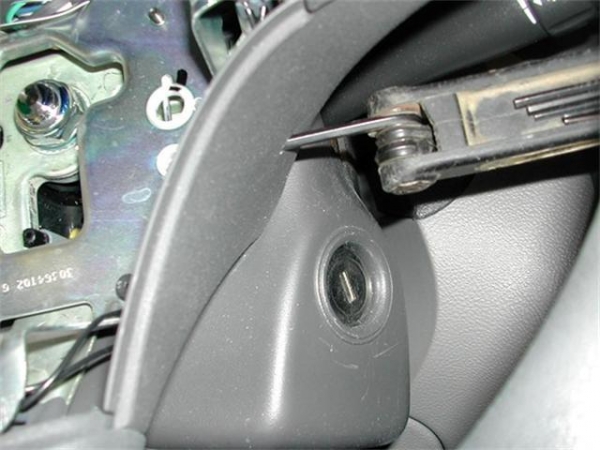
3. Insert an allen wrench or other small metal object straight into one of the little holes and push towards center of the steering wheel and you will feel the clip move, that holds the horn assembly in place.
4. Apply pressure to the allen wrench/metal tool, holding it in place with one hand and use other hand to apply pressure inward until clip holding it in place releases. Clip is made out of metal, so it takes some strength in order for it to release. (This is why you needed the wheaties.
5. Once enough pressure is applied, the clip will free itself and then you can do the same thing to the other side.
6. Once both sides are free, let the horn assembly hang by the wires during remainder of this process.
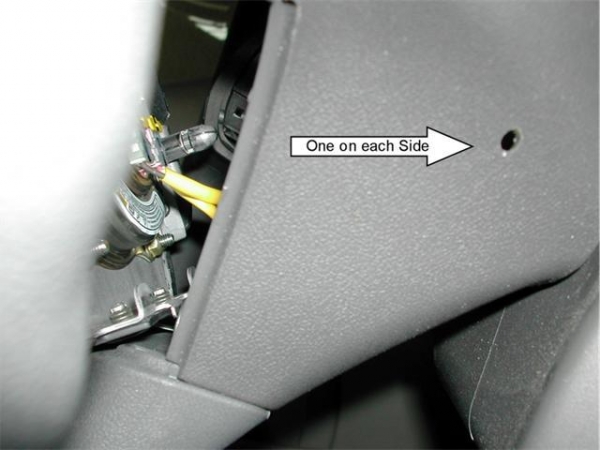
7. Take a phillips screwdriver and remove the covers from both sides...trust me, it makes things much easier to work with.
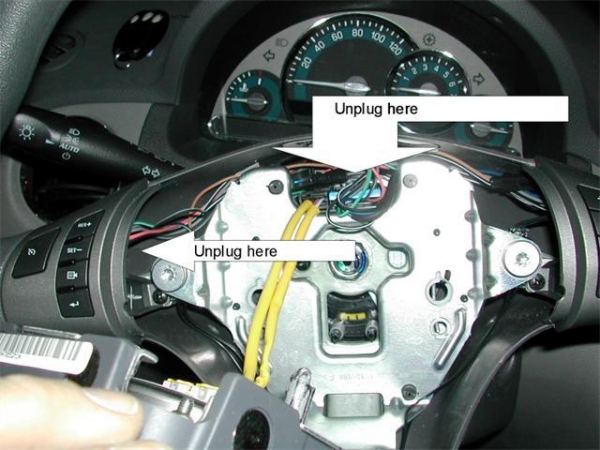
8. Once you have these out, you will be able to remove the harness ends much easier. Have the new harness handy, so you can see the 3 harness ends you need to remove from the steering assembly. The ones that go behind the brackets are a PITA to get through the steering column hole, so cut those hummers off and save yourself a lot of aggravation.
9. Using a small screwdriver or other metal object, gently lift up on the retainer that holds the last harness end in and pull it straight towards you until it has freed itself. Throw it as far as you can...it will make you feel better.
10. Plug all the harness ends into their corresponding places.
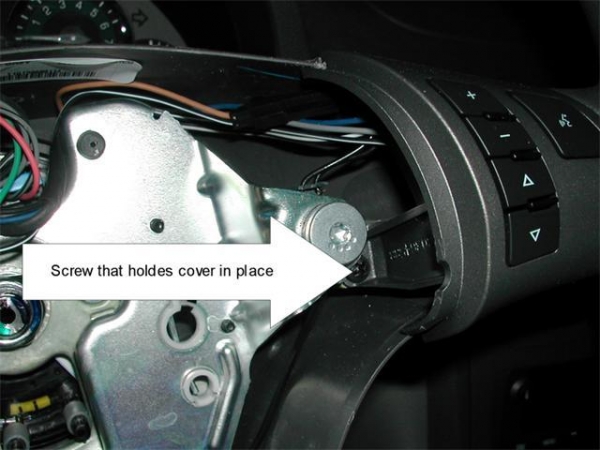
11. Put the switch covers back into their respective places and tighten them down. Then stash the wires back into the open areas on each side so they are out of the way.
12. Take horn/airbag assembly and gently push it back into place until you hear it snap into place and you are done, unless you disconnected the battery cable.
Turn the igniton and radio on and test to make sure everything works. Mine did and I nearly fell out of my HHR.
Now...on to the install photos provided by steiny.

Last edited by courthousedeb; 07-10-2006 at 11:25 PM.


 05-15-2006, 04:15 PM
#37
Senior Member

Join Date: 04-25-2006
Location: Fort Worth, TX
Posts: 428
Originally Posted by jaysz2893
I con confirmation from GM parts direct today. All parts are back ordered. Uggh.. LOL i guess all the HHR nuts are ordering them..

Just kidding. They are backordered though.
05-15-2006, 04:32 PM
#38
Senior Member
Join Date: 04-19-2006
Location: Arvada CO
Posts: 5,065
Originally Posted by MikeX
LOL - yep, parts ain't showin in-stock. I just put in my order. But he gave me a priority code so I'll get mine before anyone else.
Just kidding. They are backordered though.
Just kidding. They are backordered though.
