Driveshaft Rem/Refit
 11-17-2008, 10:08 AM
#1
Thread Starter

Join Date: 12-19-2006
Location: Upstate New York
Posts: 9
Driveshaft Rem/Refit
I'm getting a grinding noise from the right front. Sounds like a dry shaft joint not a wheel bearing. Slight click when running off of the ground. I've pulled shafts on other cars and I know the inboard snapring can be a pain to get off. Mitchell calls for a slam hammer, special tools etc. Has anyone pulled a shaft? Any ideas?


 11-17-2008, 02:13 PM
#3
Founding Member

Join Date: 11-23-2007
Location: Texas
Posts: 8,210
2006 Chevrolet HHR | HHR (VIN A) Service Manual | Driveline/Axle | Wheel Drive Shafts | Repair Instructions | Document ID: 2004236
--------------------------------------------------------------------------
Important: Steps 3, 4 and 5 is for standard disc brake only. For vehicles equipped with the Brembo brakes, proceed to step 6.
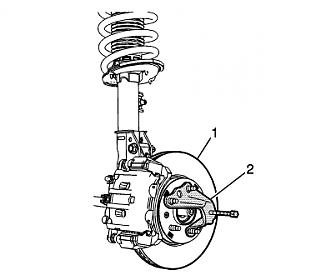
Insert a punch or drift (1) in the cooling fins of the brake rotor (2).
Position the punch or drift (1) against the brake caliper mounting bracket (5).
Using a breaker bar and the appropriate size socket (4), loosen the wheel drive shaft nut (3).
Have an assistant apply the brakes.
Remove the wheel drive shaft nut (2) from the wheel drive shaft (1) and discard. DO NOT re-use the wheel drive shaft nut. Use NEW nut only.
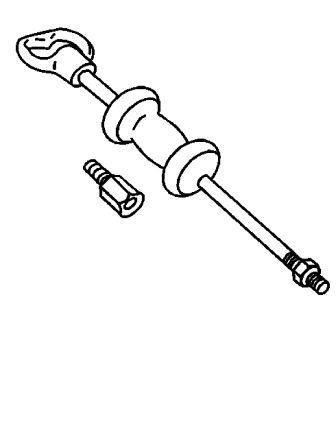
Using the J 28733-B (2), separate the wheel drive shaft from the steering knuckle (1).
Remove the lower ball joint from the steering knuckle. Refer to Lower Control Arm Replacement.

Important: The transmission stub staff may still could be attached to the right wheel drive shaft and be removed at the same time as the wheel drive shaft. If this occurs, refer to Stub Shaft Removal
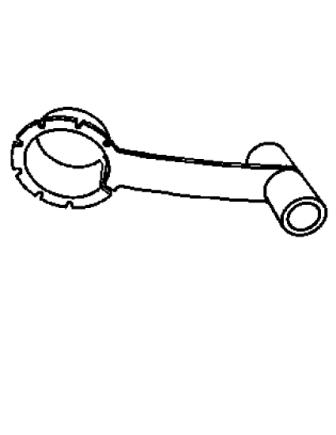
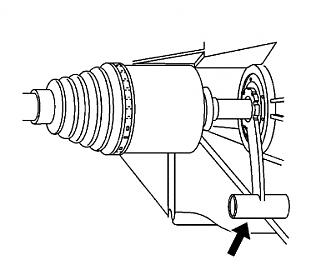
Using the J-2619-A and the J 45341 , remove the wheel drive shaft.
If the wheel drive shaft seal is found to be defective, replace the seal. Refer to Front Wheel Drive Shaft Seal and Output Shaft Sleeve Replacement - Right Side.
Installation Procedure
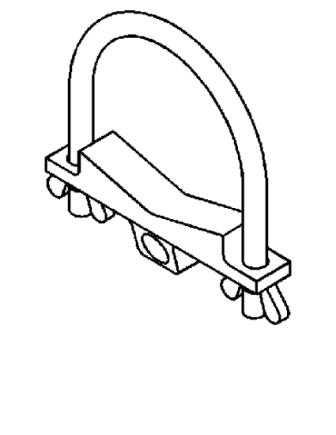
For the left wheel drive shaft, position the J 44394 in the transaxle.
Install the wheel drive shaft until the wheel drive shaft splines are past the axle seal.
Remove the J 44394 from the wheel drive shaft.
Important: The following service procedure is for those vehicles equipped with an intermediate shaft.
For the right wheel drive shaft, apply a very small amount of grease, GM P/N 1051344 (Canadian P/N 993037), or equivalent to the splines of the wheel drive shaft inner joint.
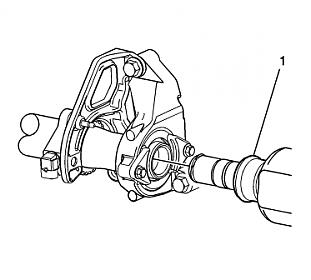
Install the wheel drive shaft into the intermediate drive shaft (1).
Install the wheel drive shaft until it is fully seated in the transaxle.
Important: In the following step, DO NOT pull on the wheel drive shaft. Pull only on the tripod.
With the wheel drive shaft installed, grasp the inner tripot housing and pull the tripot outward to ensure that the wheel drive shaft is properly engaged. The wheel drive shaft will remain in place if properly installed.
Install the lower ball joint in the steering knuckle. Refer to Lower Control Arm Replacement.
Hand tighten the NEW wheel drive shaft nut (2) on the wheel drive shaft (1).
Important: Step 10 is for standard disc brakes only, proceed to step 116 if the vehicle has Brembo brakes.
Insert a drift or punch (5) in the brake rotor cooling fins (4) and against the brake caliper mounting bracket (1).
Have an assistant apply the brakes.
Important: DO NOT air tools to tighten the wheel drive shaft nut. Use a torque wrench only.
Using a torque wrench and the appropriate size socket (3), tighten the wheel drive shaft nut (2).
Notice: Refer to Fastener Notice in the Preface section.
Tighten the wheel drive nut (2).
Tighten
Tighten the wheel drive shaft nut (2) to 210 N�m (155 lb ft).
Install the tire and wheel assembly. Refer to Tire and Wheel Removal and Installation.
Remove the support and lower the vehicle.
Inspect the fluid level of the transaxle. Refer to Transmission Fluid Check.
--------------------------------------------------------------------------
Important: Steps 3, 4 and 5 is for standard disc brake only. For vehicles equipped with the Brembo brakes, proceed to step 6.
Insert a punch or drift (1) in the cooling fins of the brake rotor (2).
Position the punch or drift (1) against the brake caliper mounting bracket (5).
Using a breaker bar and the appropriate size socket (4), loosen the wheel drive shaft nut (3).
Have an assistant apply the brakes.
Remove the wheel drive shaft nut (2) from the wheel drive shaft (1) and discard. DO NOT re-use the wheel drive shaft nut. Use NEW nut only.
Using the J 28733-B (2), separate the wheel drive shaft from the steering knuckle (1).
Remove the lower ball joint from the steering knuckle. Refer to Lower Control Arm Replacement.
Important: The transmission stub staff may still could be attached to the right wheel drive shaft and be removed at the same time as the wheel drive shaft. If this occurs, refer to Stub Shaft Removal
Using the J-2619-A and the J 45341 , remove the wheel drive shaft.
If the wheel drive shaft seal is found to be defective, replace the seal. Refer to Front Wheel Drive Shaft Seal and Output Shaft Sleeve Replacement - Right Side.
Installation Procedure
For the left wheel drive shaft, position the J 44394 in the transaxle.
Install the wheel drive shaft until the wheel drive shaft splines are past the axle seal.
Remove the J 44394 from the wheel drive shaft.
Important: The following service procedure is for those vehicles equipped with an intermediate shaft.
For the right wheel drive shaft, apply a very small amount of grease, GM P/N 1051344 (Canadian P/N 993037), or equivalent to the splines of the wheel drive shaft inner joint.
Install the wheel drive shaft into the intermediate drive shaft (1).
Install the wheel drive shaft until it is fully seated in the transaxle.
Important: In the following step, DO NOT pull on the wheel drive shaft. Pull only on the tripod.
With the wheel drive shaft installed, grasp the inner tripot housing and pull the tripot outward to ensure that the wheel drive shaft is properly engaged. The wheel drive shaft will remain in place if properly installed.
Install the lower ball joint in the steering knuckle. Refer to Lower Control Arm Replacement.
Hand tighten the NEW wheel drive shaft nut (2) on the wheel drive shaft (1).
Important: Step 10 is for standard disc brakes only, proceed to step 116 if the vehicle has Brembo brakes.
Insert a drift or punch (5) in the brake rotor cooling fins (4) and against the brake caliper mounting bracket (1).
Have an assistant apply the brakes.
Important: DO NOT air tools to tighten the wheel drive shaft nut. Use a torque wrench only.
Using a torque wrench and the appropriate size socket (3), tighten the wheel drive shaft nut (2).
Notice: Refer to Fastener Notice in the Preface section.
Tighten the wheel drive nut (2).
Tighten
Tighten the wheel drive shaft nut (2) to 210 N�m (155 lb ft).
Install the tire and wheel assembly. Refer to Tire and Wheel Removal and Installation.
Remove the support and lower the vehicle.
Inspect the fluid level of the transaxle. Refer to Transmission Fluid Check.

Thread
Thread Starter
Forum
Replies
Last Post

