Official TSB and Recall Thread
 09-09-2009, 08:09 AM
#101
Founding Member
Thread Starter

Join Date: 11-23-2007
Location: Texas
Posts: 8,210
09014
Bulletin No.:09014
Date:September 2009
Special Coverage
SPECIAL COVERAGE
SUBJECT: SPECIAL COVERAGE ADJUSTMENT � ENGINE CONTROL MODULE -
EMISSION RELATED REPROGRAMMING
MODELS: 2006 CHEVROLET COBALT, HHR
2006 PONTIAC PURSUIT (CANADA ONLY)
2006 SATURN ION
WITH 2.2L (L61) ENGINE
CONDITION
Engine control modules on certain 2006 model year Chevrolet Cobalt, HHR; Pontiac Pursuit; and Saturn ION vehicles, equipped with a 2.2L engine (RPO L61), may randomly fail to respond to single information requests made by an On-Board Diagnostic (OBD) emission test device, generic scan tool, or other aftermarket devices that plug into the vehicle's Data Link Connector (DLC).
GM Tech 2� scan tools are not affected by this condition. It is possible that the lack of a single ECM response to an emission test tool could result in
missing or inaccurate OBD emission test data (for example no or partial electronic VIN display) resulting in a customer's vehicle failing or being rejected from a state/province mandated OBD emission test (Inspection and Maintenance (I/M) Test or Smog Check).
SPECIAL COVERAGE ADJUSTMENT
This special coverage covers ECM reprogramming for the condition described above for a period of 15 years or 150,000 miles (240,000 km), whichever occurs first, from the date the vehicle was originally placed in service, regardless of ownership. ECM reprogramming will be performed at no
charge to the customer. This special coverage does not apply to vehicles that have previously been reprogrammed with the updated software (November 15, 2006, or later) or for repairs that are not related to this
condition. Repairs to address issues such as malfunction indicator light (MIL) illumination, stored diagnostic trouble codes, unset readiness monitors, component/circuit repair or replacement, etc., do not apply to this special coverage. For vehicles covered by Vehicle Service Contracts, all eligible claims with repair orders on or after September 8, 2009, are covered by this special coverage and must be submitted using the labor operation codes provided with this bulletin. Claims with repair orders prior to September 8, 2009, must be submitted to the Service Contract provider.
VEHICLES INVOLVED
Involved are certain 2006 model year Chevrolet Cobalt, HHR; Pontiac Pursuit; and Saturn ION vehicles, equipped with a 2.2L (RPO L61) 4-cylinder engine and built within the following VIN breakpoints:
YEAR DIVISION MODEL FROM THROUGH
2006 Chevrolet Cobalt 67600003 67887446
2006 Chevrolet HHR 6S500043 6S679770
2006 Pontiac Pursuit 67600110 67887269
2006 Saturn ION 6Z100015 6Z211250
Important: Dealer/retailers using the Global Warranty Management (GWM) system are to confirm vehicle eligibility prior to beginning repairs by using the "Investigate Vehicle History" link on the GWM application within Global Connect. Special coverages are displayed in the Applicable Warranties section.
PARTS INFORMATION
No parts are required for this special coverage.
SERVICE PROCEDURE
1. Determine if the ECM has been programmed on or after 11/15/06 using GMVIS.
� If the ECM was reprogrammed on or after 11/15/06, programming of the ECM is NOT required. The ECM has been programmed with the most recent OBD information and does not have the condition described in this special coverage. Diagnose and repair vehicle based on standard warranty coverage policies, if applicable.
� If the ECM was not programmed on or after 11/15/06, programming of the ECM is required.
 09-30-2009, 02:09 PM
#102
Founding Member
Thread Starter
Join Date: 11-23-2007
Location: Texas
Posts: 8,210
09-08-49-016
#09-08-49-016: Accelerator Pedal is Out of Place or Has Unusual Movement (Replace IP Module Plate) - (Sep 22, 2009)
Subject: Accelerator Pedal is Out of Place or Has Unusual Movement (Replace IP Module Plate)
Models: 2009 Chevrolet HHR
Equipped with Automatic Transmission (RPO MN5)
Built Prior to VIN Breakpoint 9S639466
--------------------------------------------------------------------------------
Condition
Note: This condition does not affect the function of the accelerator pedal.
Some customers may experience an accelerator pedal that is out of place or has unusual movement when depressing the pedal. Upon further diagnosis, the technician may find broken or loose mounting studs for the pedal.
Correction
Replace the Instrument Panel (IP) module plate following the procedure listed below.
Recover the A/C refrigerant and drain the coolant.
Remove the console. Refer To Front Floor Console Extension Replacement Center.
Remove the IP center support bracket. Refer to Instrument Center Support Bracket Replacement.
Remove the passenger side air bag. Refer to Inflatable Restraint Instrument Panel Module Replacement.
Remove the IP center compartment. Refer to Instrument Panel Center Compartment Replacement.
Remove the instrument cluster. Refer to Instrument Cluster Replacement.
Remove the upper trim pad. Refer to Instrument Panel Upper trim Pad Replacement.
Remove the radio and HVAC controller.
Remove the steering column. Refer to Steering Column Replacement.
Remove the lower IP.
Without disconnecting the brake pipes from the master cylinder, reposition the master cylinder assembly to allow for the removal of the vacuum brake booster.
Remove the four nuts and the booster.
Remove the pushrod retaining clip. Loosen the brake booster mounting nuts to aid in releasing the pushrod from the brake pedal.
Remove the A/C lines from the evaporator and the heater hoses from the heater core.
Remove the barrier pad.
Disconnect the accelerator pedal position (APP) sensor electrical connector. Remove the three nuts and APP sensor from the vehicle.
Remove the bolts from the module plate and the six bolts from the tie bar. Remove the module plate, tie bar and the A/C module as a one assembly.
Install the new module plate, P/N 20842465.
Install the module plate barrier pad and barrier pad.
Install the A/C module and tie bar and tighten the bolts.
Tighten
Tighten the bolts to 25 N�m (18 lb ft).
Install the accelerator pedal assembly and the electrical connector. Install the nuts and tighten.
Tighten
Tighten the nuts to 10 N�m (89 lb in).
Install the A/C lines to the evaporator and the heater hoses to the heater core.
Apply a bead of RTV around the master cylinder gasket and install the master cylinder. Tighten the bolts.
Tighten
Tighten the bolts to 22 N�m (16 lb ft).
Install the buster rod to the brake pedal and install the retainer.
Install the lower IP.
Install the steering column. Refer to Steering Column Replacement in SI.
Install the radio and HVAC controller.
Install the upper trim pad. Refer to Instrument Panel Upper Trim Panel Replacement.
Install the instrument cluster. Refer to Instrument Cluster Replacement.
Install the IP center compartment. Refer to Instrument Panel Center Compartment Replacement.
Install the passenger side air bag. Refer to Inflatable Restraint Instrument Panel Module Replacement.
Install the IP center support bracket. Refer To Instrument Center Support Bracket Replacement.
Install the console. Refer to Front Floor Console Extension Replacement Center.
Recharge the A/C refrigerant and refill the coolant.
Parts Information
Part Number Description
20842465 PLATE ASM-DA PNL REINF
09-30-2009, 02:12 PM
#103
Founding Member
Thread Starter
Join Date: 11-23-2007
Location: Texas
Posts: 8,210
Pic5248
#PIC5248: Intermittent Backlighting Flare Or Flicker After BCM Replacement - (Sep 24, 2009)
Subject: Intermittent backlighting flare or flicker after BCM replacement
Models: 2006 Chevrolet HHR
--------------------------------------------------------------------------------
The following diagnosis might be helpful if the vehicle exhibits the symptom(s) described in this PI.
Condition/Concern:
Some customers may observe an intermittent condition where all backlighting (IPC, Radio, HVAC, etc) may flash or flicker. This condition usually occurs after replacement of the Body Control Module (BCM)
Recommendation/Instructions:
DO NOT REPLACE any hardware for this condition.
Engineering has identified a software condition in service BCM (P/N 15910666) that could cause this concern.
Technicians will need to contact the Techline Customer Support Center (TCSC) to obtain a VCI number for this condition.
09-30-2009, 02:13 PM
#104
Founding Member
Thread Starter
Join Date: 11-23-2007
Location: Texas
Posts: 8,210
Pic4677E
#PIC4677E: No Start No Crank Intermittently / No Communication Over High Speed LAN - (Sep 08, 2010)
Subject: No Start No Crank Intermittently/No communication over High Speed LAN
Models: 2005-2011 Chevrolet Cobalt
2006-2011 Chevrolet HHR
2004-2011 Chevrolet Malibu
2008 Chevrolet Malibu Classic
2008-2009 Pontiac G5
2005-2010 Pontiac G6
2006-2007 Pontiac Pursuit (Canada)
2006-2009 Pontiac Solstice
2007-2009 Saturn Aura
2007-2009 Saturn Sky
With OnStar (UE1)
--------------------------------------------------------------------------------
This PI was superseded to update models and add codes to list. Please discard PIC4677C.
--------------------------------------------------------------------------------
The following diagnosis might be helpful if the vehicle exhibits the symptom(s) described in this PI.
Condition/Concern:
A customer may have a complaint of an intermittent no start, no crank condition, and or SES light on with I/P gauges intermittently inoperative while driving. Any of the following DTCs may be accompanied with this complaint. U0121, U0101, U1040, U2100, U2106, U2107, U2108, P0700, P2544, U0073
Recommendation/Instructions:
Before beginning to deep dive into any diagnostics on vehicles equipped with OnStar first check the VCIM connector C3 (Black) to be sure that it has been fully seated. This connector has been increasingly showing up as the root cause for loss of HIGH speed LAN concerns. Verify that the harness is not pulled too tight where the connector could be pulled once installed.
Per engineering request, if the reseating of this connector corrects the concern, please submit a field product report referencing this PI number.
Last edited by ChevyMgr; 09-14-2010 at 08:30 AM.
09-30-2009, 02:16 PM
#105
Founding Member
Thread Starter
Join Date: 11-23-2007
Location: Texas
Posts: 8,210
Pic5152e
#PIC5152E: Brake Grind / Growl Noise - (Sep 24, 2009)
Subject: Brake Grind/Growl Noise
Models: 2009-2010 Chevrolet HHR
2009 Chevrolet Malibu
2009 Pontiac G6
2009 Saturn Aura
--------------------------------------------------------------------------------
The following diagnosis might be helpful if the vehicle exhibits the symptom(s) described in this PI.
Condition/Concern:
A customer might comment about excessive brake grind/growl noise coming from the front brakes after multiple brake applications during city stop and go type driving. This is a low mileage condition that is not related to rotor corrosion and the noise is not present on initial braking.
Recommendation/Instructions:
If this noise issue exists on a vehicles built between the VIN break points below, replace the brake pads with the updated P/N 20881786.
Use labor operation H0042 for the brake pad replacement.
Important: DO NOT refinish the Rotors for this issue. Claims refinishing rotors for this issue are subject to debit.
2009-2010 Chevrolet HHR Built prior to August 15, 2009
2009 Chevrolet Malibu 1G1ZG57B094162152 - Through end of 2009 Model Year Production (Orion Assembly Built)
2009 Chevrolet Malibu 1G1ZF57509F156269 - Through end of 2009 Model Year Production (Fairfax Assembly Built)
2009 Pontiac G6 1G2ZG57B094162101 - Through end of 2009 Model Year Production
2009 Saturn Aura 1G8ZR57519F156340 - Through end of 2009 Model Year Production
Additional Notes: These pads should only be installed on vehicles when excessive grind/growl noise has been experienced and only for vehicles between the VIN break points above.
Important: With the exception of the Chevrolet HHR all 2010 Model Year vehicles already have this updated brake pads.
09-30-2009, 02:18 PM
#106
Founding Member
Thread Starter
Join Date: 11-23-2007
Location: Texas
Posts: 8,210
Pip4469G
#PIP4469G: Intermittent DTC P0011 P0014 P0016 P0017 Or Hesitation / Stall - (Nov 3, 2009)
Subject: Intermittent DTC P0011, P0014, P0016, P0017 or Hesitation/Stall
Models: 2009-2010 Chevrolet Cobalt
With RPO LAP 2.2L, LNF 2.0L
2009-2010 Chevrolet HHR
With RPO LNF 2.0L, LE8 2.2L, LE9 2.4L
2009-2010 Pontiac G5
With RPO LAP 2.2L
2009-2010 Chevrolet Malibu
2009-2010 Pontiac G6
2009 Pontiac Solstice
2009 Saturn Sky
2009 Saturn Aura
2009 Saturn Vue
With RPO LE5 2.4L
2009 Saturn AURA Hybrid
2009 Saturn VUE Hybrid
2009-2010 Chevrolet Malibu Hybrid
With RPO LAT 2.4L
2010 Buick LaCrosse
2010 Chevrolet Equinox
2010 GMC Terrain
With RPO LAF 2.4L SIDI
For engines built prior to the following breakpoints:
Block Machining debris breakpoint is August 20th for all engines built in Springhill Tn. (Plant code T)
Head Casting sand breakpoint is September 2nd for all Ecotec Plants.
ADD APPROXIMATLEY 2 WEEKS FOR VEHICLE MANUFACTURING
--------------------------------------------------------------------------------
The following diagnosis might be helpful if the vehicle exhibits the symptom(s) described in this PI.
Condition/Concern:
In rare instances a technician may comment that they find DTC's for cam phaser operation and/or have noticed a hesitation/stumble or, even more rarely, a low RPM (idle) stall (typically on a PDI or with very low mileage). They have followed eSI diagnostics and they find one or more of the DTCs listed below.
P0011-Intake Camshaft Position (CMP) System Performance
P0014-Exhaust Camshaft Position (CMP) System Performance
P0016-Crankshaft Position - Intake Camshaft Position Not Plausible
P0017-Crankshaft Position - Exhaust Camshaft Position Not Plausible
Recommendation/Instructions:
Note: Please document on the repair order the type of debris found (i.e. sand or aluminum). When debris is found change the oil and filter before returning to service, in some instances it may be necessary to change the oil and filter multiple times. The filter can be inspected afterwards to ensure no additional debris is present.
Engineering has determined that casting sand and or non-ferrous (aluminum) machining debris in the camshaft phasers/solenoid valves can cause a hesitation/stumble and or these DTCs to set intermittently. This concern typically will occur very early in the vehicle's life or at PDI. When the technician has followed the eSI diagnostic chart for these codes they may be led to ECM replacement; however additional diagnostics should be made before replacement of any parts. When the inspection of the CMP solenoids/actuators and wiring confirms correct electrical operation, check for debris. The recommendations listed below should help.
ENGINEERING HAS REQUESTED WE COLLECT ADDITIONAL INFORMATION. PLEASE FOLLOW THE STEPS LISTED BELOW FOR YOUR APPROPRIATE ENGINE.
FOR RPO LAF 2.4L SIDI ENGINES ONLY (EQUINOX / TERRAIN / LACROSSE) BUILT AFTER 90902 (2009/SEPTEMBER 2ND)
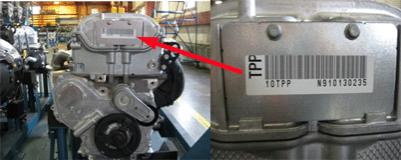
To determine the build date of the engine, look on the sticker/tag on the accessory belt end of the cam cover. Look for the numbers on the right hand side starting with the letter N. The first 5 digits after the N will determine the build date.
• The first digit is the year 9 =2009
• The second and third digits are the month 09 = September
• The fourth and fifth digits are the day of the month 02 = the second
Note: If the engine was built on or after October 2nd 2009 (90902), record the information below on the Repair Order.
• Engine build date-
• Cylinder head casting date and number of wedges found-
• Cylinder head machining date-
• Cylinder head paint mark present-
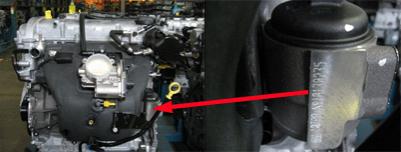
To determine the build date of the engine look on the sticker/tag on the accessory belt end of the cam cover. Look for the numbers on the right hand side starting with the letter N. The first 5 digits after the N will determine the build date. This number is also etched into a pad on the oil filter housing.
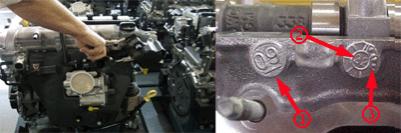
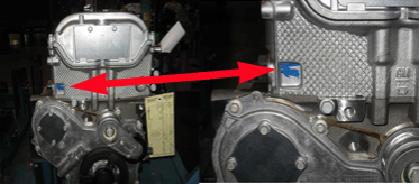
To locate the cylinder head casting date remove the air duct and engine beauty cover. Just below the cam cover and just to the left of the high pressure fuel pump are two bosses with numbers on them. The number on the left boss is the year (09) (See call out #1) and the number on the right boss is the production week (See call out #2). The number on the right boss is inside a circle with 7 wedges around it, if possible count the number of wedges (See call out #3) that have bumps in them. This corresponds to the day of the week.
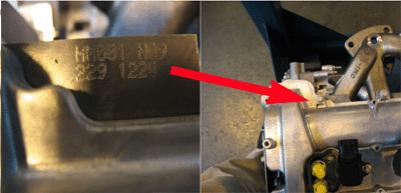
To locate the cylinder head machining date look at the front of the engine (accessory belt end). Located on a horizontal machined surface on the rear of the head (toward the cowl) are two lines of letters and numbers etched into the cylinder head. Record the 2nd line (all number with 7 digits total) closest to the cam cover.
Inspect for a process paint mark on the cylinder head: The paint mark will be on the front (accessory belt end) vertical face of the cylinder head in a small rectangular depression in the head casting just above the engine block on the left side. Note on the RO if there is any type of paint mark in this depression or if it's bare aluminum.
Remove both CMP solenoids and wrap the lower end of these solenoids with tape so that it will capture debris that is on them for shipment. Wrap tape completely around them so that the tape is sticking to itself. Then put the CMP solenoids in a plastic bag for shipping. Also place a copy of the Repair Order with the information from above: engine build date, head casting date, head machining date and if the there is a paint mark on the identified area.
Return the parts and information to this address:
General Motors - Spring Hill Manufacturing
Proceed with cleaning out debris in the cylinder head solenoid area, install new CMP solenoids, change the engine oil and filter. Drive the vehicle to determine if the DTC(s) reset. In some instances it may be necessary to change the oil/filter multiple times. The filter can be inspected afterwards to ensure no additional debris is present. If there is debris on the new CMP solenoids screens they can be cleaned and reused.
FOR RPO LAF 2.4L SIDI ENGINES BUILT BEFORE 90902 (2009/SEPTEMBER 2ND) AND ALL OTHER ENGINE RPO'S PERFORM THE FOLLOWING:
The technician should inspect each CMP solenoid valve and cam phaser actuator for debris. If debris is found on the solenoid valve screens inspect for torn screens then clean or replace as necessary.
When debris is found on the solenoid valve screens, thoroughly inspect the cam phaser actuators for debris and clean/replace as necessary. If the DTC continues to reset after thorough inspection and cleaning of the cam phaser actuators, replace the affected camshaft actuator(s) depending upon the DTC(s) that set.
Note: When debris is found change the oil and filter before returning to service, in some instances it may be necessary to change the oil/filter multiple times. The filter can be inspected afterwards to ensure no additional debris is present.
Subject: Intermittent DTC P0011, P0014, P0016, P0017 or Hesitation/Stall
Models: 2009-2010 Chevrolet Cobalt
With RPO LAP 2.2L, LNF 2.0L
2009-2010 Chevrolet HHR
With RPO LNF 2.0L, LE8 2.2L, LE9 2.4L
2009-2010 Pontiac G5
With RPO LAP 2.2L
2009-2010 Chevrolet Malibu
2009-2010 Pontiac G6
2009 Pontiac Solstice
2009 Saturn Sky
2009 Saturn Aura
2009 Saturn Vue
With RPO LE5 2.4L
2009 Saturn AURA Hybrid
2009 Saturn VUE Hybrid
2009-2010 Chevrolet Malibu Hybrid
With RPO LAT 2.4L
2010 Buick LaCrosse
2010 Chevrolet Equinox
2010 GMC Terrain
With RPO LAF 2.4L SIDI
For engines built prior to the following breakpoints:
Block Machining debris breakpoint is August 20th for all engines built in Springhill Tn. (Plant code T)
Head Casting sand breakpoint is September 2nd for all Ecotec Plants.
ADD APPROXIMATLEY 2 WEEKS FOR VEHICLE MANUFACTURING
--------------------------------------------------------------------------------
The following diagnosis might be helpful if the vehicle exhibits the symptom(s) described in this PI.
Condition/Concern:
In rare instances a technician may comment that they find DTC's for cam phaser operation and/or have noticed a hesitation/stumble or, even more rarely, a low RPM (idle) stall (typically on a PDI or with very low mileage). They have followed eSI diagnostics and they find one or more of the DTCs listed below.
P0011-Intake Camshaft Position (CMP) System Performance
P0014-Exhaust Camshaft Position (CMP) System Performance
P0016-Crankshaft Position - Intake Camshaft Position Not Plausible
P0017-Crankshaft Position - Exhaust Camshaft Position Not Plausible
Recommendation/Instructions:
Note: Please document on the repair order the type of debris found (i.e. sand or aluminum). When debris is found change the oil and filter before returning to service, in some instances it may be necessary to change the oil and filter multiple times. The filter can be inspected afterwards to ensure no additional debris is present.
Engineering has determined that casting sand and or non-ferrous (aluminum) machining debris in the camshaft phasers/solenoid valves can cause a hesitation/stumble and or these DTCs to set intermittently. This concern typically will occur very early in the vehicle's life or at PDI. When the technician has followed the eSI diagnostic chart for these codes they may be led to ECM replacement; however additional diagnostics should be made before replacement of any parts. When the inspection of the CMP solenoids/actuators and wiring confirms correct electrical operation, check for debris. The recommendations listed below should help.
ENGINEERING HAS REQUESTED WE COLLECT ADDITIONAL INFORMATION. PLEASE FOLLOW THE STEPS LISTED BELOW FOR YOUR APPROPRIATE ENGINE.
FOR RPO LAF 2.4L SIDI ENGINES ONLY (EQUINOX / TERRAIN / LACROSSE) BUILT AFTER 90902 (2009/SEPTEMBER 2ND)
To determine the build date of the engine, look on the sticker/tag on the accessory belt end of the cam cover. Look for the numbers on the right hand side starting with the letter N. The first 5 digits after the N will determine the build date.
• The first digit is the year 9 =2009
• The second and third digits are the month 09 = September
• The fourth and fifth digits are the day of the month 02 = the second
Note: If the engine was built on or after October 2nd 2009 (90902), record the information below on the Repair Order.
• Engine build date-
• Cylinder head casting date and number of wedges found-
• Cylinder head machining date-
• Cylinder head paint mark present-
To determine the build date of the engine look on the sticker/tag on the accessory belt end of the cam cover. Look for the numbers on the right hand side starting with the letter N. The first 5 digits after the N will determine the build date. This number is also etched into a pad on the oil filter housing.
To locate the cylinder head casting date remove the air duct and engine beauty cover. Just below the cam cover and just to the left of the high pressure fuel pump are two bosses with numbers on them. The number on the left boss is the year (09) (See call out #1) and the number on the right boss is the production week (See call out #2). The number on the right boss is inside a circle with 7 wedges around it, if possible count the number of wedges (See call out #3) that have bumps in them. This corresponds to the day of the week.
To locate the cylinder head machining date look at the front of the engine (accessory belt end). Located on a horizontal machined surface on the rear of the head (toward the cowl) are two lines of letters and numbers etched into the cylinder head. Record the 2nd line (all number with 7 digits total) closest to the cam cover.
Inspect for a process paint mark on the cylinder head: The paint mark will be on the front (accessory belt end) vertical face of the cylinder head in a small rectangular depression in the head casting just above the engine block on the left side. Note on the RO if there is any type of paint mark in this depression or if it's bare aluminum.
Remove both CMP solenoids and wrap the lower end of these solenoids with tape so that it will capture debris that is on them for shipment. Wrap tape completely around them so that the tape is sticking to itself. Then put the CMP solenoids in a plastic bag for shipping. Also place a copy of the Repair Order with the information from above: engine build date, head casting date, head machining date and if the there is a paint mark on the identified area.
Return the parts and information to this address:
General Motors - Spring Hill Manufacturing
Proceed with cleaning out debris in the cylinder head solenoid area, install new CMP solenoids, change the engine oil and filter. Drive the vehicle to determine if the DTC(s) reset. In some instances it may be necessary to change the oil/filter multiple times. The filter can be inspected afterwards to ensure no additional debris is present. If there is debris on the new CMP solenoids screens they can be cleaned and reused.
FOR RPO LAF 2.4L SIDI ENGINES BUILT BEFORE 90902 (2009/SEPTEMBER 2ND) AND ALL OTHER ENGINE RPO'S PERFORM THE FOLLOWING:
The technician should inspect each CMP solenoid valve and cam phaser actuator for debris. If debris is found on the solenoid valve screens inspect for torn screens then clean or replace as necessary.
When debris is found on the solenoid valve screens, thoroughly inspect the cam phaser actuators for debris and clean/replace as necessary. If the DTC continues to reset after thorough inspection and cleaning of the cam phaser actuators, replace the affected camshaft actuator(s) depending upon the DTC(s) that set.
Note: When debris is found change the oil and filter before returning to service, in some instances it may be necessary to change the oil/filter multiple times. The filter can be inspected afterwards to ensure no additional debris is present.
Last edited by ChevyMgr; 04-08-2010 at 11:24 AM.
10-07-2009, 03:30 PM
#107
Founding Member
Thread Starter
Join Date: 11-23-2007
Location: Texas
Posts: 8,210
Pip4720A
#PIP4720A: Intermittent Low Power After Stage 1 Turbo Upgrade 2008-2010 Chevrolet HHR SS - (Oct 6, 2009)
Subject: Intermittent Low Power After Stage 1 Turbo Upgrade 2008-10 Chevrolet HHR SS
2008-2010 Chevrolet Cobalt SS
2008-2010 Chevrolet HHR SS
Equipped with 2.0L turbocharged 4 cyl engine (RPO LNF) and Turbo Upgrade Kit installed
--------------------------------------------------------------------------------
The following diagnosis might be helpful if the vehicle exhibits the symptom(s) described in this PI.
Condition/Concern:
A technician or customer may comment of an intermittent low power concern, typically no DTC's are present. They may state it feels like they engage the Rev limiter and/or the vehicle will accelerate up to approximately 80-90 MPH before the concern occurs.
Recommendation/Instructions:
Note: This information does not apply to vehicles that have not had the turbo upgrade installed.
When installing the Stage-1 Turbocharger Upgrade for the HHR-SS both map sensors are swapped for Bosch TMAP sensors. The lower sensor located on the CAC (Charge Air Cooler) pipe, is hard to reach and can be difficult to install. When installing these new sensors the technicians must cut the existing wiring and crimp new wiring to a new connector. We have found that the front lower TMAP sensor (on the charge air pipe) wiring can rub/chaff against the A/C compressor or line causing this concern. This sensor is hard to reach and can be difficult to inspect the wiring for damage. It may help to follow eSI navigation: Engine / Engine Controls and Fuel - 2.0L / Repair Instructions / Intake Air Pressure and Temperature Sensor Replacement and Charge Air Cooler Outlet Pipe Replacement documents for instructions on how to access TMAP sensor and wiring for inspection when this concern is noted. Convoluted tubing (protective plastic sleeve) can be installed around the harness to prevent any future concerns. Please follow this diagnostic or repair process thoroughly and complete each step. If the condition exhibited is resolved without completing every step, the remaining steps do not need to be performed.
Last edited by ChevyMgr; 07-20-2010 at 03:32 PM.
10-07-2009, 03:35 PM
#108
Founding Member
Thread Starter
Join Date: 11-23-2007
Location: Texas
Posts: 8,210
Pip4718A
#PIP4718A: Oil Leak At Front Crankshaft Seal Area 2008-2009 Ecotec (RPOs - LAP LAT LE5 LE8 LE9 LNF) - (Mar 12, 2010)
Subject: Oil Leak at Front Crankshaft Seal Area 2008-09 Ecotec (RPO- LAP LAT LE5 LE8 LE9 LNF)
Models: 2008-2009 Chevrolet Cobalt SS
2008-2009 Chevrolet Cobalt
2008-2009 Chevrolet HHR
2008-2009 Chevrolet HHR SS
2008-2009 Chevrolet Malibu
2008-2009 Pontiac G5
2008-2009 Pontiac G6
2006-2009 Pontiac Pursuit (Canada Only)
2008-2009 Saturn Aura
2008-2009 Saturn Vue
Equipped with the following engines
2008-2009 2.0L (RPO LNF)
2009 2.2L (RPO LAP)
2009 2.2L (RPO LE8)
2008-2009 2.4L (RPO LE5/LE9/LAT)
--------------------------------------------------------------------------------
This PI was superseded to update the Recommendation/Instructions. Please discard PIP4718.
--------------------------------------------------------------------------------
The following diagnosis might be helpful if the vehicle exhibits the symptom(s) described in this PI.
Condition/Concern:
A technician may comment of an oil leak at the front timing cover/crank/pulley seal.
Recommendation/Instructions:
When the technician has determined the front crank seal is leaking replace the seal, harmonic balancer, bolt and drive belt.
Last edited by ChevyMgr; 03-15-2010 at 03:37 PM.
10-07-2009, 03:36 PM
#109
Founding Member
Thread Starter
Join Date: 11-23-2007
Location: Texas
Posts: 8,210
Pip4717
#PIP4717: Ecotec Misfire DTCs With No Concern Found - Inspect For Aftermarket Components - (Oct 1, 2009)
Subject: Ecotec Misfire DTC's With No Concern Found- Inspect for Aftermarket Components
Models: 2004-07 Saturn Ion Redline
2005-07 Chevrolet Cobalt SS
With 2.0L Supercharged Engine (RPO LSJ)
2008-2010 Chevrolet Cobalt SS
2008-2010 Chevrolet HHR
2007-2009 Pontiac Solstice GXP
2007-2009 Saturn Sky Redline
With 2.0L Turbocharged Engine (RPO LNF)
--------------------------------------------------------------------------------
The following diagnosis might be helpful if the vehicle exhibits the symptom(s) described in this PI.
Condition/Concern:
A technician may comment of MIL lamp on with DTC's of P0300, P0301, P0302 or P0304. They typically report they cannot determine a root cause. This concern (misfires) usually occurs with extended idling and may be reduced/eliminated by raising the RPM slightly or inducing an engine load (such as A/C).
Recommendation/Instructions:
Engineering has determined that aftermarket parts (such as a light weight aluminum flywheel or accessory belt drive pulleys) can contribute to this issue. Anytime any portion of the rotating assembly is changed to an aftermarket component, there is a potential for this concern. When diagnosing a misfire DTC and no concern can be found following eSI, the technician should inspect for aftermarket components installed. This concern (misfires) usually occurs with extended idling and may be reduced/eliminated by raising the RPM slightly or inducing an engine load (such as A/C).
10-07-2009, 03:38 PM
#110
Founding Member
Thread Starter
Join Date: 11-23-2007
Location: Texas
Posts: 8,210
Pip4716
#PIP4716: Sharp Engine Noise At Start Ecotec RPOs - LAF LAP LAT LNF LE5 LE8 LE9 - (Oct 1, 2009)
Subject: Sharp Engine Noise At Start Ecotec RPO's-LAF LAP LAT LNF LE5 LE8 LE9
Models: 2009 Chevrolet Cobalt
With RPO LAP 2.2L, LNF 2.0L
AND
2009 Chevrolet HHR
With RPO LNF 2.0L, LE8 2.2L, LE9 2.4L
AND
2009 Pontiac G5
With RPO LAP 2.2L
AND
2009 Chevrolet Malibu
2009 Pontiac G6
2009 Pontiac Solstice
2009 Saturn Sky
2009 Saturn Aura
2009 Saturn Vue
With RPO LE5 2.4L
AND
2009 Saturn AURA Hybrid
2009 Saturn VUE Hybrid
2009-2010 Chevrolet Malibu Hybrid
With RPO LAT 2.4L
AND
2010 Chevrolet Equinox
2010 GMC Terrain
With RPO LAF 2.4L SIDI
--------------------------------------------------------------------------------
The following diagnosis might be helpful if the vehicle exhibits the symptom(s) described in this PI.
Condition/Concern:
In rare instances a technician may comment they hear a short, sharp rattle noise from the front of the engine on start up.
Recommendation/Instructions:
If the noise is from the front accessory drive area, inspect the engine belt. We have seen concerns with engine belts causing a loud ticking type noise. If found, verify power steering pulley outer edge is aligned flush with shaft and repair as needed. If pulley alignment is correct replace the engine belt.
If the noise is still present and is very short and sharp in duration (2-5 seconds) This may be an issue with the cam phasers not parking properly. Once the noise is verified as the phasers, they must be replaced. If the cam phasers are replaced, remove the CMP actuator solenoids to inspect for debris. If debris is found clean and inspect for torn or loose screens and replace if necessary.
Note: If debris is found in the solenoids and phasers change the oil and filter before returning to service, in some instances it may be necessary to change the oil/filter multiple times with a test drive in between each. The filter and solenoids can be inspected afterwards to ensure no additional debris is present.