Aftermarket fog lights
 11-13-2006, 07:48 AM
#1
Senior Member
Thread Starter

Join Date: 07-17-2006
Location: Dallas, GA
Posts: 6,050
Aftermarket fog lights
Installing aftermarket fog lights on an HHR is extremely easy. The dummy plates are very thick and make an excellent mounting surface. I got information from this from a few individuals. So this is not new info by any means. Just trying to put it in one area to help others.
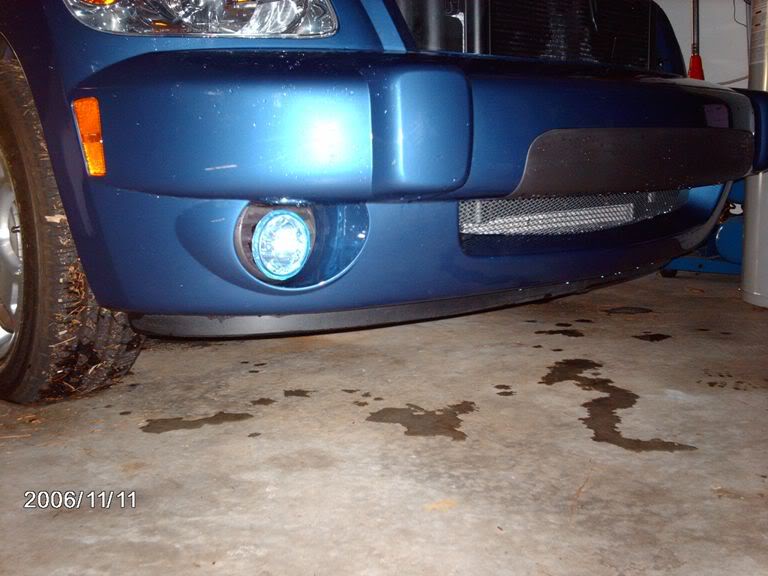
The first thing you need to do is decide on what lights you are going to run. The stock opening is about 5� at the widest point. But they are not round. The way the opening is, you basically are cutting off the top of the round 5� circle. I went with a 4� light. These are the Navigator Hyper Whites from WalMart. Standard 55 watt style lights with a blue tinted lenses for the HID effect. I chose these for a color match to the HHR.
To start, you need to open up the area behind the dummy plugs. I chose to turn the front wheels fully to the inside of the wheel well I was working with. This gave me a little more room to get hands inside the area. The manual states you need to remove three screws to gain access to the area (look up changing headlight bulb). Mine actually had one screw and two �tree� plugs. Once you get those out, you can easily see the back of the dummy plugs. They are snapped into place. Use one hand on the inside of the bumper cover and one on the outside of the dummy plug and you can get them free. Just takes a little patience.
Takes the lights out of the box. You will notice that the back of the lights are dished. Use a scrap piece of the box the lights came in and cut a hole approximately the size of the bowl are of the lights. This will be your template. You want to have the outer lip of the lights rest on the template. This will be part of the support base for the lights. Once you get the hole in the template the size you need, lay it on the dummy plug. Be sure to get it centered. Use a sharpie to draw out the hole size on the dummy plug. It�s better to be a little small, than too large (much easier to enlarge a hole in plastic than to shrink it LOL). Initially someone told me they used a dremel to cut the hole out. I did this with my first one. That was a PITA. I used a jig saw on the second, much easier and faster. Test fit you light. I made mine to where you had to use a little force to make it seat. I wanted the light to fit tight. Once I was happy with that, I used the bumper style brackets that came with the lights. I hooked the lights to the brackets and then folded the brackets to the dummy plug and tightened the brackets to the lights. This made them nice and snug to the dummy plug. Then you only have to snap the dummy plug back to the bumper cover. The lights are mounted.


Wiring. Some aftermarket lights come with a relay so that your lights will only come on with the headlights. If you bought lights that had this feature (mine didn�t), take the relay and practice you�re pitching. How far did it go? Some lights have a wiring package that is way more confusing than it needs to be. To hook up lights, you need power and ground. That is it.
First, ground the lights. Hook the ground side of the lights to a good solid ground. I used the upper radiator support for both sides. Initially, I put them behind the washer, but for some reason, I did not get a good ground with it. Once I placed it between the bolt head and washer, it was good to go.

Second, you need to run the power side of the lights to the dash. There is a nice spot on the driver�s side of the firewall to run the wires. You will need an old metal coat hanger (or similar item). Cut a 6� to 8� section that is straight. On one end, be sure to chisel it. On the driver�s side of the firewall behind the strut tower, you will see a black rubber plug with a white ring. It will already have a couple of wiring harness�s running through it. DO NOT SHOVE THE COAT HANGER THROUGH THE WIRING HARNESS. Pick a spot away from the stock wiring and tape the power wire from your lights to the coat hanger. Tape it good. Then take the coat hanger and shove it through the rubber plug. It will have to go in several inches. Then take a look under the dash above the brake pedal. If you do not see the coat hanger, shove some more. You are going through rubber and matting. It will take a little force. Once you get the hanger through, pull it all the way through. With luck you did not pull the wire off. This is why you needed to tape it on good LOL.

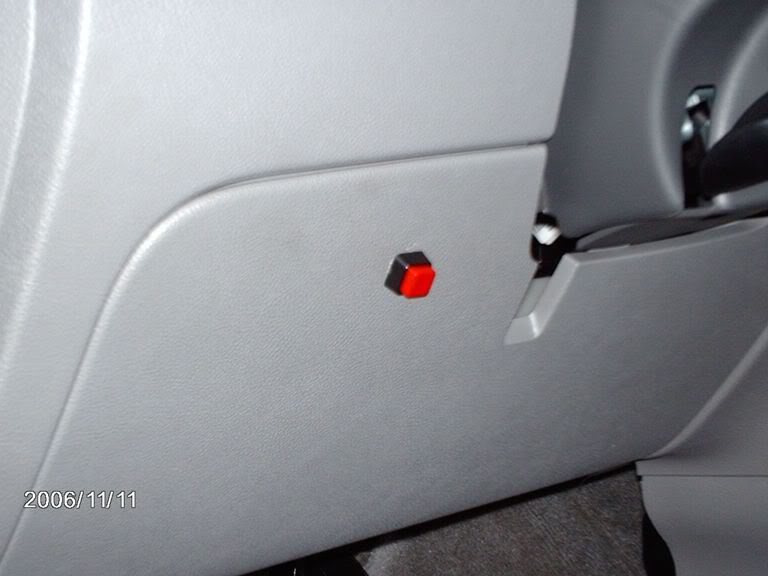
Now is a good time to decide where you are going to mount the switch. For this, I did not use the rocker switch that came with the lights. I made a trip to Radio Shack. There I picked up a push button type switch (none illuminated). Selection is slim. They only had one style that was not a momentary switch. Also while you are there, pick up a pack of the blade fuse style wiring adapters. You will need those also.
I went with the push button style switch for a couple of reasons. One, I wanted a switch that did not stick out too far or get hit by accident. Plus, this style only requires a hole to be drilled and then you can flush mount the switch. If you choose the same panel I did, be sure to pull it off and look behind it. There is another panel behind it so you will need to use a spot the switch will clear. Mount your switch and you are ready to move on. Since I had already ran the wiring through the firewall and mounted the switch, I went ahead and soldered the green wire from the lights to the switch. Now you�re ready for power��
The inside fuse panel is on the passenger side of the center console. It is not marked. Just pull off the bottom corner section where the console heads up towards the dash. You will be looking for open slot #21.

That is an ignition on circuit. Using this allows you to not worry if you turn the fog lights off. They will turn off when you get out of the car (same as radio). Take one of the fuse adapters you picked up. These are designed for the standard size blade fuses. SO take the �J� end that would normally wrap around the fuse and flatten the �J� together to make one thicker plug. Then solder your fused wire to the switch and the adapter. Then you can just plug this into the right side of #21 on the fuse panel. Test lights. Start (or turn ignition to run) and hit the switch if they lights did not turn on the with the ignition. If the switch was already on, they test to make sure the lights turn off/on as they should. Then with the lights on, turn off the ignition, and get out. Once you open the door, the lights should turn off light the radio does. This way, no worries about leaving them on. All you have left to do is hid your wiring.
The first thing you need to do is decide on what lights you are going to run. The stock opening is about 5� at the widest point. But they are not round. The way the opening is, you basically are cutting off the top of the round 5� circle. I went with a 4� light. These are the Navigator Hyper Whites from WalMart. Standard 55 watt style lights with a blue tinted lenses for the HID effect. I chose these for a color match to the HHR.
To start, you need to open up the area behind the dummy plugs. I chose to turn the front wheels fully to the inside of the wheel well I was working with. This gave me a little more room to get hands inside the area. The manual states you need to remove three screws to gain access to the area (look up changing headlight bulb). Mine actually had one screw and two �tree� plugs. Once you get those out, you can easily see the back of the dummy plugs. They are snapped into place. Use one hand on the inside of the bumper cover and one on the outside of the dummy plug and you can get them free. Just takes a little patience.
Takes the lights out of the box. You will notice that the back of the lights are dished. Use a scrap piece of the box the lights came in and cut a hole approximately the size of the bowl are of the lights. This will be your template. You want to have the outer lip of the lights rest on the template. This will be part of the support base for the lights. Once you get the hole in the template the size you need, lay it on the dummy plug. Be sure to get it centered. Use a sharpie to draw out the hole size on the dummy plug. It�s better to be a little small, than too large (much easier to enlarge a hole in plastic than to shrink it LOL). Initially someone told me they used a dremel to cut the hole out. I did this with my first one. That was a PITA. I used a jig saw on the second, much easier and faster. Test fit you light. I made mine to where you had to use a little force to make it seat. I wanted the light to fit tight. Once I was happy with that, I used the bumper style brackets that came with the lights. I hooked the lights to the brackets and then folded the brackets to the dummy plug and tightened the brackets to the lights. This made them nice and snug to the dummy plug. Then you only have to snap the dummy plug back to the bumper cover. The lights are mounted.
Wiring. Some aftermarket lights come with a relay so that your lights will only come on with the headlights. If you bought lights that had this feature (mine didn�t), take the relay and practice you�re pitching. How far did it go? Some lights have a wiring package that is way more confusing than it needs to be. To hook up lights, you need power and ground. That is it.
First, ground the lights. Hook the ground side of the lights to a good solid ground. I used the upper radiator support for both sides. Initially, I put them behind the washer, but for some reason, I did not get a good ground with it. Once I placed it between the bolt head and washer, it was good to go.
Second, you need to run the power side of the lights to the dash. There is a nice spot on the driver�s side of the firewall to run the wires. You will need an old metal coat hanger (or similar item). Cut a 6� to 8� section that is straight. On one end, be sure to chisel it. On the driver�s side of the firewall behind the strut tower, you will see a black rubber plug with a white ring. It will already have a couple of wiring harness�s running through it. DO NOT SHOVE THE COAT HANGER THROUGH THE WIRING HARNESS. Pick a spot away from the stock wiring and tape the power wire from your lights to the coat hanger. Tape it good. Then take the coat hanger and shove it through the rubber plug. It will have to go in several inches. Then take a look under the dash above the brake pedal. If you do not see the coat hanger, shove some more. You are going through rubber and matting. It will take a little force. Once you get the hanger through, pull it all the way through. With luck you did not pull the wire off. This is why you needed to tape it on good LOL.
Now is a good time to decide where you are going to mount the switch. For this, I did not use the rocker switch that came with the lights. I made a trip to Radio Shack. There I picked up a push button type switch (none illuminated). Selection is slim. They only had one style that was not a momentary switch. Also while you are there, pick up a pack of the blade fuse style wiring adapters. You will need those also.
I went with the push button style switch for a couple of reasons. One, I wanted a switch that did not stick out too far or get hit by accident. Plus, this style only requires a hole to be drilled and then you can flush mount the switch. If you choose the same panel I did, be sure to pull it off and look behind it. There is another panel behind it so you will need to use a spot the switch will clear. Mount your switch and you are ready to move on. Since I had already ran the wiring through the firewall and mounted the switch, I went ahead and soldered the green wire from the lights to the switch. Now you�re ready for power��
The inside fuse panel is on the passenger side of the center console. It is not marked. Just pull off the bottom corner section where the console heads up towards the dash. You will be looking for open slot #21.
That is an ignition on circuit. Using this allows you to not worry if you turn the fog lights off. They will turn off when you get out of the car (same as radio). Take one of the fuse adapters you picked up. These are designed for the standard size blade fuses. SO take the �J� end that would normally wrap around the fuse and flatten the �J� together to make one thicker plug. Then solder your fused wire to the switch and the adapter. Then you can just plug this into the right side of #21 on the fuse panel. Test lights. Start (or turn ignition to run) and hit the switch if they lights did not turn on the with the ignition. If the switch was already on, they test to make sure the lights turn off/on as they should. Then with the lights on, turn off the ignition, and get out. Once you open the door, the lights should turn off light the radio does. This way, no worries about leaving them on. All you have left to do is hid your wiring.


 04-16-2010, 02:17 PM
#4
Senior Member

Join Date: 08-03-2009
Location: D.C., Md., Va. area
Posts: 837
I have to disagree about the relay. A relay keeps the wires running through the firewall from having a high amperage running through them. Installing a relay within 18" of the battery ( or in our case, the power tap off the alternator, with a fuse, of course ) and keeping the load wires ( from relay to lights ) as short as possible will ensure maintaining full power going to the lights. With a relay, the dash switch acts as it should ( just a switch ), but without it, the switch has to carry the load of the lights as well. For any gauge of wire, as temperature and length increase, so does resistance.
04-16-2010, 05:35 PM
#5
Senior Member

Join Date: 08-29-2009
Location: Long Island, NY
Posts: 1,813
Good point! People don't realize the potential for problems till stuff starts burning out... Realays come with some of the light kits for a reason. Remember I=V over R (for those Grumman Era people out there)! !
!
Last edited by BlackknighT; 04-16-2010 at 05:36 PM. Reason: .
04-19-2010, 05:48 AM
#6
Senior Member
Thread Starter
Join Date: 07-17-2006
Location: Dallas, GA
Posts: 6,050
I have to disagree about the relay. A relay keeps the wires running through the firewall from having a high amperage running through them. Installing a relay within 18" of the battery ( or in our case, the power tap off the alternator, with a fuse, of course ) and keeping the load wires ( from relay to lights ) as short as possible will ensure maintaining full power going to the lights. With a relay, the dash switch acts as it should ( just a switch ), but without it, the switch has to carry the load of the lights as well. For any gauge of wire, as temperature and length increase, so does resistance.
The wiring harness that comes with "pre" wired lights is the bare minimum for current, and that is speaking kindly of them. I've never used a relay for lights, doubtful I ever would.
04-26-2010, 05:54 AM
#7
Senior Member
Join Date: 08-03-2009
Location: D.C., Md., Va. area
Posts: 837
You CAN run without a relay and probably never have a problem. A few more minutes in work can prevent headaches later. I like how the Germans do relays. The switch provides a ground for the relay, so there is no power to the switch or wire yourun through the firewall.
04-26-2010, 07:27 AM
#8
Senior Member
Thread Starter
Join Date: 07-17-2006
Location: Dallas, GA
Posts: 6,050
You CAN run without a relay and probably never have a problem. A few more minutes in work can prevent headaches later. I like how the Germans do relays. The switch provides a ground for the relay, so there is no power to the switch or wire yourun through the firewall.


Thread
Thread Starter
Forum
Replies
Last Post
Money in the Bank
Appearance/Modifications Discussions
25
05-21-2007 10:51 AM