Seat removal and carpet install
 02-16-2008, 07:33 PM
#1
Senior Member
Thread Starter

Join Date: 01-01-2008
Location: Windsor, Ca
Posts: 991
Seat removal and carpet install
well, this afternoon I decided to spend a half hour and start removing my rear seat so tomorrow I could take my car to the shop and install my new Ebony front and rear seat covers and ebony carpet.
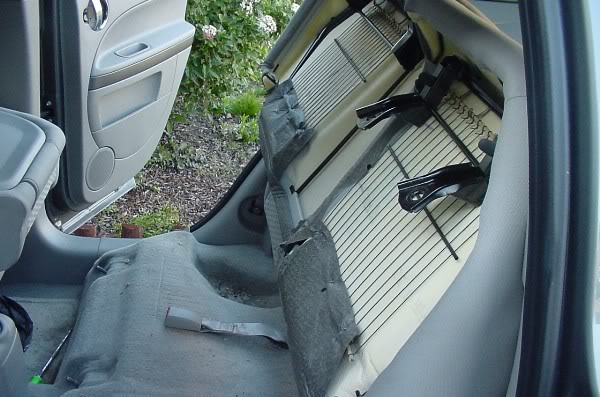
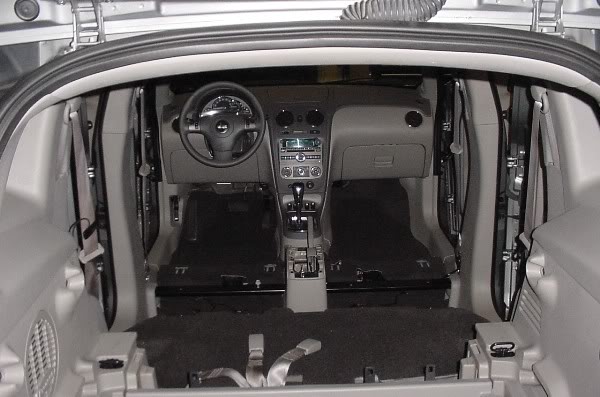
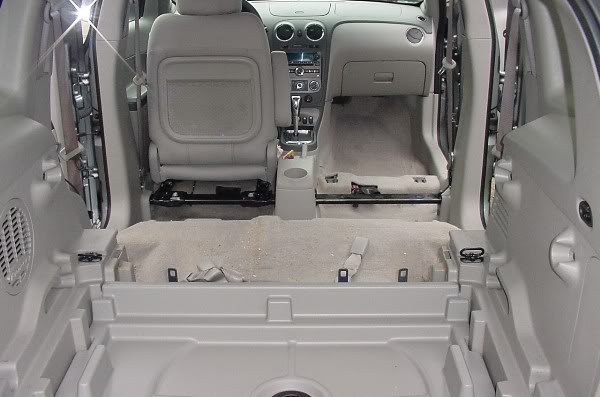
First step was to take a picture for my BEFORE;
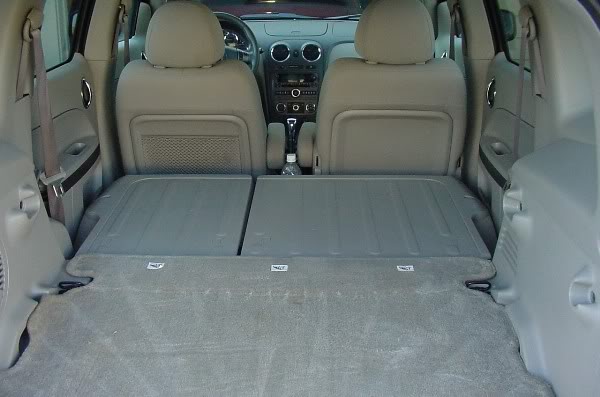

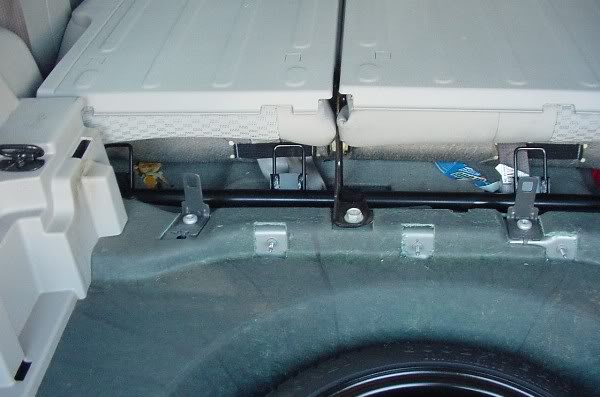
then I removed the rear shelf, and spare tire cover
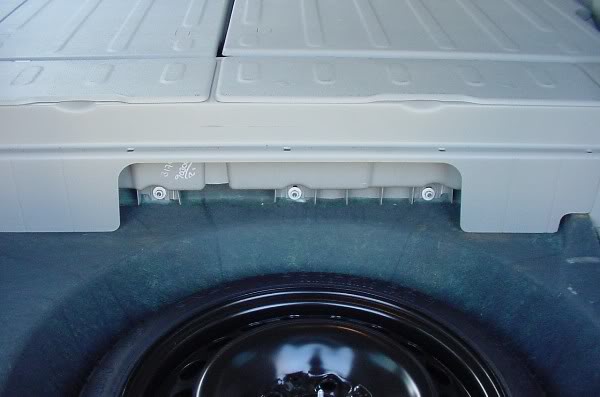
I then removed the 3 nuts that hold the rear storage compartments in, and lifted them out. Low and behold...TREASURE!
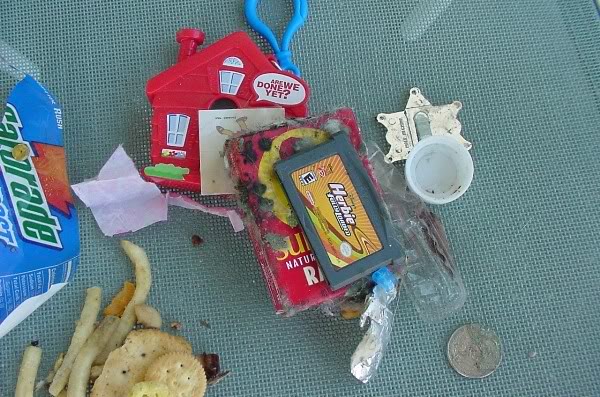
Yea, that's right...scumb and trash left behind from the previous owner that the dealer failed to clean out. Included were 4 french fries, a kids happy meal toy, some sequence, 1 old quarter, some wrappers, some mystery food and toys, and a mold-covered box of raisins. Oh joy. I am just glad I decided to replace my carpet...otherwise I might have had a smell that was impossible to find.
for your eye to feast upon...my treasure
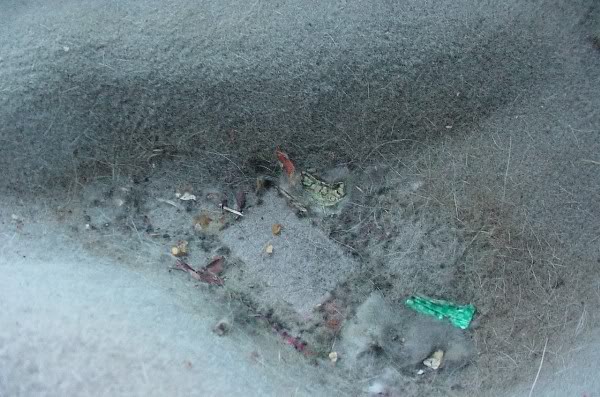
and the rear corner behind the passenger side seat cushion where the treasure rested. The science project is awesome, dont ya think?...oh lovely:
Ok...back to the tech.
Once the seat mounting nuts and bolts were visible, I removed them. 18mm deep socket and ratchet.
there is one you get in the center from behind the seat. I believe those are child seat anchors that protrude up through the rear storage compartment. Once it is out, you can see them better.
next, you have to remove the little covers from the front part of the rear seat cushion.
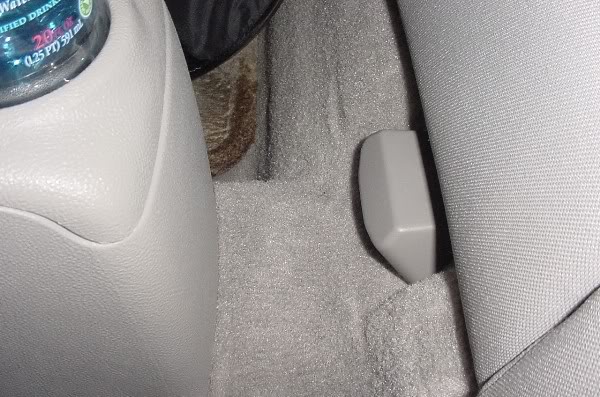
These pry off. best way is to use a large flat-blade screw driver, and get under the bottom lip, and pry upward.
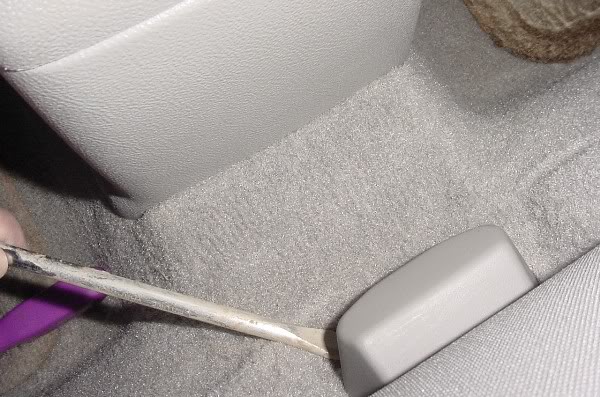
Once those are all off, you can get to the nuts below them:
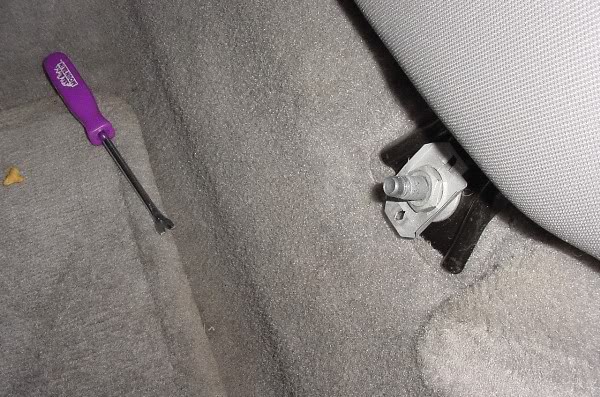
If you cant get your socket on the nuts, you can press down on the silver locking tab to reveal more of the nut. These locking tabs come off with the nut, so you can always re-position them when you re-install the little covers.
Once all of the nuts are off, pull the seat mount arms forward and lift the cushion up. it pivots towards the back rest.
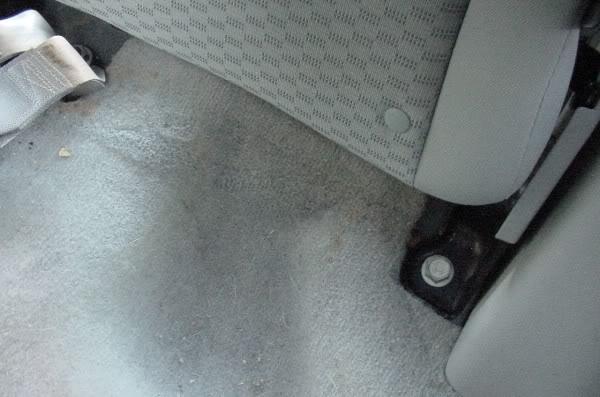
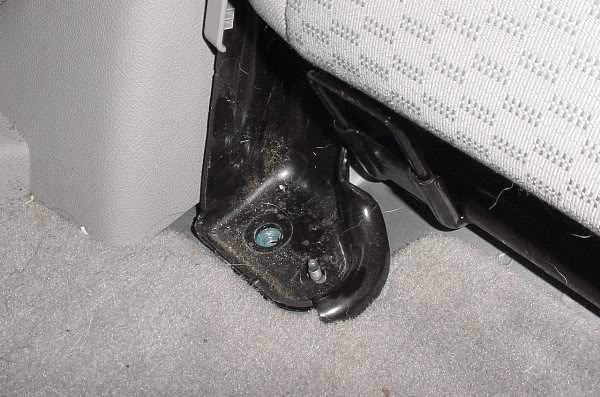
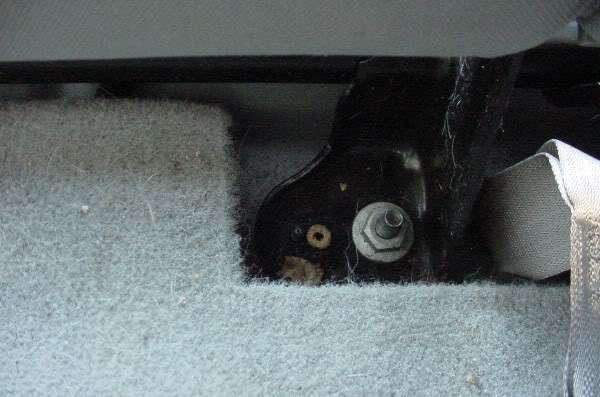
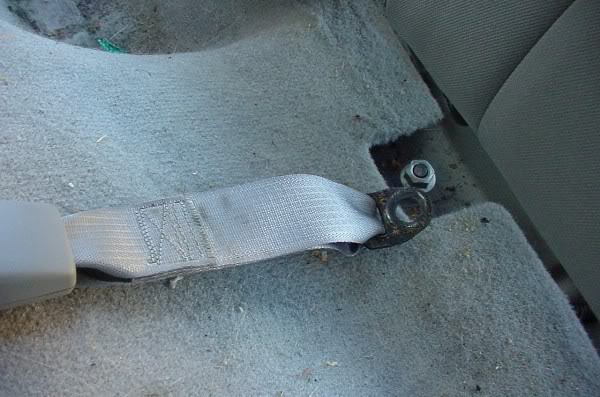
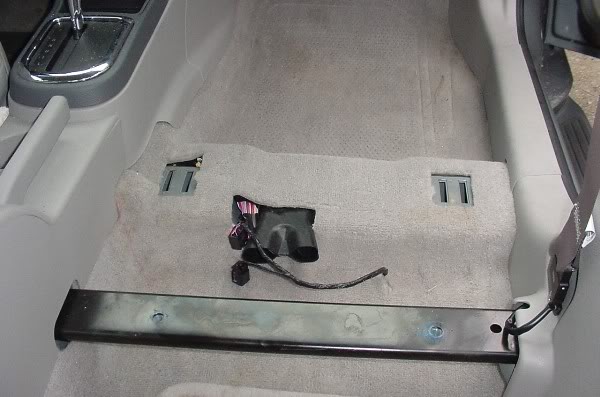
Now you can get the the 3 bolts that hold the seat frame in, and the one nut that holds the center seatbelt to the floor.
for the seat frame moutning, there is one bolt on each corner down by the bottom of the rear cushion, near the door opening and seat belt and one in the center:
your car may not have come with the optional cheerio.
this is the location of the nut that holds the center seat belt down as well. You have to remove this one because it also holds the shoulder harness part of the center seatbelt that passes through the seat.
That's it. Once all the nuts and bolts are off, you can remove the seat. it is akward because it pivots, and is hard to lift off the center stud.
Use your large screw driver to help pry it up off the stud.
I'll leave it at that for now. I will take it tomorrow to the shop, and take more pics for the front seats, console, and carpet.
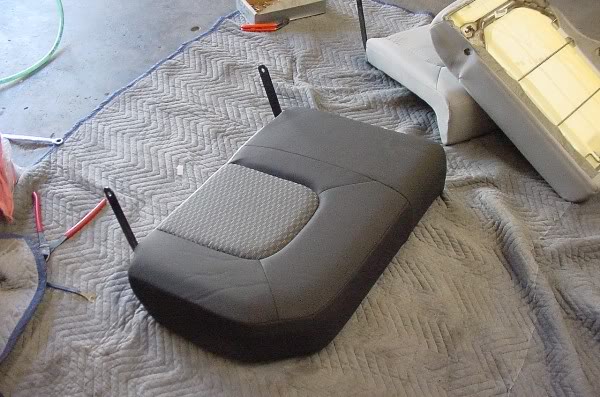
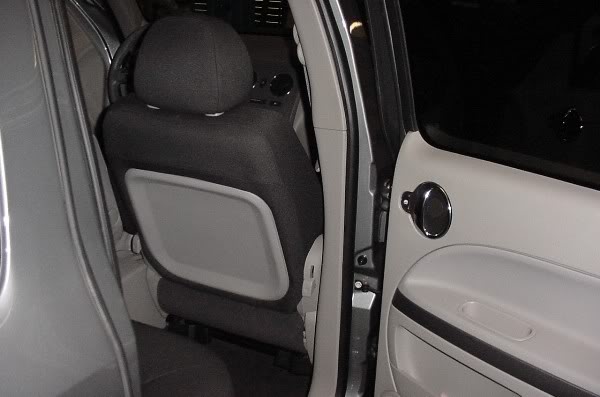
But for now, here's a shot for you.
My seat covers and carpet installed!
More tomorrow. If there's anything in particular you think I skipped, please let me know so I can cover it tomorrow.
First step was to take a picture for my BEFORE;
then I removed the rear shelf, and spare tire cover
I then removed the 3 nuts that hold the rear storage compartments in, and lifted them out. Low and behold...TREASURE!
Yea, that's right...scumb and trash left behind from the previous owner that the dealer failed to clean out. Included were 4 french fries, a kids happy meal toy, some sequence, 1 old quarter, some wrappers, some mystery food and toys, and a mold-covered box of raisins. Oh joy. I am just glad I decided to replace my carpet...otherwise I might have had a smell that was impossible to find.
for your eye to feast upon...my treasure
and the rear corner behind the passenger side seat cushion where the treasure rested. The science project is awesome, dont ya think?...oh lovely:
Ok...back to the tech.
Once the seat mounting nuts and bolts were visible, I removed them. 18mm deep socket and ratchet.
there is one you get in the center from behind the seat. I believe those are child seat anchors that protrude up through the rear storage compartment. Once it is out, you can see them better.
next, you have to remove the little covers from the front part of the rear seat cushion.
These pry off. best way is to use a large flat-blade screw driver, and get under the bottom lip, and pry upward.
Once those are all off, you can get to the nuts below them:
If you cant get your socket on the nuts, you can press down on the silver locking tab to reveal more of the nut. These locking tabs come off with the nut, so you can always re-position them when you re-install the little covers.
Once all of the nuts are off, pull the seat mount arms forward and lift the cushion up. it pivots towards the back rest.
Now you can get the the 3 bolts that hold the seat frame in, and the one nut that holds the center seatbelt to the floor.
for the seat frame moutning, there is one bolt on each corner down by the bottom of the rear cushion, near the door opening and seat belt and one in the center:
your car may not have come with the optional cheerio.
this is the location of the nut that holds the center seat belt down as well. You have to remove this one because it also holds the shoulder harness part of the center seatbelt that passes through the seat.
That's it. Once all the nuts and bolts are off, you can remove the seat. it is akward because it pivots, and is hard to lift off the center stud.
Use your large screw driver to help pry it up off the stud.
I'll leave it at that for now. I will take it tomorrow to the shop, and take more pics for the front seats, console, and carpet.
But for now, here's a shot for you.
My seat covers and carpet installed!
More tomorrow. If there's anything in particular you think I skipped, please let me know so I can cover it tomorrow.

 02-17-2008, 08:31 AM
#4
Senior Member
Thread Starter
Join Date: 01-01-2008
Location: Windsor, Ca
Posts: 991
itschaboykenny,
all yours. But I'm keeping the little badge.
Thanks for the replies folks...at least I know I might be helping someone else along the way.
I've done several HOW TO's with other cars, and I dedicated webpages to those projects...
all yours. But I'm keeping the little badge.
Thanks for the replies folks...at least I know I might be helping someone else along the way.
I've done several HOW TO's with other cars, and I dedicated webpages to those projects...
02-17-2008, 08:48 AM
#5
Senior Member

Join Date: 12-14-2007
Location: Toronto ON Canada
Posts: 2,964
Cool, do you do requests? I want to put on my 3rd brake light decal and add a 10" subwoofer in the stock location, but Im afraid of snapping my interior bits to pieces. Combination of sub-freezing temps and ham-fisted clumsyness==trashed interior. 
02-18-2008, 09:24 PM
#6
Senior Member
Thread Starter
Join Date: 01-01-2008
Location: Windsor, Ca
Posts: 991
Official HOW TO with pics
I wrote a fatastic HOW TO article, but this forum limits me to 15 images, and only 10,000 text characters...
so...piece by piece.
Ok...here's the official HOW TO:
First, you already saw how to remove the rear seats.
Here's how to remove the fronts:
PASSENGER SEAT REMOVAL
Slide the seat all the way forward.
there are two plastic covers that conceal the two seat bolts.
These just pull off by hand. Grab the front edge and pry back, to reveal the two seat rear seat bolts:
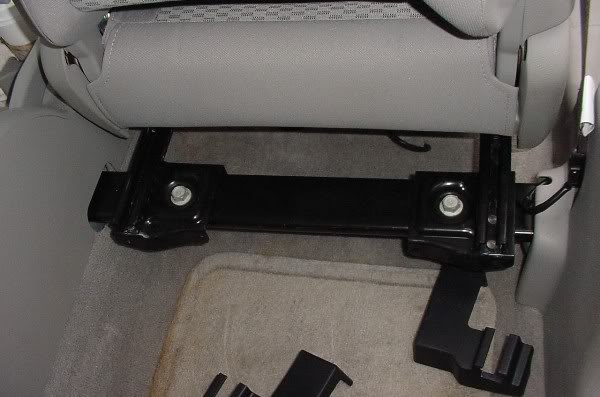
remove the two bolts from the seat tracks. They are 18mm. The front just slides in to 2-channels per side, so you can pivot the seat UP and reach the electrical connections. Un-plug these(2)
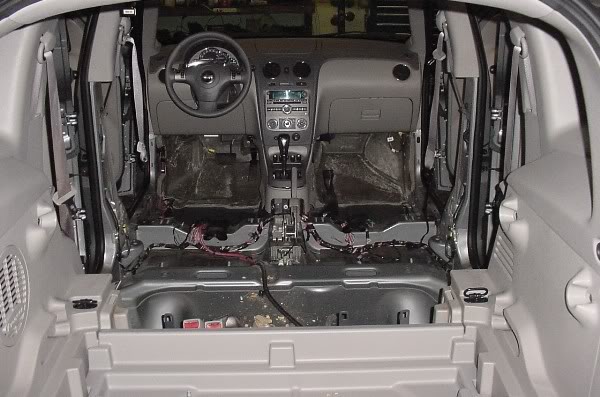
The cool part is, that's it. The front of the seat is attached in the two channel slots. Just slide it back and UP and the seat is free. I recommend you completely fold it flat to make it easier to get out of the door opening. What you have left is a large black support beam that the seat is bolted to.
The front seat comes out the same way.
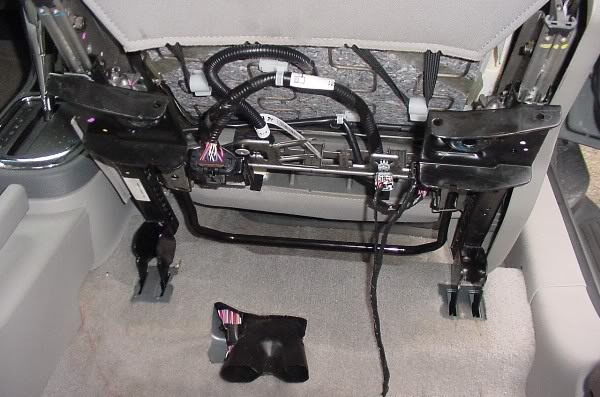
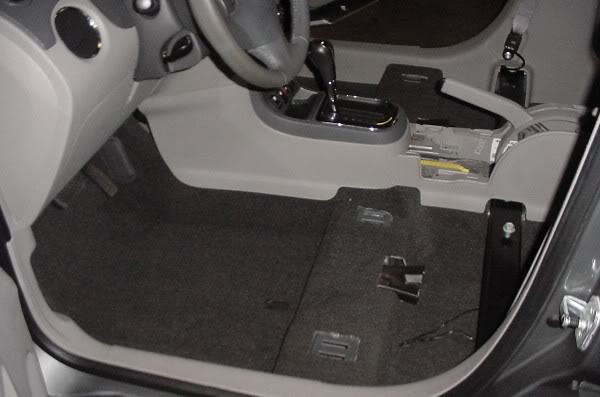
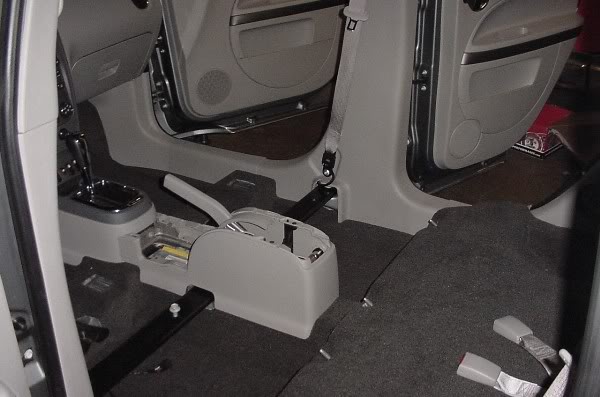
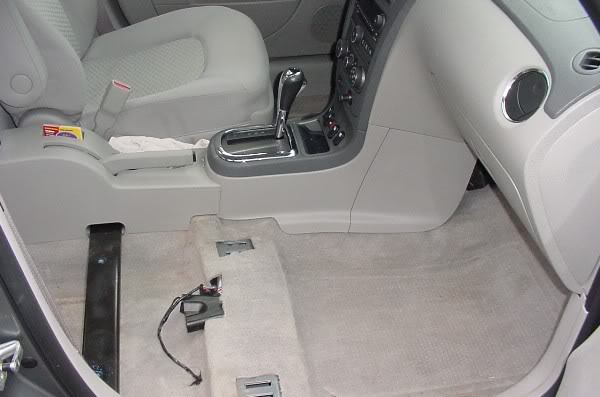
First, we'll talk about the carpet. You'll have to un-clip the top of the rear part of the console. Then slide it up and around the parking brake handle, with the parking brake handle UP. Now you have access to the console hold-down nuts and bolts. they are 10mm. There are two nuts that attach the front of the rear part of the console to the shifter housing, and two nuts that attach the rear part of the console to two verticle studs. Remove these. Un-plug the rear 12v power socket, and remove the rear part of the console.
next, you can remove the large black cross-brace that the seats attached to. there are large bolts on the outer end, and two large nuts under the center console area. Once these have been removed, you can remove the cross-brace from the car.
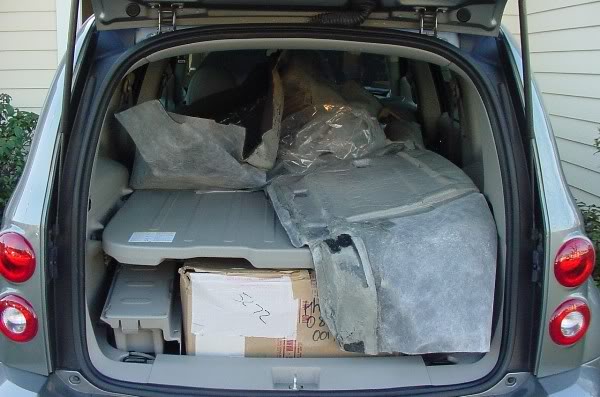
Next, remove the front kick panels, side sill panels, pillar trim panels(remove lower seat belt bolts-torx) and the rear sill plates. Now you need to lift the carpet and feed the front seat wiring through the hole to prevent snagging it. Remove the carpet by working it out from under the shifter housing part of the console, and roll it back towards the rear. I dragged it out the hatch.
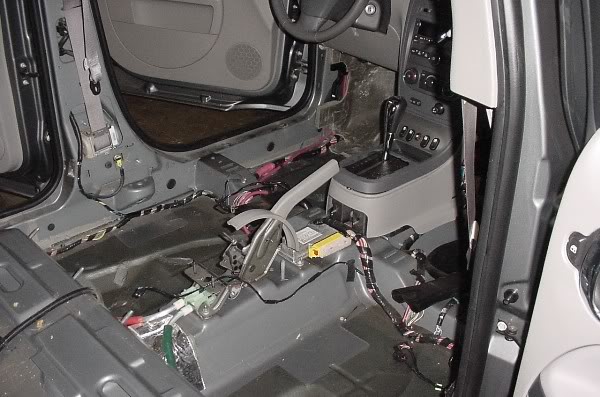
vaccuum any dirt/loose debris, and check all the factory wire looms to make sure they stayed in place.
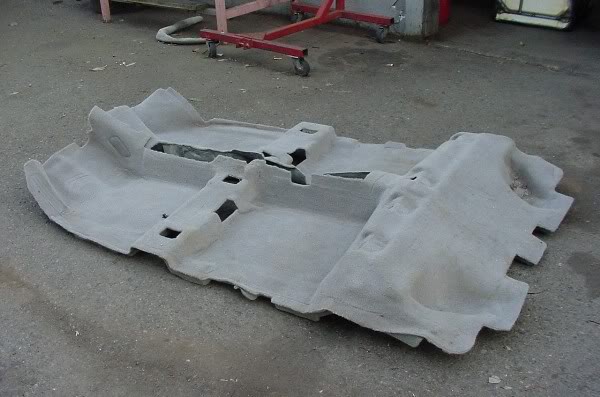
install the new carpet by following the reverse procedure. Take your time...make sure you remember to feed your front seat wiring through the access hole. Getting the new carpet under the rear trim panels can take some patience. If all else fails, you will have to completely remove the rear panels, which is alot more work. I actually removed the rear side seat belt lower torx bolts to make lifting the rear trim easier.
Once the carpet is in place, re-install all the trim pieces. be carefull to line up all the clips. especially the sill plates. Once you're satisfied, install the cross-brace, and the console, remembering to re-attach the 12v socket's wire connection.
that's it. Revel in your glory.
Now, on to the seats:
PASSENGER FRONT SEAT
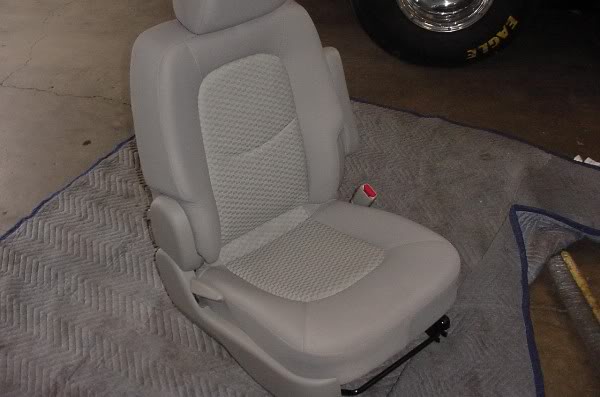
Set up a clean working environment. I HIGHLY recommend using a work bench, as handling these heavy seats on the floor is terrible for your back, knees, and it's easy to kneel on something and hurt yourself. I did not have a clean work bench available, so I took the full brunt of the abuse.
Have the following tools handy:
pincer pliers(like needle nose but with claw-like pincers at the end), panel/clip removal tool, side-cutters, 3/8 drive ratchet with deep metric sockets and 6" long extention, , a curved awl, a few pic tools, some misc flat-blade and philips screwdrivers, latex work gloves to keep your hands clean and protect the materials and a set of hog-ring pliers, and about 200 hog rings.
start by folding the seat down completely, and removing the headrest.
next, remove the button that covers the arm rest attaching bolt. Remove the arm rest.
next, remove the side trim, and seat belt buckle off the seat. The side trim is held on by clips, with a philips screw at the back of each piece:
You have to carefully remove each rear recline/forward knob. These can be tricky because they are held in by a tab that locks to the plastic as it slides on. Slide a thin screwdriver down the arm the knob is on to release the tab. If the tab breaks, it's ok...just use some RTV silicone to re-install. That way it isnt permanent, but strong enough to withstand use.
I did not remove the side corner trim completely, as it is felxible enough to allow access to the seat bracket bolts.
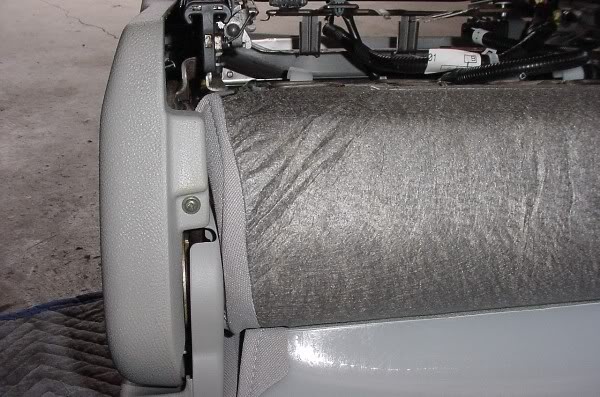
Next, remove the rear panel from the back of the backrest. It is held in with two push clips in the bottom corners. Use a panel clip removal tool to gently pry UP on the bottom corners of the panel. Once un-clipped, slide it back towards the bottom of the seat, and it'll come off
so...piece by piece.
Ok...here's the official HOW TO:
First, you already saw how to remove the rear seats.
Here's how to remove the fronts:
PASSENGER SEAT REMOVAL
Slide the seat all the way forward.
there are two plastic covers that conceal the two seat bolts.
These just pull off by hand. Grab the front edge and pry back, to reveal the two seat rear seat bolts:
remove the two bolts from the seat tracks. They are 18mm. The front just slides in to 2-channels per side, so you can pivot the seat UP and reach the electrical connections. Un-plug these(2)
The cool part is, that's it. The front of the seat is attached in the two channel slots. Just slide it back and UP and the seat is free. I recommend you completely fold it flat to make it easier to get out of the door opening. What you have left is a large black support beam that the seat is bolted to.
The front seat comes out the same way.
First, we'll talk about the carpet. You'll have to un-clip the top of the rear part of the console. Then slide it up and around the parking brake handle, with the parking brake handle UP. Now you have access to the console hold-down nuts and bolts. they are 10mm. There are two nuts that attach the front of the rear part of the console to the shifter housing, and two nuts that attach the rear part of the console to two verticle studs. Remove these. Un-plug the rear 12v power socket, and remove the rear part of the console.
next, you can remove the large black cross-brace that the seats attached to. there are large bolts on the outer end, and two large nuts under the center console area. Once these have been removed, you can remove the cross-brace from the car.
Next, remove the front kick panels, side sill panels, pillar trim panels(remove lower seat belt bolts-torx) and the rear sill plates. Now you need to lift the carpet and feed the front seat wiring through the hole to prevent snagging it. Remove the carpet by working it out from under the shifter housing part of the console, and roll it back towards the rear. I dragged it out the hatch.
vaccuum any dirt/loose debris, and check all the factory wire looms to make sure they stayed in place.
install the new carpet by following the reverse procedure. Take your time...make sure you remember to feed your front seat wiring through the access hole. Getting the new carpet under the rear trim panels can take some patience. If all else fails, you will have to completely remove the rear panels, which is alot more work. I actually removed the rear side seat belt lower torx bolts to make lifting the rear trim easier.
Once the carpet is in place, re-install all the trim pieces. be carefull to line up all the clips. especially the sill plates. Once you're satisfied, install the cross-brace, and the console, remembering to re-attach the 12v socket's wire connection.
that's it. Revel in your glory.
Now, on to the seats:
PASSENGER FRONT SEAT
Set up a clean working environment. I HIGHLY recommend using a work bench, as handling these heavy seats on the floor is terrible for your back, knees, and it's easy to kneel on something and hurt yourself. I did not have a clean work bench available, so I took the full brunt of the abuse.
Have the following tools handy:
pincer pliers(like needle nose but with claw-like pincers at the end), panel/clip removal tool, side-cutters, 3/8 drive ratchet with deep metric sockets and 6" long extention, , a curved awl, a few pic tools, some misc flat-blade and philips screwdrivers, latex work gloves to keep your hands clean and protect the materials and a set of hog-ring pliers, and about 200 hog rings.
start by folding the seat down completely, and removing the headrest.
next, remove the button that covers the arm rest attaching bolt. Remove the arm rest.
next, remove the side trim, and seat belt buckle off the seat. The side trim is held on by clips, with a philips screw at the back of each piece:
You have to carefully remove each rear recline/forward knob. These can be tricky because they are held in by a tab that locks to the plastic as it slides on. Slide a thin screwdriver down the arm the knob is on to release the tab. If the tab breaks, it's ok...just use some RTV silicone to re-install. That way it isnt permanent, but strong enough to withstand use.
I did not remove the side corner trim completely, as it is felxible enough to allow access to the seat bracket bolts.
Next, remove the rear panel from the back of the backrest. It is held in with two push clips in the bottom corners. Use a panel clip removal tool to gently pry UP on the bottom corners of the panel. Once un-clipped, slide it back towards the bottom of the seat, and it'll come off
02-18-2008, 09:25 PM
#7
Senior Member
Thread Starter
Join Date: 01-01-2008
Location: Windsor, Ca
Posts: 991
Now you have to remove the headrest plugs. These are LONG tubes that have extending tabs at the top to lock them in. Lay the backrest down flat, and look up into the back of the seat to see what I mean. You need to use your pincer pliers(or a long set of needle nose pliers) to compress the locking tabs, and use the panel removal took to work them up out of the seat just far enough for the locking tabs to disappear inside the tubes. Now pull them out by hand, taking note the position of the adjusting one for adjusting the headrest height.
Here's what they look like when removed. Notice the pincer pliers.

Now look at the exposed area of the back of the seat's backrest.
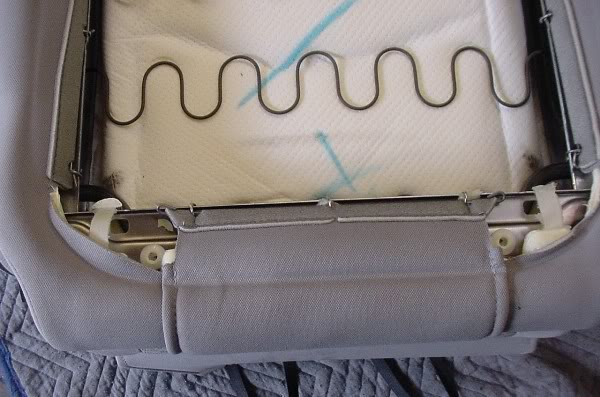
take note of the position of the cross beam bar that attaches both reclining mechanism/springs. This is the same position it needs to be in when you re-assemble the seat.
Un-bolt the side brackets from the back rest, and set the bolts, and the one recline bracket aside. make a mental image as to which piece went on which side. One is definately marked R for RIGHT.
you will now see all the hog rings that attach the backrest cover to the seat.
Dont cut the hog-rings off. Use the side-cutters to grasp them, and twist them off. if they get cut off, you'll spend eternity chasing the half-clipped pieces off the attaching cables, and this is not fun. A few will break, but twisting them off saves time.
Parts of the cover are held on with slide-channel plastic...just remove them by hand, or use a curved awl to help walk the channel off the metal frames.
Once the bottoms of the seat covers are free from wrapping around the seat frame, start turning it inside out. You will find more hog-rings that attach some of the seating area seams to the seat's foam support. This keeps the seat covers taut, and prevents them from moving around, giving the seats that nice tight look. Just manipulate the foam out of your way, and twist the hog-rings off. You'll end up with a bare seat when done.
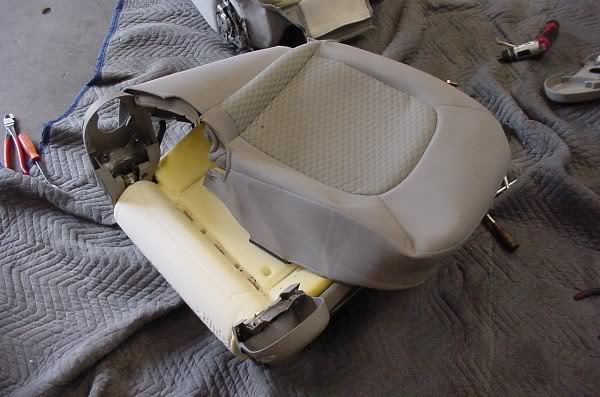
go back and make sure there are no broken hog rings left in the channels of the foam, or they might come back to haunt you later and damage your seat covers.
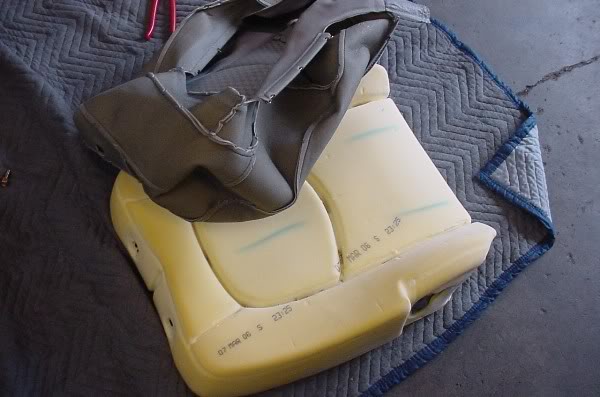
I found the date stamped on my seat foam...March 7, 2006.
Now match up your new seat cover with the old one to make sure you are installing the correct cover on the coresponding seat.test fit it FIRST.
Flip the cover like it's inside out. and start with the hog rings. Work from the center part of the seat, towards the outside, and then back, pulling the seat cover towards the back as you go to make sure you get no wrinkles. The cables that the hog rings attach to inside the seat foam seams allow the hog rings to slide back. They dont have to be crimped tight, just closed. as you wrap them around to the bottom, that's what holds them back and tight. Dont forget all the seams.
wrap the cover around to the back, and fasten the hog rings and locking channels.
re-install the head rest tubes, and observe the finished section.
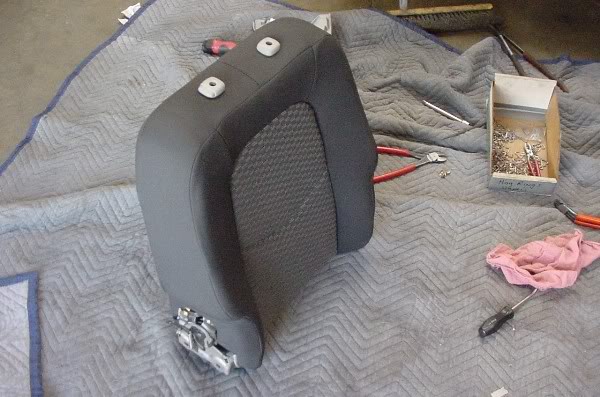
You basically do the same thing as above for the bottom cushion.
re-assemble the seat assembly.
I have NOT done my driver's seat yet, as I ran out of time, so as soon as I learn how to dis-assemble a power driver's seat, I will add that.
Here's what they look like when removed. Notice the pincer pliers.
Now look at the exposed area of the back of the seat's backrest.
take note of the position of the cross beam bar that attaches both reclining mechanism/springs. This is the same position it needs to be in when you re-assemble the seat.
Un-bolt the side brackets from the back rest, and set the bolts, and the one recline bracket aside. make a mental image as to which piece went on which side. One is definately marked R for RIGHT.
you will now see all the hog rings that attach the backrest cover to the seat.
Dont cut the hog-rings off. Use the side-cutters to grasp them, and twist them off. if they get cut off, you'll spend eternity chasing the half-clipped pieces off the attaching cables, and this is not fun. A few will break, but twisting them off saves time.
Parts of the cover are held on with slide-channel plastic...just remove them by hand, or use a curved awl to help walk the channel off the metal frames.
Once the bottoms of the seat covers are free from wrapping around the seat frame, start turning it inside out. You will find more hog-rings that attach some of the seating area seams to the seat's foam support. This keeps the seat covers taut, and prevents them from moving around, giving the seats that nice tight look. Just manipulate the foam out of your way, and twist the hog-rings off. You'll end up with a bare seat when done.
go back and make sure there are no broken hog rings left in the channels of the foam, or they might come back to haunt you later and damage your seat covers.
I found the date stamped on my seat foam...March 7, 2006.
Now match up your new seat cover with the old one to make sure you are installing the correct cover on the coresponding seat.test fit it FIRST.
Flip the cover like it's inside out. and start with the hog rings. Work from the center part of the seat, towards the outside, and then back, pulling the seat cover towards the back as you go to make sure you get no wrinkles. The cables that the hog rings attach to inside the seat foam seams allow the hog rings to slide back. They dont have to be crimped tight, just closed. as you wrap them around to the bottom, that's what holds them back and tight. Dont forget all the seams.
wrap the cover around to the back, and fasten the hog rings and locking channels.
re-install the head rest tubes, and observe the finished section.
You basically do the same thing as above for the bottom cushion.
re-assemble the seat assembly.
I have NOT done my driver's seat yet, as I ran out of time, so as soon as I learn how to dis-assemble a power driver's seat, I will add that.
02-18-2008, 09:25 PM
#8
Senior Member
Thread Starter
Join Date: 01-01-2008
Location: Windsor, Ca
Posts: 991
REAR SEAT ASSEMBLY
start by laying the seat as it would sit folded down in your car.
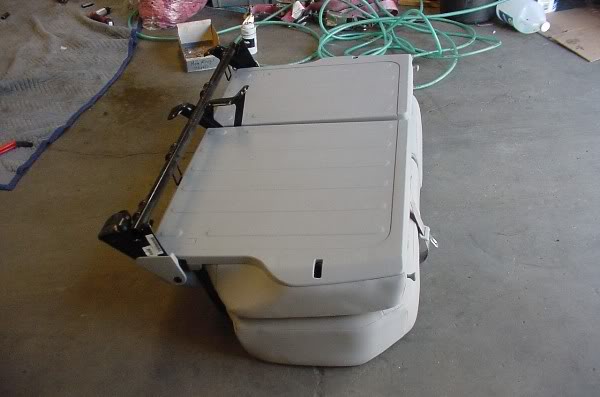
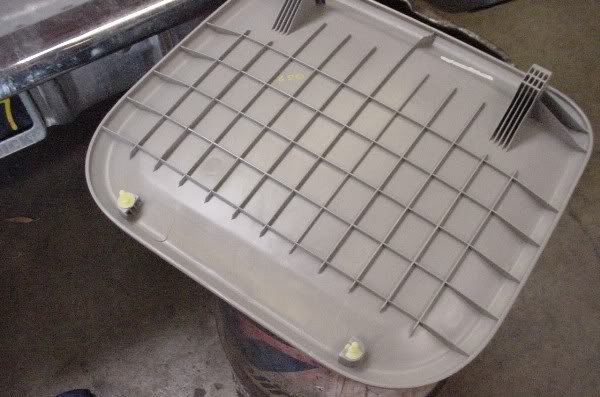
on the back plastic panels, there are 4 small plastic covers that come out. Use your little pick tool. Below them are philips screws. remove these:
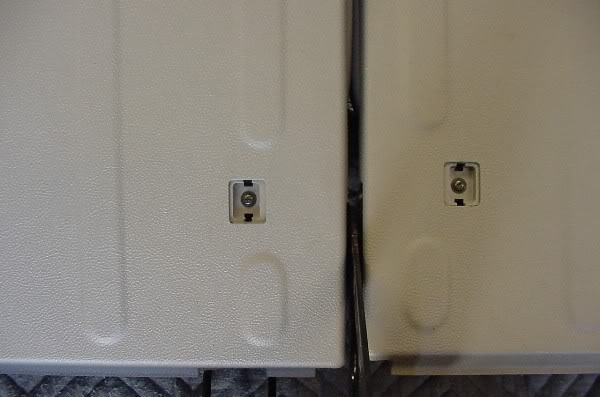
then carefully remove the plastic panels and set them aside with the screws and screw covers.
remove the 4 bolts that attach the main part of the frame to the BACK of the rear seat's backrest.
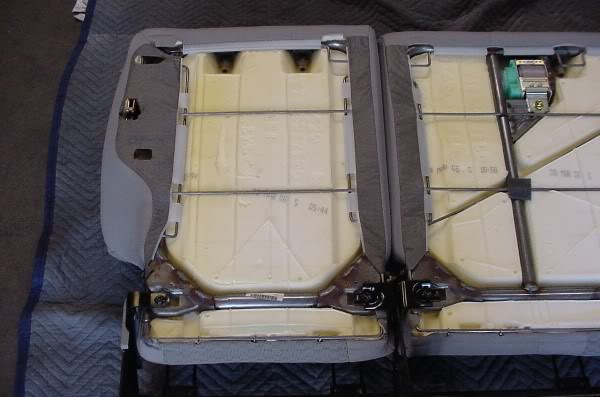
pivot/roll this part of the frame back away from the seat.
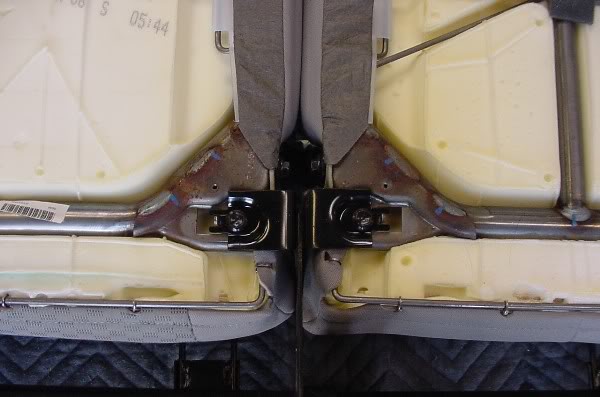
remove the side bolts from the back rests. I used a ratchetting box-end wrench for one of the center bolts, and regular ratchet for the outer ends. Once one half of the split backrest is off, you have easier access to the other center side bolt.
Flip the seat over, and unbolt the cushions from the lower part of the frame.
The backrests and lower cushions are now free from the frame.
The rear seat covers install just like the fronts. You will have to first remove the head rest guide knobs, and the release knobs.
the release knobs work like door lock knobs...they simply un-thread from the studs. Inside the back of the backrests, the release knob guides are held in similar to the head rest guide knobs. You have to press in two sides, and pull them out.
Now you may begin removing the seat covers. The center seat belt does NOT have to be unbolted from the backrest. The guide plate for it simply folds out/un-clips from the seat cover as you will see when the cover is free from the seat. the plastic reinforcing framework for the seat belt hole is flexible, and will un-clip from the guide trim.
Now remove the seat covers completely. You have to release the plastic channel and the hog rings. 4 pieces total, and take your time.
re-assemble the back seat in the reverse fashion.
Now you may re-install the back seat in to the car, being carefull not to trap the seat belt buckles underneath it as you go.
I ended up dragging the seat out the rear hatch when removing it, as I was alone. it is a bit cumbersome as it is akward and both cushions and backrests are able to flop about. I had help from Brenda when I re-installed it in the car through the narrow door opening.
That's it for now folks...I'll update you when I finally do the driver's seat.
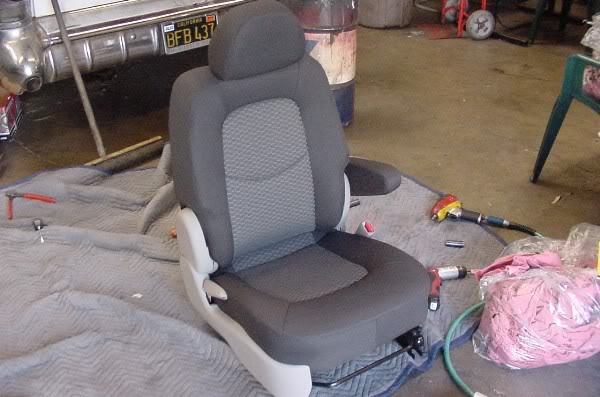
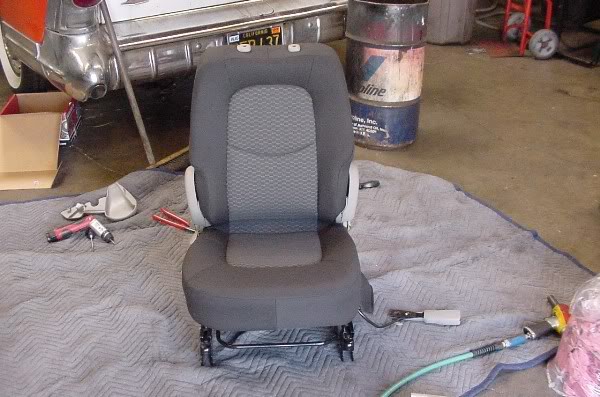
Until then, enjoy:
BEFORE

AFTER
I'll get some fantastic shots in the daylight when it is ALL done.
feel free to ask me any questions...especially now, while it is all still fresh on my mind(and soreness in my bones)
start by laying the seat as it would sit folded down in your car.
on the back plastic panels, there are 4 small plastic covers that come out. Use your little pick tool. Below them are philips screws. remove these:
then carefully remove the plastic panels and set them aside with the screws and screw covers.
remove the 4 bolts that attach the main part of the frame to the BACK of the rear seat's backrest.
pivot/roll this part of the frame back away from the seat.
remove the side bolts from the back rests. I used a ratchetting box-end wrench for one of the center bolts, and regular ratchet for the outer ends. Once one half of the split backrest is off, you have easier access to the other center side bolt.
Flip the seat over, and unbolt the cushions from the lower part of the frame.
The backrests and lower cushions are now free from the frame.
The rear seat covers install just like the fronts. You will have to first remove the head rest guide knobs, and the release knobs.
the release knobs work like door lock knobs...they simply un-thread from the studs. Inside the back of the backrests, the release knob guides are held in similar to the head rest guide knobs. You have to press in two sides, and pull them out.
Now you may begin removing the seat covers. The center seat belt does NOT have to be unbolted from the backrest. The guide plate for it simply folds out/un-clips from the seat cover as you will see when the cover is free from the seat. the plastic reinforcing framework for the seat belt hole is flexible, and will un-clip from the guide trim.
Now remove the seat covers completely. You have to release the plastic channel and the hog rings. 4 pieces total, and take your time.
re-assemble the back seat in the reverse fashion.
Now you may re-install the back seat in to the car, being carefull not to trap the seat belt buckles underneath it as you go.
I ended up dragging the seat out the rear hatch when removing it, as I was alone. it is a bit cumbersome as it is akward and both cushions and backrests are able to flop about. I had help from Brenda when I re-installed it in the car through the narrow door opening.
That's it for now folks...I'll update you when I finally do the driver's seat.
Until then, enjoy:
BEFORE
AFTER
I'll get some fantastic shots in the daylight when it is ALL done.
feel free to ask me any questions...especially now, while it is all still fresh on my mind(and soreness in my bones)
