
Install a hitch and transmission cooler


Thread Starter
Senior Member
Joined: 09-25-2009
Posts: 159
From: Palm Desert, CA
Install a hitch and transmission cooler
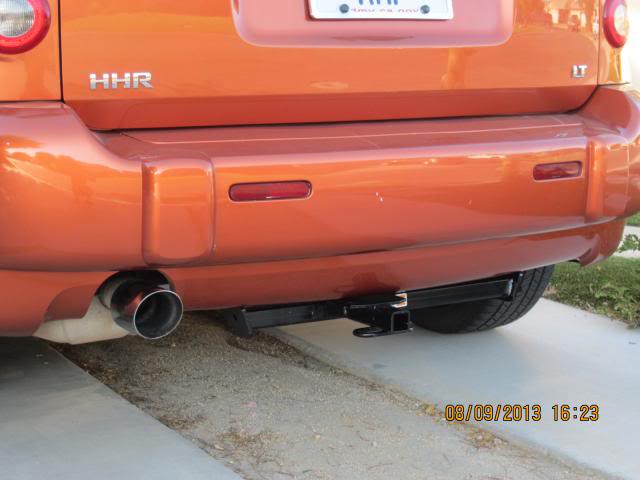
Last weekend I installed a Draw-Tite hitch on my HHR that I bought online from etrailer.com. Very heavy duty and high quality. The hardest part was removing the exhaust support donuts to drop the exhaust so the hitch could be installed, and even that wasn't too bad. The wiring kit they sell plugs right in, and you can run the wiring out the bottom. There are access holes next to the battery that can be removed. Install a 1 1/4" grommet and the wiring looks like a factory install.
As for the cooler, I ordered a new set of GM cooler lines first, they were available on EBay for about $36. I did this just in case the worst-case scenario played out and I ruined them by making modifications. But this didn't happen.
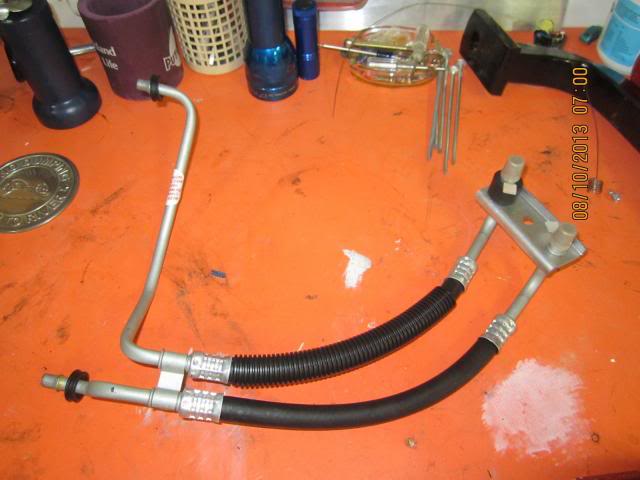
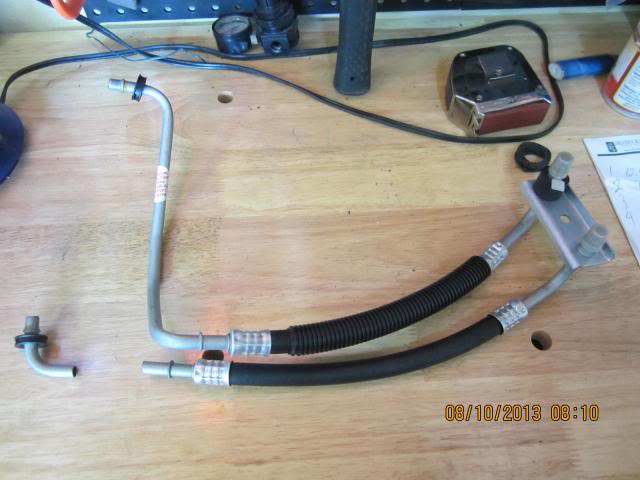
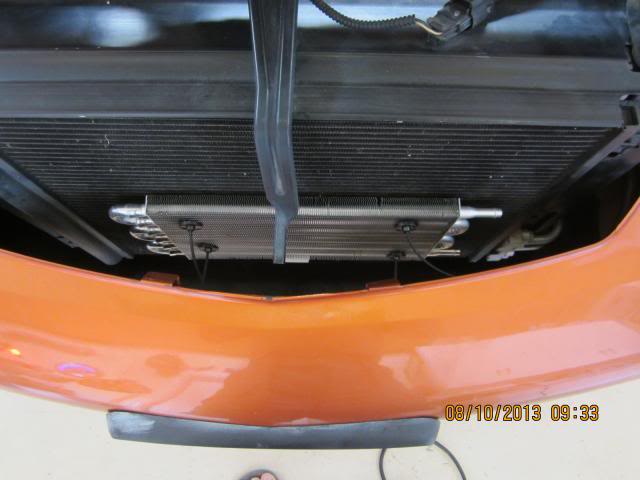
The lower cooler line is the return line. I cut that with a cut-off wheel so the new rubber lines could be connected in series. The unit I used was a Hayden 404, also available on EBay. The most difficult part is getting the small retaining clips out that hold the lines into the radiator, it takes a pick and a small screwdriver. Loosen the upper radiator flap, along with the one on the driver's side and you will have easy access to everything. I cut 2 holes in the vertical flap, just above the A/C lines, for the rubber lines to go to the cooler that is mounted on the condenser. The short lower metal tube comes out of the radiator and makes a 90 degree bend, then the hose goes on. I cut out the next bend, then the hose slides onto the lower transmission cooler line and clamps are tightened. I added about 3/4 quart Dexron VI and drove a few miles, then let the excess drain out of the pan (with vehicle level, running, in park). Be sure to re-install the plug before turning the engine off!
Everything worked out great, no leaks and everything looks good.
The hitch install might take an hour or so, the cooler took about 3 hours due to those clips that are so hard to get out. I did it, so you can, too.
As for the cooler, I ordered a new set of GM cooler lines first, they were available on EBay for about $36. I did this just in case the worst-case scenario played out and I ruined them by making modifications. But this didn't happen.
The lower cooler line is the return line. I cut that with a cut-off wheel so the new rubber lines could be connected in series. The unit I used was a Hayden 404, also available on EBay. The most difficult part is getting the small retaining clips out that hold the lines into the radiator, it takes a pick and a small screwdriver. Loosen the upper radiator flap, along with the one on the driver's side and you will have easy access to everything. I cut 2 holes in the vertical flap, just above the A/C lines, for the rubber lines to go to the cooler that is mounted on the condenser. The short lower metal tube comes out of the radiator and makes a 90 degree bend, then the hose goes on. I cut out the next bend, then the hose slides onto the lower transmission cooler line and clamps are tightened. I added about 3/4 quart Dexron VI and drove a few miles, then let the excess drain out of the pan (with vehicle level, running, in park). Be sure to re-install the plug before turning the engine off!
Everything worked out great, no leaks and everything looks good.
The hitch install might take an hour or so, the cooler took about 3 hours due to those clips that are so hard to get out. I did it, so you can, too.

Senior Member
Joined: 08-26-2008
Posts: 1,488
From: Sequim Washington
Great job and good pic's too.
So now that you did it ... what are you planning on towing?
You must live where it gets hot?
Where and how did you dead end your trailer wiring on the outside?
SF
So now that you did it ... what are you planning on towing?
You must live where it gets hot?
Where and how did you dead end your trailer wiring on the outside?
SF

 Very nicely done!
Thread Starter
Senior Member
Joined: 09-25-2009
Posts: 159
From: Palm Desert, CA
This is a photo of the cooler completed and connected-
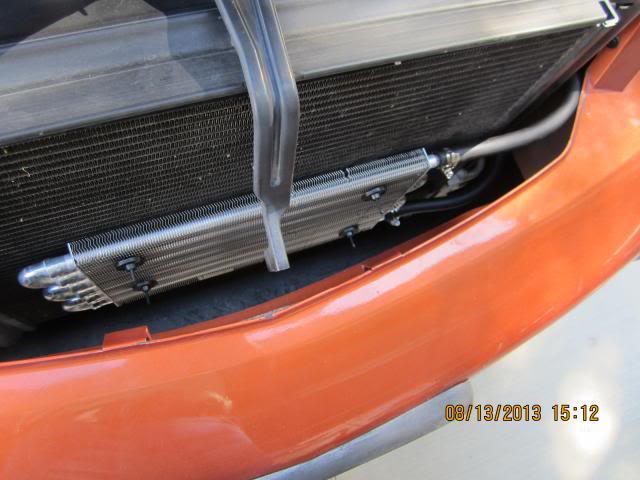
Here's a look at how the rubber cooler lines are connected to the factory cooler lines. Note how they enter/exit through the vertical rubber flap on the driver's side-
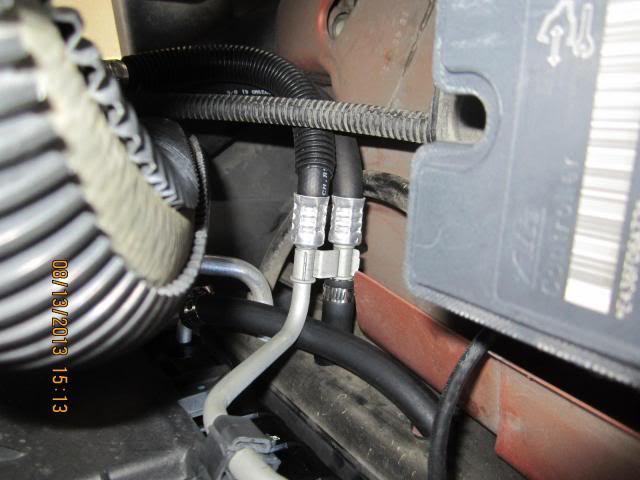
The cooler is on the radiator return line so that the entire cooling capacity is dedicated to the transmission. If the cooler were on the transmission output line, some of the cooling capacity could be lost to the engine as it tries to cool the radiator.
Here's a look at how the rubber cooler lines are connected to the factory cooler lines. Note how they enter/exit through the vertical rubber flap on the driver's side-
The cooler is on the radiator return line so that the entire cooling capacity is dedicated to the transmission. If the cooler were on the transmission output line, some of the cooling capacity could be lost to the engine as it tries to cool the radiator.
Thread Starter
Senior Member
Joined: 09-25-2009
Posts: 159
From: Palm Desert, CA
Silverfox-
I plan to pull a 5 X 8 utility trailer on occasion. It weighs about 300 lbs empty and can haul about 1600 lbs. I live in the desert Southwest, so the temps here are over 100 for several months a year. The HHR has never had a heating problem and the A/C works great.
Here is a photo of how I ran the wire out the back of the car. There is a hole near the battery with a cover, which I removed. The grommet I had didn't hold well, so I had to order a 1 3/16" version at a truck supply shop.
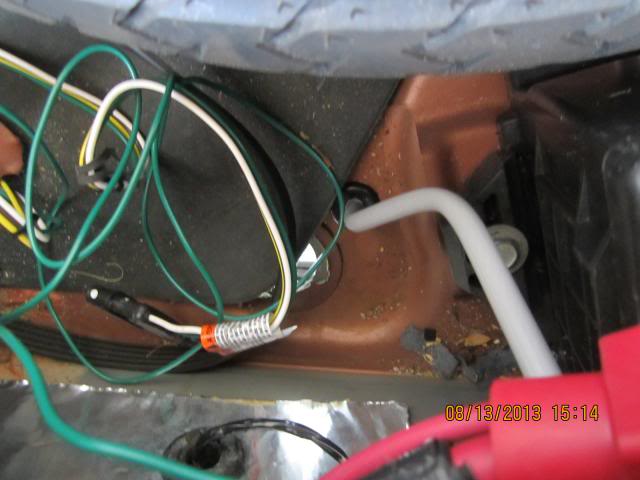
The tube to the right is the battery vent.
I plan to pull a 5 X 8 utility trailer on occasion. It weighs about 300 lbs empty and can haul about 1600 lbs. I live in the desert Southwest, so the temps here are over 100 for several months a year. The HHR has never had a heating problem and the A/C works great.
Here is a photo of how I ran the wire out the back of the car. There is a hole near the battery with a cover, which I removed. The grommet I had didn't hold well, so I had to order a 1 3/16" version at a truck supply shop.
The tube to the right is the battery vent.

Moderator
Joined: 01-23-2009
Posts: 26,532
From: Fredericksburg,VA
I have the same cooler, just because I drive so much (70K a year). I ended up just splicing into the rubber part of the factory hose. I'm not sure that's enough cooler for real towing though.
I accidentally found out that if you hook into the other hose you actually raise the engine temp about 5-10 degrees.
I accidentally found out that if you hook into the other hose you actually raise the engine temp about 5-10 degrees.

New Member
Joined: 10-31-2013
Posts: 22
From: Jacksonville
Nice right up and pics. Did you consider adding a spin on filter? I added one to my Explorer and it made a world of difference. The external filter grabs the small particles that build up over time causing trouble in the tranny. I would change it at every third oil change which also helped keep the fluid in the system fresh. http://www.summitracing.com/parts/sum-g4980. Just picked up a 2011 LT and I am thinking of doing the same thing. I use mine in my courier service so I see a lot of miles but thankfully only a few stops.
CJ JAX
CJ JAX
Senior Member
Joined: 08-26-2008
Posts: 1,488
From: Sequim Washington
Nice right up and pics. Did you consider adding a spin on filter? I added one to my Explorer and it made a world of difference. The external filter grabs the small particles that build up over time causing trouble in the tranny. I would change it at every third oil change which also helped keep the fluid in the system fresh. http://www.summitracing.com/parts/sum-g4980. Just picked up a 2011 LT and I am thinking of doing the same thing. I use mine in my courier service so I see a lot of miles but thankfully only a few stops.
CJ JAX
CJ JAX

SF
New Member
Joined: 10-31-2013
Posts: 22
From: Jacksonville
I still changed the transmission filter and fluid every 75K. The spin on filter kit was $33 and took less than an hour to install. Five minutes to spin the old one off and the new one on with a fresh filter of fluid. At the last 75k change the fluid was clear in the transmission but gray when I poured it out of the filter. A lot easier than pulling the pan and refilling/checking level. Has the added benefit of not shocking the system with all new fluid for those systems that have not been serviced in a long time. JMHO
CJ JAX
CJ JAX

Thread
Thread Starter
Forum
Replies
Last Post