How to Shell Blast Intake Valves - SS
 02-12-2016, 11:17 AM
#1
Moderator
Thread Starter

Join Date: 05-01-2014
Location: California
Posts: 7,788
How to Shell Blast Intake Valves - SS
The 2.0 turbocharged SS - Yeah!! Direct injection + turbo = great performance and good gas mileage!! But wait, turbo means more blow-by and direct injection means no fuel wash over the intake valve stems - awww man!!
Sooner or later, you're gonna have compression problems like I did from intake valves not sealing, and you're gonna need to clean your valves. You can do it 'right' and take the head off, remove each valve for cleaning, and reassemble. That's a whole lotta work. I mean a lot. And then you have to worry about, among other things, getting it timed properly again.
Or..... We can do something similar to what BMW is doing. We remove the airbox and remove the intake manifold and clean up the ports and valves by blasting them, not with sand, but with crushed walnut shells.
So you've decided to give it a try, great , but you've got to gather some tools and materials first. I went to Harbor Freight and got
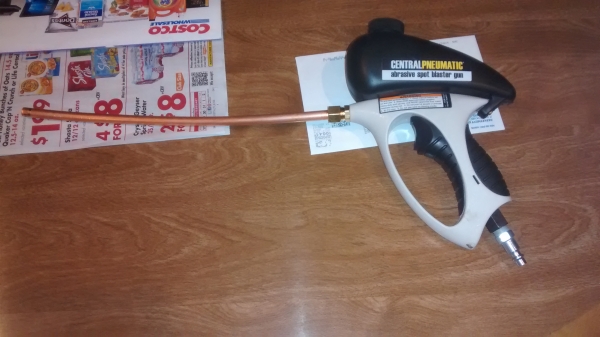
A. this blaster
B. Some fine walnut shell blast media.
C An air fitting for the blaster, as one is not included.
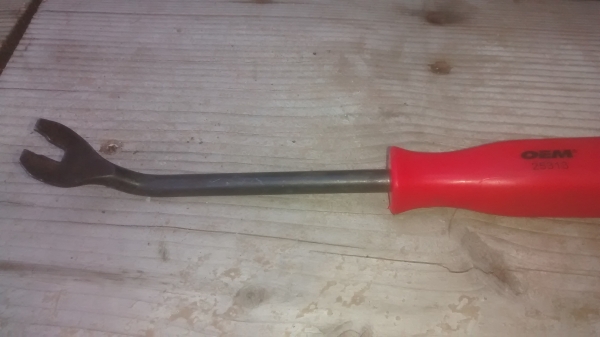
D. these scrapers, I mostly used just the second one from the left.
E. these brushes they were pretty handy too.
You'll need some other things, too. Most of this I already had, so pick up what you don't already have.
F. An air compressor. Mine was broken, and I thought I would need a pretty nice one, blasters usually require a lot of CFM. But it turned out that with the short burst use that this procedure requires, my dad's 1 HP 8 gallon compressor was good enough(just barely).
G. A painter's spray hood. It's like a sock that goes over your head. Use it to cover your nose and mouth while blasting. If you'd rather have a respirator, get one. I have one, but I felt it was unnecessary.
H. A spray can of Berryman's B-12. Be sure to read the posts below from member m_ridzon. He had a very bad experience using the Berryman's product. Use at your own risk!!
I. A 1/4" MPT x 3/8" compression brass fitting.
J. 21" of 3/8" copper tubing(refrigerator tubing, to be specific).
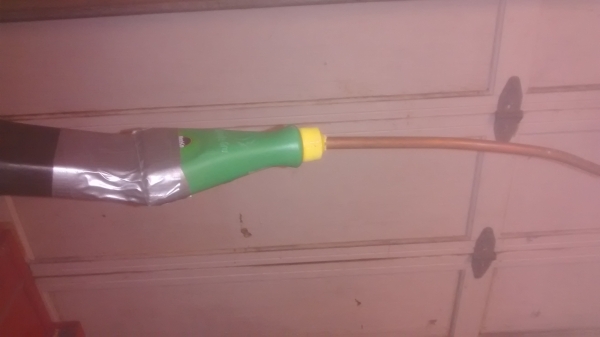
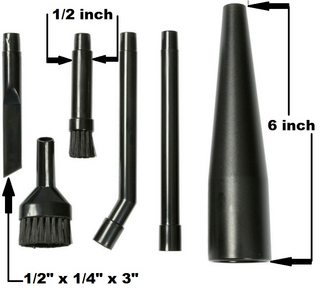
K. A decent Shop-Vac. I got another 1' of the copper tubing, and reduced the shop-vac down.
L. A small flashlight, a head lamp worked well for me.
M. 5 quarts of your favorite oil and an oil filter.
N. 1 can of Sea Foam spray.
You'll also need a couple of plastic grocery bags, large leaf bags, duct tape, paper towels, I even used an old towel and an old bedsheet. You'll need some good goggles. I have prescription safety glasses, and goggles don't fit over them, so I got by just with the glasses and some technique.
You're going to need to modify the blaster . There are 2 phillips screws holding the hopper on to the gun. One at the back of the handle, the other is inside the hopper. Remove the screws and the hopper. You're going to be drilling a bigger hole in the bottom of the hopper, and the corresponding feed hole in the gun. Use at least a 3/16" drill bit, even 1/4" will work well. Reattach the hopper when you're done. Then take the nozzle off the blaster gun, and replace it with the compression fitting and the 21" tubing. Attach the air fitting, using pipe tape or dope. Some fittings come with the dope already on it. Now it's starting to come together, huh?
You also need to modify your Shop Vac, reducing it down something like this so you can vacuum the blast media and gunk out of the ports.
If you have an automatic transmission, start the engine and turn the wheels to the right! There is an access panel in the passenger wheel well. There are 5 push pins and 2 small screws. You will need a 7mm or 9/32" nutdriver or socket for the screws. This tool works well on the push pins. I got it for $10 at Autozone.
Remove the fasteners and pull the access panel down enough where you can get to the crankshaft pulley bolt. This is for turning the engine over manually later.
Ok, so follow the links above to remove the airbox and the intake manifold, then find your way back here. There's a link back to here on the intake how-to.
Sooner or later, you're gonna have compression problems like I did from intake valves not sealing, and you're gonna need to clean your valves. You can do it 'right' and take the head off, remove each valve for cleaning, and reassemble. That's a whole lotta work. I mean a lot. And then you have to worry about, among other things, getting it timed properly again.
Or..... We can do something similar to what BMW is doing. We remove the airbox and remove the intake manifold and clean up the ports and valves by blasting them, not with sand, but with crushed walnut shells.
So you've decided to give it a try, great , but you've got to gather some tools and materials first. I went to Harbor Freight and got
A. this blaster
B. Some fine walnut shell blast media.
C An air fitting for the blaster, as one is not included.
D. these scrapers, I mostly used just the second one from the left.
E. these brushes they were pretty handy too.
You'll need some other things, too. Most of this I already had, so pick up what you don't already have.
F. An air compressor. Mine was broken, and I thought I would need a pretty nice one, blasters usually require a lot of CFM. But it turned out that with the short burst use that this procedure requires, my dad's 1 HP 8 gallon compressor was good enough(just barely).
G. A painter's spray hood. It's like a sock that goes over your head. Use it to cover your nose and mouth while blasting. If you'd rather have a respirator, get one. I have one, but I felt it was unnecessary.
H. A spray can of Berryman's B-12. Be sure to read the posts below from member m_ridzon. He had a very bad experience using the Berryman's product. Use at your own risk!!
I. A 1/4" MPT x 3/8" compression brass fitting.
J. 21" of 3/8" copper tubing(refrigerator tubing, to be specific).
K. A decent Shop-Vac. I got another 1' of the copper tubing, and reduced the shop-vac down.
L. A small flashlight, a head lamp worked well for me.
M. 5 quarts of your favorite oil and an oil filter.
N. 1 can of Sea Foam spray.
You'll also need a couple of plastic grocery bags, large leaf bags, duct tape, paper towels, I even used an old towel and an old bedsheet. You'll need some good goggles. I have prescription safety glasses, and goggles don't fit over them, so I got by just with the glasses and some technique.
You're going to need to modify the blaster . There are 2 phillips screws holding the hopper on to the gun. One at the back of the handle, the other is inside the hopper. Remove the screws and the hopper. You're going to be drilling a bigger hole in the bottom of the hopper, and the corresponding feed hole in the gun. Use at least a 3/16" drill bit, even 1/4" will work well. Reattach the hopper when you're done. Then take the nozzle off the blaster gun, and replace it with the compression fitting and the 21" tubing. Attach the air fitting, using pipe tape or dope. Some fittings come with the dope already on it. Now it's starting to come together, huh?
You also need to modify your Shop Vac, reducing it down something like this so you can vacuum the blast media and gunk out of the ports.
If you have an automatic transmission, start the engine and turn the wheels to the right! There is an access panel in the passenger wheel well. There are 5 push pins and 2 small screws. You will need a 7mm or 9/32" nutdriver or socket for the screws. This tool works well on the push pins. I got it for $10 at Autozone.
Remove the fasteners and pull the access panel down enough where you can get to the crankshaft pulley bolt. This is for turning the engine over manually later.
Ok, so follow the links above to remove the airbox and the intake manifold, then find your way back here. There's a link back to here on the intake how-to.
Last edited by RJ_RS_SS_350; 07-29-2022 at 10:35 AM.
 02-12-2016, 01:18 PM
#2
Moderator
Thread Starter
Join Date: 05-01-2014
Location: California
Posts: 7,788
Wow, you're back already? You're not gonna have a problem with this at all! Alright, let's get to it!!
You may already have the coil packs and spark plugs removed from a compression or leak down test. If not, remove them now.
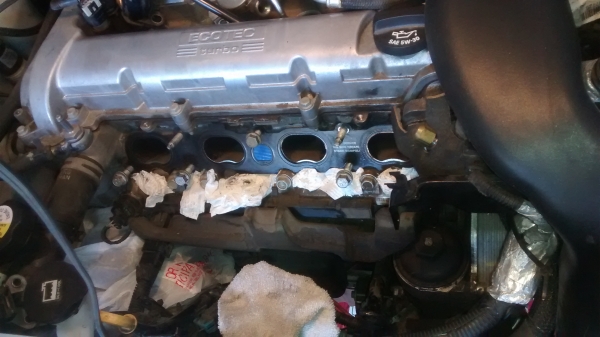
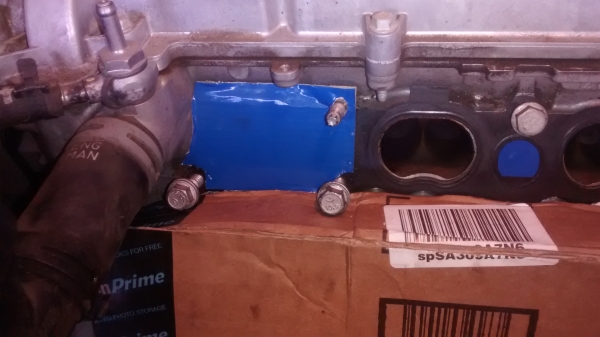
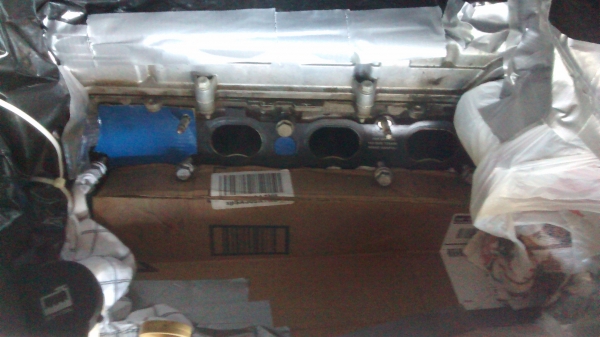
1. I left the old intake manifold gasket on, as it helped with masking the center PCV port. You can see the oil puddled up in the port. Once the oil gets sprayed on the hot valves, it bakes on. I cut a small piece of cardboard and slipped it in behind the gasket, covering the center port.
2. I unplugged the alternator and put a plastic grocery bag around it. Don't want any grit getting in the windings! I also stuffed paper towels between the head and the fuel rail, and stuffed a rag in the charge pipe. Here you can also see the blue cardboard covering the center port.
3. Next you'll need to cut a piece of cardboard 13" x 18 1/2"
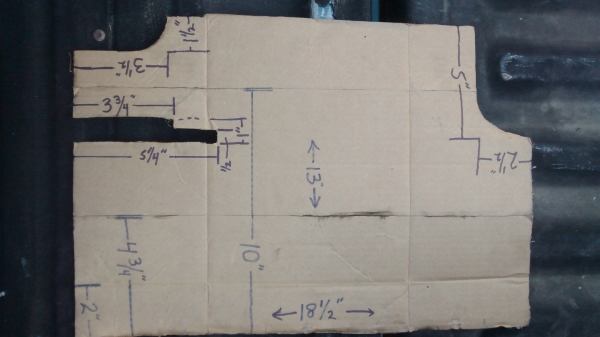
The 2" and the 10" dimensions are scored only on the back side. The 4 3/4" dimension is scored only on the front side. This means you are only cutting into the outer layer of cardboard, not all the way through. These scores are so you can fold the cardboard nicely. Then proceed to make the other 3 cutouts to the dimensions given.
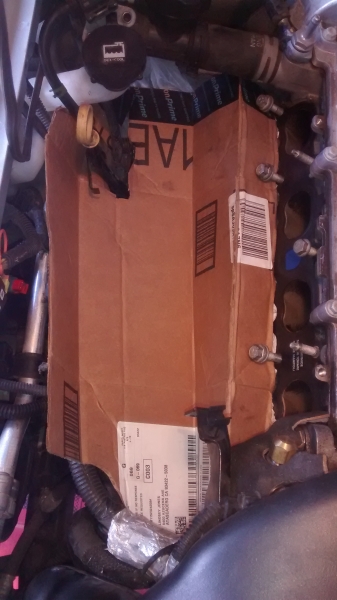
This cardboard worked really well. It was a nice fit, and gave most of the blast media a place to collect that was out of the way for the duration of the job, and was easy to vacuum up at the end of the job.
The 2" fold tucks up under the manifold bolts, which I screwed back in by hand. I didn't want the holes to get blast media in them, and they held down the cardboard. The stepped notch goes around the dipstick tube. Here is the cardboard installed.
4. If you have a manual transmission, this is easy. Put the parking brake on, and jack up the driver's front wheel. Put the transmission in 4th gear and turn the wheel counter-clockwise only! This will turn the engine's rotating assembly in a clockwise direction, as viewed from the crankshaft pulley. If you need to jack up the passenger side instead, you must turn the passenger wheel Clockwise only!
If you have an automatic transmission, you're going to have to turn the engine with the bolt on the harmonic balancer. You'll be on the passenger side of the car, turning clockwise only! Thanks to Donbrew and Oldblue for this information about the auto-equipped cars!!
If you ignore this specific instruction on rotation, you risk skipping links on the timing chain. Thanks, Donbrew!
You'll have something long in the spark plug hole. I used a long spade drill bit, a long screwdriver will work too. Turn the engine over until the long tool is at it's highest point. You now have the valves closed on 3 cylinders at the same time. I made a cover for the open port(cylinder #1 in this case). I drilled a hole to push it over the stud. I would advise putting something(plastic, a towel) over the valve cover to keep blast media out of the open spark plug holes.
It can be turned over as needed to cover any other port too.

5. Continue masking. I put another plastic grocery bag around the fuel pump. I took towels and stuffed then wherever there was a hole, under the charge pipe, under the radiator hose, stuff any hole you can find. Duct tape the smaller holes.
6. Then I took a large leaf bag, starting near the radiator fill cap, I zip tied it to the radiator hose, then started duct taping it down. First to the hose, then to the valve cover, the oil fill cap, the fuel pump bag, the charge pipe. Then duct taped it to the upper radiator support on each side, creating a blast shroud. You can also see I taped some plastic from the main cardboard piece through to the outer radiator( might be the AC evaporator).
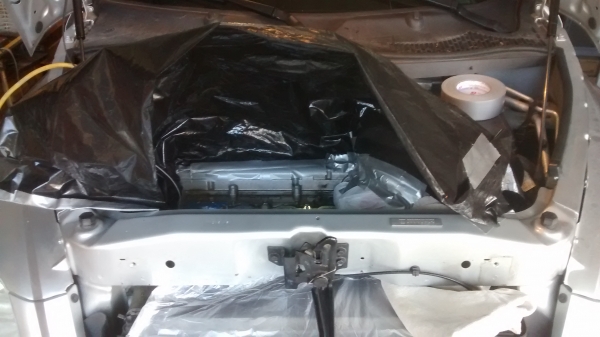
7. Double check all your masking, make sure all the holes are plugged up. You don't want any blast media in the engine compartment. Some will find it's way through, but you've got to do your best to limit that to the absolute minimum.
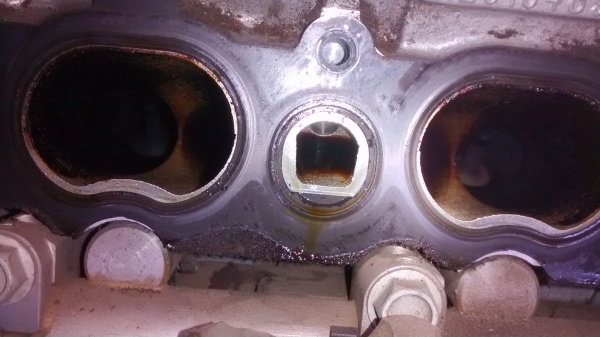
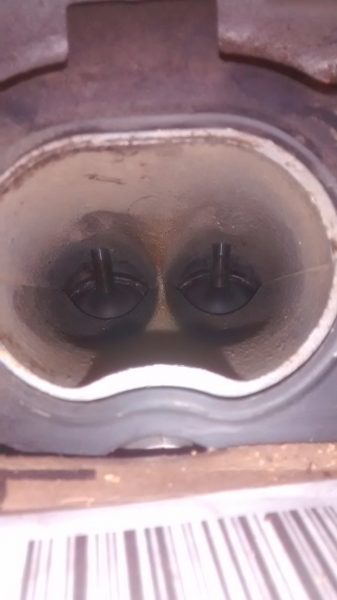
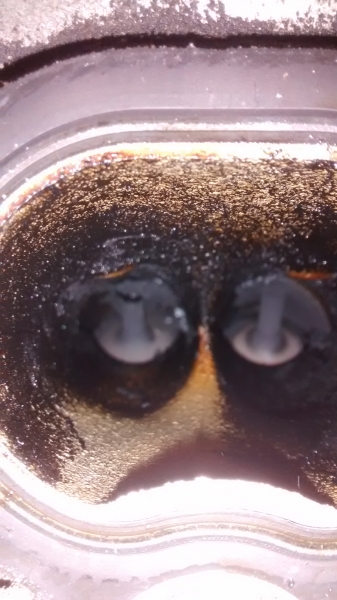
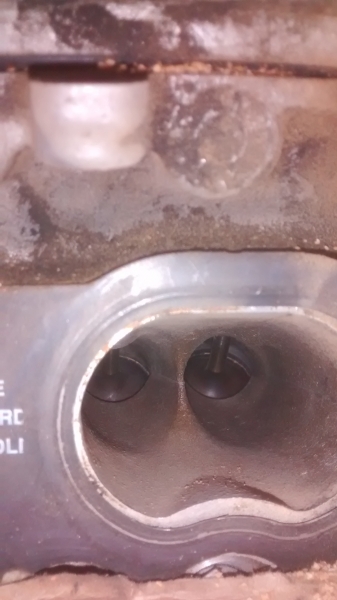
8. Now take a small scraper, like the one I referred to from Harbor Freight, and scrape as much of the gunk off as you can. Mine was about 1/8" thick in some spots! I think it was port 3A that was the worst. Then vacuum it all out. I caution you here to not run your Shop Vac for a long time with the reducer on it, as you could burn up the motor. Here are my ports prior to cleaning.
Cylinder #1.........Before................................. ......................Sorry, no clean pic of #1
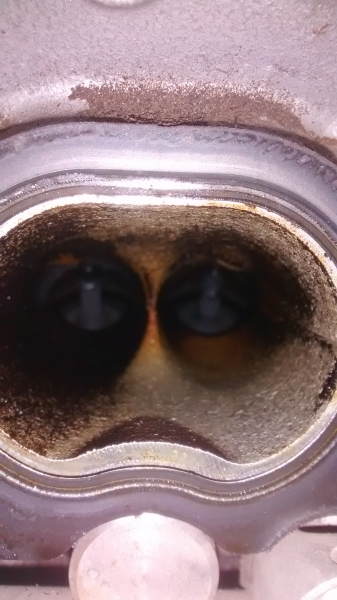
Cylinder #2.....................Before..................... .................................................. ...........................After
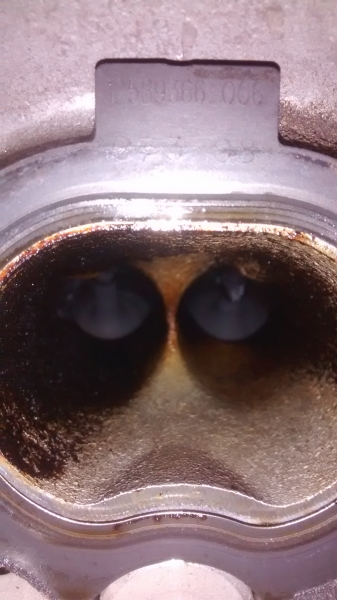
Cylinder #3.....................Before..................... .................................................. ...........................After
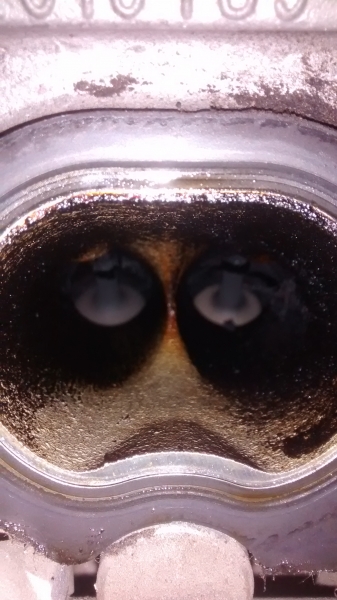
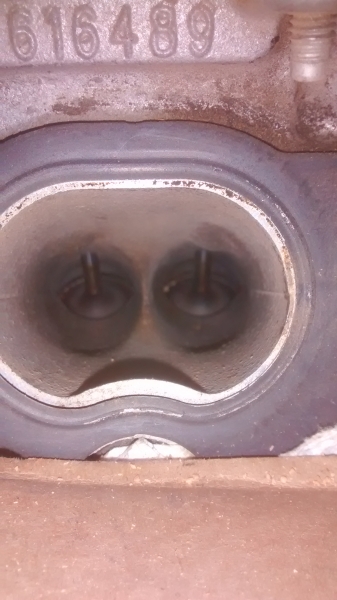
Cylinder #4.....................Before..................... .................................................. ...........................After
9. You're ready to start blasting! Get your compressor and blaster set up. Get a funnel and a scoop for the blast media. You will also want to find a good spot where you can prop the blaster while you're refilling the hopper. Put on your painter's spray hood sock, covering your nose and mouth. Or put on your respirator, if that's what you've decided to use. And your safety glasses/goggles.
10. Ok, NOW you're ready for blasting! Your blaster tip should have just a slight bend in it so it can point down at the valves. Guide the extended nozzle though the gap above the radiator and into the port. You'll be giving this short bursts, about a second at a time. And you'll be alternating between scraping, vacuuming, and blasting.
11. I put my right hand on the trigger. In my left hand I held my headlamp, looking into the port, aiming my next blast. Just when I was to pull the trigger, I would move the headlamp, blocking my view of the port, which kept the blast media from blasting back in my eyes. This is the technique I mentioned before, how I got by with safety glasses and no goggles. Please take every precaution to protect your eyes from this blast media!! I did get one grain in my eye, and it was not pleasant!! Have a plan for flushing your eye ready. Even if you are wearing a full-face respirator, you could still get some in your eyes while removing your gear from your head.
12. Again, keep alternating between scraping, vacuuming, and blasting. Once you get those 3 cylinders, 6 ports and valves, as clean as you think you can, spray some Berryman's B-12 in the port, and you will see the spots you missed. A little more scraping and vacuuming. Spray a little more Berryman's and use those brushes I referenced above, with a drill or impact driver, or even by hand if you don't have these power tools. I used the nylon brushes, so as not to scratch anything.
13. OK, so the Berryman's has shown you that those 6 ports and valves are clean, great job, but you're not done yet! Vacuum out those ports real well, as well as the immediate surrounding area(the intake gasket and the 2" shelf below and everything above all 8 ports). You're going to be removing that port cover soon, and you don't want a bunch of grit going into an open cylinder.
14. Turn the engine over until that long tool reaches it's lowest point. The valves for one of the cylinders you just cleaned should now be open. Remove the cardboard port cover and move it to the now open port.
15. Clean your last 2 ports and valves in the same way as before.
16. When everything is as clean as you're going to get it, remove the port cover. At this point, I soaked the 6 closed valves in a puddle of Berryman's and sprayed some on the open valves, too. Then I took my impact driver with an appropriate sized nylon brush, and cleaned the valve seat and mating surface area, on the open valves, as best as I could. Now be careful here, as the brush is likely to pop out of the extension, and you don't want it getting trapped in the cylinder. More than once I had to pull it out with long needle nose pliers, from being stuck in the valve. Spray once more when you are done brushing.
17. Turn the engine again so 2 different valves open. Put a puddle of Berryman's in the ports you just brushed. Repeat steps 16 and 17 until you've done all 8 valves. I would advise doing the first 2 valves one more time, now that they've been able to soak for a while.
18. Vacuum everything really well. Very carefully remove all the masking, avoid knocking any blast media into the ports or into the alternator windings. You'll be alternating between de-masking and vacuuming.
You may already have the coil packs and spark plugs removed from a compression or leak down test. If not, remove them now.
1. I left the old intake manifold gasket on, as it helped with masking the center PCV port. You can see the oil puddled up in the port. Once the oil gets sprayed on the hot valves, it bakes on. I cut a small piece of cardboard and slipped it in behind the gasket, covering the center port.
2. I unplugged the alternator and put a plastic grocery bag around it. Don't want any grit getting in the windings! I also stuffed paper towels between the head and the fuel rail, and stuffed a rag in the charge pipe. Here you can also see the blue cardboard covering the center port.
3. Next you'll need to cut a piece of cardboard 13" x 18 1/2"
The 2" and the 10" dimensions are scored only on the back side. The 4 3/4" dimension is scored only on the front side. This means you are only cutting into the outer layer of cardboard, not all the way through. These scores are so you can fold the cardboard nicely. Then proceed to make the other 3 cutouts to the dimensions given.
This cardboard worked really well. It was a nice fit, and gave most of the blast media a place to collect that was out of the way for the duration of the job, and was easy to vacuum up at the end of the job.
The 2" fold tucks up under the manifold bolts, which I screwed back in by hand. I didn't want the holes to get blast media in them, and they held down the cardboard. The stepped notch goes around the dipstick tube. Here is the cardboard installed.
4. If you have a manual transmission, this is easy. Put the parking brake on, and jack up the driver's front wheel. Put the transmission in 4th gear and turn the wheel counter-clockwise only! This will turn the engine's rotating assembly in a clockwise direction, as viewed from the crankshaft pulley. If you need to jack up the passenger side instead, you must turn the passenger wheel Clockwise only!
If you have an automatic transmission, you're going to have to turn the engine with the bolt on the harmonic balancer. You'll be on the passenger side of the car, turning clockwise only! Thanks to Donbrew and Oldblue for this information about the auto-equipped cars!!
If you ignore this specific instruction on rotation, you risk skipping links on the timing chain. Thanks, Donbrew!
You'll have something long in the spark plug hole. I used a long spade drill bit, a long screwdriver will work too. Turn the engine over until the long tool is at it's highest point. You now have the valves closed on 3 cylinders at the same time. I made a cover for the open port(cylinder #1 in this case). I drilled a hole to push it over the stud. I would advise putting something(plastic, a towel) over the valve cover to keep blast media out of the open spark plug holes.
It can be turned over as needed to cover any other port too.
5. Continue masking. I put another plastic grocery bag around the fuel pump. I took towels and stuffed then wherever there was a hole, under the charge pipe, under the radiator hose, stuff any hole you can find. Duct tape the smaller holes.
6. Then I took a large leaf bag, starting near the radiator fill cap, I zip tied it to the radiator hose, then started duct taping it down. First to the hose, then to the valve cover, the oil fill cap, the fuel pump bag, the charge pipe. Then duct taped it to the upper radiator support on each side, creating a blast shroud. You can also see I taped some plastic from the main cardboard piece through to the outer radiator( might be the AC evaporator).
7. Double check all your masking, make sure all the holes are plugged up. You don't want any blast media in the engine compartment. Some will find it's way through, but you've got to do your best to limit that to the absolute minimum.
8. Now take a small scraper, like the one I referred to from Harbor Freight, and scrape as much of the gunk off as you can. Mine was about 1/8" thick in some spots! I think it was port 3A that was the worst. Then vacuum it all out. I caution you here to not run your Shop Vac for a long time with the reducer on it, as you could burn up the motor. Here are my ports prior to cleaning.
Cylinder #1.........Before................................. ......................Sorry, no clean pic of #1
Cylinder #2.....................Before..................... .................................................. ...........................After
Cylinder #3.....................Before..................... .................................................. ...........................After
Cylinder #4.....................Before..................... .................................................. ...........................After
9. You're ready to start blasting! Get your compressor and blaster set up. Get a funnel and a scoop for the blast media. You will also want to find a good spot where you can prop the blaster while you're refilling the hopper. Put on your painter's spray hood sock, covering your nose and mouth. Or put on your respirator, if that's what you've decided to use. And your safety glasses/goggles.
10. Ok, NOW you're ready for blasting! Your blaster tip should have just a slight bend in it so it can point down at the valves. Guide the extended nozzle though the gap above the radiator and into the port. You'll be giving this short bursts, about a second at a time. And you'll be alternating between scraping, vacuuming, and blasting.
11. I put my right hand on the trigger. In my left hand I held my headlamp, looking into the port, aiming my next blast. Just when I was to pull the trigger, I would move the headlamp, blocking my view of the port, which kept the blast media from blasting back in my eyes. This is the technique I mentioned before, how I got by with safety glasses and no goggles. Please take every precaution to protect your eyes from this blast media!! I did get one grain in my eye, and it was not pleasant!! Have a plan for flushing your eye ready. Even if you are wearing a full-face respirator, you could still get some in your eyes while removing your gear from your head.
12. Again, keep alternating between scraping, vacuuming, and blasting. Once you get those 3 cylinders, 6 ports and valves, as clean as you think you can, spray some Berryman's B-12 in the port, and you will see the spots you missed. A little more scraping and vacuuming. Spray a little more Berryman's and use those brushes I referenced above, with a drill or impact driver, or even by hand if you don't have these power tools. I used the nylon brushes, so as not to scratch anything.
13. OK, so the Berryman's has shown you that those 6 ports and valves are clean, great job, but you're not done yet! Vacuum out those ports real well, as well as the immediate surrounding area(the intake gasket and the 2" shelf below and everything above all 8 ports). You're going to be removing that port cover soon, and you don't want a bunch of grit going into an open cylinder.
14. Turn the engine over until that long tool reaches it's lowest point. The valves for one of the cylinders you just cleaned should now be open. Remove the cardboard port cover and move it to the now open port.
15. Clean your last 2 ports and valves in the same way as before.
16. When everything is as clean as you're going to get it, remove the port cover. At this point, I soaked the 6 closed valves in a puddle of Berryman's and sprayed some on the open valves, too. Then I took my impact driver with an appropriate sized nylon brush, and cleaned the valve seat and mating surface area, on the open valves, as best as I could. Now be careful here, as the brush is likely to pop out of the extension, and you don't want it getting trapped in the cylinder. More than once I had to pull it out with long needle nose pliers, from being stuck in the valve. Spray once more when you are done brushing.
17. Turn the engine again so 2 different valves open. Put a puddle of Berryman's in the ports you just brushed. Repeat steps 16 and 17 until you've done all 8 valves. I would advise doing the first 2 valves one more time, now that they've been able to soak for a while.
18. Vacuum everything really well. Very carefully remove all the masking, avoid knocking any blast media into the ports or into the alternator windings. You'll be alternating between de-masking and vacuuming.
Last edited by RJ_RS_SS_350; 02-14-2016 at 01:56 PM.
02-12-2016, 01:24 PM
#3
Moderator
Thread Starter
Join Date: 05-01-2014
Location: California
Posts: 7,788
19. Now you begin the re-assembly process. Once you get the spark plugs and coil packs back on, and the intake manifold bolted back on(don't rush through re-assembly, but once you do get there), you can blow out the engine bay with compressed air.
20. Once everything is back together(what a relief that will be!), Have your lovely assistant help you with the Sea Foam process. Start the engine and let it warm up. It will probably be running rough. Have your lovely assistant maintain 1800-2000 RPM. Pull the vacuum line that is in the center of the intake manifold and start spraying the Sea Foam in. Spray for about 30-45 seconds. Keep spraying, signaling your assistant to shut the engine off. Once the engine is completely off, stop spraying. I believe this will allow for a much better soak than if you stop spraying and then shut the engine off.
21. After about 30 minutes to an hour, start the engine and go for a "spirited' drive. Don't get too crazy, you've probably got quite a bit of berryman's and maybe some gunk and grit in the crankcase. Shouldn't be any gunk or grit, but there could be.
22. I performed another leak down test here. My prior readings - cylinders 1-3 had 2-4% leakage, and cylinder 4 had 23% leakage(crankcase and intake). Now cylinders 1-3 have 2% leakage and cylinder 4 has 5-6% leakage (crankcase). These results are better than I expected. They are not as clean as the BMW machines get them, but they were pretty good.
23. Change your oil & oil filter
24. That's it. You're done, good job!
If you have decided that you never, ever want to do this again, head on over to DBeluscak's oil catch can thread. A group of us have been collaborating on a solution to this problem. I've also made a "reader's digest" version of my catch can system install, here oil-catch-can-readers-digest-version-59726/
EDIT: Cannuck has posted an alternative blasting technique. Have a look, you may find it better suited to your needs.
https://www.chevyhhr.net/forums/ss-s...p-video-58510/
Last edited by RJ_RS_SS_350; 12-17-2017 at 09:33 AM.
 02-12-2016, 01:41 PM
#5
Moderator
Thread Starter
Join Date: 05-01-2014
Location: California
Posts: 7,788
Thanks OB, I've gained so much from this community, I want to do my part to help others.
I wasn't sure if these should go here in the how-to forum, or over in the SS Specific forum. I'll leave that for you mods to decide.
I wasn't sure if these should go here in the how-to forum, or over in the SS Specific forum. I'll leave that for you mods to decide.
 02-12-2016, 02:16 PM
#7
Senior Member

Join Date: 09-07-2008
Location: Mebane, NC
Posts: 1,016
Happy to see that your leakdown rate has changed for the better. Speaking of the catch can thread, once we find a solution I believe we need to make a seperate how to thread of what to do and what to use. Reading through all the posts while entertaining takes some time.
Again nice job, glad to see it worked out for you.
02-12-2016, 04:18 PM
#8
Senior Member

Join Date: 12-26-2015
Location: Central Florida
Posts: 118
If you don't have parts laying around to rig up a vacuum attachment, Shop Vac sells a micro cleaning attachment set (Shop Vac part # 801-89-00) that works with 1 1/4" hoses & "should" work quite well for the vacuum needs for this project. It can occasionally be found for less than $10, but usually $12 - $15 at your local "mart"
02-12-2016, 06:03 PM
#10
Moderator
Thread Starter
Join Date: 05-01-2014
Location: California
Posts: 7,788
Okay I just went out and jacked up the car, took off the access panel, marked the crankshaft pulley, and noted rotation as I turned the wheels. Driver's side is correct, I will edit step #4 to add wheel rotation direction for passenger wheel.

