Chrome Tail Light Rings
 06-19-2014, 03:39 AM
#1
New Member
Thread Starter

Join Date: 06-10-2014
Location: Vancouver Washington
Posts: 15
Received and installed my chrome tail light rings by Autotecnica today, plus my new tires came in too! I may do a write up on the install of the rings as I documented my install with photos. How can I post photos? Says I'm not allowed? By the way, I am a new owner and my first post. 2008 HHR Black SS.


 &
&  I'm sure someone will chime in with the info you are looking for

 07-18-2014, 01:51 PM
#6
Senior Member

Join Date: 03-20-2012
Location: Dallas, TX
Posts: 292
Upload photos into your gallery, then just copy the BB code and paste it here.
(Note: If you delete this part of the link _thumb then the pics will be larger.)
Example:
 07-22-2014, 07:22 PM
#7
Member

Join Date: 08-29-2008
Location: NYC
Posts: 57
I would be VERY interested in your experience with your tail light ring installation. I bought the same ones this spring but have not installed yet, mostly due to reading that you want to install them when the weather is warm so didn't install in the spring.
I read every post I could find about the ring install, but many of the photos with those posts showed the rings made the tail lights look "cross eyed" or just not quite right. I saw the photos in your gallery, and those looked great. I saw one HHR with them installed in person but was unable to ask the owner any questions about installation.
I've also read up about the install with the designation codes and arrows, and everyone said you still need to adjust for the best fit. I don't want to wind up with the "cross eyed" look.
Some of the red plastic you peel off the double sided tape has come loose and wonder if those sections will still adhere well and was thinking of trying to replace the tape with new 3M tape but couldn't get the tape off the rings so will probably leave them.
The alochol pads are used to wipe down the areas where the tape will adhere to the car and to remove any wax, etc., that might be there now?
I'll probably get to this installation in a couple weeks and would appreciate hearing about your installation experience.
07-29-2014, 02:36 AM
#8
New Member
Thread Starter
Join Date: 06-10-2014
Location: Vancouver Washington
Posts: 15
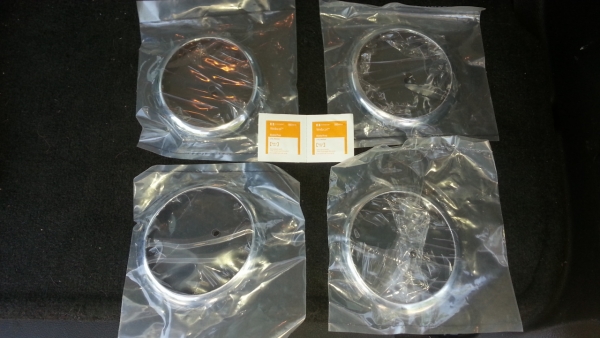
Here is a couple of tips, as directions are somewhat vague for installing the chrome platic tail light rings.
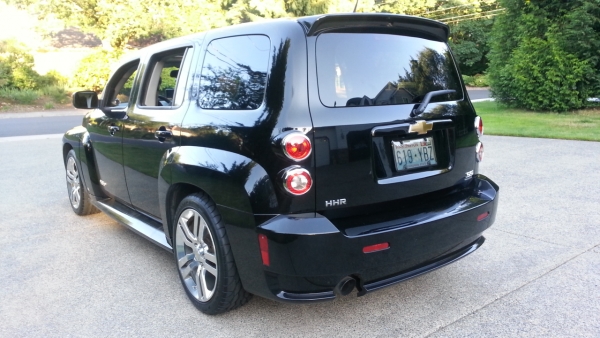
First impression was wow these are big! I believe the stainless rings have a different fit and profile but it was hard to tell from photos. I opted for the chrome plastic ones and am pleased with the look. It really pops on my SS, adding just a touch of bling without going over board on the chrome. Even traded in my chrome license plate frame for black and smoked cover. The chrome frame making a center focal point and a bit too much for my personal preference.
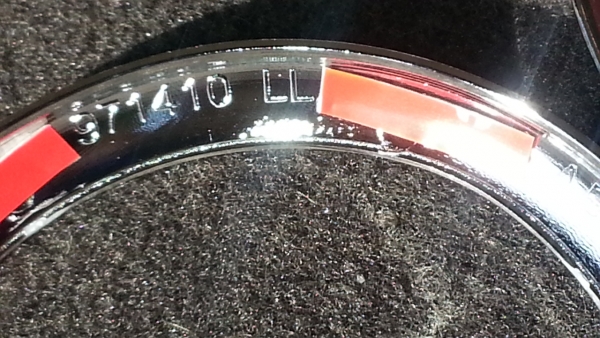
Important: If you look closely each ring is Marked.
RU, RL, LU, LL: Upper, Lower, Left , and Right. (passenger side is right side).
They look round but are actually kind of oval and only fit correctly one way.
Before applying use the alcohol pad provided and clean edge of tail light and painted surface that will make contact with the double sided tape when removed.
CAUTION: the prep pads seemed stronger than rubbing alcohol and seemed to eat the plastic lens a bit! Use caution and sparingly. I swear it fogged the edge of my lens and took serious rubbing to clean up.
Start with one ring and rotate it slowly on the correct lens for best fit before removing the double sided tape.
Double check it by rotating it 180 degrees as it appears to fit in two positions but one is better than the other.
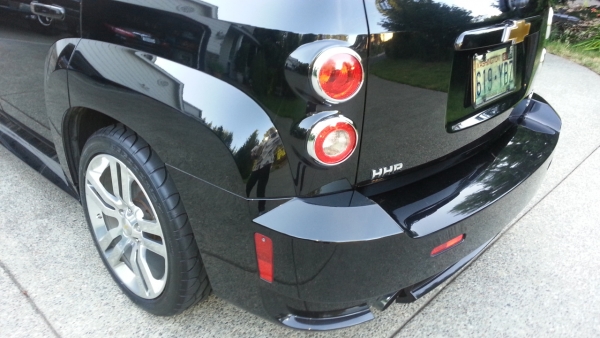
Proper fit will fit flush to your paint all the way around the lens and on the inside diameter, the red tail light lens fit to the chrome ring should be snug all the way around with no gaps.
Mark your chrome ring and body of car with a piece of tape once you have positioned it correctly, to reapply to the exact spot, so once you lift it off to remove the double sided tape. I used blue painters tape across the chrome ring on to the paint and slit it with a finger nail to remove leaving tape on the car to matchup with tape on the ring. Take your time for best fit. I used a micro fiber towel to push on tight on rotate around the ring and lens to seat it proper.
Keep in mind you will be pushing it on tight to seat it, once the tape covering is removed. Some of the tape covering came off hard so I used tweezers to remove carefully.
Another good tip is to do it on a warm day! Sticks and seats much better to a warm surface.


Best regrads...
First impression was wow these are big! I believe the stainless rings have a different fit and profile but it was hard to tell from photos. I opted for the chrome plastic ones and am pleased with the look. It really pops on my SS, adding just a touch of bling without going over board on the chrome. Even traded in my chrome license plate frame for black and smoked cover. The chrome frame making a center focal point and a bit too much for my personal preference.
Important: If you look closely each ring is Marked.
RU, RL, LU, LL: Upper, Lower, Left , and Right. (passenger side is right side).
They look round but are actually kind of oval and only fit correctly one way.
Before applying use the alcohol pad provided and clean edge of tail light and painted surface that will make contact with the double sided tape when removed.
CAUTION: the prep pads seemed stronger than rubbing alcohol and seemed to eat the plastic lens a bit! Use caution and sparingly. I swear it fogged the edge of my lens and took serious rubbing to clean up.
Start with one ring and rotate it slowly on the correct lens for best fit before removing the double sided tape.
Double check it by rotating it 180 degrees as it appears to fit in two positions but one is better than the other.
Proper fit will fit flush to your paint all the way around the lens and on the inside diameter, the red tail light lens fit to the chrome ring should be snug all the way around with no gaps.
Mark your chrome ring and body of car with a piece of tape once you have positioned it correctly, to reapply to the exact spot, so once you lift it off to remove the double sided tape. I used blue painters tape across the chrome ring on to the paint and slit it with a finger nail to remove leaving tape on the car to matchup with tape on the ring. Take your time for best fit. I used a micro fiber towel to push on tight on rotate around the ring and lens to seat it proper.
Keep in mind you will be pushing it on tight to seat it, once the tape covering is removed. Some of the tape covering came off hard so I used tweezers to remove carefully.
Another good tip is to do it on a warm day! Sticks and seats much better to a warm surface.
Best regrads...
Last edited by Prowlen; 07-29-2014 at 03:20 AM. Reason: Add photos.
08-12-2014, 09:18 PM
#9
Member
Join Date: 08-29-2008
Location: NYC
Posts: 57
I finally installed the chrome tail light rings this past weekend. Its not always easy to work on your car when you live in NYC, but found the time and place to do it.
I took all your steps and used them for the installation. I could find the little up arrow on only one ring as the tape covered it up on the three others. But as you suggested, you just need to play around with them and rotate to get the best fit. And your suggestion of using tape as a marker worked out great as it was very easy to line them up correctly for the final stick-on installation.
I washed the lenses twice with plain water, then washed them twice with alcohol to get all the wax off. Then as you suggested, saw where the rings would attach and only used the promoter pad on that area. The first ring installation took the longest, but once you get the hang of it the others went faster.
Its amazing how much they improve the looks of the tail lights, as if somethine was missing or fell off the original lights. It makes the light look complete, like its how they should have looked all along. A friend was equally impressed and said the same thing. I couldn't stop looking at them they look so good. All the other retro cars have similar chrome bezels for the tail lights, and it just fits the car design from the late 40's era. I thought more chrome might look garish, but it doesn't at all. So glad I finally got around to the installation!
08-12-2014, 10:04 PM
#10
New Member
Thread Starter
Join Date: 06-10-2014
Location: Vancouver Washington
Posts: 15
Congratulations on the install! Photos please...
Glad you got it done! Great improvement worth the time and effort that really looks great on the HHR. Would love to see some photos.
I decided my left lower ring wasn't quite right and broke it trying to remove it! It was almost off and broke on the last tug. I turned it 180 degrees and stuck it back on for a perfect fit. I ordered a new set just to replace the one broken one, so I will have some spares available too. You can purchase a single but over $30.00 delivered for 1 each.
While I was at it I ordered some Spring Edition smoked headlights and GE Platinum Nighthawk bulbs plus some Silver Star parking lamps.
I researched SS front bumper removal and it looks straight forward and fairly easy to do. Can't wait for the new look! Best regards...

