Official TSB and Recall Thread
 10-21-2008, 09:47 AM
#11
Founding Member
Thread Starter

Join Date: 11-23-2007
Location: Texas
Posts: 8,210
Pit4787c
#PIT4787C: Approximate 150 To 200 mA Draw From The Power Steering Control Module - keywords battery electric motor PSCM - (Feb 18, 2009)
Subject: Approximate 150 to 200 ma Draw From The Power Steering Control Module
Models: 2007-2009 Chevrolet Cobalt, Equinox and HHR
2007-2009 Pontiac Torrent
2008-2009 Saturn VUE
--------------------------------------------------------------------------------
This PI was superseded to update models and Condition/Concern. Please discard PIT4787B.
--------------------------------------------------------------------------------
The following diagnosis might be helpful if the vehicle exhibits the symptom(s) described in this PI.
Condition/Concern:
The vehicles listed above may have a 150 to 200 ma battery draw from the power steering control module. If the mega fuse for the power steering control module is removed, the draw may drop to around 20 - 25 ma. This can be due to the power steering control module staying awake for approximately 45 minutes. This may be a normal draw.
On the following vehicles: Equinox, Torrent, VUE and HHR SS only the power steering control module will stay awake for 45 minutes and then shut down.
On the Cobalt and HHR base model, the power steering control module may stay awake for up to 45 minutes. On these vehicles the PSCM module may stay awake based on the power steering motor temperature. The hotter the motor, the longer the module will stay awake (up to 45 minutes).
Recommendation/Instructions:
When diagnosing a battery draw, if the draw drops after removing the mega fuse for the power steering control module, do the following: Reinstall the mega fuse for the power steering control module and make sure to plug everything back in, then turn the ignition key on and then back off. Let the vehicle sit for up to 45 minutes and then re-check the battery draw readings. If the draw drops to around 20 - 25 ma, after 45 minutes, this is normal operation of the vehicle.
Last edited by ChevyMgr; 06-03-2009 at 09:31 AM.
 10-21-2008, 09:54 AM
#12
Founding Member
Thread Starter
Join Date: 11-23-2007
Location: Texas
Posts: 8,210
Pip4511
#PIP4511: Unable To Reset The Engine Oil Life System Using The Accelerator Pedal - keywords DIC ECM EOL engine inop inoperative intermittent life lof lnf maintenance message monitor oil OLM pedal performance - (Oct 16, 2008)
Subject: Unable to Reset the Engine Oil Life System Using the Accelerator Pedal
Models: 2008-2009 Chevrolet HHR SS With Engine RPO LNF ONLY
--------------------------------------------------------------------------------
The following diagnosis might be helpful if the vehicle exhibits the symptom(s) described in this PI.
Condition/Concern:
A technician may report that the Engine Oil Life (EOL) will not reset.
Recommendation/Instructions:
Engineering has determined that the ECM for the 2008-09 HHR SS does not support the use of the accelerator pedal for the Engine Oil Life System reset procedure. This is listed incorrectly in eSI and the Owners Manuals of this vehicle; and is in the process of being changed.
Technicians should be advised to use the DIC procedure or Tech2 to perform the EOL reset.
Last edited by ChevyMgr; 06-03-2009 at 09:32 AM.
11-05-2008, 02:34 PM
#13
Founding Member
Thread Starter
Join Date: 11-23-2007
Location: Texas
Posts: 8,210
Pip4520
#PIP4520: Low Boost / Power And/Or DTC P0299 Or P0101 - keywords actuator boost CAC charge control cooler driveability DTC ECM engine gas lnf low maf MIL reduced reducedpwmde SES wastegate - (Nov 4, 2008)
Subject: Low Boost/Power and/or DTC P0299 or P0101
Models: 2008-2009 Chevrolet Cobalt SS Only
2008-2009 Chevrolet HHR SS Only
2007-2009 Pontiac Solstice GXP
2007-2009 Saturn Sky Redline
With Engine RPO LNF Only
--------------------------------------------------------------------------------
The following diagnosis might be helpful if the vehicle exhibits the symptom(s) described in this PI.
Condition/Concern:
A technician may encounter a vehicle with a low boost/power condition and/or DTC P0299 and or P0101 setting. This may be the result of a cracked or broken fitting at the turbocharger assembly.
Recommendation/Instructions:
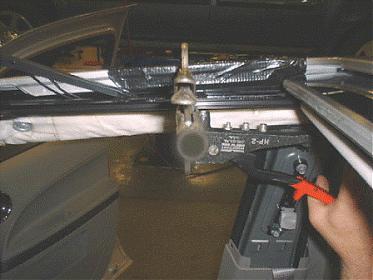
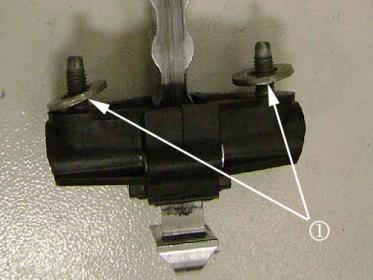
It has been determined that the nipple for the turbocharger wastegate actuator may be damaged causing this condition. If this concern is noted please inspect the area on the underside of the turbo compressor housing for the wastegate actuator solenoid valve. The nipple (see CALLOUT #1) may have been damaged causing a loss of boost pressure. It may be necessary to remove the charge air duct for a closer inspection. See eSI "Turbocharger Wastegate Actuator Replacement" for solenoid replacement procedure.
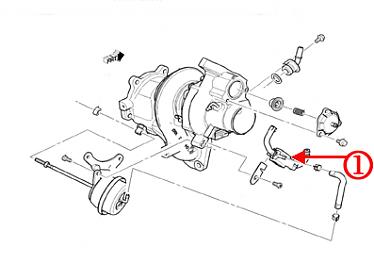
This solenoid is available separate from the turbocharger and should be replaced as a sub assembly. Do not replace the turbocharger assembly.
Subject: Low Boost/Power and/or DTC P0299 or P0101
Models: 2008-2009 Chevrolet Cobalt SS Only
2008-2009 Chevrolet HHR SS Only
2007-2009 Pontiac Solstice GXP
2007-2009 Saturn Sky Redline
With Engine RPO LNF Only
--------------------------------------------------------------------------------
The following diagnosis might be helpful if the vehicle exhibits the symptom(s) described in this PI.
Condition/Concern:
A technician may encounter a vehicle with a low boost/power condition and/or DTC P0299 and or P0101 setting. This may be the result of a cracked or broken fitting at the turbocharger assembly.
Recommendation/Instructions:
It has been determined that the nipple for the turbocharger wastegate actuator may be damaged causing this condition. If this concern is noted please inspect the area on the underside of the turbo compressor housing for the wastegate actuator solenoid valve. The nipple (see CALLOUT #1) may have been damaged causing a loss of boost pressure. It may be necessary to remove the charge air duct for a closer inspection. See eSI "Turbocharger Wastegate Actuator Replacement" for solenoid replacement procedure.
This solenoid is available separate from the turbocharger and should be replaced as a sub assembly. Do not replace the turbocharger assembly.
Last edited by ChevyMgr; 06-03-2009 at 09:32 AM.
11-05-2008, 03:16 PM
#14
Founding Member
Thread Starter
Join Date: 11-23-2007
Location: Texas
Posts: 8,210
Pip3673e
#PIP3673E: P0833 And/Or Cruise Control Inop - keywords 5sp 6sp clutch code control cruise cylinder false grind hard inoperative low pedal shift slip switch transmission - (Oct 28, 2008)
Subject: P0833 and/or Cruise Control Inop
Models: 2004-2007 Cadillac CTS-V
2004-2007 Chevrolet Cobalt
2004-2006 Chevrolet Corvette, Silverado and SSR
2006-2007 Chevrolet HHR
2004-2006 Pontiac GTO
2005-2006 Pontiac Pursuit (Canada)
2006-2007 Pontiac Solstice
2007-2007 Pontiac G5
2007-2007 Saturn SKY
2006-2007 Saturn Ion
2004-2006 GMC Sierra
Equipped with Manual Transmission
--------------------------------------------------------------------------------
This PI was superseded to combine data from AIC3407A and to remove the 08 MY from list as these vehicles do not set the P0833 DTC. Please discard PIP3673D.
--------------------------------------------------------------------------------
The following diagnosis might be helpful if the vehicle exhibits the symptom(s) described in this PI.
Condition/Concern:
Some customers may comment that the cruise control is inoperative and/or the MIL is on with DTC P0833 stored. The condition may not be duplicated by the dealer; however, the customer may have a repeat concern.
Recommendation/Instructions:
Check the "Top of Travel" or CCP switch for adjustment if your application is adjustable. Also check for possible intermittent connections in the clutch switch circuit.
It has been discovered in some applications that using a Tech II during circuit testing of the clutch and cruise switches may lead to false readings and improper diagnosis of the CCP switch. The Tech II may read APPLIED/RELEASE upon initial toggling of the switch, however repeated toggling may then lead the Tech II to indicate a steady APPLIED or RELEASED state.
Use a DVOM to check the clutch and cruise switches.
If no circuit concerns are found, verify that the customer's driving habits are not inducing the concern. This code can set (and the cruise control disabled) if the driver rests their foot on the clutch continuously and therefore prevents the pedal from reaching the top switch. This will keep the ECM from seeing transitions while they drive above and then below the vehicle speeds listed for setting the DTC. This can cause a false P0833 to set. An example of this occurring would be in slow moving stop and go traffic such as a construction zone or heavy traffic.
Important: Please make the customer aware of this scenario and advise to make an effort to refrain from resting their foot on the clutch pedal in these situations to avoid disabling the cruise control and/or setting DTC P0833.
Note: FOR THE FOLLOWING VEHICLES ONLY
2005-2007 Chevrolet Cobalt
2006-2007 Chevrolet HHR
2005-2006 Pontiac Pursuit
2007 Pontiac G5
2006-2007 Saturn ION
If the technician has followed the SI procedure for adjustment/replacement of the clutch pedal position sensor this may make the switch too sensitive for some driver's habits. The PPS should be adjusted to reduce the sensitivity. This can be accomplished by watching the PPS change states with a Tech2 and adjusting the PPS so that the pedal must travel farther before engaging switch. (I.e. from 1/4 inch travel to 1/2 inch of travel when changing states.)
Last edited by ChevyMgr; 06-03-2009 at 09:32 AM.
11-19-2008, 09:21 AM
#15
Founding Member
Thread Starter
Join Date: 11-23-2007
Location: Texas
Posts: 8,210
Pic4125b
#PIC4125B: Reduced Power Message Or Long Crank No Start On The First Key Crank - keywords 2.2 2.2L 2.4 2.4L battery cooling crankshaft dead DTC drain draw engine extended fan hard harness key lamp L61 LE5 light - (Nov 17, 2008)
Subject: Reduced Power Message or Long Crank, No Start On The First Key Crank
Models: 2006 - 2007 Chevrolet HHR
--------------------------------------------------------------------------------
This PI was superseded to combine information from AIC3193 due to both concerns coming from same harness issue. Please discard PIC4125A.
--------------------------------------------------------------------------------
The following diagnosis might be helpful if the vehicle exhibits the symptom(s) described in this PI.
Condition/Concern:
A customer may bring the vehicle in with a Reduce Engine Power message on the DIC. Any of the following codes may set:
P2120: Accelerator Pedal Position (APP) Sensor 1 Circuit
P2122: Accelerator Pedal Position (APP) Sensor 1 Circuit Low Voltage
P2123: Accelerator Pedal Position (APP) Sensor 1 Circuit High Voltage
P2125: Accelerator Pedal Position (APP) Sensor 2 Circuit
P2127: Accelerator Pedal Position (APP) Sensor 2 Circuit Low Voltage
P2128: Accelerator Pedal Position (APP) Sensor 2 Circuit High Voltage
P2138: Accelerator Pedal Position (APP) Sensor 1-2 Correlation
In addition, on vehicles with the 2.4L LE5 Engine (VIN Code P) only, the following codes could also occur:
P0651: 5 Volts Reference 2 Circuit
C0561: System Disabled Information Stored
P0326: Knock Sensor (KS) Performance
P2135: Throttle Position (TP) Sensor 1-2 Correlation
P0335: Crankshaft Position (CKP) Sensor Circuit)
It has also been reported that the cooling fans may run constantly due to this condition.
Recommendation/Instructions:
It has been identified that the engine harness may contact the purge solenoid bracket, causing harness damage and exposing the wires.

Inspect the harness and repair any necessary wires and secure the harness away from the bracket to prevent harness from grounding on the bracket.
Subject: Reduced Power Message or Long Crank, No Start On The First Key Crank
Models: 2006 - 2007 Chevrolet HHR
--------------------------------------------------------------------------------
This PI was superseded to combine information from AIC3193 due to both concerns coming from same harness issue. Please discard PIC4125A.
--------------------------------------------------------------------------------
The following diagnosis might be helpful if the vehicle exhibits the symptom(s) described in this PI.
Condition/Concern:
A customer may bring the vehicle in with a Reduce Engine Power message on the DIC. Any of the following codes may set:
P2120: Accelerator Pedal Position (APP) Sensor 1 Circuit
P2122: Accelerator Pedal Position (APP) Sensor 1 Circuit Low Voltage
P2123: Accelerator Pedal Position (APP) Sensor 1 Circuit High Voltage
P2125: Accelerator Pedal Position (APP) Sensor 2 Circuit
P2127: Accelerator Pedal Position (APP) Sensor 2 Circuit Low Voltage
P2128: Accelerator Pedal Position (APP) Sensor 2 Circuit High Voltage
P2138: Accelerator Pedal Position (APP) Sensor 1-2 Correlation
In addition, on vehicles with the 2.4L LE5 Engine (VIN Code P) only, the following codes could also occur:
P0651: 5 Volts Reference 2 Circuit
C0561: System Disabled Information Stored
P0326: Knock Sensor (KS) Performance
P2135: Throttle Position (TP) Sensor 1-2 Correlation
P0335: Crankshaft Position (CKP) Sensor Circuit)
It has also been reported that the cooling fans may run constantly due to this condition.
Recommendation/Instructions:
It has been identified that the engine harness may contact the purge solenoid bracket, causing harness damage and exposing the wires.
Inspect the harness and repair any necessary wires and secure the harness away from the bracket to prevent harness from grounding on the bracket.
Last edited by ChevyMgr; 06-03-2009 at 09:32 AM.
11-25-2008, 04:24 PM
#16
Founding Member
Thread Starter
Join Date: 11-23-2007
Location: Texas
Posts: 8,210
Pic5038
#PIC5038: RVS Inoperative / Horn Chirp When RVS Function Is Performed - keywords beep button chirp fob function horn inop intermittent key keyless locate no pressed performed remote start - (Nov 20, 2008)
Subject: RVS Inoperative/Horn Chirp When RVS Function is Performed
Models: 2006-2009 Chevrolet Cobalt
2006-2009 Chevrolet HHR
2007-2009 Pontiac G5
--------------------------------------------------------------------------------
The following diagnosis might be helpful if the vehicle exhibits the symptom(s) described in this PI.
Condition/Concern:
A customer may comment the Remote Start is inoperative. When attempting an RVS event the customer will hear three horn chirps and park lights flash.
Recommendation/Instructions:
The three horn chirps should be used as a key indicator for what is causing the RVS not to work properly.
While monitoring the key fob data list, technicians should perform a RVS function, When you press the RVS button on the keyfob, the data list will show "locate" instead of "Start/RVS/Engine".
This issue has been identified as an internal concern with the keyfob. Keyfob replacement should resolve this issue.
Last edited by ChevyMgr; 06-03-2009 at 09:33 AM.
12-05-2008, 12:36 PM
#17
Founding Member
Thread Starter
Join Date: 11-23-2007
Location: Texas
Posts: 8,210
08-08-67-018
#08-08-67-018: Wind/Air Deflector Bracket on Sunroof Module Broken (Replace Bracket) - (Dec 2, 2008)
Subject: Wind/Air Deflector Bracket on Sunroof Module Broken (Replace Bracket)
Models: 2006-2009 Chevrolet HHR
--------------------------------------------------------------------------------
Condition
Some customers may comment that the sunroof will not close because the wind deflector won't fold down properly when the sunroof glass closes.
Cause
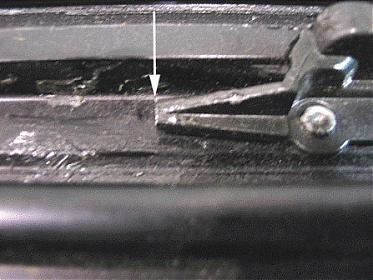
The end on the wind deflector retaining bracket may have broken off, which causes the wind deflector to function improperly.
Correction
Remove the headliner following SI procedures.
Open the sunroof and protect the interior.
Clean the sunroof tracks around the broken bracket.
Tape off the area around the bracket to contain the drill shavings in the next step.
Using a 1/4 inch drill bit, drill off the head of the two rivets.
Vacuum the drill shavings.
Using a small drift, pound out the rest of the rivet in the sunroof module.
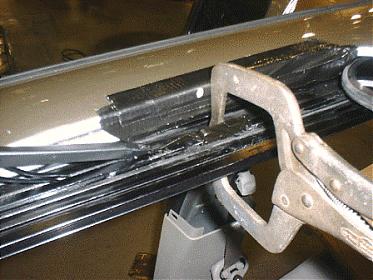
Attach the wind deflector to the new bracket and clamp the bracket in place.
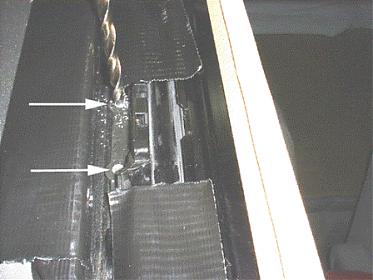
Using the holes as a guide in the sunroof module, drill 1/8 inch holes through the bottom of the new brackets.
Install two 1/8 x 3/8 inch long rivets (obtained locally) through the BOTTOM of the sunroof module to the new bracket.
Apply weatherstrip adhesive to the top of the rivet head.
Replace the bracket on the other side following steps 3 through 10.
Important: Make sure the tracks are clean and no metal shavings are present.
Cycle the sunroof several times to make sure the sunroof functions properly.
Reinstall the Headliner following SI procedures.
Parts Information
Part Number
Description
20794829
Bracket-Sun RF Frm SI LH
20794830
Bracket-Sun RF Frm Si RH
Subject: Wind/Air Deflector Bracket on Sunroof Module Broken (Replace Bracket)
Models: 2006-2009 Chevrolet HHR
--------------------------------------------------------------------------------
Condition
Some customers may comment that the sunroof will not close because the wind deflector won't fold down properly when the sunroof glass closes.
Cause
The end on the wind deflector retaining bracket may have broken off, which causes the wind deflector to function improperly.
Correction
Remove the headliner following SI procedures.
Open the sunroof and protect the interior.
Clean the sunroof tracks around the broken bracket.
Tape off the area around the bracket to contain the drill shavings in the next step.
Using a 1/4 inch drill bit, drill off the head of the two rivets.
Vacuum the drill shavings.
Using a small drift, pound out the rest of the rivet in the sunroof module.
Attach the wind deflector to the new bracket and clamp the bracket in place.
Using the holes as a guide in the sunroof module, drill 1/8 inch holes through the bottom of the new brackets.
Install two 1/8 x 3/8 inch long rivets (obtained locally) through the BOTTOM of the sunroof module to the new bracket.
Apply weatherstrip adhesive to the top of the rivet head.
Replace the bracket on the other side following steps 3 through 10.
Important: Make sure the tracks are clean and no metal shavings are present.
Cycle the sunroof several times to make sure the sunroof functions properly.
Reinstall the Headliner following SI procedures.
Parts Information
Part Number
Description
20794829
Bracket-Sun RF Frm SI LH
20794830
Bracket-Sun RF Frm Si RH
Last edited by ChevyMgr; 06-03-2009 at 09:33 AM.
12-15-2008, 08:51 AM
#18
Founding Member
Thread Starter
Join Date: 11-23-2007
Location: Texas
Posts: 8,210
Pic5055
#PIC5055: Rear Hatch Will NOT Lock - keywords door fuse gate latch lift liftgate lock pad release RKE touch UBEC unlock - (Dec 11, 2008)
Subject: Rear Hatch Will NOT Lock
Models: 2006-2009 Chevrolet HHR
--------------------------------------------------------------------------------
The following diagnosis might be helpful if the vehicle exhibits the symptom(s) described in this PI.
Condition/Concern:
The customer will notice that at anytime by using the touch pad on the rear lift gate the lift gate will open WITHOUT unlocking the vehicle.
Recommendation/Instructions:
If this condition exists, check for a fuse in position #11 in the Underhood Buss Electrical Center. If there is a fuse in that position, remove it, as it is not supposed to be there.
Note: A fuse in that position will cause the release relay (coil side) to stay powered up at all times and will only need a ground (touch pad) to activate the relay.
If no fuse is present then check for voltage on circuit #1221 (WH/BK) and proceed with diagnostics.
Last edited by ChevyMgr; 06-03-2009 at 09:33 AM.
12-18-2008, 11:14 AM
#19
Founding Member
Thread Starter
Join Date: 11-23-2007
Location: Texas
Posts: 8,210
Pip4547
2006 HHRs in Emission Testing States
Document ID: 2219832
--------------------------------------------------------------------------------
#PIP4547: No Communication With Emission Test Equipment - Reprogram ECM - keywords 240 controls facility failed inspection I/M IM no state - (Dec 17, 2008)
Subject: No Communication With Emission Test Equipment- Reprogram ECM
Models: 2006 Chevrolet Cobalt
2006 Chevrolet HHR
2006 Saturn ION
With 2.2L Engine - (RPO-L61)
--------------------------------------------------------------------------------
The following diagnosis might be helpful if the vehicle exhibits the symptom(s) described in this PI.
Condition/Concern:
Some emission test equipment may not communicate with the ECM but normal communication is noted with a Tech 2.
Recommendation/Instructions:
If this is encountered, reprogram the ECM with the latest calibrations and re-evaluate the concern.
Important: With the ignition is OFF, apply the parking brake to disable the daytime running lights (DRL) prior to starting the reprogramming procedures. On models equipped with an "Auto Headlamp Feature", the headlamps must be turned off prior to reprogramming.
Important: Select the "Reprogram" option in order to reprogram the ECM.
Please follow this diagnostic or repair process thoroughly and complete each step. If the condition exhibited is resolved without completing every step, the remaining steps do not need to be performed.
Last edited by ChevyMgr; 02-25-2009 at 07:57 AM.
01-07-2009, 08:37 AM
#20
Founding Member
Thread Starter
Join Date: 11-23-2007
Location: Texas
Posts: 8,210
09-08-64-001
#09-08-64-001: Rear Side Cargo Door Not Opening With Button Activation (Add Washers to Check Link) - (Jan 5, 2009)
Subject: Rear Side Cargo Door Not Opening With Button Activation (Add Washers to Check Link)
Models: 2008-2009 Chevrolet HHR Panel Van
--------------------------------------------------------------------------------
Condition
Some customers may comment that the rear side cargo door(s) intermittently will not release open upon first activation of the instrument panel (IP) buttons, or by using the key fob.
Cause
Assembly variation may be causing the door latch mechanism to stick or only release intermittently.
Correction
Note: Ensure that the door latch does react to the IP and key fob buttons, and that there is no drag between the latch and striker.
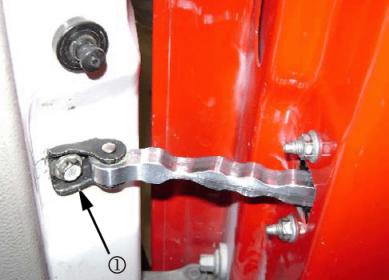
Remove the bolt (1) holding the rear side cargo door check link bracket to the "B" pillar.
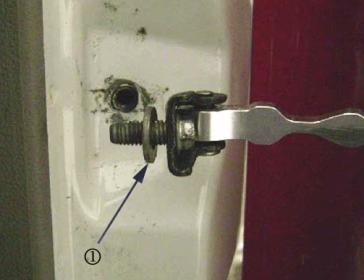
Add a 2 mm thick washer (1), P/N 11609679, or equivalent, to the bolt. Slide the washer onward to rest against the outer surface of the bracket.
Position the check link bracket to the B pillar and reinstall the bolt.
Tighten
Tighten the bolt to 20 N�m (15 lb ft).
Verify that the door is releasing open upon first activation of the IP or key fob buttons. If the door is releasing properly, repair is complete. If the condition has NOT been corrected, continue on to step 5.
Remove the rear side cargo door interior trim panel. Refer to Rear Side Door Trim Panel Replacement in SI.
Pull the top front edge of the water deflector downward to gain access to the check link.
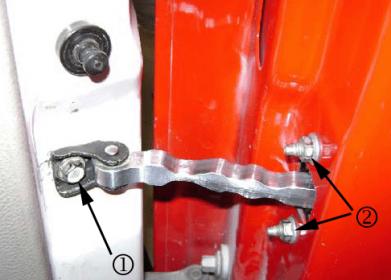
Remove the "B" pillar bolt (1) and the nuts (2) retaining the check link to the door.
Remove the check link through the inside of the door.
Add a 2 mm thick washer (1) , P/N 11609679, or equivalent, to each bolt on the check link (two total). Slide them onward to rest against the body of the check link.
Reinstall the check link through the inside of the door, and position the check link to the inner door frame.
Install the nuts (2) that retain the check link to the door.
Tighten
Tighten the nuts to 10 N�m (89 lb in).
Position the check link bracket to the "B" pillar and reinstall the bolt (1) with washer.
Tighten
Tighten the bolt to 20 N�m (15 lb ft).
Verify that the door is releasing open upon first activation of the IP or key fob buttons.
Install the door trim panel. Refer to Rear Side Door Trim Panel Replacement in SI.
Parts Information
Part Number Description Qty
11609679 Washer (2 mm thick) 10 per package
Subject: Rear Side Cargo Door Not Opening With Button Activation (Add Washers to Check Link)
Models: 2008-2009 Chevrolet HHR Panel Van
--------------------------------------------------------------------------------
Condition
Some customers may comment that the rear side cargo door(s) intermittently will not release open upon first activation of the instrument panel (IP) buttons, or by using the key fob.
Cause
Assembly variation may be causing the door latch mechanism to stick or only release intermittently.
Correction
Note: Ensure that the door latch does react to the IP and key fob buttons, and that there is no drag between the latch and striker.
Remove the bolt (1) holding the rear side cargo door check link bracket to the "B" pillar.
Add a 2 mm thick washer (1), P/N 11609679, or equivalent, to the bolt. Slide the washer onward to rest against the outer surface of the bracket.
Position the check link bracket to the B pillar and reinstall the bolt.
Tighten
Tighten the bolt to 20 N�m (15 lb ft).
Verify that the door is releasing open upon first activation of the IP or key fob buttons. If the door is releasing properly, repair is complete. If the condition has NOT been corrected, continue on to step 5.
Remove the rear side cargo door interior trim panel. Refer to Rear Side Door Trim Panel Replacement in SI.
Pull the top front edge of the water deflector downward to gain access to the check link.
Remove the "B" pillar bolt (1) and the nuts (2) retaining the check link to the door.
Remove the check link through the inside of the door.
Add a 2 mm thick washer (1) , P/N 11609679, or equivalent, to each bolt on the check link (two total). Slide them onward to rest against the body of the check link.
Reinstall the check link through the inside of the door, and position the check link to the inner door frame.
Install the nuts (2) that retain the check link to the door.
Tighten
Tighten the nuts to 10 N�m (89 lb in).
Position the check link bracket to the "B" pillar and reinstall the bolt (1) with washer.
Tighten
Tighten the bolt to 20 N�m (15 lb ft).
Verify that the door is releasing open upon first activation of the IP or key fob buttons.
Install the door trim panel. Refer to Rear Side Door Trim Panel Replacement in SI.
Parts Information
Part Number Description Qty
11609679 Washer (2 mm thick) 10 per package
Last edited by ChevyMgr; 06-03-2009 at 09:33 AM.

