Solution -- Default AC Vent Issue
 10-01-2012, 02:41 PM
#1
New Member
Thread Starter

Join Date: 04-13-2012
Location: Jackson, TN
Posts: 23
I know this has been discussed a great deal before, but I've found a genuine solution this issue.
Please note that as is typical with this sort of thing, I offer this freely, but without guarantee of any sort -- if you choose to do it and trash something, it's not my fault.
I have actually done this, and it does work as described, but I haven't had it in place all that long, so it's possible (though unlikely) that it may develop some sort of quirk down the line.
Standing on the shoulders of giants, I started from the point of snipping the signal pink/white wire so that the controller can't switch back to vent.
This approach has the advantage of being effective, simple and cheap. The disadvantage is that you give up being able to switch vent if you want it -- such as if you have a toddler with a full diaper, or you want to run the defroster with outside air (which works much better for reasons I've never quite understood). Also, the panel light will still show that it's on vent even when it's not (unless you push the recirc button). That may not bother others but it's the sort of thing that makes me nuts.
The first thing I experimented with was to clip and cross the pink/white wire with the green/black wire. The green/black wire carries the signal to go to recirc mode. Basically, this fools the controller into working backwards on the vent/recirc settings.
The advantage to this is that the system puts itself into recirc, but allows manually switching to vent. The main disadvantage is that if you want to use vent on a function that disallows recirc (such as defroster, again) the system will force you to remain in recirc, because it thinks it's the vent. Also, the indicator lights are still backwards.
I can confirm that the system switches between the two states just fine with that wire-crossing mod. If that suits your needs, then you're all done.
If you want a full solution, however, and you're not afraid of soldering, capacitors, resistors, relays and schematics, read on.
 10-01-2012, 02:41 PM
#2
New Member
Thread Starter
Join Date: 04-13-2012
Location: Jackson, TN
Posts: 23
I found myself thinking, "Gee, what I really need here is something to automatically push this stinking button for me. Then I could have otherwise normal control over the AC system, but I wouldn't have to push that button all the time."
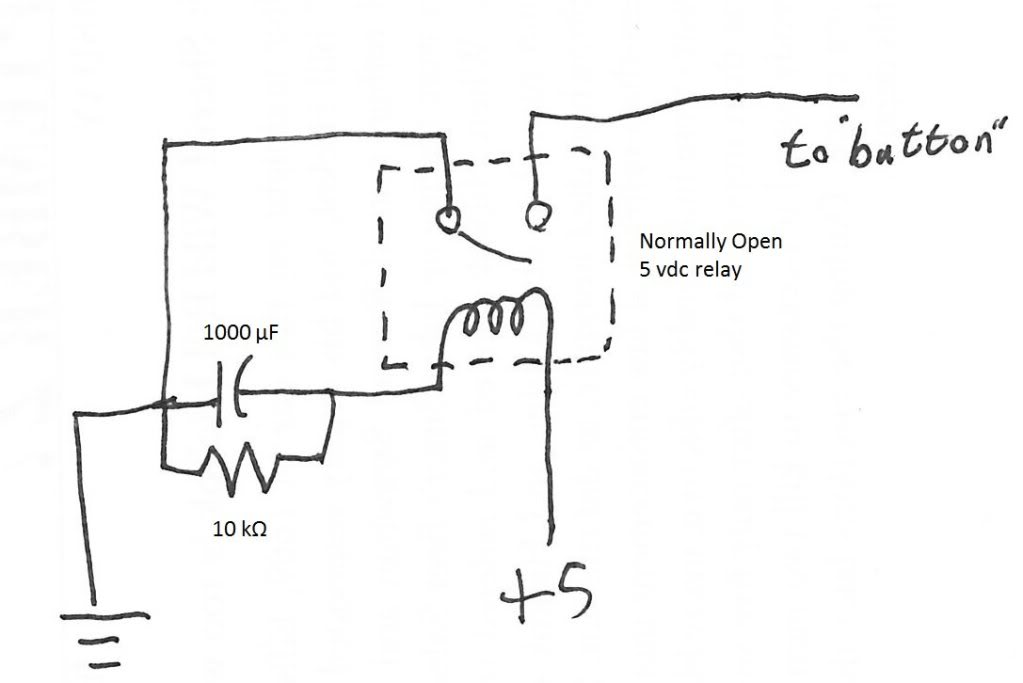
Talking a bit with my buddy Google lead me to this circuit which takes a constant input and turns it into a momentary one (Note that I did not create this circuit, I don't claim any credit for coming up with it):
Thanks to a fellow forumite db/sb, I had the details I needed to identify the pins for power and ground, so I figured that if I connected a circuit like this the constant signal of the AC controller's power supply and ground, and used it to close the contact on the button to shift to vent, then I'd be all set.
Not quite so simple, unfortunately. The "button" is a contact pad such as the ones used in the keyfob, so there isn't an obvious point to tie into.
Undeterred, I broke out the multi-meter and started testing contacts until I identified an empty soldier pad that connected directly to the "button" in question. Now I just had to build and install the rascal, and see how it works, of course.
I've done just that, and it does indeed work -- when I start the car, it switches to recirc all by itself.
So now I'm sharing the details for those who might want to do the same thing.
Note that I did this to a 2011 AC controller, but I've confirmed that the contacts are the same in the spare 2009 controller I bought off ebay to experiment on, so I expect it's good across the board. I'd suggest confirming the contact identities on the "front" board with a multi-meter before you try this on other year models, but I don't expect them to be different.
10-01-2012, 02:42 PM
#3
New Member
Thread Starter
Join Date: 04-13-2012
Location: Jackson, TN
Posts: 23
First, remove your AC control unit. Start by popping the console rim (put your fingers in the bottom of the two top, center ac vents and pull sharply, it should pop loose), disconnect whatever control lines you feel are necessary to shift the thing out of your way.
Next remove the four hex-bolts that hold the AC control unit in place, and disconnect the three plugs on its back side. If you want to just clip the one wire, or clip and cross the two, you can do that here (they're in the plug on the left-hand side as you face forward), put everything back together and go on about your business.
If you want the full mod carry on.
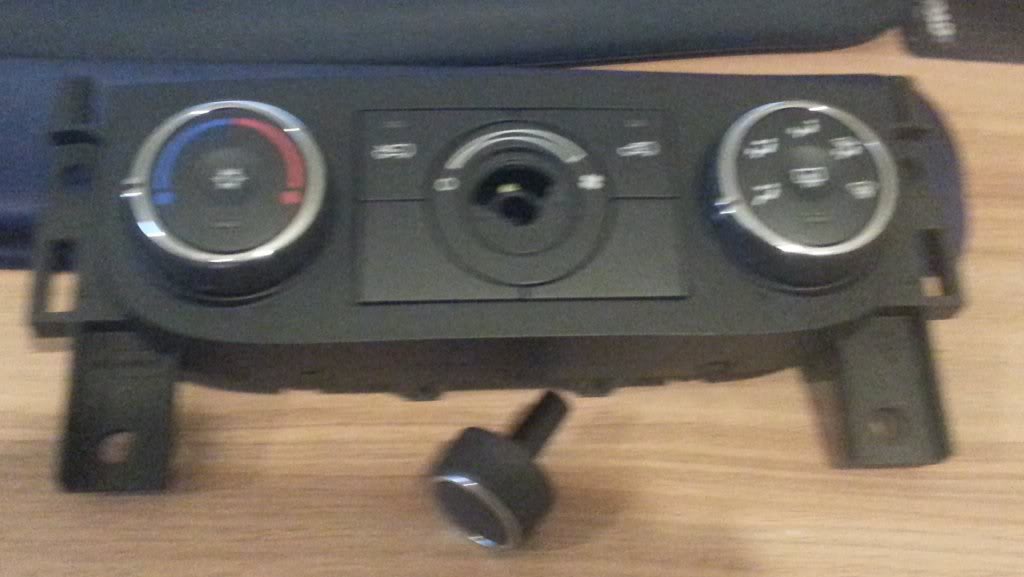
To open the AC controller case, start by pulling the AC fan speed knob loose from the front of the unit. It should slide off fairly easily (sorry for the blurry pic, but details aren't vital on this step, so I didn't retake it):
Next remove the four torx screws on the back.
Now there are four tabs (two each top and bottom -- they're pretty obvious from looking) that are holding the two pieces of the unit together, gently pull them away from their catches and tease the two parts apart.
Now you have two pieces connected by a ribbon wire.
It's easier to work with if you disconnect the ribbon wire, but the thing is kinda difficult to detach (only the connector on the "front" board will come loose at all), and I'm not going to go into doing so. If you feel up to removing it, knock yourself out, but it's really not necessary in order to do this mod.
There are two basic tasks to this mod: building the "button pusher" assembly and connecting it to the AC controller.
I suggest building the assembly first, probably even before you pull the AC control unit. Follow the schematic above, for this. You need a 1000�F capacitor (rated at greater than 5VDC), a 10kΩ resistor (.25 Watt is ample) and a relay that has a normally open connection and can be triggered by 5 VDC. The rest of the details aren't important. I had most of these parts lying around from a past life, but some web research suggests that they can all be had for about $10 -- that's from Radio Shack, whose prices are generally kinda high.
A note about the capacitor for the uninitiated: a 1000�F cap is pretty much going to be an electrolytic capacitor. Those things have a specific positive/negative orientation which needs to be complied with or they will burst. The orientation is always pretty clearly marked, so please pay attention. Also, these things have a rated temp and lifetime. Parsing those ratings to real world conditions gets complex, but if you find something 185�F or higher and 1000 hours or greater the cap will almost certainly outlast the car, unless you live in Death Valley or something -- it's the heat that does for them.
Due to the capacitor needing some time to discharge when the power goes off, this "button pusher" circuit does take some time to reset (about 30 seconds for my build), so turning the car off and back on within that discharge period means that it won't push the button again that time, but that shouldn't be an issue very often.
I'm not including much detail on connecting the parts because it's of limited use. Your components may not look like mine, so how exactly I hooked them up may not be helpful. If you can follow the schematic, you'll do fine, if you can't, consult a friend who can. Here's a picture of my assembly after soldering, just for grins.
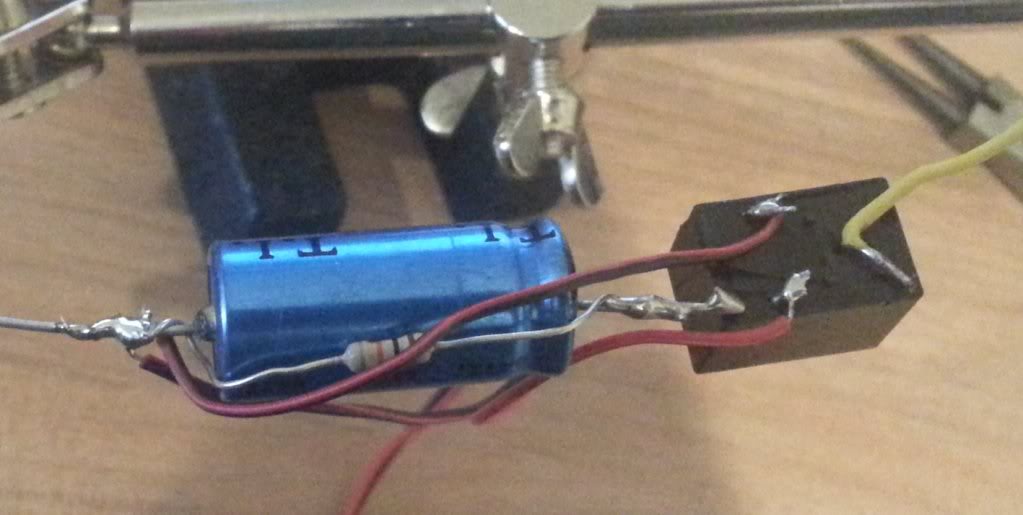
Once you've built it, I suggest wrapping it in black tape or heat shrink tubing or whatever pleases you and is handy. I didn't have any heat shrink tubing big enough, so I used black tape.
Now we look at connecting it up.
Here is the "back" board (that is the one that is in the back part of the control assembly):
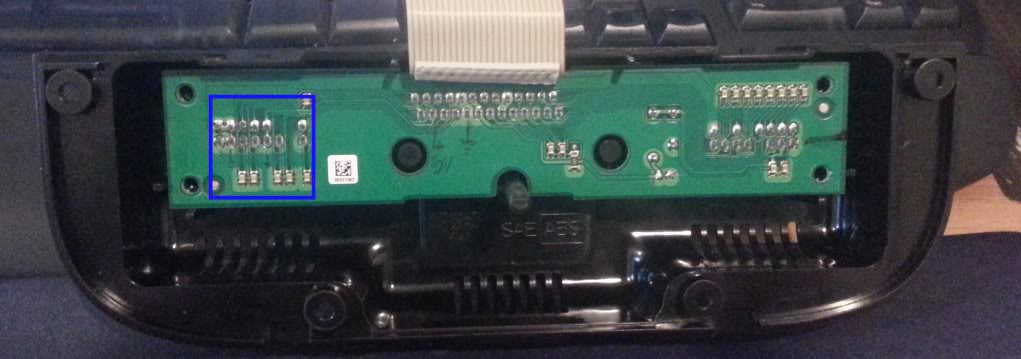
And here is the part of it we're interested in:
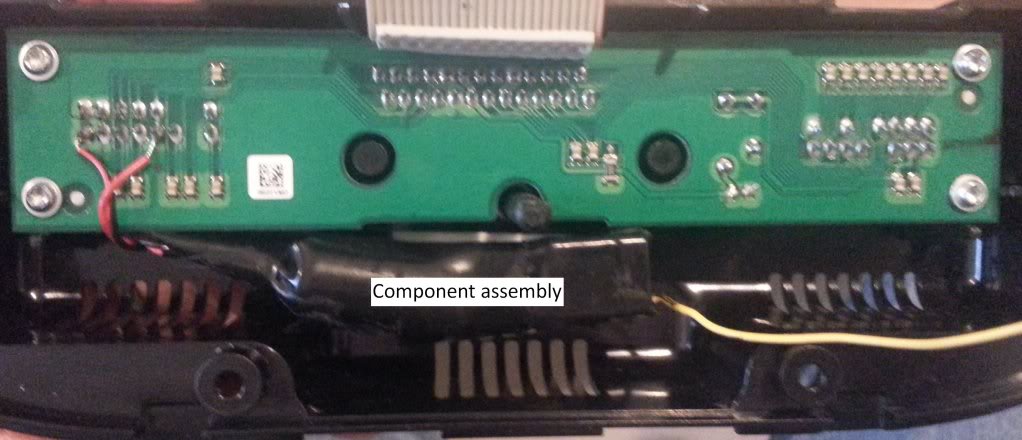
Soldier the indicated ground and power pins to your wires from the button pusher circuit you built (make sure you match them!), then tuck the assembly into the space at the bottom of the enclosure. I added some double sticky foam tape to inhibit rattles. Rattles being another thing that makes me nuts.
Here's my assembly in place:
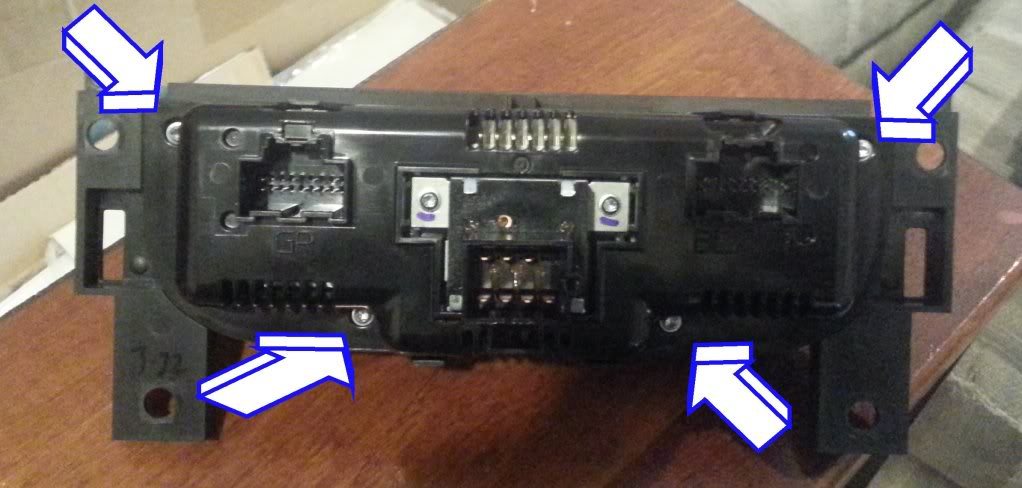
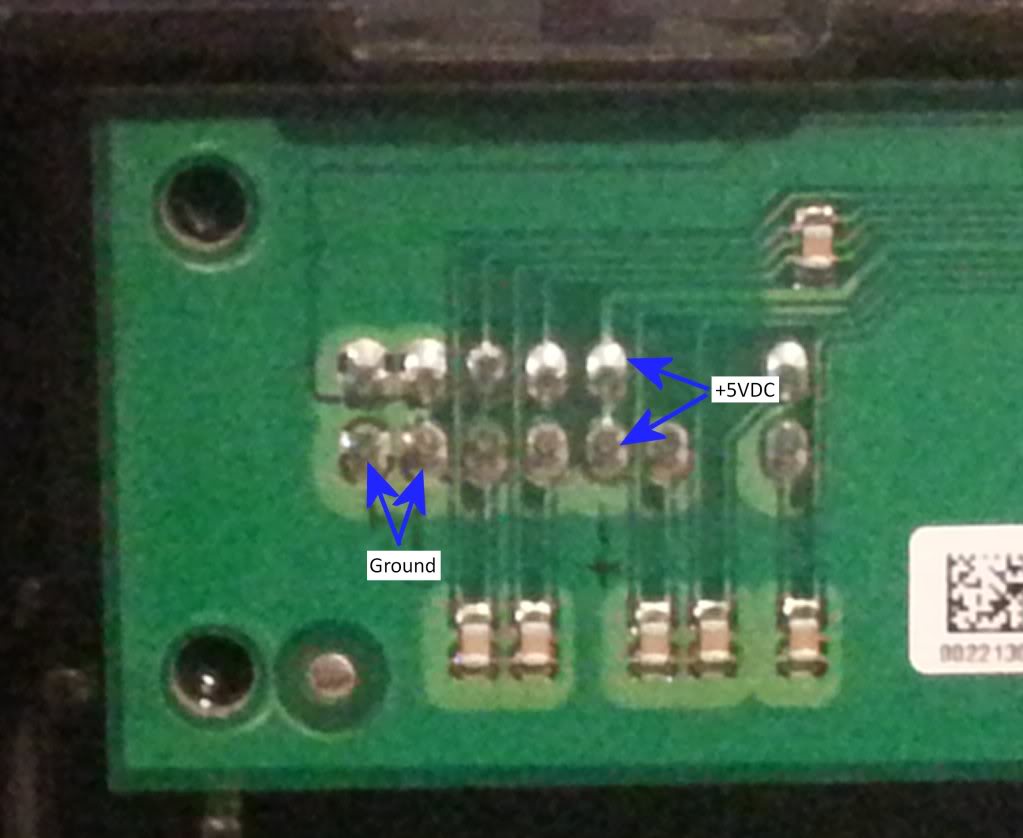
Now for the twitchy bit. Here is the "front" board:
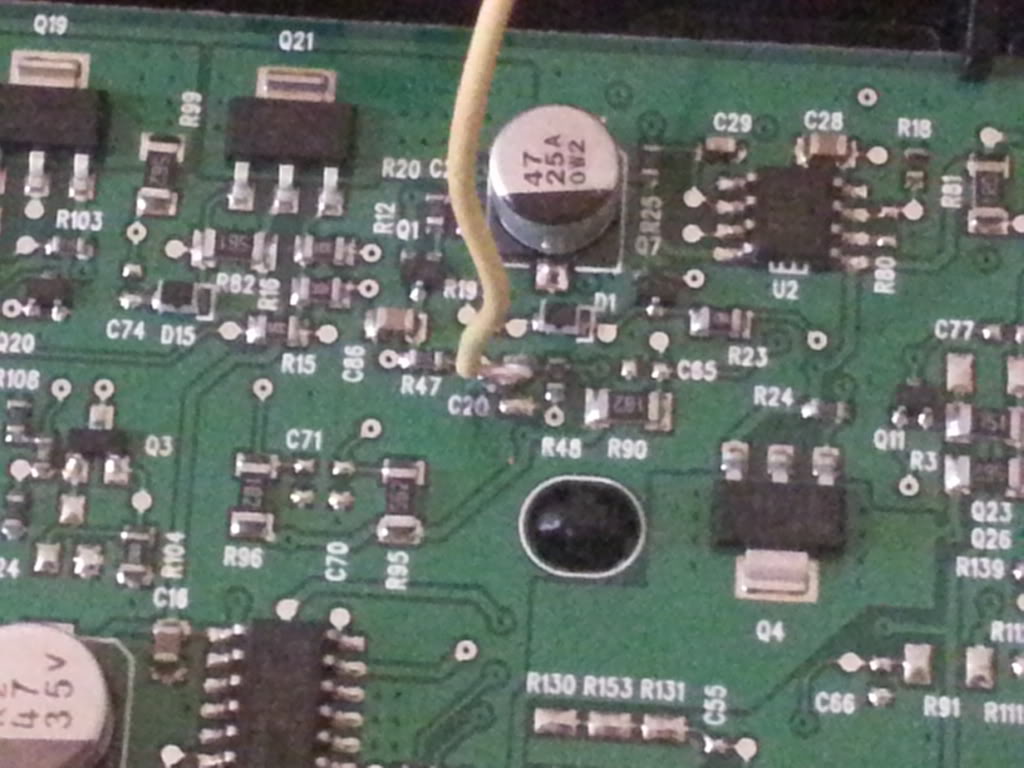
And here is the bit we're interested in:
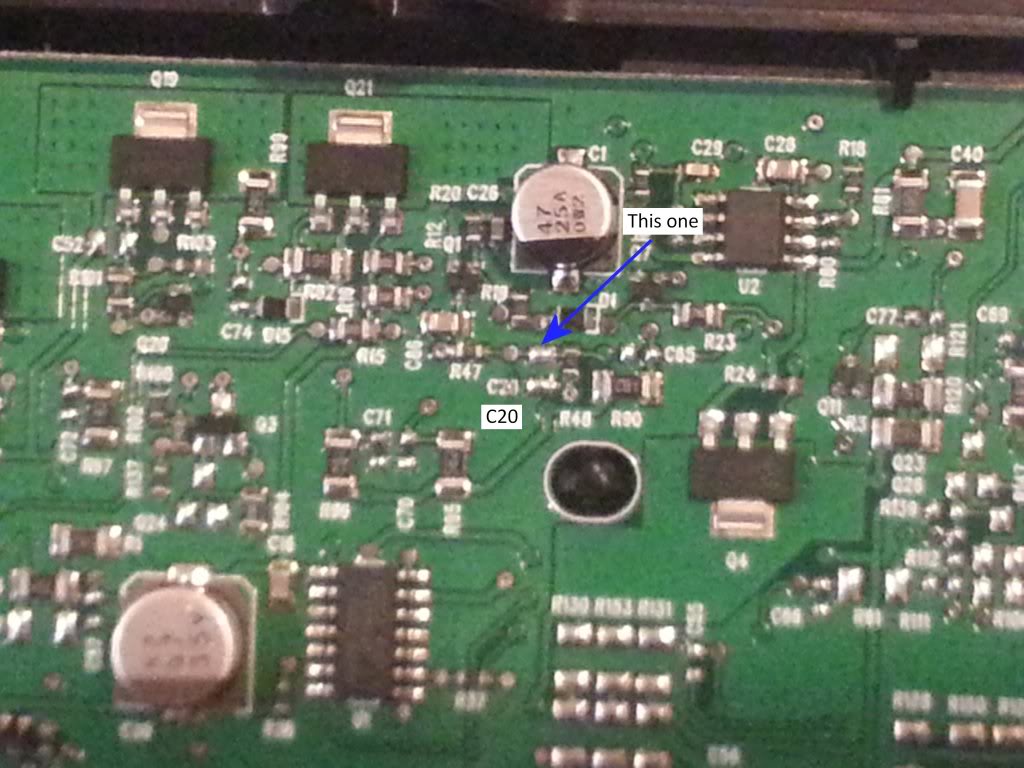
Note the label "C20" just below our target solder pads -- it's helpful for determining that you're in the right place.
Also note that we're interested in the second pad above that label. The bottom one is a ground connection, so not much help.
Before you solder here, please be aware (if you aren't already) that you're working next to surface mount components. They're pretty heat sensitive, so do your soldering quick-quick like a bunny rabbit, lest you slag something. Slagging is bad. Slagging lets out the Magic Smoke. If you let the Magic Smoke out of anything, the control console will very likely stop working properly. You have been warned.
Also, make sure you don't accidentally over solder to any other bits on the board. That could be ... not good, and is also likely to make your controller unit malfunction.
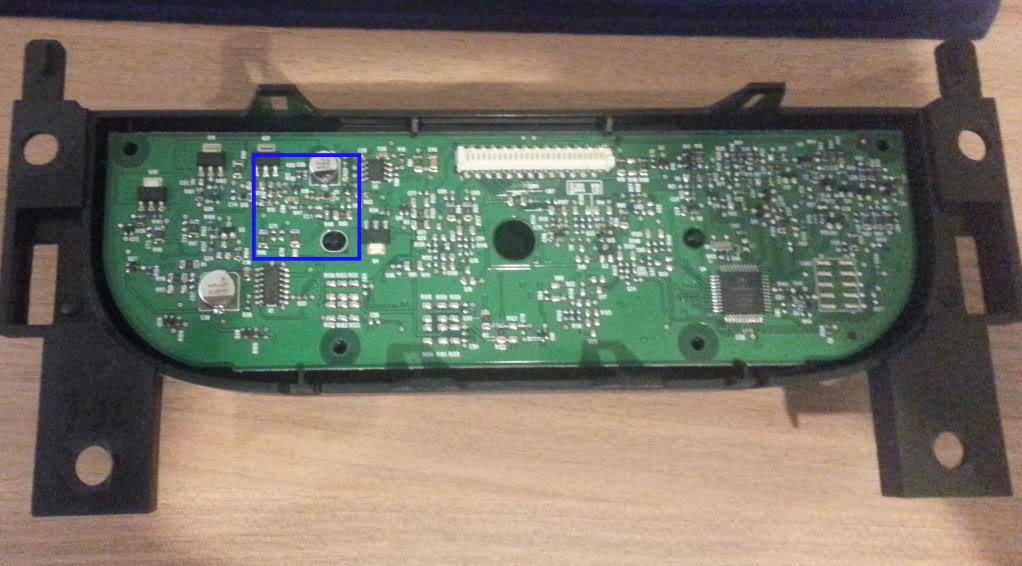
Here's the connection actually made, just to be thorough:
Now all that's left is putting it all back together, reinstalling the controller, buttoning up the console and enjoying your new default recirc AC!
Next remove the four hex-bolts that hold the AC control unit in place, and disconnect the three plugs on its back side. If you want to just clip the one wire, or clip and cross the two, you can do that here (they're in the plug on the left-hand side as you face forward), put everything back together and go on about your business.
If you want the full mod carry on.
To open the AC controller case, start by pulling the AC fan speed knob loose from the front of the unit. It should slide off fairly easily (sorry for the blurry pic, but details aren't vital on this step, so I didn't retake it):
Next remove the four torx screws on the back.
Now there are four tabs (two each top and bottom -- they're pretty obvious from looking) that are holding the two pieces of the unit together, gently pull them away from their catches and tease the two parts apart.
Now you have two pieces connected by a ribbon wire.
It's easier to work with if you disconnect the ribbon wire, but the thing is kinda difficult to detach (only the connector on the "front" board will come loose at all), and I'm not going to go into doing so. If you feel up to removing it, knock yourself out, but it's really not necessary in order to do this mod.
There are two basic tasks to this mod: building the "button pusher" assembly and connecting it to the AC controller.
I suggest building the assembly first, probably even before you pull the AC control unit. Follow the schematic above, for this. You need a 1000�F capacitor (rated at greater than 5VDC), a 10kΩ resistor (.25 Watt is ample) and a relay that has a normally open connection and can be triggered by 5 VDC. The rest of the details aren't important. I had most of these parts lying around from a past life, but some web research suggests that they can all be had for about $10 -- that's from Radio Shack, whose prices are generally kinda high.
A note about the capacitor for the uninitiated: a 1000�F cap is pretty much going to be an electrolytic capacitor. Those things have a specific positive/negative orientation which needs to be complied with or they will burst. The orientation is always pretty clearly marked, so please pay attention. Also, these things have a rated temp and lifetime. Parsing those ratings to real world conditions gets complex, but if you find something 185�F or higher and 1000 hours or greater the cap will almost certainly outlast the car, unless you live in Death Valley or something -- it's the heat that does for them.
Due to the capacitor needing some time to discharge when the power goes off, this "button pusher" circuit does take some time to reset (about 30 seconds for my build), so turning the car off and back on within that discharge period means that it won't push the button again that time, but that shouldn't be an issue very often.
I'm not including much detail on connecting the parts because it's of limited use. Your components may not look like mine, so how exactly I hooked them up may not be helpful. If you can follow the schematic, you'll do fine, if you can't, consult a friend who can. Here's a picture of my assembly after soldering, just for grins.
Once you've built it, I suggest wrapping it in black tape or heat shrink tubing or whatever pleases you and is handy. I didn't have any heat shrink tubing big enough, so I used black tape.
Now we look at connecting it up.
Here is the "back" board (that is the one that is in the back part of the control assembly):
And here is the part of it we're interested in:
Soldier the indicated ground and power pins to your wires from the button pusher circuit you built (make sure you match them!), then tuck the assembly into the space at the bottom of the enclosure. I added some double sticky foam tape to inhibit rattles. Rattles being another thing that makes me nuts.
Here's my assembly in place:
Now for the twitchy bit. Here is the "front" board:
And here is the bit we're interested in:
Note the label "C20" just below our target solder pads -- it's helpful for determining that you're in the right place.
Also note that we're interested in the second pad above that label. The bottom one is a ground connection, so not much help.
Before you solder here, please be aware (if you aren't already) that you're working next to surface mount components. They're pretty heat sensitive, so do your soldering quick-quick like a bunny rabbit, lest you slag something. Slagging is bad. Slagging lets out the Magic Smoke. If you let the Magic Smoke out of anything, the control console will very likely stop working properly. You have been warned.
Also, make sure you don't accidentally over solder to any other bits on the board. That could be ... not good, and is also likely to make your controller unit malfunction.
Here's the connection actually made, just to be thorough:
Now all that's left is putting it all back together, reinstalling the controller, buttoning up the console and enjoying your new default recirc AC!
10-02-2012, 01:51 AM
#5
Platinum Member

Join Date: 04-09-2006
Location: Vancouver, BC, Canada
Posts: 7,032
Keep at it man - so far the documentation and research is great.
Now to gets the bugs out - and if you do, THIS is what I would say is worthy of being called "MOD", rather than hanging a Hello Kitty air freshner from the mirror and doin' a strut around the garage.
Go for it. Keep us posted.
Now to gets the bugs out - and if you do, THIS is what I would say is worthy of being called "MOD", rather than hanging a Hello Kitty air freshner from the mirror and doin' a strut around the garage.
Go for it. Keep us posted.
10-02-2012, 05:31 AM
#6
Senior Member

Join Date: 07-25-2012
Location: Columbus, Ohio
Posts: 602
hey Natch i have a question for you seein as how you seem to be educated on this. when i turn my air completely off it still blows out enough air to be noticeable. and im gettin tired of putting on defrost or closing all my vents. have you or anybody else had this issue? and its temperature regulated as in, if its set to hot its hot, if its set to cold its cold. i guess the air flow amount while on "off" would be what i would say to be the lowest setting. its very frustrating.. im a window down kinda guy and i would love to be able to actually kill the air flow in my hhr. thanks in advance!
10-02-2012, 06:01 AM
#7
Senior Member

Join Date: 07-17-2006
Location: Dallas, GA
Posts: 6,050
Nice write up. Good luck with it.
This is very common in GM products. I've heard various reasons why it's set that way. One way to bypass is if your not going to have the fan running, turn it to recir, that shuts off the airflow and won't enguage the AC compressor.
hey Natch i have a question for you seein as how you seem to be educated on this. when i turn my air completely off it still blows out enough air to be noticeable. and im gettin tired of putting on defrost or closing all my vents. have you or anybody else had this issue? and its temperature regulated as in, if its set to hot its hot, if its set to cold its cold. i guess the air flow amount while on "off" would be what i would say to be the lowest setting. its very frustrating.. im a window down kinda guy and i would love to be able to actually kill the air flow in my hhr. thanks in advance!