Camshaft Position Actuator Solenoid Valve Replacement (w. pics) - P0010/11 P0013/14
 01-08-2015, 07:16 PM
#521
Platinum Member
Thread Starter

Join Date: 04-09-2006
Location: Vancouver, BC, Canada
Posts: 7,032
Another win for Whopper's tutorial and my HHR. I did not threaten the best time but got both the intake and exhaust solenoids replaced, changed the air filter and followed up with an oil and filter change. All seems well. I got the gray clips out with no problem but still struggled to get the connectors off the top.
 01-18-2015, 07:30 AM
#522
New Member

Join Date: 03-17-2012
Location: Florence Ky
Posts: 28
Thank you Whopper and everyone else who chimed in helpfully on this post. I had the 13/14 codes. After reading this post and living with the codes for a while... no money and too much working trying to survive. I finally got the chance to get both the intake and exhaust solenoids, along with new plugs and air filter. The only problem I had was with the grey clips. I did break one. While I had it apart I inspected the throttle body and went ahead and removed it and cleaned it as well. My HHR is happy now, just need to get it into the dealer for an oil change.
01-25-2015, 08:47 AM
#523
Senior Member

Join Date: 04-14-2010
Location: Wisconsin
Posts: 432
I had a problem removing the actuators. They didn't want to come out or even turn. I didn't want to break them so I filled the cavity with penetrating oil and waited a week. Then they would turn slightly but still didn't come out easy. When I finally got them out, it appeared to be the o ring that was stuck, probably due to heat. The actuators were very clean but the coil was open on the exhaust actuator.
02-16-2015, 04:55 PM
#524
Senior Member

Join Date: 03-16-2006
Location: Tucson Arizona
Posts: 217
Use for Old Intake and Exhaust Solenoids
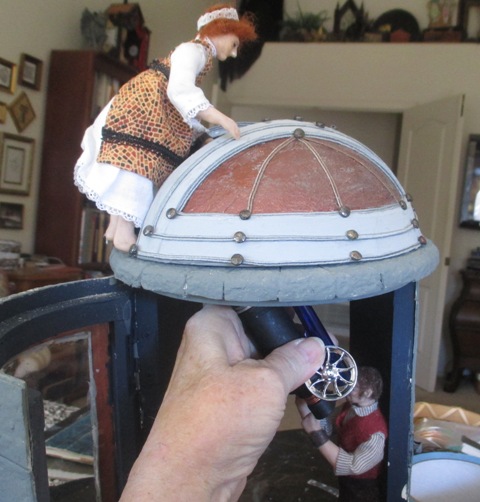
My wife is a miniaturist and is doing something pretty cool with my replaced exhaust and intake solenoids. For Christmas, I bought her a wooden container with a bottle of pretty good rum in it. I got the rum, she got the container. She has transformed the container into an observatory, where a solenoid will become the telescope. This has involved many steps that she covers in a daily blog but I am attaching a couple of photos for you to get the idea. Our old HHR solenoids did not go to waste!

02-16-2015, 10:32 PM
#525
Platinum Member
Thread Starter
Join Date: 04-09-2006
Location: Vancouver, BC, Canada
Posts: 7,032
LOL - you made my day!!!!! Ingenious.
Now I have a pair of used lower control arms....................... :)
Now I have a pair of used lower control arms....................... :)
02-18-2015, 11:42 AM
#526
Senior Member
Join Date: 03-16-2006
Location: Tucson Arizona
Posts: 217
Intake and Exhaust Solenoids as Telescopes
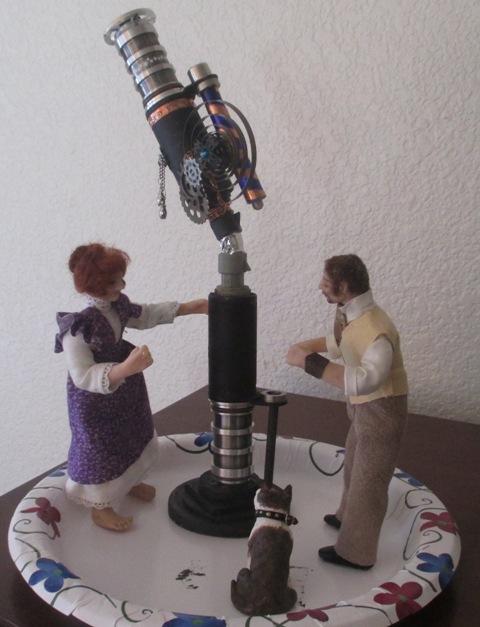
One more photo showing both solenoids that will be used as telescopes in a "miniature" observatory. Thanks for indulging me, just thought it was pretty unique.
02-18-2015, 05:27 PM
#527
Platinum Member
Thread Starter
Join Date: 04-09-2006
Location: Vancouver, BC, Canada
Posts: 7,032
Very cool!!!! 
Ok, now we need to talk about you playing with dolls - especially at your age.....

Ok, now we need to talk about you playing with dolls - especially at your age.....
03-05-2015, 11:00 AM
#528
New Member

Join Date: 06-25-2010
Location: Norfolk, VA
Posts: 20
"Variable Valve Timing (VVT) Camshaft Solenoids"
I just had both solenoids replaced at my local AAA maintenance center. Also involved replacing spark plugs, oil change (due they said because the oil (still in mid life range) had caused the solenoids to malfunction), "3 part fuel injection" service.
Damage: Parts 289.90, Labor 574.91, Env Fees/Shop Suppl 31.06, Tax 19l26 for a sum total of $915.13.
Last edited by centaur1129; 03-05-2015 at 11:03 AM. Reason: Correction
03-05-2015, 11:03 AM
#529
Administrator

Join Date: 10-13-2011
Location: Welland,Ont Canada
Posts: 36,519
Wow, but if you don't have the tools or the knowledge to fix these things then that's money well spent!
but just a few minutes watching this helped me figure it out
but just a few minutes watching this helped me figure it out
04-21-2015, 02:51 PM
#530

Join Date: 11-23-2013
Location: Seattle
Posts: 7
Thanks Everyone!
On the tutorial / instruction on the Camshaft Position Solenoid Valve Replacement. Besides the grommets on the airbox, it was easier than replacing the headlight bulbs!