
Windshield graphics and wipers


Senior Member
Joined: 04-19-2006
Posts: 5,065
From: Arvada CO
I'm going out later and will be taking some pictures of my HHR. I have the one you're referring to Mike. I'll get a nice photo and post it here and email it as well. 
This is the only one I have so far...and it's not a real good one.
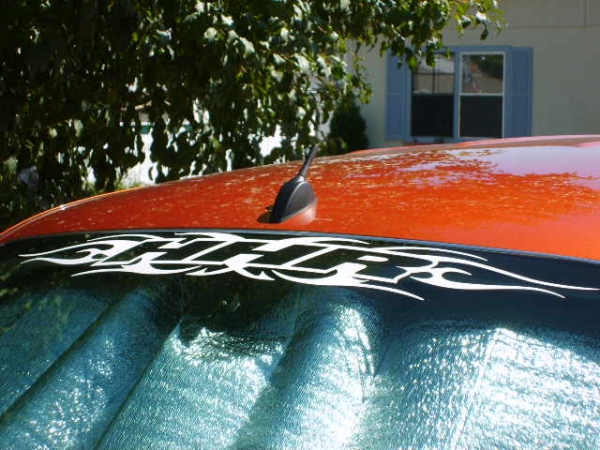
This is the only one I have so far...and it's not a real good one.

Founding Member
Joined: 08-21-2005
Posts: 1,207
From: NE OH

 .
.
Senior Member
Joined: 04-19-2006
Posts: 5,065
From: Arvada CO
When I put mine on, I folded it in half...not creased...just enough so I had an indentation in the decal. I then laid it on the windshield and eyeballed where I wanted things to lay, then cleaned the windshield real good where it was going to be placed. I removed the backing from the sticker and placed it on the windshield lightly and stood back to be sure I liked the placement...which I did. I then took a credit card and started in the center and pressed the decal on...working towards the outside of the car and then went to other side and did the same thing. When all the bubbles were out, I removed the top portion of the decal slowly (cut a slit in the center area) pulling it towards the outside of the car as well. Had no problems with bubbles or lifting doing it this way. 
Senior Member
Joined: 10-14-2005
Posts: 5,359
From: SoCal
Here are our "official" SoCal instructions that ship with all our atandard banners:
SoCalHHR's Windshield Graphics Installation Instructions
1) Clean glass well with isopropyl alcohol
2) Measure & mark the center of the decal (18")
3) Place a piece of tape with a pen mark above the windshield indicating center for reference
4) Slit decal with scissors every inch from the edge, allowing decal to "flex" to the angle you want
5) Remove a 2" section of the backing from the center rear paper area of decal only
6) Carefully stick the center of decal where desired
7) Leaving backing paper on pass side, work on driver's side first.
8) Press center down well, remove backing paper from driver side.
Gently curve decal as desired, working outward from center.
Go slow and curve gently towards decal end.
9) Repeat for pass side.
10) Rub down well removing any bubbles using a needle.
Enjoy your new graphic!


Senior Member
Joined: 02-27-2006
Posts: 1,198
From: NC
id suggest debbies method with the exception of:
clean the whole windshield first. (rubbing alcohol, lint free paper towels)
instead of pulling the back off like she suggested, get the widest masking tape you can find and run a piece across the top of the whole decal leaving half of the tape exposed so it will stick to the car. Then just take your measurements get it centered, push the tape down to hold it in place. flip the decal up and from the top pull the backing halfway down and squeege the decal from the top down on the car.once you squeeged half pull the rest of the backing off and finish. credit card will work fine
Senior Member
Joined: 10-14-2005
Posts: 5,359
From: SoCal
The HHR windshield is very curved, that is why I recommend our method. If you try the top/bottom 50/50 method on an HHR, you will get "droopy sides." Our method allows you to swing the ends up so the banner appears level.
Just a tip,
Just a tip,