
Air Lift (Drag Bags) HOW TO:


Thread Starter
Senior Member
Joined: 05-13-2008
Posts: 2,075
From: Knoxville, TN
Air Lift (Drag Bags) HOW TO:
He ya'll I just installed the available Air Lift kit that Rob, and WSFrasier have installed as well. I figured I would share the install of this product with you, as it is a really easy mod to accomplish in less than an hour....even with a 4 year old assistant... who felt the parts were better kept safe in his mouth.
The kit is available from Summit Racing for under $90.00 with free shipping. I ordered on a Thursday and the Kit was here Saturday.
This kit comes complete with an overkill of extra parts, to make plumbing the air lines the choice of the installer/application. I chose a single fill line and used the available T-connection that was supplied.
The kit has several un-need parts for the HHR install, mainly in the form of worm clamps and heat sheilds.(the HHR has sub-frame passages that will adequately hide/sheild the rated poly tubing.
TOOLS REQUIRED:
snub-nose clines-for the small compression clamps
Nippers - for cutting tubing
3/8" drill/bit - for air valve mounting
THATS IT!
Thread Starter
Senior Member
Joined: 05-13-2008
Posts: 2,075
From: Knoxville, TN
Positioning the bag is pretty straight forward. On the drivers side there is the exhaust to contend with so place the airbag nipples facing towards the brake line. This allows the air-line to follow the brake line and then disappear into the sub-frame away from the exhaust and it can then travel to the openings at the passanger side.
Thread Starter
Senior Member
Joined: 05-13-2008
Posts: 2,075
From: Knoxville, TN
The plumbing for the passanger side is a repeat of the drivers side with the exception that the air-line is exposed for about 1' before re-entering the sub-frame that leads towards the bumper. At this point both lines meet up and are secured with the provided zip ties...Note: dont tighten zip ties too much, you will pinch the air lines, and be sure to allow plenty of slack so that the air lines travel freely with the susoension.
Thread Starter
Senior Member
Joined: 05-13-2008
Posts: 2,075
From: Knoxville, TN
I ran both lines through the available openings with the sub-frame and was able to place the T-junction in an easily accessible location in the event that leaks develop over time. I again left plenty of extra line for any unforeseeable future needs or problems.
Thread Starter
Senior Member
Joined: 05-13-2008
Posts: 2,075
From: Knoxville, TN
This is where I placed the air fill line. Again The tube is comiing from within the protective area of the sub-frame and mounts in a very easily reachabe spot. This is the only step that requires the use of a drill and it is completely up to you where you place the fill valve. The kit also comes with enough parts so you can individually mount 2 air lines instead of one.
Thread Starter
Senior Member
Joined: 05-13-2008
Posts: 2,075
From: Knoxville, TN
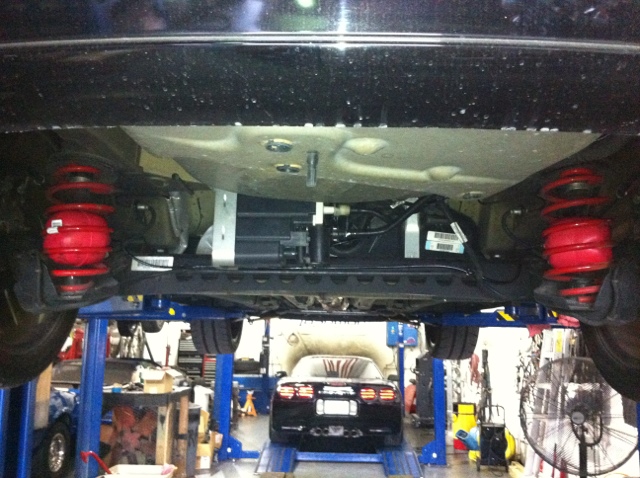
This is what they look like at 25PSI. They raised the ass-end a good 1.5 inches. I haven't had time to play with this yet, as I am currently dooing the 12hour leak-down test. But between the short distance I did drive it, the nose stayed completely flat. torque steer was enormous but planted solidly.
Again, I'll know more this weekend
Again, I'll know more this weekend


Senior Member
Joined: 02-05-2011
Posts: 1,056
From: south florida