
Badging Mods for the Uninitiated and Rushed Among Us


Thread Starter
Senior Member
Joined: 07-26-2006
Posts: 903
From: Soon to be Longview, Texas
Hey all. Spring is (officially) springing this week, and I know a lot of folks are chomping at the bit to do some appearance mods to their babies as soon as the weather breaks, and some of us are willing to do it anyway. It was cold and snowing today, but I did a mod which I have been meaning to do for a while, and took some pictures along the way. So here's my first how-to post.
Since some of the badging mods we might want to do involve older badging which is designed for mounting in holes (not with tape), this is a how-to for installing these types of badgings the least intrusive way possible: WITH tape!

What you will need is:
* Your badging. In this case, I have two badges here, the "Hotrod" badge from the late, great and lamented SoCal, and a Stitch pin from Disney World which I thought would be perfect for use on Stitch II. Both of them had pins in them: the "Hotrod" has already had them cut off.
* Thin-size mounting tape. The tape I used is 3M #06385, it's a quarter-inch wide, about 2mm thick, and comes in a 25-foot roll.
* A pocketknife. I suppose you could use a hobby knife, it's for cutting the tape: I used this big manly knife in the picture.
* A rotary cutoff tool (like a Dremel tool).

To demonstrate cutting off the posts, I'm cutting off the post from the Stitch pin. To do this, I'm using the cutoff tool's thinnest cutting wheel. One suggestion, you don't need to use too much pressure, it only makes the motor work way too hard to do the same job.
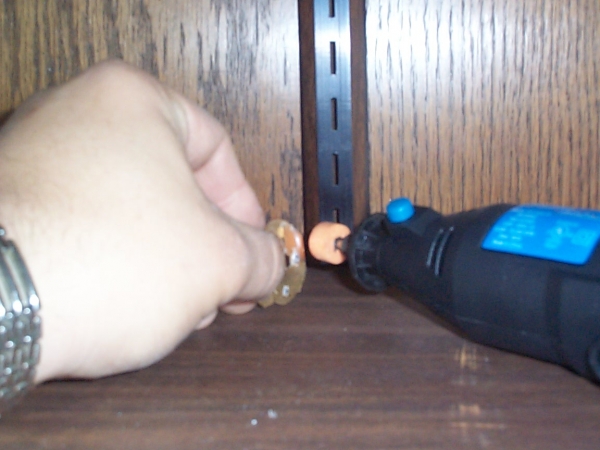
Once the post was cut off, there was a remnant of the triangular base to the post left, as well as two centering spikes. I switched tips to this grinding wheel to grind these down. The ultimate goal ...
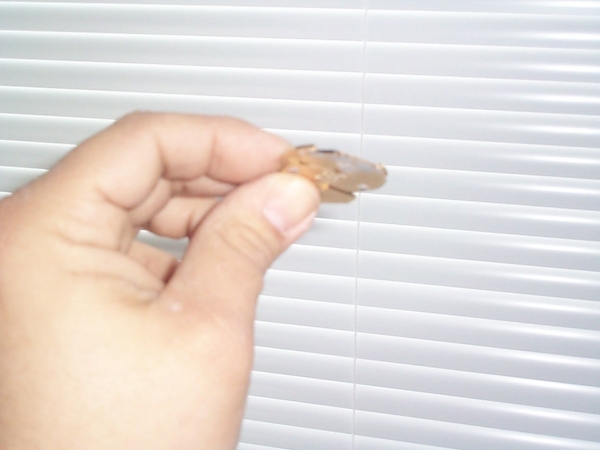
... is to achieve a flat surface upon which you can put the mounting tape. Grind it until it's as flat as possible without cutting too much into the material of the badge.
Now we can put the tape on the badges. How much, though? I finally came up with this amount.
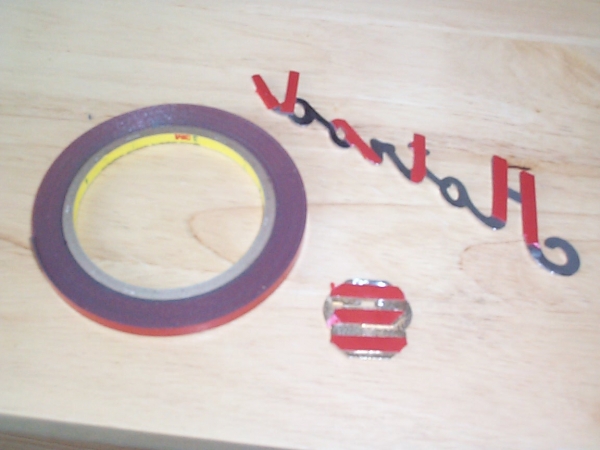
You want to secure the badges at multiple points, so that it won't be tempted to bow out or not hold securely to the car's surface. I got these on the badges straight off the spool, then used the knife to trim the excess, the less of the adhesive showing the better. Once the tape is mounted on the badges, it's time to mount them on the car.
Treat the car's painted surface by cleaning it, first with water and then with alcohol. The best way is with an alcohol swab (not pictured), medical will do. I collect leftover Trico "Optimizer" pads from my work just for these purposes. Similarly to stick-on ventshades (the tape is identical), you want to pull up a handle on the backing, but not all of the backing, so that the badge can be positioned. Once it's where you want it, you can pull the backing out and press it into place.
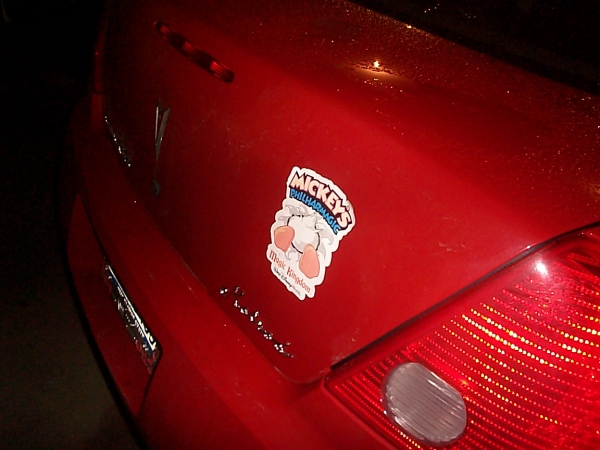
I did it in the middle of a 30 degree snowfall, not the best of conditions. I did, however, manage to get the surfaces treated and the badges down, and they have stayed in place since I did it at about noon. Here's the final results:
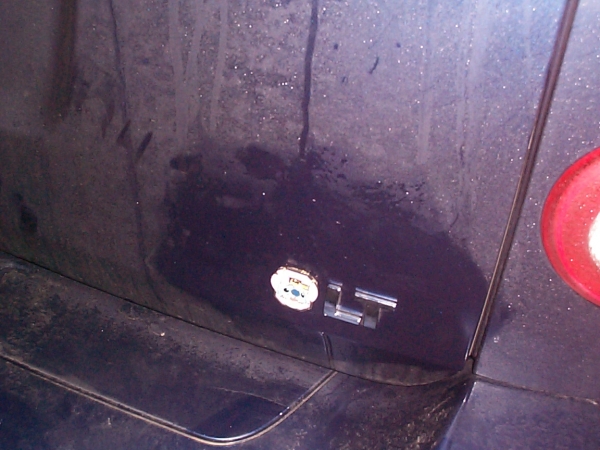
"But what about the Hotrod badge?"
I put it elsewhere:
Since some of the badging mods we might want to do involve older badging which is designed for mounting in holes (not with tape), this is a how-to for installing these types of badgings the least intrusive way possible: WITH tape!
What you will need is:
* Your badging. In this case, I have two badges here, the "Hotrod" badge from the late, great and lamented SoCal, and a Stitch pin from Disney World which I thought would be perfect for use on Stitch II. Both of them had pins in them: the "Hotrod" has already had them cut off.
* Thin-size mounting tape. The tape I used is 3M #06385, it's a quarter-inch wide, about 2mm thick, and comes in a 25-foot roll.
* A pocketknife. I suppose you could use a hobby knife, it's for cutting the tape: I used this big manly knife in the picture.
* A rotary cutoff tool (like a Dremel tool).
To demonstrate cutting off the posts, I'm cutting off the post from the Stitch pin. To do this, I'm using the cutoff tool's thinnest cutting wheel. One suggestion, you don't need to use too much pressure, it only makes the motor work way too hard to do the same job.
Once the post was cut off, there was a remnant of the triangular base to the post left, as well as two centering spikes. I switched tips to this grinding wheel to grind these down. The ultimate goal ...
... is to achieve a flat surface upon which you can put the mounting tape. Grind it until it's as flat as possible without cutting too much into the material of the badge.
Now we can put the tape on the badges. How much, though? I finally came up with this amount.
You want to secure the badges at multiple points, so that it won't be tempted to bow out or not hold securely to the car's surface. I got these on the badges straight off the spool, then used the knife to trim the excess, the less of the adhesive showing the better. Once the tape is mounted on the badges, it's time to mount them on the car.
Treat the car's painted surface by cleaning it, first with water and then with alcohol. The best way is with an alcohol swab (not pictured), medical will do. I collect leftover Trico "Optimizer" pads from my work just for these purposes. Similarly to stick-on ventshades (the tape is identical), you want to pull up a handle on the backing, but not all of the backing, so that the badge can be positioned. Once it's where you want it, you can pull the backing out and press it into place.
I did it in the middle of a 30 degree snowfall, not the best of conditions. I did, however, manage to get the surfaces treated and the badges down, and they have stayed in place since I did it at about noon. Here's the final results:
"But what about the Hotrod badge?"
I put it elsewhere:

Thread Starter
Senior Member
Joined: 07-26-2006
Posts: 903
From: Soon to be Longview, Texas
It's all right, the pin's already been weather tested. That pin was on the outside of my backpack I take to campus for over a year and was exposed to every possible weather condition (including road salt). If it does rust, I'm not sweating it, I'll just use some naval jelly to clean up the area.


Senior Member
Joined: 05-15-2017
Posts: 264
From: Garland, TX.
Both really good points - I didn't even think about the ugly factor from the inside. My emblem should arrive today and I will temporarily use masking tape and play around with different locations before I attach with the 3M tape.

Thread
Thread Starter
Forum
Replies
Last Post