
How To: Replace your dash gauges w/ Black Cat Custom


Thread Starter
Senior Member
Joined: 01-04-2010
Posts: 1,584
From: Imported from Detroit
How To: Replace your dash gauges w/ Black Cat Custom
So you want to get a custom set of dash gauges. The boys at Black Cat Custom will help you get there. Pick your color, logo or custom text you want, colors of your text. Nearly the sky is the limit.
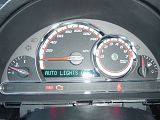
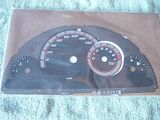
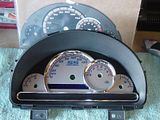
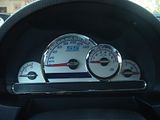
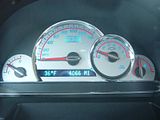
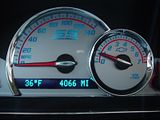
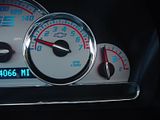
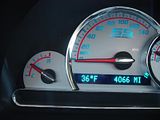
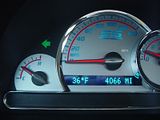
I went with a silver gauge face, blue numbers and dashes, with red accent line, SS Turbocharge in the speedo and a non-lit (can't light due to LED right under it)bow tie in the tach. Some time later it arrives, it's not super fast because they are custom made for you.
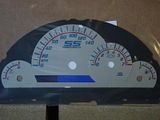
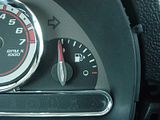
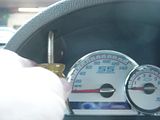
The silver color is really close to my car's silver paint as shown above. Black Cat suggest you do this with a full tank of gas and a cold motor. Also, to make note of speeds vs rpm. I say to verify with GPS speeds prior to installation. Do all of this at least the day before you plan on working on the swap. So that the motor is cold. Read more on Black Cat's Install Guide.
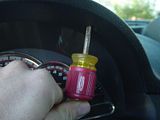
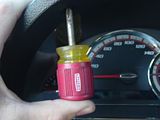
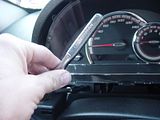
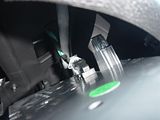
Remove the 2 Phillips screws from above the gauges with a stubby screw driver
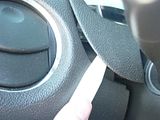
With something to pry or your fingers, pull up on each side of the panel on each side of the steering wheel
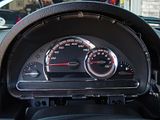
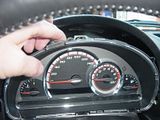
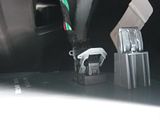
You now have this and can see the next step
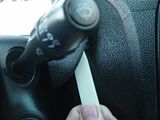
With a 7mm socket and extension, remove the 2 screws holding the cluster in. You may want to employ a magnet or some small needle nose or be careful so you don't drop the screws into the dash.
I went with a silver gauge face, blue numbers and dashes, with red accent line, SS Turbocharge in the speedo and a non-lit (can't light due to LED right under it)bow tie in the tach. Some time later it arrives, it's not super fast because they are custom made for you.


The silver color is really close to my car's silver paint as shown above. Black Cat suggest you do this with a full tank of gas and a cold motor. Also, to make note of speeds vs rpm. I say to verify with GPS speeds prior to installation. Do all of this at least the day before you plan on working on the swap. So that the motor is cold. Read more on Black Cat's Install Guide.
Remove the 2 Phillips screws from above the gauges with a stubby screw driver


With something to pry or your fingers, pull up on each side of the panel on each side of the steering wheel


You now have this and can see the next step

With a 7mm socket and extension, remove the 2 screws holding the cluster in. You may want to employ a magnet or some small needle nose or be careful so you don't drop the screws into the dash.


Thread Starter
Senior Member
Joined: 01-04-2010
Posts: 1,584
From: Imported from Detroit
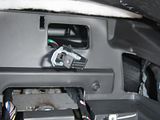
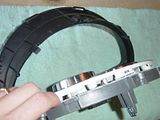
Pull forward on the top of the cluster to release the clips hold on the rear of the cluster.
Work the cluster out slightly and remove the clear plastic covering the cluster.
Take note of your needle positions both with ignition on and off. I suggest taking pictures.
Start prying the needles off carefully with a counter clockwise twist & pull movement as described by Black Cat
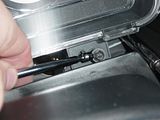
Now stick your hand behind the cluster to un-hook the harness. This is a gear locked harness.
So you will see this harness
Simply rotated the gray piece. You have to depress the small black tab facing you to rotate the gray piece.
The cluster will come un-plugged and you will now see the harness and the clip location just above left of the harness in this pic.

Work the cluster out slightly and remove the clear plastic covering the cluster.

Take note of your needle positions both with ignition on and off. I suggest taking pictures.

Start prying the needles off carefully with a counter clockwise twist & pull movement as described by Black Cat


Now stick your hand behind the cluster to un-hook the harness. This is a gear locked harness.

So you will see this harness

Simply rotated the gray piece. You have to depress the small black tab facing you to rotate the gray piece.

The cluster will come un-plugged and you will now see the harness and the clip location just above left of the harness in this pic.

Thread Starter
Senior Member
Joined: 01-04-2010
Posts: 1,584
From: Imported from Detroit
Take your cluster to a work place. I suggest a towel on your work bench. Remove the T10 torx screws to separate the cluster pieces.
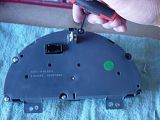
here's what you end up with
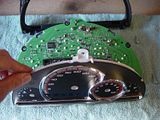


Now you must release the hold on the chrome gauge rings or decorative whatever. This is holding the gauge face down. This is a tedious step. You need to push the chrome pins back thru the white housing. There are allot of them and this takes some careful but heavy pressure and pushing. I used a small phillips screw driver and pressure.
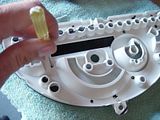
Soon you will have all of the little pins pushed free.
Once you do that the stock faces (main & tach) will fall off.
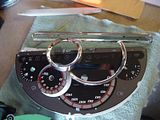
Replace with your Black Cat Custom gauge face and slide the chrome rings back over. Now at this point I smudged some clear silicone on the silver pins to help hold the chrome rings in securely over time.
Then replace the black top shade and screw the cluster back together with the T10 torx screws.
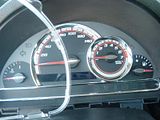
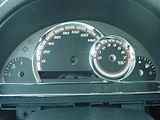
You can now see how great it's going to look. With clear plastic cover still off, take the cluster back to the car and plug the harness back in, rotate the gray plastic holder back into place to secure the harness. At this point reinstall your needles. I had a hard learning curve on this that rose my blood pressure. It required lots of ignition cycles, starting the car, driving the car, removing and replacing the needles over and over. However I eventually got it.
My suggestion. Allow for an hour to do the needle replacement. This is by far the longest piece of the job. Place the needle back on the stem but just enough for it to stick. That way if you need to remove it, it's easier to pull back off. Each time you adjust the needle, retest that needle, once it's set to where you are satisfied push it on completely till it stops. If you see a glowing ring around the base of the needle with the lights are on, it's not completely seated. The fuel and temp gauge will be the easiest.
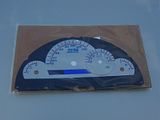
Once you have that done, you can see the fruits of your labor


here's what you end up with


Now you must release the hold on the chrome gauge rings or decorative whatever. This is holding the gauge face down. This is a tedious step. You need to push the chrome pins back thru the white housing. There are allot of them and this takes some careful but heavy pressure and pushing. I used a small phillips screw driver and pressure.

Soon you will have all of the little pins pushed free.

Once you do that the stock faces (main & tach) will fall off.

Replace with your Black Cat Custom gauge face and slide the chrome rings back over. Now at this point I smudged some clear silicone on the silver pins to help hold the chrome rings in securely over time.
Then replace the black top shade and screw the cluster back together with the T10 torx screws.

You can now see how great it's going to look. With clear plastic cover still off, take the cluster back to the car and plug the harness back in, rotate the gray plastic holder back into place to secure the harness. At this point reinstall your needles. I had a hard learning curve on this that rose my blood pressure. It required lots of ignition cycles, starting the car, driving the car, removing and replacing the needles over and over. However I eventually got it.
My suggestion. Allow for an hour to do the needle replacement. This is by far the longest piece of the job. Place the needle back on the stem but just enough for it to stick. That way if you need to remove it, it's easier to pull back off. Each time you adjust the needle, retest that needle, once it's set to where you are satisfied push it on completely till it stops. If you see a glowing ring around the base of the needle with the lights are on, it's not completely seated. The fuel and temp gauge will be the easiest.
Once you have that done, you can see the fruits of your labor


Thread Starter
Senior Member
Joined: 01-04-2010
Posts: 1,584
From: Imported from Detroit
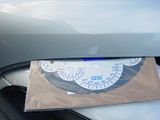
Now you're done with the needles, test drives, and have to replace the clear plastic cover. I cleaned mine with Novus a plastic cleaner. I suggest you be careful if you don't have such a cleaner. Windex can scratch this type of plastic so consider your options carefully. Clean the inside first, then place the cover on the cluster, wait to clean the outer face.
Now push the cluster back into place, push the top back into the clip position, and install the two 7mm screws. Again, be careful not to drop those screws into the dash. Bring your dash piece back into play and snap it back into place, replace the two small screws into the top

Oh yeah baby!


Now push the cluster back into place, push the top back into the clip position, and install the two 7mm screws. Again, be careful not to drop those screws into the dash. Bring your dash piece back into play and snap it back into place, replace the two small screws into the top


Oh yeah baby!


 Chris that looks great.


Thread Starter
Senior Member
Joined: 01-04-2010
Posts: 1,584
From: Imported from Detroit
They can also do any type of icon, custom text and even some logo or something custom. Just speak with Al at Black Cat. They are great to deal with and reasonable in pricing.