


How to Drain(and Flush) Coolant - SS


Thread Starter
Moderator
Joined: 05-01-2014
Posts: 8,512
From: California
How to Drain(and Flush) Coolant - SS
Edit: On recommendations from our moderators, the best way to flush is as follows: Drain from the petkawk, AND remove the drain bolt from the water pump, AND remove the thermostat. Close system back up again, and refill with 50/50 mix. This will prevent damage to your engine in freezing temperatures. Full-strength Dex-Cool will take some time and miles(or kilometers) to mix in the block with the water, risking damage from freezing climates. We now return you to your regularly scheduled programming.
So you've got your SS up on jackstands or ramps with the coolant filler cap off, and you want to drain the coolant. Where is that darn petkawk? OK, you can just barely see it, passenger side, bottom of radiator. Great, it's buried behind the charge piping.

Even if you could get your hand up in there(which you cannot), it's way too tight to turn it by hand. And you can't get any tool in there to turn it either.
1.) There's a bracket holding the radiator, you can see it in the pics, it's got 3 shiny bolts. Remove the push pin that holds the splash shield to this bracket, then remove the 3 bolts with a 1/2" socket. Then you can push up on the bottom corner of the radiator , enough where you can remove the bracket from the radiator.

2.) These are the tools I used. I took the bent needlenose, with the hook up and handles horizontal, and placed them between the charge pipe and the black frame member(in the first pic). Then I could crack open the petkawk.

3.) Not out of the woods yet. I then used the other needlenose to turn the petkawk a little more. Eventually I could turn it with one finger from each hand(I've got very strong hands, you may have to find a different tool to turn it a little more), and you can see the coolant was flowing in pic 2.
Now you can do whatever you were going to do. I was flushing the coolant, so I'll continue for those of you who are doing the same.
Let me say right now, I didn't want to mess with the thermostat. It was functioning properly, so I left it. I could only get about 1/2 gallon out of the radiator. Our cooling system capacity is 9.2 quarts, so you need to get a little over a gallon out to make room for the new coolant(full-strength).
3a.) If you are changing the thermostat, you should get enough out without having to pull the plug from the water pump. If you are pulling the thermostat, pull the 2 bolts and remove the housing and thermostat. Clean mating surfaces. When it's done draining, replace the thermostat and housing. Here is the thermostat How-To https://www.chevyhhr.net/forums/how-...l-p0128-24493/
Skip to step 7. If you are not changing the thermostat, continue to step 4.
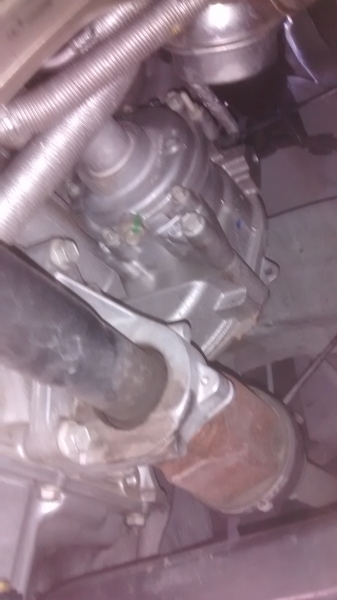
4.) I needed to drain more, so I pulled the plug on the water pump with a 1/2" socket. Here is a pic, the bolt with the dab of green paint is the one. This is the passenger side, between the engine and the firewall, above the axle shaft.
I was able to fashion a splash shield of sorts out of a piece of sheet metal(sorry, no pic). I pushed it up between the engine block and the water pump and then
5.) removed the bolt. It still made a bit of a mess, but I caught the vast majority of it.
6.) Once it's done draining, put the bolt back in and tighten it. Torque spec is 16 ft/lbs. Just tighten it until the paint marks line up again for now, you're gonna have to do this a few times.
7.) Close the radiator petkawk and
8.) refill the cooling system with deionized water. Deionized is best, but you can use distilled, or even drinking water in a pinch. Do not use hard or softened water. This watering can worked well for me.

9.) Restart the engine and run it until it reaches operating temperature(190 is good) topping off the water as needed.
Do not let the coolant run dry, you will risk destroying the water pump!!
10.) Increase engine speed to about 2,000 RPM for 10 to 20 seconds. This will cause the water pump to operate faster and move the water better. Quickly top off the water again.
11.) Shut off the engine and let cool for at least 30 minutes.
Return to step 2, repeating process until you have removed all coolant and have only water in the system.
12.) Repeat steps 2 thru 7 one more time, applying a little bit of teflon pipe dope to the threads of the water pump bolt. Don't overdo the dope, I don't think you want that gunk in the cooling system. Make sure you've installed your new thermostat if that's what you're doing.
13.) Reinstall the lower bracket for the radiator. Remember that, way back when? 3 shiny bolts(1/2")? 1 push pin? Starting to come back to you now?
14.)Remove any liquid from the coolant recovery tank. You can try to siphon it out. I removed the tube from the filler neck and re-routed it down so it would drain out. When empty, route it back and reconnect it. A little bit of a pain to put it back, but not too bad.
15.) If you removed the drain bolt from the water pump, you will now have to torque it to 16 ft/lbs. If your torque wrench is more than 14 1/2" long, it probably will not work. If your 1/2" socket is more than 1 11/16" long, it will not work. If your socket is shorter than about 1 1/2", you probably will not be able to turn your torque wrench. You may be able to make a wobble socket work, I don't think a standard universal joint will work.
16.) Pour one(1) gallon + 3 cups of full-strength Dex-Cool into the filler neck, or until full. If you have not removed the thermostat, you will not get it all in just yet. This is for the SS model. If you have a different model, you will not need this much Dex-Cool
17.) When full, start the engine and top off the filler neck again. If you have not used all of the one(1) gallon + 3 cups of Dex-Cool yet, use that for topping off, otherwise, use the deionized, distilled, or drinking water.
18.) Mix a little Dex-Cool 50/50 with the water, and add it to the coolant recovery tank until at the full mark. https://www.chevyhhr.net/forums/main...ank-pic-55772/
19.) Now you must "burp" the system. This will probably take a few heating-cooling cycles, maybe a few days.
Again, if you haven't used up the premeasured, one(1) gallon + 3 cups of full-strength Dex-Cool, use that first, then use the water. If the vehicle seems to be running a bit hotter than it should, you aren't done "burping" it yet. And keep monitoring the recovery tank, I would say every morning for 2 weeks. If it holds steady and your operating temps are good, you're done!!
If I missed something, or got something wrong, please say so. The cooling system is too important to take chances.
So you've got your SS up on jackstands or ramps with the coolant filler cap off, and you want to drain the coolant. Where is that darn petkawk? OK, you can just barely see it, passenger side, bottom of radiator. Great, it's buried behind the charge piping.
Even if you could get your hand up in there(which you cannot), it's way too tight to turn it by hand. And you can't get any tool in there to turn it either.
1.) There's a bracket holding the radiator, you can see it in the pics, it's got 3 shiny bolts. Remove the push pin that holds the splash shield to this bracket, then remove the 3 bolts with a 1/2" socket. Then you can push up on the bottom corner of the radiator , enough where you can remove the bracket from the radiator.
2.) These are the tools I used. I took the bent needlenose, with the hook up and handles horizontal, and placed them between the charge pipe and the black frame member(in the first pic). Then I could crack open the petkawk.
3.) Not out of the woods yet. I then used the other needlenose to turn the petkawk a little more. Eventually I could turn it with one finger from each hand(I've got very strong hands, you may have to find a different tool to turn it a little more), and you can see the coolant was flowing in pic 2.
Now you can do whatever you were going to do. I was flushing the coolant, so I'll continue for those of you who are doing the same.
Let me say right now, I didn't want to mess with the thermostat. It was functioning properly, so I left it. I could only get about 1/2 gallon out of the radiator. Our cooling system capacity is 9.2 quarts, so you need to get a little over a gallon out to make room for the new coolant(full-strength).
3a.) If you are changing the thermostat, you should get enough out without having to pull the plug from the water pump. If you are pulling the thermostat, pull the 2 bolts and remove the housing and thermostat. Clean mating surfaces. When it's done draining, replace the thermostat and housing. Here is the thermostat How-To https://www.chevyhhr.net/forums/how-...l-p0128-24493/
Skip to step 7. If you are not changing the thermostat, continue to step 4.
4.) I needed to drain more, so I pulled the plug on the water pump with a 1/2" socket. Here is a pic, the bolt with the dab of green paint is the one. This is the passenger side, between the engine and the firewall, above the axle shaft.
I was able to fashion a splash shield of sorts out of a piece of sheet metal(sorry, no pic). I pushed it up between the engine block and the water pump and then
5.) removed the bolt. It still made a bit of a mess, but I caught the vast majority of it.
6.) Once it's done draining, put the bolt back in and tighten it. Torque spec is 16 ft/lbs. Just tighten it until the paint marks line up again for now, you're gonna have to do this a few times.
7.) Close the radiator petkawk and
8.) refill the cooling system with deionized water. Deionized is best, but you can use distilled, or even drinking water in a pinch. Do not use hard or softened water. This watering can worked well for me.
9.) Restart the engine and run it until it reaches operating temperature(190 is good) topping off the water as needed.
Do not let the coolant run dry, you will risk destroying the water pump!!
10.) Increase engine speed to about 2,000 RPM for 10 to 20 seconds. This will cause the water pump to operate faster and move the water better. Quickly top off the water again.
11.) Shut off the engine and let cool for at least 30 minutes.
Return to step 2, repeating process until you have removed all coolant and have only water in the system.
12.) Repeat steps 2 thru 7 one more time, applying a little bit of teflon pipe dope to the threads of the water pump bolt. Don't overdo the dope, I don't think you want that gunk in the cooling system. Make sure you've installed your new thermostat if that's what you're doing.
13.) Reinstall the lower bracket for the radiator. Remember that, way back when? 3 shiny bolts(1/2")? 1 push pin? Starting to come back to you now?
14.)Remove any liquid from the coolant recovery tank. You can try to siphon it out. I removed the tube from the filler neck and re-routed it down so it would drain out. When empty, route it back and reconnect it. A little bit of a pain to put it back, but not too bad.
15.) If you removed the drain bolt from the water pump, you will now have to torque it to 16 ft/lbs. If your torque wrench is more than 14 1/2" long, it probably will not work. If your 1/2" socket is more than 1 11/16" long, it will not work. If your socket is shorter than about 1 1/2", you probably will not be able to turn your torque wrench. You may be able to make a wobble socket work, I don't think a standard universal joint will work.
16.) Pour one(1) gallon + 3 cups of full-strength Dex-Cool into the filler neck, or until full. If you have not removed the thermostat, you will not get it all in just yet. This is for the SS model. If you have a different model, you will not need this much Dex-Cool
17.) When full, start the engine and top off the filler neck again. If you have not used all of the one(1) gallon + 3 cups of Dex-Cool yet, use that for topping off, otherwise, use the deionized, distilled, or drinking water.
18.) Mix a little Dex-Cool 50/50 with the water, and add it to the coolant recovery tank until at the full mark. https://www.chevyhhr.net/forums/main...ank-pic-55772/
19.) Now you must "burp" the system. This will probably take a few heating-cooling cycles, maybe a few days.
Either jack up the right front corner or drive up on ramps or just park so the front bumper is higher then the back bumper , say on a hill, or your drive, if it inclines.
Run the car till it reaches temperature, like go for a 5 to 10 minute drive. Come back and park as I said , let the HHR cool off for a few hours, open the rad hose cap, top off the Dexcool, this can take a few tries. Start up the HHR with the cap off and see if the Dexcool goes down then top it up. Put the cap back on, tighten it up.
Check the Dexcool again next morning.
Run the car till it reaches temperature, like go for a 5 to 10 minute drive. Come back and park as I said , let the HHR cool off for a few hours, open the rad hose cap, top off the Dexcool, this can take a few tries. Start up the HHR with the cap off and see if the Dexcool goes down then top it up. Put the cap back on, tighten it up.
Check the Dexcool again next morning.
If I missed something, or got something wrong, please say so. The cooling system is too important to take chances.
Last edited by RJ_RS_SS_350; Aug 13, 2017 at 10:27 PM.
Administrator
Joined: 10-13-2011
Posts: 40,090
From: Welland,Ont Canada
Great write up and directions, I'm old school, ensure the mix is mixed, 50/50 is the mix and mixing in the rad and block is 50% chance it's not mixed!!
Up here in the great white north, a cold snap can freeze you frost plugs before the coolant is mixed! Just ask my brother why my mom won't let him work in her cars since the great big block crack in her '66 Galaxie 500 XL !
And thanks for the quote! In burping the system!!
Up here in the great white north, a cold snap can freeze you frost plugs before the coolant is mixed! Just ask my brother why my mom won't let him work in her cars since the great big block crack in her '66 Galaxie 500 XL !
And thanks for the quote! In burping the system!!
Moderator
Joined: 01-23-2009
Posts: 26,537
From: Fredericksburg,VA

Thread
Thread Starter
Forum
Replies
Last Post
slonny
Problems/Service/Repairs
52
Aug 1, 2016 02:24 PM