Late night fix for an air cleaner housing bracket
 08-03-2012, 11:04 AM
#1
Thread Starter

Join Date: 07-27-2008
Location: Coquitlam, BC
Posts: 9
Late night fix for an air cleaner housing bracket
This forum has been wonderful for solving a lot of my problems with my 2006 HHR. So, I thought I would share some pictures of my late night fix to the bracket that mounts to the engine block and supports the giant air cleaner housing.
My situation was both "legs" on the housing bracket snapped off right by the bolts into the engine. (see #12 on the diagram) Not sure if it was a weak point, bumpy roads or the mechanics pushing down too hard on the air cleaner housing to get on the nibs. Can't really point fingers at anyone, but, maybe it was a matter of time.
I might quickly add, the fix is not pretty and temporary. I did order a new bracket, but it would take 2 weeks for it to come in from the States to Canada. I'm heading out for the long weekend and will be travelling on forestry service roads to get to my cabin. The option of "just-miss-the-bumps" is not possible. After calling the local GM dealership, and consulting with another mechanic, which said that I could bolt a strip of steel to the legs and secure to the engine. After working full-time and family stuff, I didn't get around to the fix until 8pm at night. I would of like to grind down some of the screws, but it was well after 10pm and did not want to wake up my neighbor.
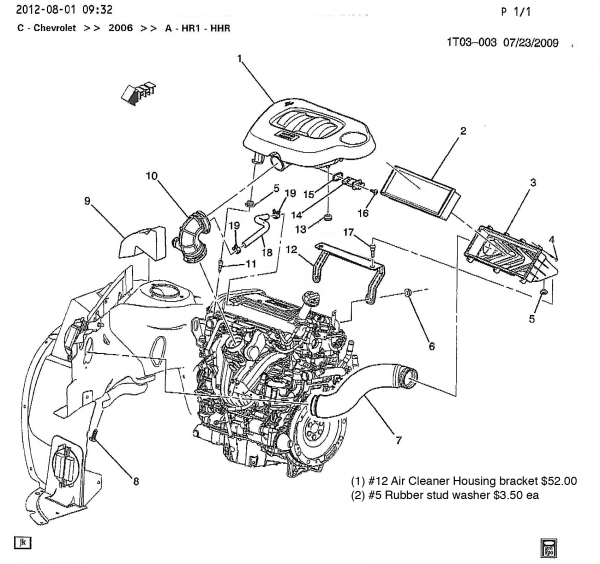
Here's the link to the diagram for the air intake or cleaner system. Really helpful to see the part #12. I saved a larger, high resolution image in the gallery, here's the link https://www.chevyhhr.net/gallery/fil...-breakdown.jpg
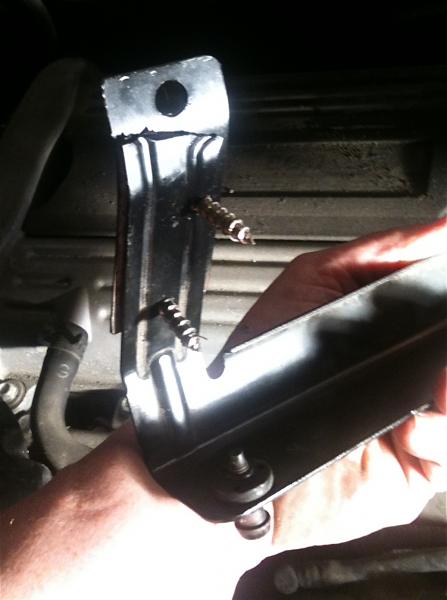
Finished bracket. (please don't laugh!) Used a steel door hinge for the temp plates on the legs of bracket. Bent it on my vice to match the same angle. I work with wood and aluminum mostly, so I have little steel around the shop. I coated the parts with high heat BBQ spray paint to keep it from corroding.
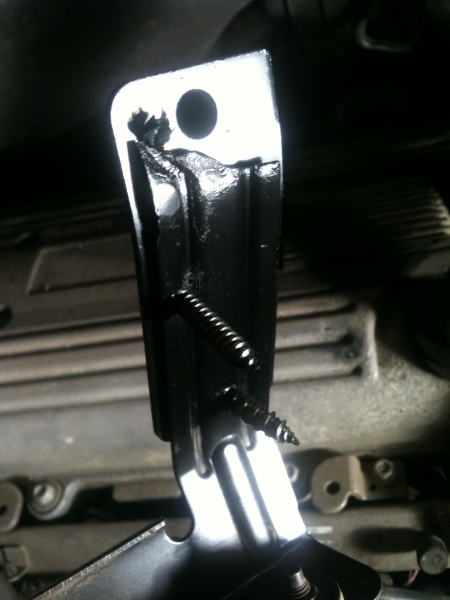
In this picture you can see where the break happened and my door hinge fix. The door hinges were already drilled with 3 holes, nice and wide. I had the old parts and managed to line them up to get the same angle.
Since I had no bolts that were under 1-1/2", I used some massive metal screws. Coated everything with the BBQ spray paint. I wish I could of ground the screws down, just too late a night and I was leaving the next morning for the long weekend. That little black piece is some electrician tape I used to temp secure the old piece on to get the same profile. I should of cleaned it all out.
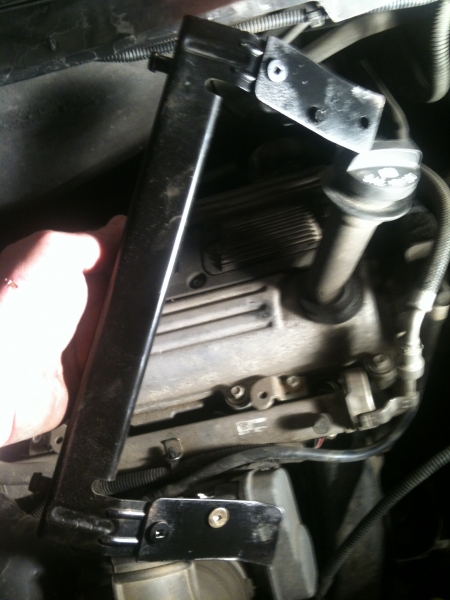
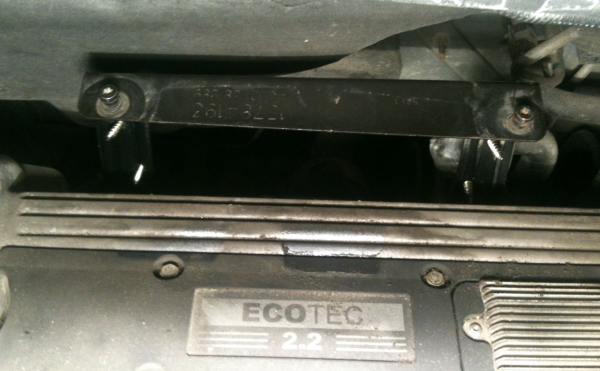
Here you see the modified #12 Housing bracket in place. It fit on easily on the engine block and snug. As suggested by another HHR dude on this forum, I put on a little Vaseline to the rubber mounts. The nibs went easily into place.
Since the air cleaner was apart, might as well change the filter, picked up a new part for $16.00.
So, I'm off today and will monitor the shape it's in over the weekend.
Hope this helps out the next person that needs to do a temp fix until the good GM part comes in.
My situation was both "legs" on the housing bracket snapped off right by the bolts into the engine. (see #12 on the diagram) Not sure if it was a weak point, bumpy roads or the mechanics pushing down too hard on the air cleaner housing to get on the nibs. Can't really point fingers at anyone, but, maybe it was a matter of time.
I might quickly add, the fix is not pretty and temporary. I did order a new bracket, but it would take 2 weeks for it to come in from the States to Canada. I'm heading out for the long weekend and will be travelling on forestry service roads to get to my cabin. The option of "just-miss-the-bumps" is not possible. After calling the local GM dealership, and consulting with another mechanic, which said that I could bolt a strip of steel to the legs and secure to the engine. After working full-time and family stuff, I didn't get around to the fix until 8pm at night. I would of like to grind down some of the screws, but it was well after 10pm and did not want to wake up my neighbor.
Here's the link to the diagram for the air intake or cleaner system. Really helpful to see the part #12. I saved a larger, high resolution image in the gallery, here's the link https://www.chevyhhr.net/gallery/fil...-breakdown.jpg
Finished bracket. (please don't laugh!) Used a steel door hinge for the temp plates on the legs of bracket. Bent it on my vice to match the same angle. I work with wood and aluminum mostly, so I have little steel around the shop. I coated the parts with high heat BBQ spray paint to keep it from corroding.
In this picture you can see where the break happened and my door hinge fix. The door hinges were already drilled with 3 holes, nice and wide. I had the old parts and managed to line them up to get the same angle.
Since I had no bolts that were under 1-1/2", I used some massive metal screws. Coated everything with the BBQ spray paint. I wish I could of ground the screws down, just too late a night and I was leaving the next morning for the long weekend. That little black piece is some electrician tape I used to temp secure the old piece on to get the same profile. I should of cleaned it all out.
Here you see the modified #12 Housing bracket in place. It fit on easily on the engine block and snug. As suggested by another HHR dude on this forum, I put on a little Vaseline to the rubber mounts. The nibs went easily into place.
Since the air cleaner was apart, might as well change the filter, picked up a new part for $16.00.
So, I'm off today and will monitor the shape it's in over the weekend.
Hope this helps out the next person that needs to do a temp fix until the good GM part comes in.
Last edited by Pylonman; 08-03-2012 at 11:46 AM. Reason: Argh, can't get pics to show!


Thread
Thread Starter
Forum
Replies
Last Post
TomsHHR
South Central
0
04-27-2009 07:47 PM