
Installing an Oil Catch Can


Moderator
Joined: 05-01-2014
Posts: 8,512
From: California
I couldn't find a cutaway pic or drawing of the one that 2005HHRauto linked to. It's an 8-oz can with 4 chambers. The 2-valve cans have a port for each of the 2 vacuum sources, and a port for the oil draw. They do say they have "billet check valves". I did see a cutaway drawing of the RX can on their website.
Yes, there is quite a bit of water mixed in, it was a rainy day. I think our can(s) will fill up faster on moist days. Nearly 500 miles on a rainy day, less than an ounce collected(although some got through, so probably about an ounce in all). I think an 8 oz can would take a while to fill.
I've been through your thread a few times, that's good work! I might just try to make one. If I can figure a new drain valve, I might give the bigger Home Depot filter a try.
Here is the muck separated, I think some of the water evaporated overnight, the level seems just a bit lower.
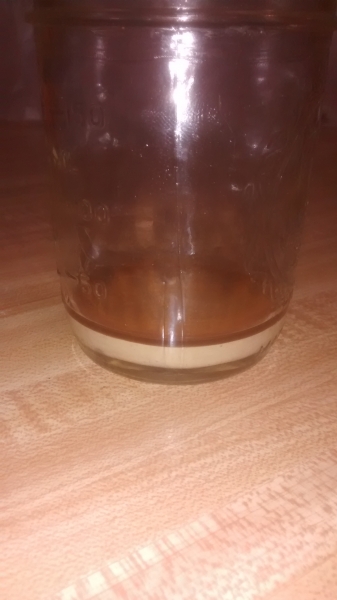
I poured it out on a paper towel, the smell is pretty strong.

Yes, there is quite a bit of water mixed in, it was a rainy day. I think our can(s) will fill up faster on moist days. Nearly 500 miles on a rainy day, less than an ounce collected(although some got through, so probably about an ounce in all). I think an 8 oz can would take a while to fill.
I've been through your thread a few times, that's good work! I might just try to make one. If I can figure a new drain valve, I might give the bigger Home Depot filter a try.
Here is the muck separated, I think some of the water evaporated overnight, the level seems just a bit lower.
I poured it out on a paper towel, the smell is pretty strong.
Last edited by RJ_RS_SS_350; Mar 17, 2016 at 03:05 PM.
Moderator
Joined: 05-01-2014
Posts: 8,512
From: California
I think I'm gonna give this a try, it looks like it could be made to work. I'm thinking of taking the cap off the top and running the vapors in there. Hook a vacuum source to each of the side ports, with a check valve in-line to the turbo and the PCV in-line to the brake booster. That, and figure a way to baffle/coalesce inside the can.

Most of the catch cans on eBay have breathers, so I'm guessing that's what the port on top was originally designed for, I'm hoping that area is already somewhat baffled.
Most of the catch cans on eBay have breathers, so I'm guessing that's what the port on top was originally designed for, I'm hoping that area is already somewhat baffled.

Moderator
Joined: 05-01-2014
Posts: 8,512
From: California
Shoot, I can't seem to make up my mind. Now I'm back to thinking a 2 can system might be better, and here's why.
In a 2 can system, any amount of suction could potentially draw vapors from the crankcase, both sources could potentially draw at the same time if there was a little bit of vacuum in the manifold and a lot of air was moving past the port at the turbo.
With 1 can, and a PCV or check valve in each line, I would think that when one source had stronger vacuum, it would cause the valve in the opposite line to close.
What do you guys think?

Moderator
Joined: 05-01-2014
Posts: 8,512
From: California
They want $100 for it. After reading about it a few times, I'm still not sure why it's needed. It sounds similar to our fresh air(metered) into port #1. Maybe other engines don't have a fresh air into the crankcase.
I'm going to get the larger filter from Home Depot and see if I can put a better drain valve on it.
I'm going to get the larger filter from Home Depot and see if I can put a better drain valve on it.

Thread Starter
Senior Member
Joined: 05-29-2015
Posts: 542
From: Cleveland, OH
The two can approach is about the closest we can get to stock. Those sure are some impressive results for a 500 miles drive RJ! Obviously, we need to make our own cans! Like RX, Grimmspeed, Mishimoto, etc., the cans are about the same internally. Incoming through a brass sintered filter, into a large open void, and then out as allegedly fresh air.
What we need is 2 cans in 1, 2 separate inputs with individual outlets and built in check valves. I'm looking into making that happen, along with the possibility of adding a 3rd chamber for port 1 "fresh air". I know we said we were going to leave it alone, but...
I'm not exactly convinced that we are getting positive pressure from the intake tube, as long as the engine is running, it's a vacuum. I don't think it would hurt to catch between port 1 and the intake tube. If it's clean air so be it, if not, that's oil vapor headed toward the turbo impeller.
Moderator
Joined: 05-01-2014
Posts: 8,512
From: California
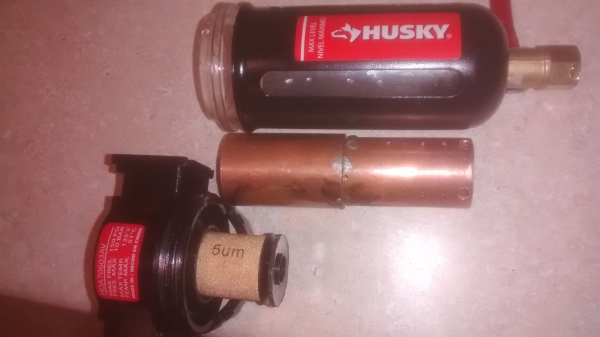
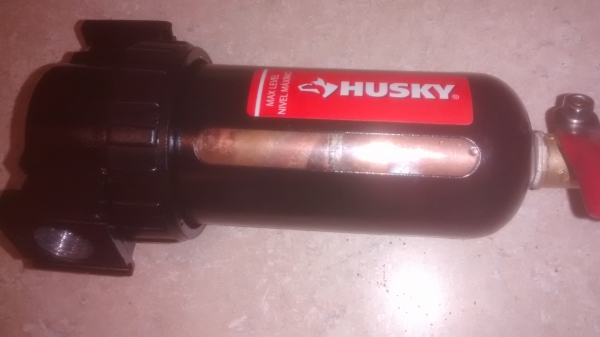
Man, I am really excited, this turned out fantastic!! I bought the larger Husky air compressor filter from Home Depot, then went to the hardware store for the rest of the goodies.
The plastic at the bottom of the holder for the sintered filter needs to be ground down so that the 1" copper coupler fits around it loosely. The coupler will be pressed tight against the top of the sintered filter holder. The 1" copper pipe will slide into the coupler, right up close to the bottom of the sintered filter holder. Then mark the pipe at the end of the coupler and go solder the coupler to the pipe. Then measure carefully and cut so the pipe & coupler assembly will wedge snug between the top piece of the filter holder and the bottom of the bowl, it was right about 4" long.
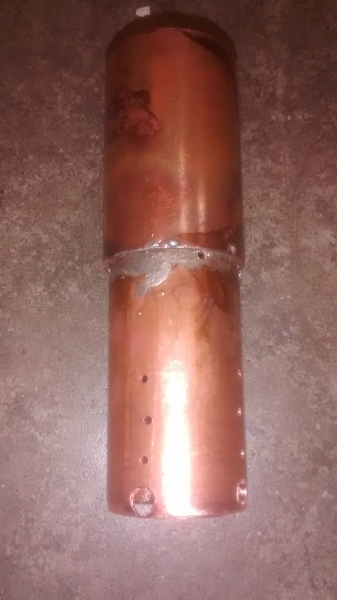
I cut the pipe a bit long, and fine tuned it with the bench grinder, carefully deburring the edge of the pipe that wedges against the bottom of the bowl.
Then I drilled 4 holes just below the coupler, 1/16". I drilled more 1/16" holes, and the holes at the very bottom, redrilled larger, so that the muck could get to the drain valve.
Remove the drain valve however you can. I didn't have the right hex key that was long enough, but discovered that my Torx T-50 worked great. You're not going to use the valve, so if you have to cut it off, who cares. The hole that the valve was in, you need to tap that with 1/4" NPT. Again, don't just bury the tap, run it close to halfway and test your fitting. I couldn't find the drain valve that I wanted at the hardware store, but when I got home, I realized that I already had one from my Harbor Freight purchase! It's a 90* turn shut off valve for compressed air, with 1/4" male NPT on one end. Make sure you tap it properly, so you don't crack the bowl while tightening the valve!
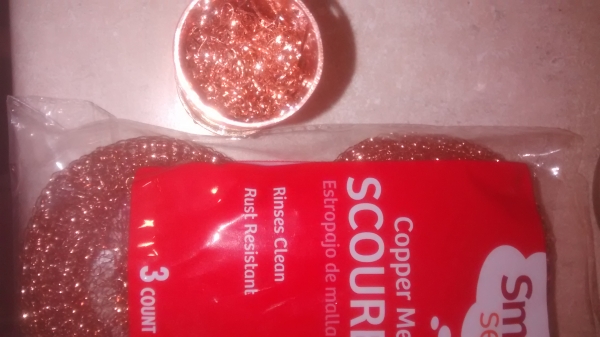
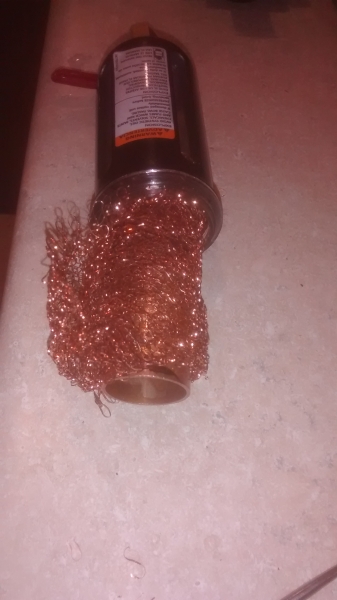
Then I stuffed the copper pipe assembly with the copper wool that I got at KMart. Carefully unbundle it and then rebundle it to suit your need. I packed it in there pretty tight, but you have to leave room for the sintered filter.
I also stuffed copper mesh around the outside of the copper pipe. Here it is assembled, before the outer wrap. You can see the copper pipe in there, it doesn't rattle.
Here is the beginning of the outer wrap.
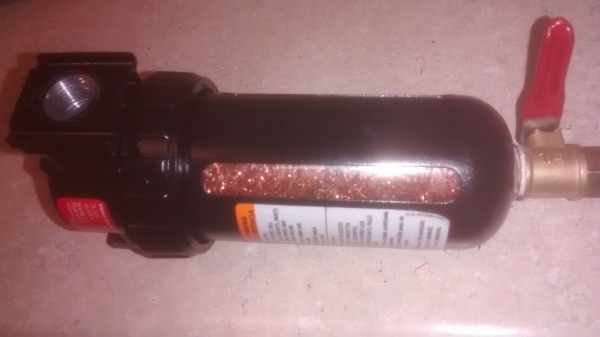
Push the pipe and outer wrap into the bowl, being careful not to trap any of the wrap in the pipe-to-bowl mating surface . Then take a tool and push the top of the wrap down a bit, so it doesn't interfere with the bowl-to-O-ring seal.

Put it all together, lining up the valve handle and the "max fill" line wherever you want it. I would drain before you reach the "max fill" line. It can safely hold about 2 oz.
So the dirty air will enter the can, run through the mesh on the outside, separating some muck. Then it will go through the holes in the pipe, into the inner, tightly packed mesh, where more muck will get separated. Then any vapors that are still in the air will be separated by the 5 micron sintered brass filter, and the clean air will exit.
$22.49 Filter
$ 2.80 1/2 foot of 1" copper pipe(other half for the other can)
$ 4.99 1" Coupler
$ 8.99 1/4" Pipe Tap
$ 3.99 Drain Valve
$ 1.00 1/2 pack copper scrubbers
$44.26 +whatever fittings you need +tax
The plastic at the bottom of the holder for the sintered filter needs to be ground down so that the 1" copper coupler fits around it loosely. The coupler will be pressed tight against the top of the sintered filter holder. The 1" copper pipe will slide into the coupler, right up close to the bottom of the sintered filter holder. Then mark the pipe at the end of the coupler and go solder the coupler to the pipe. Then measure carefully and cut so the pipe & coupler assembly will wedge snug between the top piece of the filter holder and the bottom of the bowl, it was right about 4" long.
I cut the pipe a bit long, and fine tuned it with the bench grinder, carefully deburring the edge of the pipe that wedges against the bottom of the bowl.
Then I drilled 4 holes just below the coupler, 1/16". I drilled more 1/16" holes, and the holes at the very bottom, redrilled larger, so that the muck could get to the drain valve.
Remove the drain valve however you can. I didn't have the right hex key that was long enough, but discovered that my Torx T-50 worked great. You're not going to use the valve, so if you have to cut it off, who cares. The hole that the valve was in, you need to tap that with 1/4" NPT. Again, don't just bury the tap, run it close to halfway and test your fitting. I couldn't find the drain valve that I wanted at the hardware store, but when I got home, I realized that I already had one from my Harbor Freight purchase! It's a 90* turn shut off valve for compressed air, with 1/4" male NPT on one end. Make sure you tap it properly, so you don't crack the bowl while tightening the valve!
Then I stuffed the copper pipe assembly with the copper wool that I got at KMart. Carefully unbundle it and then rebundle it to suit your need. I packed it in there pretty tight, but you have to leave room for the sintered filter.
I also stuffed copper mesh around the outside of the copper pipe. Here it is assembled, before the outer wrap. You can see the copper pipe in there, it doesn't rattle.
Here is the beginning of the outer wrap.
Push the pipe and outer wrap into the bowl, being careful not to trap any of the wrap in the pipe-to-bowl mating surface . Then take a tool and push the top of the wrap down a bit, so it doesn't interfere with the bowl-to-O-ring seal.
Put it all together, lining up the valve handle and the "max fill" line wherever you want it. I would drain before you reach the "max fill" line. It can safely hold about 2 oz.
So the dirty air will enter the can, run through the mesh on the outside, separating some muck. Then it will go through the holes in the pipe, into the inner, tightly packed mesh, where more muck will get separated. Then any vapors that are still in the air will be separated by the 5 micron sintered brass filter, and the clean air will exit.
$22.49 Filter
$ 2.80 1/2 foot of 1" copper pipe(other half for the other can)
$ 4.99 1" Coupler
$ 8.99 1/4" Pipe Tap
$ 3.99 Drain Valve
$ 1.00 1/2 pack copper scrubbers
$44.26 +whatever fittings you need +tax
Last edited by RJ_RS_SS_350; Mar 17, 2016 at 03:12 PM.
Thread Starter
Senior Member
Joined: 05-29-2015
Posts: 542
From: Cleveland, OH
Pretty sweet DIY catch can there RJ! Having chambers is what it's all about. I'm playing with some 6061 Aluminum pipe. Looking into stainless filters for interior tubing, plastic baffles along the walls.
Definitely keep up your research! I've ditched the small cans and decided to build my own. Can't wait to see the results from your new can.
Definitely keep up your research! I've ditched the small cans and decided to build my own. Can't wait to see the results from your new can.