Appearance/Modifications Discussions Body Kits, Hoods, Spoilers, Interiors,Engine Compartments,Exhaust

A Grand Discovery!

Thread Tools
 
Search this Thread
 
Old 07-17-2008, 06:00 PM
  #1  
Senior Member
Thread Starter
 
Yonash's Avatar
 
Join Date: 02-07-2008
Location: Lakenheath, UK
Posts: 826
A Grand Discovery!

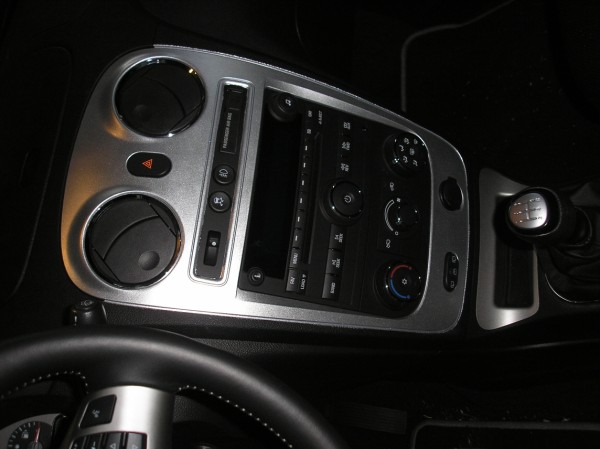
as some may remember, i recently painted my waterfall panel and bowties silver (see thread here), and i wanted to clean up some of the edges on the waterfall. as you can see in the second picture in that thread, it was very difficult to mask into the groove, so the entire groove was silver, as well as some "overspray" along the outer edge of the groove, and it simply did not look right, since the groove does not go above the panel too, so it had a silver "outline" down the sides and bottom, but not around the top. well, for anyone with the black interior, should you ever need to do some touch-up on the black, Testors flat black acrylic paint matches PERFECTLY. you literally can not tell where i laid down the black paint and where is still original panel. i know EXACTLY where i painted, and i can't even tell it was painted! pictures coming in a couple minutes.

cliffnotes: to touch up black "ebony" interior plastics for an invisible repair, use Testors flat black acrylic model paint!
Yonash is offline  
Old 07-17-2008, 06:03 PM
  #2  
Senior Member
 
mitzkity's Avatar
 
Join Date: 08-27-2006
Location: Anaheim, CA
Posts: 2,566
Wow....good to know!!
mitzkity is offline  
Old 07-17-2008, 06:27 PM
  #3  
Senior Member
Thread Starter
 
Yonash's Avatar
 
Join Date: 02-07-2008
Location: Lakenheath, UK
Posts: 826
this is the pic from the other thread, note the nasty edges


now, notice the difference on the edges!


Yonash is offline  
Old 07-17-2008, 06:39 PM
  #4  
Senior Member
 
stick's Avatar
 
Join Date: 07-26-2007
Location: Pekin, Illinois
Posts: 1,789
Very nice Planning on doing that to mine soon too.
stick is offline  
Old 07-17-2008, 07:25 PM
  #5  
Senior Member
 
GDZHHR's Avatar
 
Join Date: 04-30-2006
Location: Maryland Heights, MO
Posts: 9,149
Looks great!
GDZHHR is offline  
Old 07-17-2008, 09:07 PM
  #6  
Senior Member
 
Canuck's Avatar
 
Join Date: 04-19-2008
Location: Ontario Cdn
Posts: 563
Very nice, excellent job finishing off the edges.
Canuck is offline  
Old 07-18-2008, 03:06 AM
  #7  
Senior Member
 
MrVette's Avatar
 
Join Date: 04-09-2007
Location: S.E. Michigan
Posts: 1,942
Very nice work!
What kind of job is it to take the water fall off and what kind of paint did you use?
MrVette is offline  
Old 07-18-2008, 08:24 AM
  #8  
Senior Member
 
prod's Avatar
 
Join Date: 12-14-2007
Location: Toronto ON Canada
Posts: 2,964
Originally Posted by MrVette
Very nice work!
What kind of job is it to take the water fall off and what kind of paint did you use?
I think I read elsewhere on here that you can just grab the vents and pull, but I havent been brave enough to try it (yet).
prod is offline  
Old 07-18-2008, 09:07 AM
  #9  
jx3
Senior Member
 
jx3's Avatar
 
Join Date: 10-19-2005
Location: Miami
Posts: 20,687
Originally Posted by prod
I think I read elsewhere on here that you can just grab the vents and pull, but I havent been brave enough to try it (yet).
Each vent is held on by 3 screws, accesible when the water fall is popped off.
jx3 is offline  
Old 07-18-2008, 10:00 AM
  #10  
Senior Member
 
Cokeybill's Avatar
 
Join Date: 03-28-2008
Location: Oshawa
Posts: 1,115
This how to do it...

http://www.socalhhr.citymax.com/hhrradioremoval.html
Cokeybill is offline  


Quick Reply: A Grand Discovery!


All times are GMT -5. The time now is 04:40 PM.