
Mud Flap Advice Sought....


Thread Starter
Member
Joined: 09-19-2007
Posts: 78
From: USA
Mud Flap Advice Sought....
I picked up the set of molded mud flaps for my '07 2LT, and I have to say that now that they're in-hand, I like them and am really looking forward to having them installed.
My big question is this: With a white HHR, what's the consensus about having the flaps painted (properly) versus installing them as is, as their native dark grey plastic.
I can see the merits/aesthetics of both options. Any thoughts from anyone who has considered this?
Thanks!
My big question is this: With a white HHR, what's the consensus about having the flaps painted (properly) versus installing them as is, as their native dark grey plastic.
I can see the merits/aesthetics of both options. Any thoughts from anyone who has considered this?
Thanks!

Senior Member
Joined: 01-19-2008
Posts: 1,658
From: Chicago, IL (Waukegan)
I've got the Victory Red color and just picked up some mud flaps as well.
My plan is to leave them unpainted for the most part. Would hate to think of the pain of paint chipping with the rocks and such that will be kicked up.
I am, however, going to paint the 'HHR' the same red as my body color.
My plan is to leave them unpainted for the most part. Would hate to think of the pain of paint chipping with the rocks and such that will be kicked up.
I am, however, going to paint the 'HHR' the same red as my body color.
Thread Starter
Member
Joined: 09-19-2007
Posts: 78
From: USA
Thanks for the opinion. I may very well be leaning that way too, though despite my many hesitations for the same reason(s) you've mentioned, like the chipping etc, but I've read a lot of reports about how surprisingly well painted ones have held up. It's too bad they just couldn't produce them of plastic tinted to the same color as the body paint they offer....
As for painting the "HHR", I'd love to do that, but I'm just so damn afraid of getting it wrong or not cutting a clean line that I may just leave them be, given that it has to be done not only in paint but primer too. I have a feeling it's as much art as science, and I just don't have those skills in my DNA.
Thanks again!

Senior Member
Joined: 09-06-2006
Posts: 1,222
From: St. Louis, MO
Hey Remford..
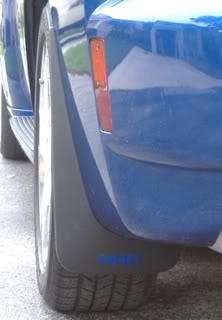
I bought a set for my White HHR and I decided to paint the raised HHR lettering white to match the car but keep the rest of the splashguard natural color.
I had the same concern you had with the road debris possibly chipping the white paint if I painted the entire splashguard.
After having them on for a year, I am VERY glad I did not paint the entire splashgauard because I can see where the inside of the splashguard is getting a bit of abuse from small debris that it catches.
As for painting the raised HHR letters, it's real easy... buy a small tube of touch-up paint and use the little brush.
Last edited by Big Kahuna; Mar 4, 2008 at 09:27 AM.

Senior Member
Joined: 10-19-2005
Posts: 20,687
From: Miami
However if you think you may have trouble, why not just paint the back sides of the guards, it's not as if they are going to be getting any road debris on that side to chip the paint.


Senior Member
Joined: 01-04-2008
Posts: 2,366
From: Long Beach, Ca
I have a summit white 08. I love the black molded flaps and they way the contrast the white. Blackwall tires, black running board strips. It all ties in. A lot of folks are painting the extruded HHR logo on the rears. Ive seen red ones like that and it looks cool.
Senior Member
Joined: 02-23-2006
Posts: 2,529
From: Mesa Arizona
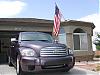
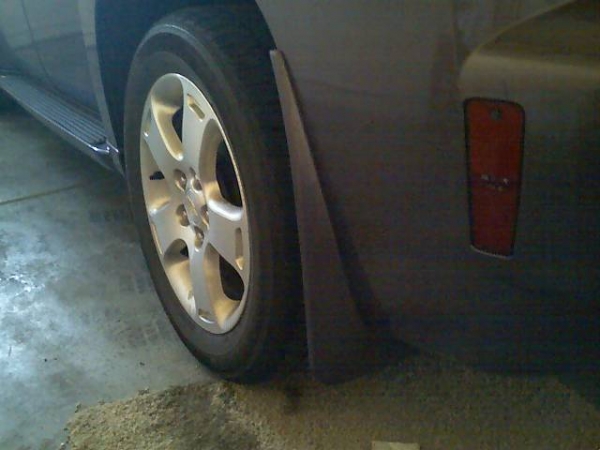
When I had to have my hood repainted I had the dealer install and paint mine. Color matched and I love the look. If I get a chance I will see if I have a photo of them or take one. The inside does not reall show any abuse but I live in Az so no snow and salt get tossed up on mine.
Everyone who seen the love the look it gives and ever the dealer was loved the way they came out.
I give the idea
Here goes sorry the photo is not that great taken off the cell phone and dirty but you get the idea
Everyone who seen the love the look it gives and ever the dealer was loved the way they came out.
I give the idea
Here goes sorry the photo is not that great taken off the cell phone and dirty but you get the idea
Last edited by dbarberaz; Mar 4, 2008 at 12:50 PM. Reason: Photo added
Thread Starter
Member
Joined: 09-19-2007
Posts: 78
From: USA
Well, I got around to installing them this weekend, after laughing myself out of the local dealership who wanted $100 for the privilege. The counter twerp started blathering on about the "complicated process" of having to put the vehicle up on a lift, because it's "just like the Yukon...". At that point, my eyes glazed over and by backside headed toward Wal-Mart for a $2 mini pry-bar and stubby phillips head screwdriver.
It couldn't have been simpler. The plastic mounting pins that need to be removed are just as easily snipped beneath the heads using wire-cutting pliers. Removing all ten, 8 minutes.
Using a small socket to remove the actual screw in the bottom hole of each front wheel well took another 6 miinutes (including turning the steering wheel for better access to the wheel well), and installing the retaining clips took another 5.
From there, putting on the front pair took less than 5 minutes each, and the rear less than 10. All together it took me 40 minutes on my driveway. And, as others have noted, the three screws are very secure, making me question the need for the foruth intended for newly-drilled holes in the underside. My only concern would be for extreme odd-angle pressure, (like car washes), so I decided to use 3M auto trim adhesive to bond the screw tabs on each flap to the body underside. I'll drill and screw the next time it happens to be up on a rack having the tires rotated.
My only caveat would be that each of the lowest rear screws can be a tight fit between screw head and tire. I simply switched my bit from the screwdriver handle to a ratchet, and it worked just great. No tools (or GM service) necessary. $100 saved.
Long and short of it is that i chose to not paint the "HHR", though I do like the look on those where I've seen it done. The mud flaps add to the "finished" look of the wheel well areas, and I'm glad they're on. I was surprised at how much they seemed to extend (especially the rear) but that may be more optical perspective than practical. Nevertheless, I like them and hope they happen to provide nominal benefit in protecting the finish.
Thanks a bunch to all who cared to share their experiences and advice.

Senior Member
Joined: 01-06-2006
Posts: 437
From: Batesville, Indiana
I hope you like your flaps. I love mine. I had them painted to ,atch, but only on the rear of the flaps. I didnot want the inside of the flaps painted due to debris scratching them. I am very happy about painting tham. After 2 plus years, I still do not have any scratches in the paint.