
SoCal How-To: Bumper Insert Removal

Thread Starter
Senior Member
Joined: 10-14-2005
Posts: 5,359
From: SoCal
SoCal How-To: Bumper Insert Removal
Here's a quick How-To on removing the front bumper insert for color-matching.
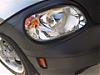
1. After you remove the front bumper fascia...there are nine tabs that hold the insert in place. Start in the middle and work your way out to the edges.

2. Move the tabs sideways to release them from the bumper fascia, then push them in slightly so they don't reattach.

3. After releasing the 5 bottom and 2 lower side tabs, lift the insert back and away from the holes.

4. Now release the two end tabs. You may need a small flat-bladed screwdriver to get them to break loose.
Pry gently, just enough to let the tab slip through.

5. Now slide the insert out of the bumper cover.

6. Once the insert is out, you can prepare it for painting. Reverse the procedure to reinstall it.

And finally...
7. Why you must remove the bumper cover to do this:
There is a steel brace (the actual bumper), across the entire front making acess from behind impossible. The shot below is looking behind the bumper from between the radiator and the front bumper.

Hope it helps!
1. After you remove the front bumper fascia...there are nine tabs that hold the insert in place. Start in the middle and work your way out to the edges.
2. Move the tabs sideways to release them from the bumper fascia, then push them in slightly so they don't reattach.
3. After releasing the 5 bottom and 2 lower side tabs, lift the insert back and away from the holes.
4. Now release the two end tabs. You may need a small flat-bladed screwdriver to get them to break loose.
Pry gently, just enough to let the tab slip through.
5. Now slide the insert out of the bumper cover.
6. Once the insert is out, you can prepare it for painting. Reverse the procedure to reinstall it.
And finally...
7. Why you must remove the bumper cover to do this:
There is a steel brace (the actual bumper), across the entire front making acess from behind impossible. The shot below is looking behind the bumper from between the radiator and the front bumper.
Hope it helps!

Thread Starter
Senior Member
Joined: 10-14-2005
Posts: 5,359
From: SoCal
Ummm...no! (I don't have one anyway.) It's kind of a body shop guy thing. Remove the fender plugs and you just "yank" it off! 
If this scares you...well, you probably shouldn't attempt it! Leave it to the body shop guys.
For all the work it takes to remove this insert, I would consider filling in the lines around it and painting the whole bumper to give it the "solid" effect.
If this scares you...well, you probably shouldn't attempt it! Leave it to the body shop guys.
For all the work it takes to remove this insert, I would consider filling in the lines around it and painting the whole bumper to give it the "solid" effect.


Senior Member
Joined: 12-21-2005
Posts: 1,010
From: Launch Coast Calif.
Originally Posted by SoCalHHR
Here's a quick How-To on removing the front bumper insert for color-matching.
1. After you remove the front bumper fascia...there are nine tabs that hold the insert in place. Start in the middle and work your way out to the edges.
2. Move the tabs sideways to release them from the bumper fascia, then push them in slightly so they don't reattach.
3. After releasing the 5 bottom and 2 lower side tabs, lift the insert back and away from the holes.
4. Now release the two end tabs. You may need a small flat-bladed screwdriver to get them to break loose.
Pry gently, just enough to let the tab slip through.
5. Now slide the insert out of the bumper cover.
6. Once the insert is out, you can prepare it for painting. Reverse the procedure to reinstall it.
And finally...
7. Why you must remove the bumper cover to do this:
There is a steel brace (the actual bumper), across the entire front making acess from behind impossible. The shot below is looking behind the bumper from between the radiator and the front bumper.
Hope it helps!
good job..
https://www.chevyhhr.net/forums/show...ighlight=grill
Thread Starter
Senior Member
Joined: 10-14-2005
Posts: 5,359
From: SoCal
Originally Posted by dbarberaz
Mike 
your step by steps rock Not something I would probally try but you make things looks easy
your step by steps rock
Now it's all for fun though...

Senior Member
Joined: 08-27-2006
Posts: 2,566
From: Anaheim, CA
DH was at his dealer yesterday to get some parts paint-matched, and they said they couldn't warrantee anything that they painted that was PLASTIC. Especially if it had weathered or had armor-all applied to it. I would love to have mine paint-matched, but.... will it last a few years at least?