HID INSTALL-Easy How To
 01-01-2012, 04:41 PM
#1
Member
Thread Starter

Join Date: 12-14-2008
Location: Missouri
Posts: 32
HID INSTALL-Easy How To
Ok guys/ladies I first installed a single beam HID kit in my HHR and it looked great but since I got a deal on a Hi/Lo kit now I just finished installing them. I'll do my best to make this easy, it really was not hard to do.
PART ONE:
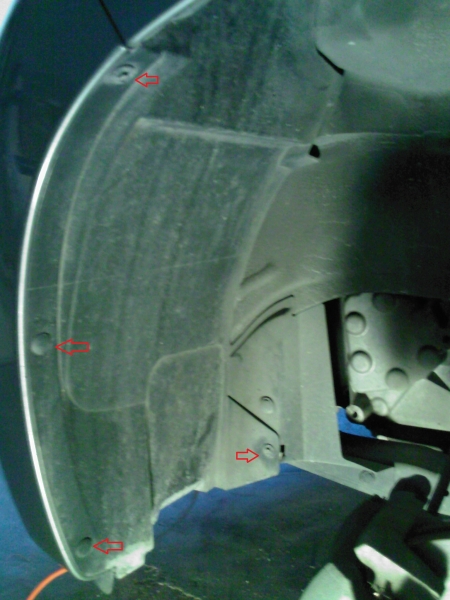
Remove your wheel and remove the two plugs and the 2 screws on the plastic wheel well cover.
Underneath there will be one more screw and 2 more plugs, remove these as well.
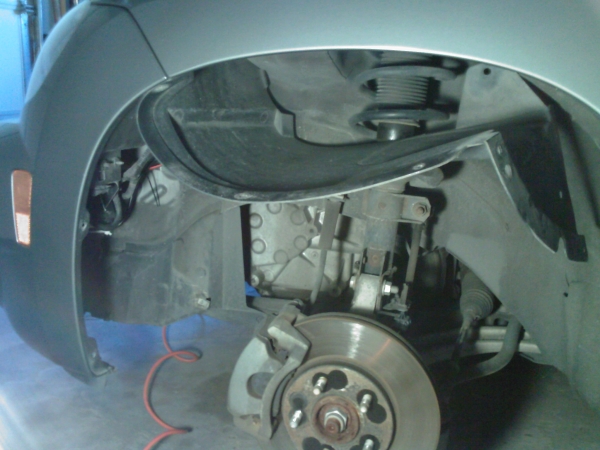
With all the plugs and screws removed you can now fold the plastic wheel well cover out of your way. From this point you have all access to fog lights and headlights.
In this picture you will see my current kits installed. The two ballast fastened to the bracket that is already there and all the wires zip tied off. For the fog lights you just install the HID bulbs, wires from the ballast plug into the light and the plug from the car plugs into the wire coming out of the ballast. Really no way to screw this up, only one way to plug these wires in.
This is the plug for the headlights coming from the ballast. The wires did not come pre-installed into the plug so you have to figure out which wire goes where. REMEMBER: THIS IMAGE/INFO IS FOR A SINGLE BEAM HEADLIGHT INSTALL ONLY. This is how your plug should look with the wires installed in it the proper way. Make sure you plug is facing this same way and the red wire is on bottom and black on top, will not work right if not installed exactly like this. This will then plug right into the factory headlight plug on the car. Once this is pluged in try the lights to see if your driver side works, if not make sure everything is pluged in very secure...it should work though. This is it for the SINGLE BEAM HID install. Just zip tie all lose wires up and re-install the wheel well cover, you're now ready to do the same to the passenger side. NO ground wires to mess with on the single beams.
IF DOING A HI/LO INSTALL KEEP READING TO PART 2
PART ONE:
Remove your wheel and remove the two plugs and the 2 screws on the plastic wheel well cover.
Underneath there will be one more screw and 2 more plugs, remove these as well.
With all the plugs and screws removed you can now fold the plastic wheel well cover out of your way. From this point you have all access to fog lights and headlights.
In this picture you will see my current kits installed. The two ballast fastened to the bracket that is already there and all the wires zip tied off. For the fog lights you just install the HID bulbs, wires from the ballast plug into the light and the plug from the car plugs into the wire coming out of the ballast. Really no way to screw this up, only one way to plug these wires in.
This is the plug for the headlights coming from the ballast. The wires did not come pre-installed into the plug so you have to figure out which wire goes where. REMEMBER: THIS IMAGE/INFO IS FOR A SINGLE BEAM HEADLIGHT INSTALL ONLY. This is how your plug should look with the wires installed in it the proper way. Make sure you plug is facing this same way and the red wire is on bottom and black on top, will not work right if not installed exactly like this. This will then plug right into the factory headlight plug on the car. Once this is pluged in try the lights to see if your driver side works, if not make sure everything is pluged in very secure...it should work though. This is it for the SINGLE BEAM HID install. Just zip tie all lose wires up and re-install the wheel well cover, you're now ready to do the same to the passenger side. NO ground wires to mess with on the single beams.
IF DOING A HI/LO INSTALL KEEP READING TO PART 2
 01-01-2012, 04:54 PM
#2
Member
Thread Starter
Join Date: 12-14-2008
Location: Missouri
Posts: 32
Hid install part 2
PART 2 OF HID INSTALL...HI/LO BEAM INSTALL
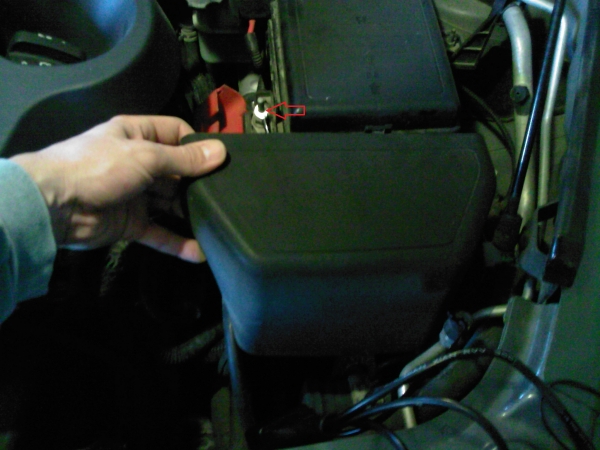
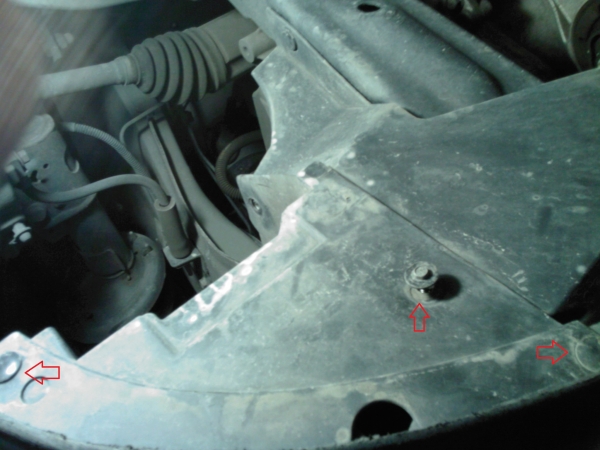
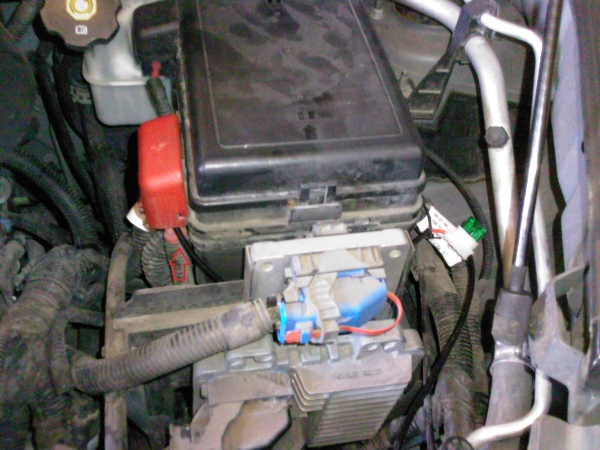
Now, a HI/LO kit you have to install a relay harness, not to worry this is pretty simple too. In this picture you will see I already put the red wire from the harness on the power supply under the hood. Remove this plastic cover my hand is on.
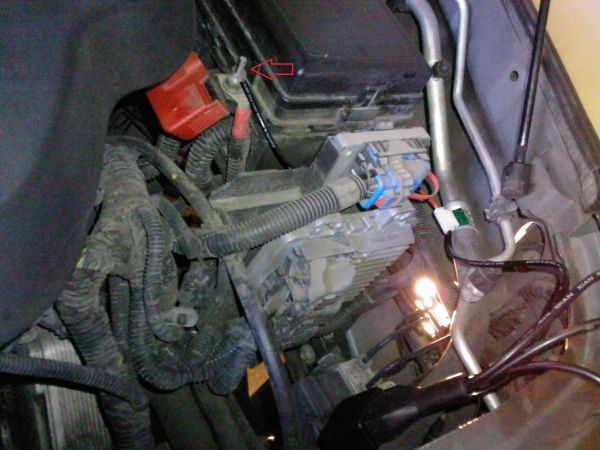
Now you can clearly see the power wire from the harness on the power supply, just leave this loose for now. You will also see the fuse on the relay harness which is the small green thing in the right of the picture.
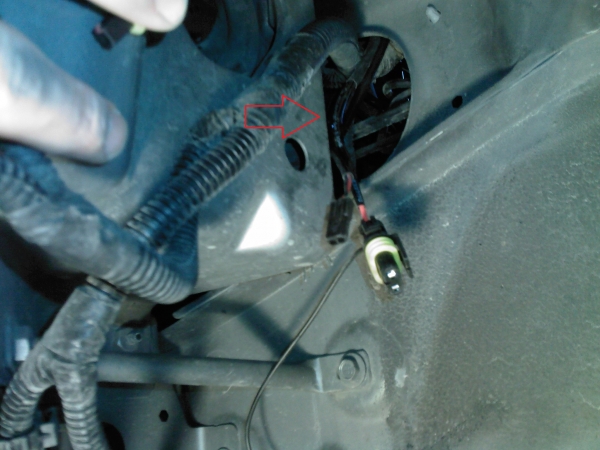
You will see a hole from under the hood which is down by the fender, the wires have to be fed through this hole. This photo is taken from the wheel well but you can see the wires being fed through the hole.
Here you can clearly see the wires through the hole and you can also see where the headlight get's installed.
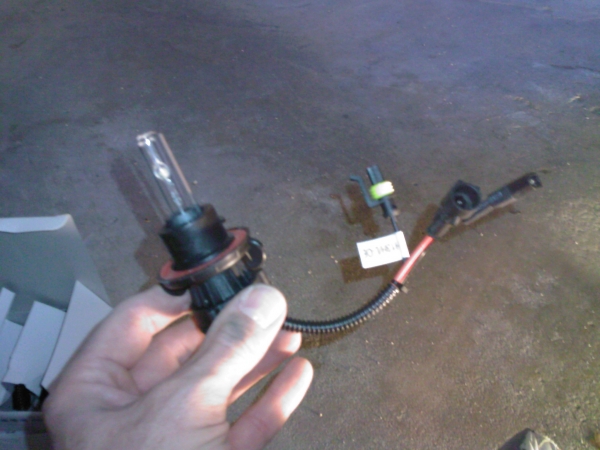
This is your HI/LO Bulb, install it in the headlight.
One plug from the harness plugs directly into the ballast, the others plug into the wires coming off the bulb itself. These will only plug in one way, I don't think you can mess this up.
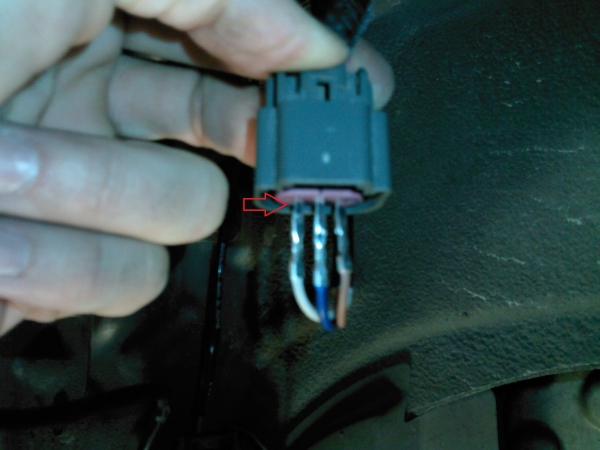
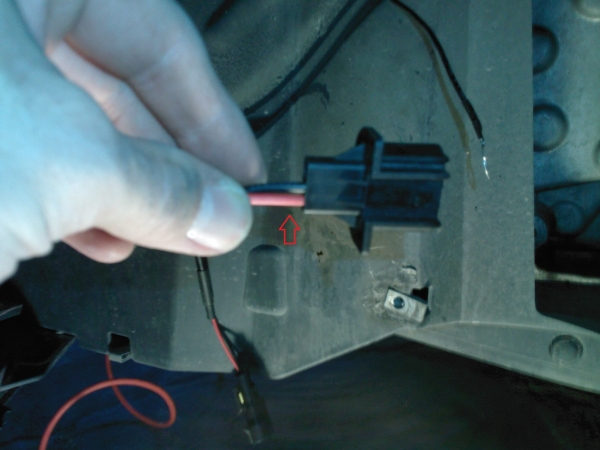
Now, again the wires that plug into the factory plug on the car did not come pre-installed into the plug head. You will have to figure out again how these wires need to be installed. Before you put them in the plug just slip them into the factory plug like in this image and turn the lights on to see if they work. Make sure your positive wire has good connection on the power supply for them to work. Make sure the HI and LO both work. If they don't first make sure you have good connection on the power supply under the hood...if still not working right you may have to move the wires around until you figure out how they need to go. They should have to go exactly like in this photo. White/Blue/Red color. Once you get them working right install the wires into the plug head and plug it into the factoy plug on the car. READ NEXT STEP ON HOW TO GROUND THE GROUND WIRE....IF THIS ISN'T GROUNDED THE LIGHT WILL NOT WORK AT ALL!

Here the plugs are plugged together.

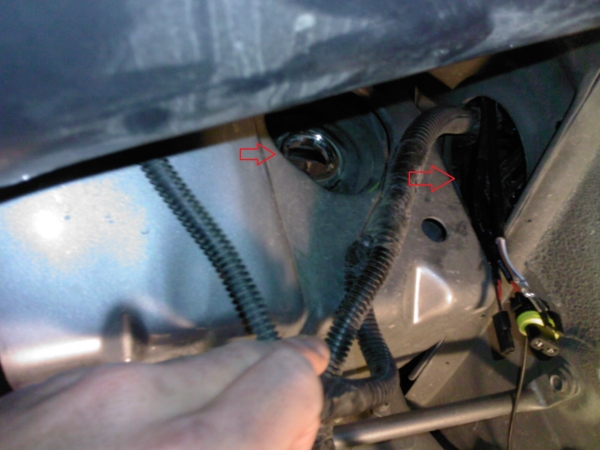
The last wire that we fed through the hole was a ground wire. There will be one on both sides, driver and passenger. There is already a hole in a metal bracket just sand the paint off to get a good ground and install the ground wire with a small bolt. This bracket is near where the ballast are installed.
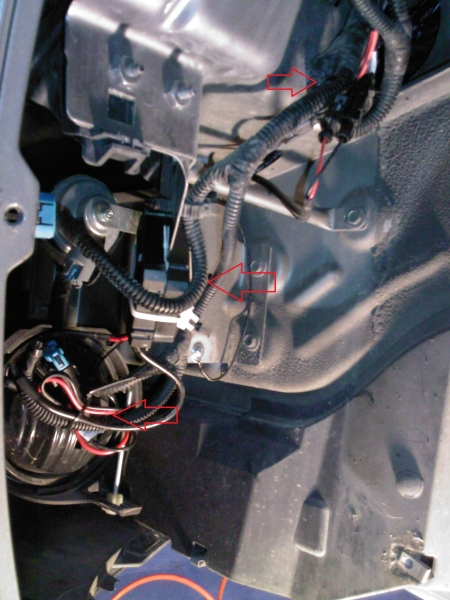
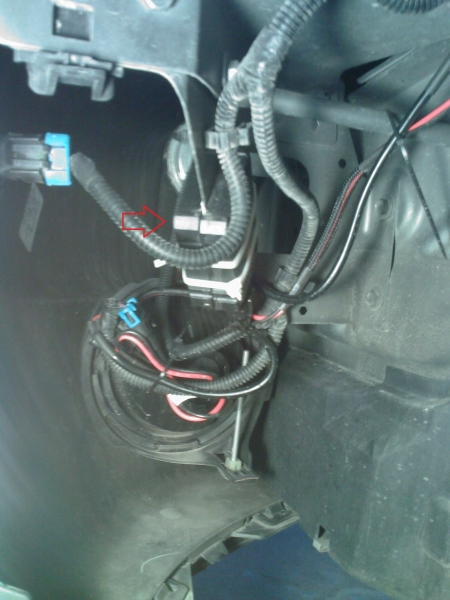
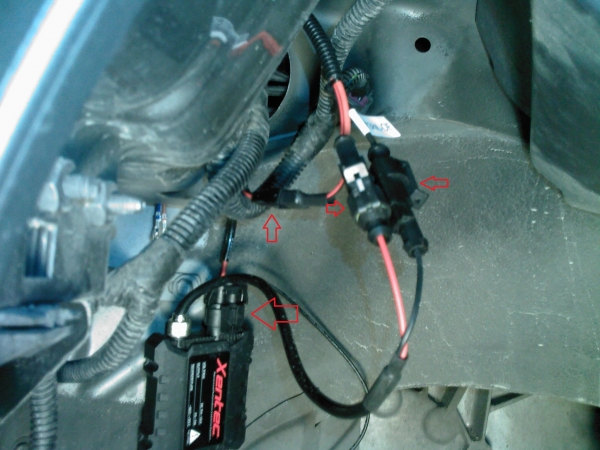
With the ground wire installed now you just zip tie and lose wires. Here you can see the wires from the foglights, headlights and you can even make out the ground wire installed and all wires zip tied. The zip tied ballast are also pointed out in this photo.

Now it's time to do the passenger side. From under the hood take the other end of the relay harness and take it to the passenger side. You will remove the air hose to feed the wires through there, you will see factory wires fed through the same hole.
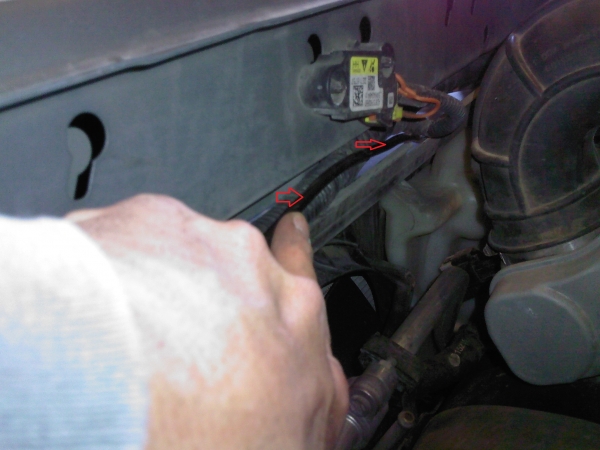
Zip tie the wires coming across the engine compartment to the factory wires that also feed across, along the top backside of the radiator. Easy to see and easy to zip tie together.
The wires from the harness plug in the same way. One directly into the ballast and the others plug in with the wires coming from the head bulb you install. Again, only one way for these all to plug in so there is no way to mess this up. NOTHING WILL BE PLUGGED INTO THE FACTORY PLUG ON THE PASSENGER SIDE!! Just tape it up to keep water from getting to it. The power is coming from the driver side that we have already done. Do the ground wire exactly the same as the driver side. Hole is already there, sand it down to the metal and use a small bolt to fasten it.
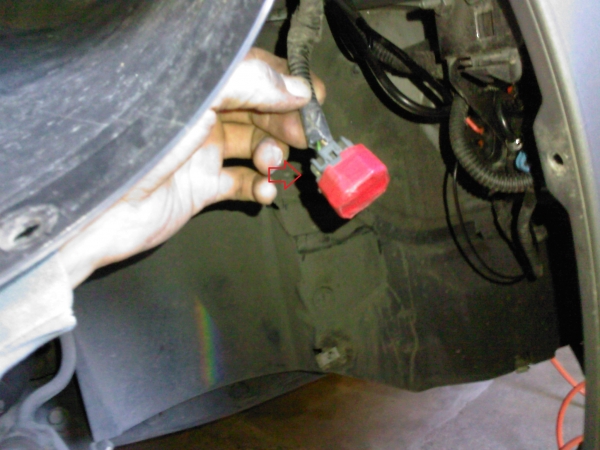
Now go back to the power supply under the hood and fasten that down. Just undo the nut under the red cap, slip the power wire from the relay harness back onto it and tighten the nut back down. Pop the red cap back on and try your lights. They should all be working now, if not check the grounds to make sure they are grounded really good.
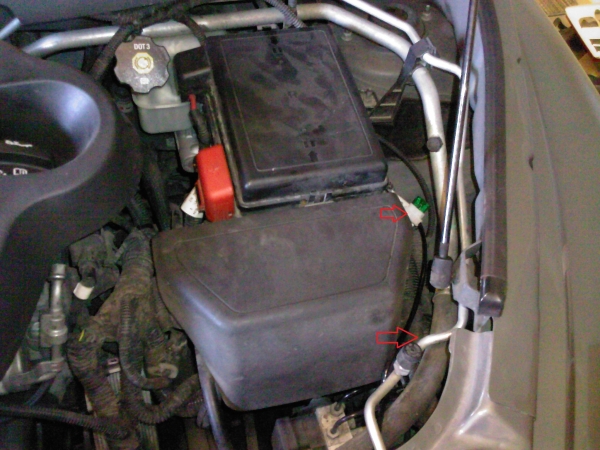
With everything working install the plastic cover back on that we removed. You can see the green fuse is easy to get to if you need to and the other red arrow is pointing to where the relay harness control box is tucked away out of sight...so tucked away you can't even see it in the photo;-)
Take a trip around come night and see how good they look!!
This completes your HID Headlight installation. Pretty simple, the single beam kits are very easy to install, the HI/LO just add in the relay harness you have to also install....all in all it's a pretty simple kit to install too.
Now, a HI/LO kit you have to install a relay harness, not to worry this is pretty simple too. In this picture you will see I already put the red wire from the harness on the power supply under the hood. Remove this plastic cover my hand is on.
Now you can clearly see the power wire from the harness on the power supply, just leave this loose for now. You will also see the fuse on the relay harness which is the small green thing in the right of the picture.
You will see a hole from under the hood which is down by the fender, the wires have to be fed through this hole. This photo is taken from the wheel well but you can see the wires being fed through the hole.
Here you can clearly see the wires through the hole and you can also see where the headlight get's installed.
This is your HI/LO Bulb, install it in the headlight.
One plug from the harness plugs directly into the ballast, the others plug into the wires coming off the bulb itself. These will only plug in one way, I don't think you can mess this up.
Now, again the wires that plug into the factory plug on the car did not come pre-installed into the plug head. You will have to figure out again how these wires need to be installed. Before you put them in the plug just slip them into the factory plug like in this image and turn the lights on to see if they work. Make sure your positive wire has good connection on the power supply for them to work. Make sure the HI and LO both work. If they don't first make sure you have good connection on the power supply under the hood...if still not working right you may have to move the wires around until you figure out how they need to go. They should have to go exactly like in this photo. White/Blue/Red color. Once you get them working right install the wires into the plug head and plug it into the factoy plug on the car. READ NEXT STEP ON HOW TO GROUND THE GROUND WIRE....IF THIS ISN'T GROUNDED THE LIGHT WILL NOT WORK AT ALL!
Here the plugs are plugged together.
The last wire that we fed through the hole was a ground wire. There will be one on both sides, driver and passenger. There is already a hole in a metal bracket just sand the paint off to get a good ground and install the ground wire with a small bolt. This bracket is near where the ballast are installed.
With the ground wire installed now you just zip tie and lose wires. Here you can see the wires from the foglights, headlights and you can even make out the ground wire installed and all wires zip tied. The zip tied ballast are also pointed out in this photo.
Now it's time to do the passenger side. From under the hood take the other end of the relay harness and take it to the passenger side. You will remove the air hose to feed the wires through there, you will see factory wires fed through the same hole.
Zip tie the wires coming across the engine compartment to the factory wires that also feed across, along the top backside of the radiator. Easy to see and easy to zip tie together.
The wires from the harness plug in the same way. One directly into the ballast and the others plug in with the wires coming from the head bulb you install. Again, only one way for these all to plug in so there is no way to mess this up. NOTHING WILL BE PLUGGED INTO THE FACTORY PLUG ON THE PASSENGER SIDE!! Just tape it up to keep water from getting to it. The power is coming from the driver side that we have already done. Do the ground wire exactly the same as the driver side. Hole is already there, sand it down to the metal and use a small bolt to fasten it.
Now go back to the power supply under the hood and fasten that down. Just undo the nut under the red cap, slip the power wire from the relay harness back onto it and tighten the nut back down. Pop the red cap back on and try your lights. They should all be working now, if not check the grounds to make sure they are grounded really good.
With everything working install the plastic cover back on that we removed. You can see the green fuse is easy to get to if you need to and the other red arrow is pointing to where the relay harness control box is tucked away out of sight...so tucked away you can't even see it in the photo;-)
Take a trip around come night and see how good they look!!
This completes your HID Headlight installation. Pretty simple, the single beam kits are very easy to install, the HI/LO just add in the relay harness you have to also install....all in all it's a pretty simple kit to install too.
Last edited by 8CH8CHR; 01-01-2012 at 06:48 PM.