
Home-Grown CAI


Thread Starter
Senior Member
Joined: 10-18-2005
Posts: 163
From: TX
I have finally found the right combo to build your own CAI. Tube diameter is biggest problem that I had. Choose the wrong diameter - get the service engine light. So here's the Recipe:
2.5" PVC pipe
Thats it. The ID of the tubing gives the right air velocity for the MAF to work properly. 2" PVC is too small and restrictive, 3" is too big and doesn't give enough air velocity. I also tried several diameters of aluminum tubing. 2.5" is not a standard size. You will probably have to go to a sprinkler system supply store to find it.
I have made one similar to the AirRaid (~8" long tube) and one similar to the CGS (same path with 2 PVC elbows). Both worked with NO check-engine light. I've been running it for over a month now and no problems. WoooHooooo!
I know it is not precisely tuned like the CGS, but you can feel a difference from the seat-of-the-pants guage. Better MPG by about 1.5 - using the old math, and the DIC.
The only hard part is the adapter for the MAF sensor. I designed one in 3D CAD and had it made by a rapid prototyping house from plastic. I'd be glad to share the drawing if anyone is interested.
And as always, if you prefer professional performance parts, buy one of the others. But if you are budget minded and have a little building ability, this one is pretty simple.
Good Luck!


 I'd like to see what it looks like!

Thread Starter
Senior Member
Joined: 10-18-2005
Posts: 163
From: TX
Here's the Pics!
OK. Here is the first set of pictures:
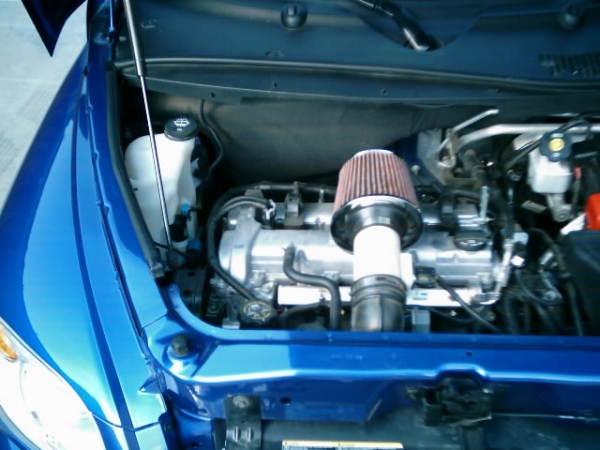
Front
Right
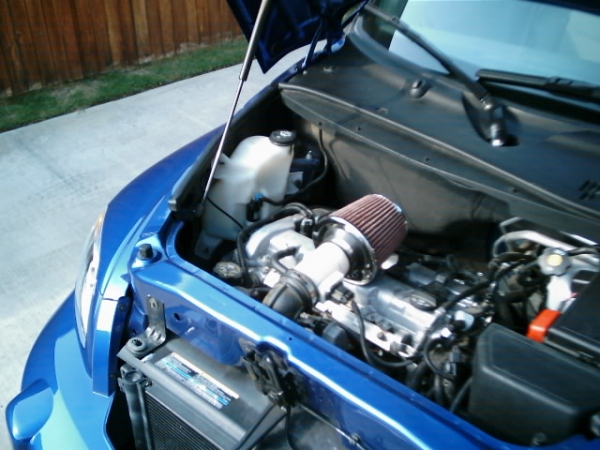
Left
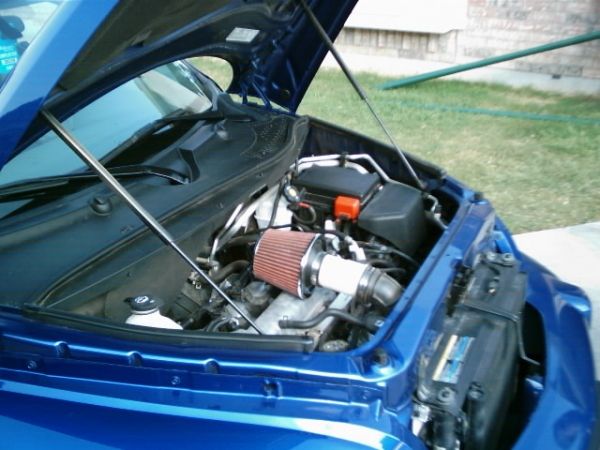
There are no braces or brackets holding the air filter in place. I do have a couple of heat resistant plastic grommets that fit over 2 of the pleats in the filter like a clip to keep the filter element from rubbing on the engine.
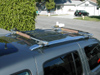
Now I am sure that some will say that this looks like it is going to draw in a lot of hot air since there is no heat shield. Yes that is true while sitting still at a stop light, however, I have made a small mod around the radiator to help increase air flow. I have removed the plastic guard from the right and left side of the radiator. I have also trimmed the vertical wall off of the plastic cover on top of the radiator. (See the arrows in the pic below) This allows cold air to flow through the grill (even in the summer heat, 100� air is cold compared to the engine temp) - then through the engine compartment - then the hot air flows out the rear of the engine compartment where the hood meets the windshield. It is very similar to how heat escapes with a cowl induction hood.
Radiator Plastic Detail

I don't have the CGS style home-made intake on my car right now. However here are the drawings for it. If I get a chance to swap and take a picture this weekend, I will.
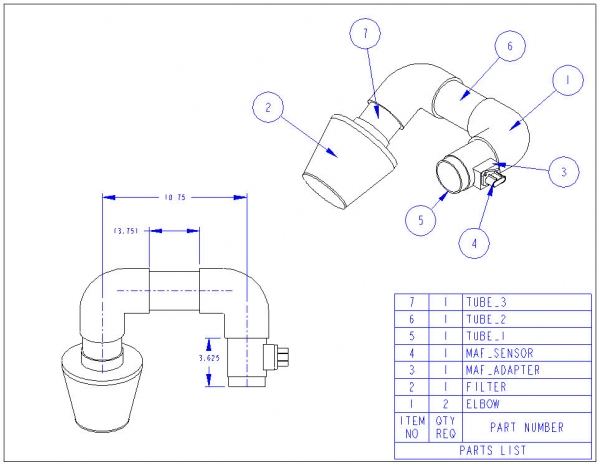
CAI Assembly View
You may have to change the length of Tube #2. I can't remember if this is the version that puts the filter on top, or down in the hole just like the CGS. If anyone has a CGS and would like to measure the actual distance for where I show 10.75 inches, then I'll update the print.
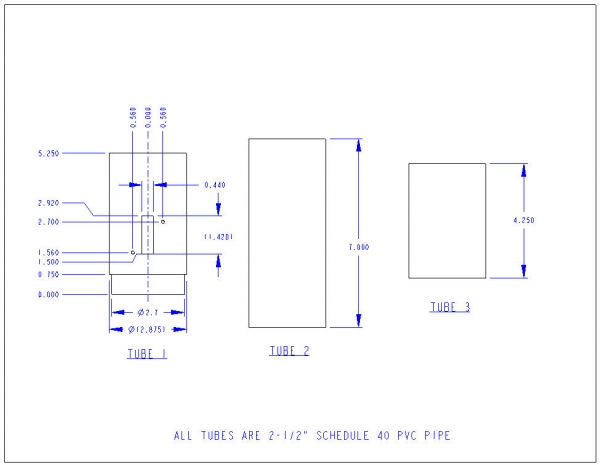
CAI Tube Details
Dimensions for the tube details. The stepped diameter on Tube #1 is not necessary. It just makes it a little easier to fit on the stock rubber elbow. I did not add the step, but it is pretty hard to get the rubber elbow over the tube. I had to use the 2 screwdriver trick like you do when trying to put a tire bead over a rim. I don't think it is stretched so much that the rubber will split over time though. It should be safe.
MAF Sensor Adapter
These are te basic dimensions that you need to create a Mass Air Flow Sensor adapter for use with 2.5" PVC tubing. If you try it with other tubing, Just make sure the �2.875 matches your tubes actual outside diameter. I made a gasket out of bicycle inner tube to put between the adapter and the PVC tube.
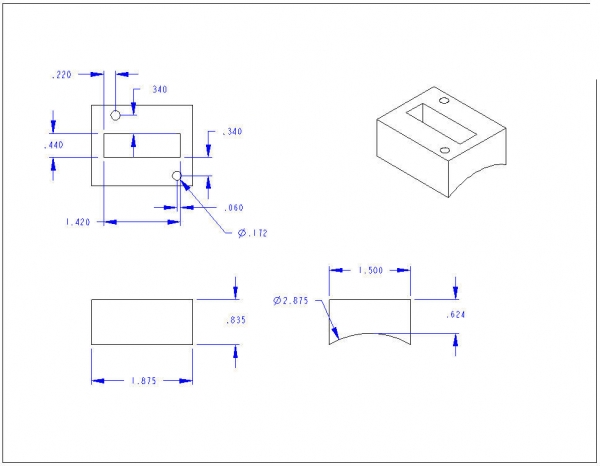
That's it.
BTW, Sorry for the not-so-clear images. The only camera I have right now is a 640x480 Batman Kids camera. But at least you can tell what I've got now.
Front
Right
Left
There are no braces or brackets holding the air filter in place. I do have a couple of heat resistant plastic grommets that fit over 2 of the pleats in the filter like a clip to keep the filter element from rubbing on the engine.
Now I am sure that some will say that this looks like it is going to draw in a lot of hot air since there is no heat shield. Yes that is true while sitting still at a stop light, however, I have made a small mod around the radiator to help increase air flow. I have removed the plastic guard from the right and left side of the radiator. I have also trimmed the vertical wall off of the plastic cover on top of the radiator. (See the arrows in the pic below) This allows cold air to flow through the grill (even in the summer heat, 100� air is cold compared to the engine temp) - then through the engine compartment - then the hot air flows out the rear of the engine compartment where the hood meets the windshield. It is very similar to how heat escapes with a cowl induction hood.
Radiator Plastic Detail
I don't have the CGS style home-made intake on my car right now. However here are the drawings for it. If I get a chance to swap and take a picture this weekend, I will.
CAI Assembly View
You may have to change the length of Tube #2. I can't remember if this is the version that puts the filter on top, or down in the hole just like the CGS. If anyone has a CGS and would like to measure the actual distance for where I show 10.75 inches, then I'll update the print.
CAI Tube Details
Dimensions for the tube details. The stepped diameter on Tube #1 is not necessary. It just makes it a little easier to fit on the stock rubber elbow. I did not add the step, but it is pretty hard to get the rubber elbow over the tube. I had to use the 2 screwdriver trick like you do when trying to put a tire bead over a rim. I don't think it is stretched so much that the rubber will split over time though. It should be safe.
MAF Sensor Adapter
These are te basic dimensions that you need to create a Mass Air Flow Sensor adapter for use with 2.5" PVC tubing. If you try it with other tubing, Just make sure the �2.875 matches your tubes actual outside diameter. I made a gasket out of bicycle inner tube to put between the adapter and the PVC tube.
That's it.
BTW, Sorry for the not-so-clear images. The only camera I have right now is a 640x480 Batman Kids camera. But at least you can tell what I've got now.