
Installing an Oil Catch Can


Thread Starter
Senior Member
Joined: 05-29-2015
Posts: 542
From: Cleveland, OH
In the name of SCIENCE!
I reigned myself in today and decided on a KISS approach. I did build a parallel setup but without ordering special fittings the system got too large and cumbersome.
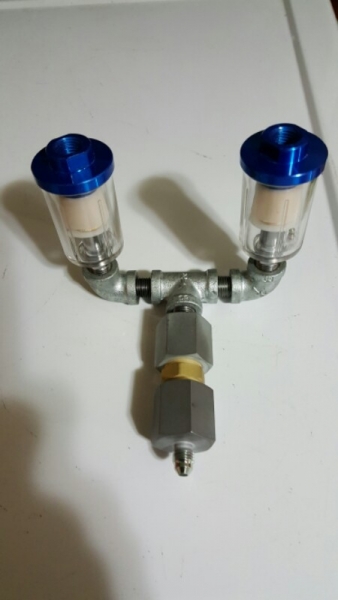
I was thinking of ditching the T and adding landing for the cans directly on the housing. That would've meant a few hours on the bridgeport today. Since this is uncharted territory I decided to keep it simple for now. My theory for parallel cans was trying to avoid a bottleneck in the system. I feel like adding all that is too much at once (in the name of SCIENCE of course!) That being said, I thought maybe 2 cans and all the associated fittings would create too much cavity and hurt the flow more than help. Let's see how well the 1 works, if it fills to quickly I'll design a better can at that point.
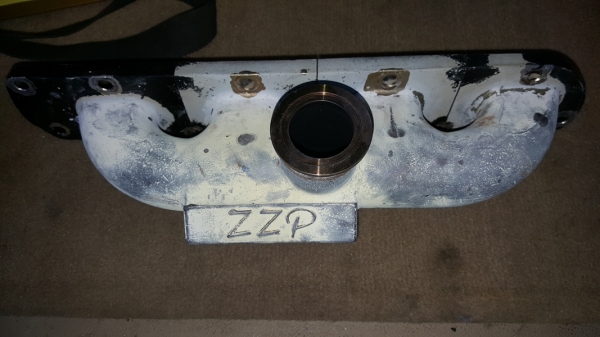
Here's what I came up with

I don't need any of the 3 mounting holes near the housing. They're for electrical sensors I've moved elsewhere. I intend on building the mount off of these.
I also Painted up a simple line diagram so we can visualize my intentions. RED lines are DIRTY air and BLUE lines are CLEAN. Hope this helps
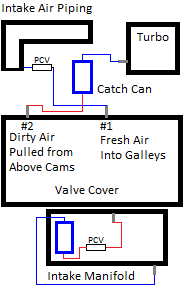
While I'm guessing we could plumb the two systems together into 1 can. Again, trying to Keep It Simple, this setup is basically stock. All I'm doing is making it external and installing catch cans where dirty air comes out.
I was thinking of ditching the T and adding landing for the cans directly on the housing. That would've meant a few hours on the bridgeport today. Since this is uncharted territory I decided to keep it simple for now. My theory for parallel cans was trying to avoid a bottleneck in the system. I feel like adding all that is too much at once (in the name of SCIENCE of course!) That being said, I thought maybe 2 cans and all the associated fittings would create too much cavity and hurt the flow more than help. Let's see how well the 1 works, if it fills to quickly I'll design a better can at that point.
Here's what I came up with
I don't need any of the 3 mounting holes near the housing. They're for electrical sensors I've moved elsewhere. I intend on building the mount off of these.
I also Painted up a simple line diagram so we can visualize my intentions. RED lines are DIRTY air and BLUE lines are CLEAN. Hope this helps
While I'm guessing we could plumb the two systems together into 1 can. Again, trying to Keep It Simple, this setup is basically stock. All I'm doing is making it external and installing catch cans where dirty air comes out.

Moderator
Joined: 05-01-2014
Posts: 8,512
From: California
I agree, DB, keep it simple. This is a prototype after all. After it's all together, the results of this science experiment may lead you to change or upgrade something.
I'm wondering now though, if the PCV valve should actually be on the clean side of the can. Otherwise it's getting coked, isn't it?
I'm also thinking you don't want to plumb it all into one can. If you did, you would need a tee on each end of the can. And wouldn't you need a check valve on each of the 4 lines? And how would you even know if one (or more) of the check valves failed? Again, the check valves on the dirty lines would be more susceptible to failure.
Thread Starter
Senior Member
Joined: 05-29-2015
Posts: 542
From: Cleveland, OH
I don't mind if the pcv is on the dirty side. After seeing one with 138k still functioning I'm convinced it'll be just fine. I'll be taking the housing off to dump it for now anyway. So I can keep it "check" lol.

Senior Member
Joined: 08-03-2010
Posts: 3,564
From: Lake Ronkonkoma, N.Y.
Dbeluscak
Just to clarify the PCV location/mod. You have to R&I the intake to remove the valve, plug the port in the intake manifold and add a new location for the PCV to the top of the intake?
I believe in the KISS method also.
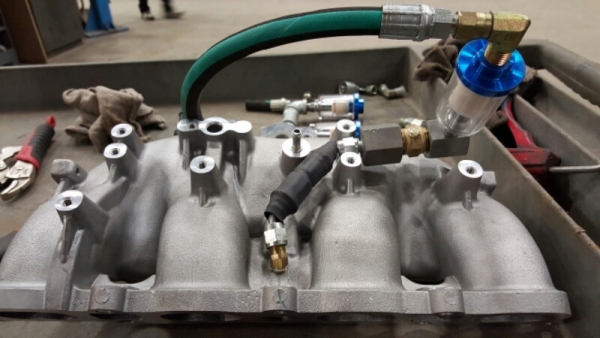
Being that I have half of your set up with the can coupled to the turbo I now need to hook up the PCV.
Your using #4 hose which is 1/4" I'm using 3/8" because it couples to the OEM nipples good using hose clamps. I think flow wouldn't be a problem with either of them.
I would like to tee into both lines and use my catch can.
I mounted my can towards the front right above the oil filter which is a good location using a stock air box. Easy to remove to drain and get to the oil filter.
Just to clarify the PCV location/mod. You have to R&I the intake to remove the valve, plug the port in the intake manifold and add a new location for the PCV to the top of the intake?
I believe in the KISS method also.
Being that I have half of your set up with the can coupled to the turbo I now need to hook up the PCV.
Your using #4 hose which is 1/4" I'm using 3/8" because it couples to the OEM nipples good using hose clamps. I think flow wouldn't be a problem with either of them.
I would like to tee into both lines and use my catch can.
I mounted my can towards the front right above the oil filter which is a good location using a stock air box. Easy to remove to drain and get to the oil filter.
Thread Starter
Senior Member
Joined: 05-29-2015
Posts: 542
From: Cleveland, OH
Sounds like you're halfway there catman. You're going to want to check post #31 on page 4. Goes into the details of removing and plugging the intake pcv. You'll be fine using 3/8 as it's close to factory. You're making a 1/8 npt hole in the top of the intake, you could probably pick up a 1/8npt x 3/8 Barb and hose clamp it. You just need a way to house your removed valve and place it in line. Either before or after the catch can. I would plumb in the pcv just after it leaves the intake. In an effort to remain as stock as possible.
On a side note, if you'd rather not do this to the intake on your car. Contact ZZP, apparently they sell the LDK intake manifold dirt cheap. Like 40 bucks! My guess is they take them off of long blocks and sell them without. So technically they gave me one, but in reality I already bought it when I bought the complete LDK from them. The only difference is the MAP sensor hole. You have 3 choices. Buy a new MAP for the LDK, buy a new o ring for existing MAP, or drill it out a bit with a chamfered bit.
On a side note, if you'd rather not do this to the intake on your car. Contact ZZP, apparently they sell the LDK intake manifold dirt cheap. Like 40 bucks! My guess is they take them off of long blocks and sell them without. So technically they gave me one, but in reality I already bought it when I bought the complete LDK from them. The only difference is the MAP sensor hole. You have 3 choices. Buy a new MAP for the LDK, buy a new o ring for existing MAP, or drill it out a bit with a chamfered bit.
Senior Member
Joined: 08-03-2010
Posts: 3,564
From: Lake Ronkonkoma, N.Y.
Dbeluscak (What is your real name?)
Relocating the PCV isn't a problem. Yeah using a barbed fitting to pipe is a no brainer.
What I would like to look into is the PCV itself. You know as well as me there are many replacement valves that you can buy from Delco, Fram and Wally World.
Knowing the specs on it would help installing one that has a barb on both ends so using a hose is more user friendly.
Something like this:
http://www.summitracing.com/parts/sm...FcOQHwodtCYFTg
Thread Starter
Senior Member
Joined: 05-29-2015
Posts: 542
From: Cleveland, OH
Name's Dan!
I agree using a replacement "off the shelf" valve would be an easier solution than making a housing for the current model. However, as I mentioned before. The external pcv from Port 1 to the intake tube is 100% shut off. The internal intake manifold pcv is not.
I'd say it allows 10% flow in the opposite direction. GM chose this for a reason, which is why I'm sticking with it. I'm assuming that if it was 100% shut off, under boost it could possibly damage the valve. That being said it will no longer see direct boost. Only small positive and negative pressure changes, that the pcv would see normally. By blocking the intake, the charge air will no longer try and force it's way into the cylinder head/oil galleys. We're relying on suction from the turbo and fresh air pressure provided by the intake tubing.
I think...lol
I have a couple questions regarding your current can setup.
1. How long have you had it installed?
2. How much oil are you getting from it?
3. It's your "home brew" can you designed in your thread?
I had the Mishimoto can in for about 200 miles and never saw a drop of oil in it. But I also had ZZProblems and blocked ports. I'm convinced this is the ONLY real solution to our problem. Cleaner oil would definitely help but only to a certain extent. Adding the 5th injector will keep things clean but we should remove the oil as well because it's lowering your detonation threshold. We're pretty excited to get Harley (the wife's SS) back on the road.
Once tuned, I can easily expect 400hp. As long as her Trans can make a few passes this season we have no reason not to be the fastest HHR out there! The top 3 are all pretty close to here. I'm thinking there needs to be a shootout somewhere in the Pittsburgh area!
Thread Starter
Senior Member
Joined: 05-29-2015
Posts: 542
From: Cleveland, OH
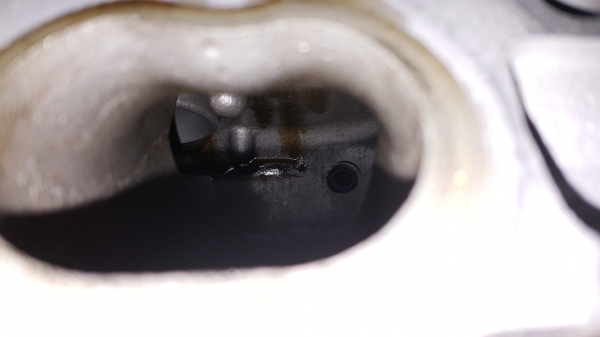
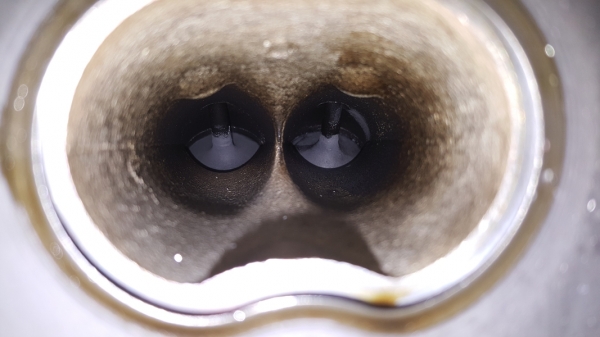
Okay, I forged the cold today. Not much fun but it had to be done. Here's what 4000k looks like. Oil buildup on everything. Valves are coated now, the walls of the cylinder head have considerably shrunk from buildup. And all this in less than 4000 miles. Unacceptable in my opinion!
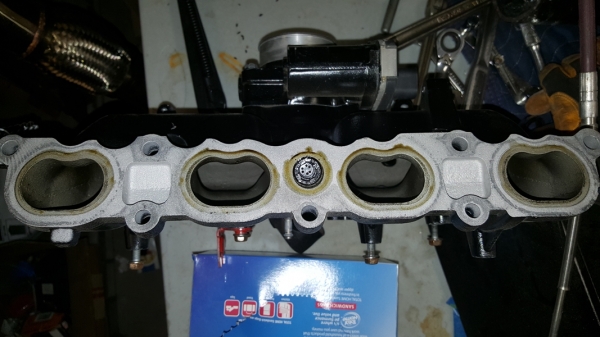
I tried to get a shot of the pool inside but its tough, I cant find my scope anywhere! Probably buried under all these parts laying around the garage. If you look at the back wall(the bottom of the intake) you can actually see it running down and pooling inside the intake. So Donbrew was correct, it is a catch can! Only problem is it's not designed to keep that oil off the valves.
This stuff isn't really oil either. It's extremely sticky, like molasses. Here you can see it on the intake tube and brake booster port. Yuck!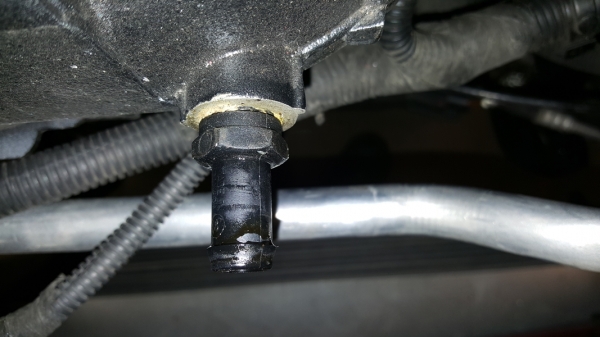
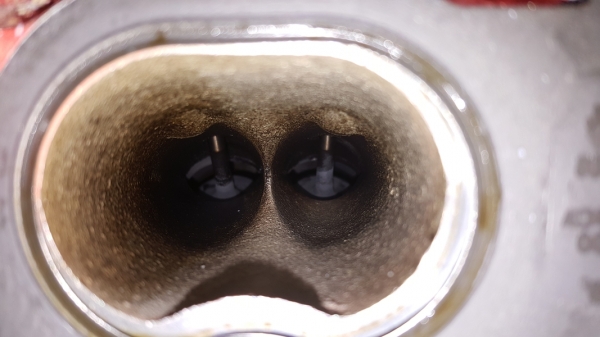
And finally the valves/cylinder head. Most people don't pull apart a new engine with 4000 miles. We're not most people round' here! Find a problem, FIX IT. Always been my motto. Which is why this thread is here in the first place. I can't wait to put these cans on and see how quickly I can fill them! I'm going to guess I'll be designing new ones after a few weeks.
(Sorry I can't rotate this! I've tried everything)
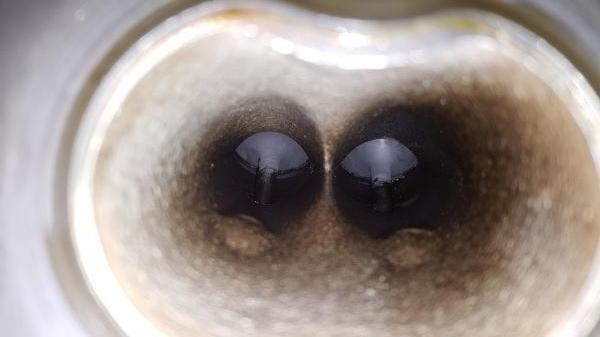
You can see what they're suppose to look like. The stem is exposed on 1 and 4. Just ugly! I think I'm going to have to shell blast, just for my own piece of mind.

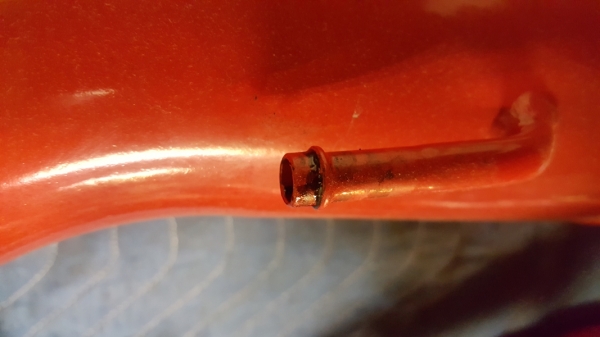
Just for fun. This one doesn't belong here but it's a nice oops. This is what happens when you grab the wrong can of High Temp black. By the time I realized I didn't use the 1500* everything was together and the car was running. I'm glad I got the chance to do it over. Well, not really. I wish I didn't have to take it apart again. But life goes on. Won't make this mistake again. Smelled really bad for the first few hundred miles and the wife thought I broke her car from all the smoke pouring out burning this paint off.
That's all for now. I'll have some updates soon. I'm off to powder coat the new intake and valve cover. Once we're coated I can start reassembly.
I tried to get a shot of the pool inside but its tough, I cant find my scope anywhere! Probably buried under all these parts laying around the garage. If you look at the back wall(the bottom of the intake) you can actually see it running down and pooling inside the intake. So Donbrew was correct, it is a catch can! Only problem is it's not designed to keep that oil off the valves.
This stuff isn't really oil either. It's extremely sticky, like molasses. Here you can see it on the intake tube and brake booster port. Yuck!
And finally the valves/cylinder head. Most people don't pull apart a new engine with 4000 miles. We're not most people round' here! Find a problem, FIX IT. Always been my motto. Which is why this thread is here in the first place. I can't wait to put these cans on and see how quickly I can fill them! I'm going to guess I'll be designing new ones after a few weeks.
(Sorry I can't rotate this! I've tried everything)
You can see what they're suppose to look like. The stem is exposed on 1 and 4. Just ugly! I think I'm going to have to shell blast, just for my own piece of mind.
Just for fun. This one doesn't belong here but it's a nice oops. This is what happens when you grab the wrong can of High Temp black. By the time I realized I didn't use the 1500* everything was together and the car was running. I'm glad I got the chance to do it over. Well, not really. I wish I didn't have to take it apart again. But life goes on. Won't make this mistake again. Smelled really bad for the first few hundred miles and the wife thought I broke her car from all the smoke pouring out burning this paint off.
That's all for now. I'll have some updates soon. I'm off to powder coat the new intake and valve cover. Once we're coated I can start reassembly.
