2.4L Performance Tech 16 valve 172 hp EcoTec with 162 lb-ft of torque

2.4L Engine Build

Thread Tools
 
Search this Thread
 
Old 01-08-2012, 04:38 PM
  #21  
Senior Member
 
masterchief1112's Avatar
 
Join Date: 06-04-2008
Location: Toledo, OH
Posts: 1,882
sounds like a good solid plan. the valve train starts to become a worry over stock rpm dont remember what the max is on them. popping a valve would not be good for your new pistons
masterchief1112 is offline  
Old 01-08-2012, 04:54 PM
  #22  
Senior Member
Thread Starter
 
hhrfreek's Avatar
 
Join Date: 03-04-2010
Location: SE Wisconsin
Posts: 458
Originally Posted by masterchief1112
sounds like a good solid plan. the valve train starts to become a worry over stock rpm dont remember what the max is on them. popping a valve would not be good for your new pistons
Covered that already I installed aftermarket cams and 78# springs/retainers last year. I am good to rev 7500rpm. 8000rpm+ if I pulled the balance shafts, but I am not interested in shaking myself or my occupants at idle. At least thats what I remember in my dads older Cavalier/ecotec that didn't have balance shafts, that and I have some pretty stiff engine/trans mounts. I haven't heard of anyone having issues with the stock valves and high rpms, just float.
hhrfreek is offline  
Old 01-08-2012, 05:49 PM
  #23  
Senior Member
 
masterchief1112's Avatar
 
Join Date: 06-04-2008
Location: Toledo, OH
Posts: 1,882
especially if you have solid engine mounts it is pretty bumpy at idle without them
masterchief1112 is offline  
Old 01-09-2012, 11:29 PM
  #24  
Senior Member
Thread Starter
 
hhrfreek's Avatar
 
Join Date: 03-04-2010
Location: SE Wisconsin
Posts: 458
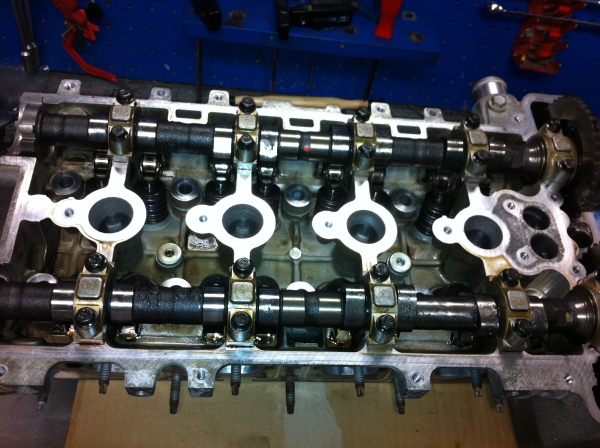
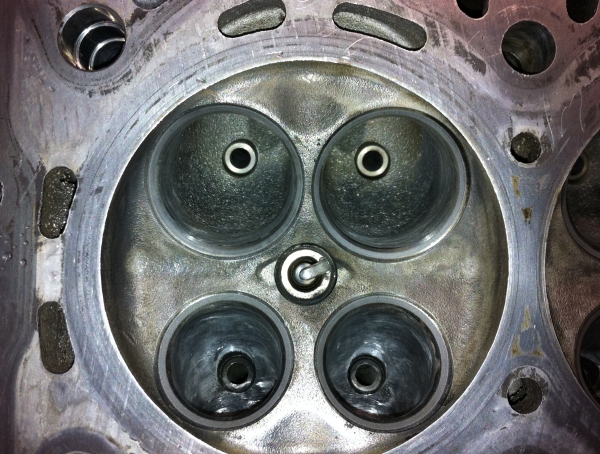
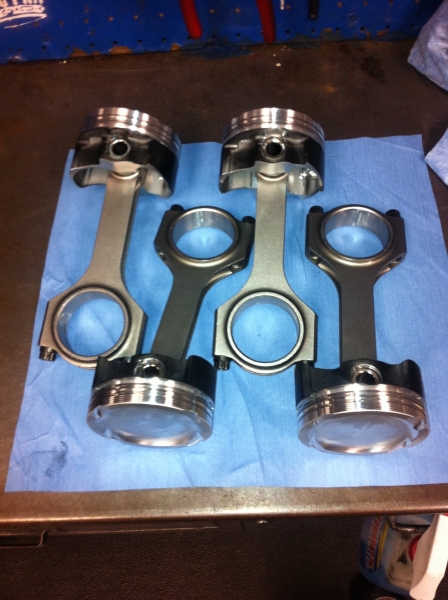
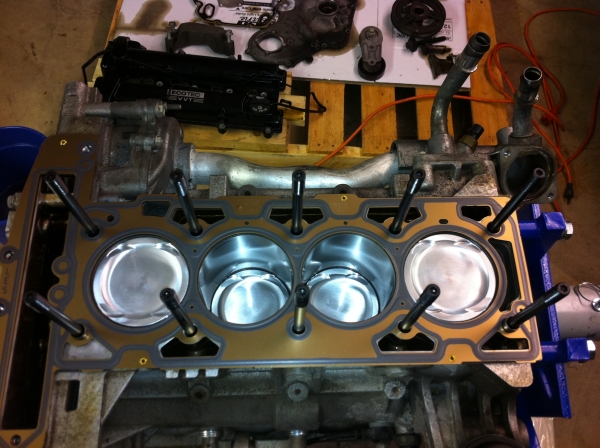
Alright, 1st post is locked so I will just update pics as I post. Today I finished the head assembly and got the rods/pistons installed. I kept the intake porting to a minimum since they are large already. There I just focused on matching the valve seat up. I opened the exhaust up a lot. Tomorrow I hope to have the head on and hopefully set the timing. Then its all pretty straight forward from there. It'd be nice to fire it up before the weekend.


hhrfreek is offline  
Old 01-10-2012, 12:37 PM
  #25  
Senior Member
 
SmootHHR's Avatar
 
Join Date: 01-21-2010
Location: The Middie OHIO
Posts: 1,700
Maybe I missed it in an earlier post, but you kept the stock bore for the new pistons, no? I think I speak for the lot of us by respectfully requesting a youtube video of this little monster when completed :)
SmootHHR is offline  
Old 01-10-2012, 09:22 PM
  #26  
Senior Member
Thread Starter
 
hhrfreek's Avatar
 
Join Date: 03-04-2010
Location: SE Wisconsin
Posts: 458
I just deglazed the cylinders. They cleaned up really well. I will surely have some videos once I get it up and running. It will be at least a few weeks as I am going to run some break in oil for 300ish miles and I need to break in the new clutch as well. I am going to break it in and tune it on my 3.1" pulley and then throw on the 2.9" and finally drop down to the 2.7"
hhrfreek is offline  
Old 01-10-2012, 11:14 PM
  #27  
Platinum Member
 
sleeper's Avatar
 
Join Date: 01-09-2007
Location: SE USA
Posts: 15,856
Yea, the JE forged pistons need some clearance. Also will possibly hear em (slight piston slap) on start up, till the heat gets in there.

You're moving right along !!!
sleeper is offline  
Old 01-11-2012, 04:57 AM
  #28  
Senior Member
 
bigjacksauto's Avatar
 
Join Date: 10-19-2011
Location: N.Y.
Posts: 1,553
Talking

Originally Posted by sleeper
Yea, the JE forged pistons need some clearance. Also will possibly hear em (slight piston slap) on start up, till the heat gets in there.

You're moving right along !!!
I agree with sleeper the 2618 alloy in your particular pistons can be noisy on startup compared to the 4032 forged.
Not to worry loose is fast lol. This a great build you are doing can't wait to see the results and also see it run quicker than a SS
bigjacksauto is offline  
Old 01-11-2012, 07:06 AM
  #29  
Senior Member
 
kwboydston's Avatar
 
Join Date: 07-09-2008
Location: in my own little world
Posts: 416
sounds like a great build, dynos and run times will be interesting to look at I do have a question maybe I missed it, did you open the exhaust up and if so how much?
kwboydston is offline  
Old 01-11-2012, 08:20 AM
  #30  
Senior Member
Thread Starter
 
hhrfreek's Avatar
 
Join Date: 03-04-2010
Location: SE Wisconsin
Posts: 458
Originally Posted by sleeper
Yea, the JE forged pistons need some clearance. Also will possibly hear em (slight piston slap) on start up, till the heat gets in there.

You're moving right along !!!
They are spec'd with a .03" offset pin to aid in a quieter running piston. But I am sure I am going to notice a much different sounding ride all together. I already get about a 2 second clatter at start up from my stiff valve springs.

Originally Posted by kwboydston
sounds like a great build, dynos and run times will be interesting to look at I do have a question maybe I missed it, did you open the exhaust up and if so how much?
In my first post you can see what I did to the exhaust ports. I port matched my exhuast gasket to my header then I etched a line in the head with the gasket to match the head to the header. You can see in the pictures how much larger they are. I think this is part of the reason my whp was falling off early. We'll soon find out The Intake side already flows very well so I kept that to a minimum by removing material around the valve seat.


Few more pics here:

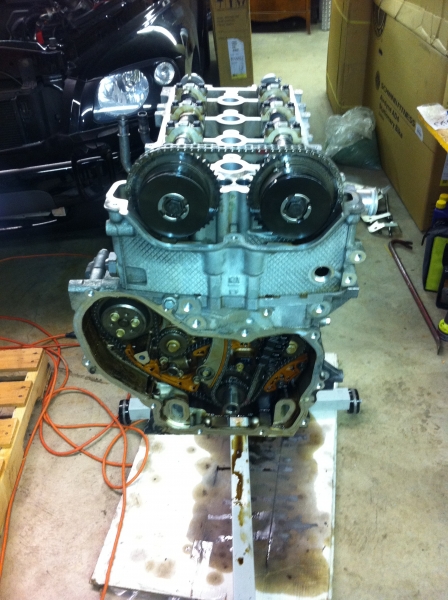
The ARP studs are not bolts like oem and they can be reused since they are not TTY so I am happy to hear that since 10 bolts are $135. The stud goes into the block and the head is nutted on. Also got the timing all set and turned the motor over a few times by hand to make sure it was correct. Putting the front cover back on you can see how badly my gasket was leaking so that has been replaced and I am going to scrub up the motor before it goes back in. Also ran into a problem when I was about to put the tensioner back on. It has a crack developing on the underside of it. Looking for a new one today.


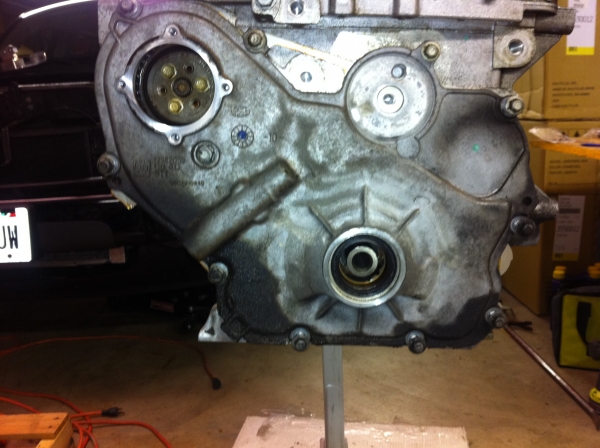
Got the oil pan on after that and just have to put on the valve cover and then its ready to go back in. Hopefully in the next couple days here
hhrfreek is offline  


Quick Reply: 2.4L Engine Build


All times are GMT -5. The time now is 06:33 AM.