


HELP! Installing Fog Switch on 2010 LS


Thread Starter
Senior Member
Joined: 09-10-2010
Posts: 904
From: Cleveland, Ohio
 HELP! Installing Fog Switch on 2010 LS
Hello everyone,
I am piecing together a factory GM fog lamp kit for my 2010 LS.
I received the fog switch today and took a peak behind the waterfall to see what it was all about.
I see the connector in the wiring harness that plugs into the switch, which I'm happy about, but I have another question.
On the back of the waterfall, I see the retainer housing for the fog light button. But, on the front panel, there is no pop out for the switch.
My question is, do I need to drill out a hole for the fog button, or is there something else I can do? As in, do I need to buy a new waterfall, or maybe swap out that small plate where the buttons sit in with one that already has it-is there a part number for this? I really didn't get that great of a peek at it since its cold out.
Any help or links to help would be greatly appreciated.
:)
I am piecing together a factory GM fog lamp kit for my 2010 LS.
I received the fog switch today and took a peak behind the waterfall to see what it was all about.
I see the connector in the wiring harness that plugs into the switch, which I'm happy about, but I have another question.
On the back of the waterfall, I see the retainer housing for the fog light button. But, on the front panel, there is no pop out for the switch.
My question is, do I need to drill out a hole for the fog button, or is there something else I can do? As in, do I need to buy a new waterfall, or maybe swap out that small plate where the buttons sit in with one that already has it-is there a part number for this? I really didn't get that great of a peek at it since its cold out.
Any help or links to help would be greatly appreciated.
:)


Senior Member
Joined: 12-24-2007
Posts: 2,873
From: Seville. OH
all the hhr's that i have done have a cover to remove to install the switch but I have not done a 2010. on other model cars I have had to drill or cut the panel for the switch there was always a indentation on the back that show you where and what shape to cut. A drumel tool workss well for cutting out the plastic. let us know how it works out for you.

Thread Starter
Senior Member
Joined: 09-10-2010
Posts: 904
From: Cleveland, Ohio
On the switch retainer for the traction control, there is already a spot where you can press the fog lamp button into and it will snap in place just like the traction control button.
The only issue is, there is not a hole in front on the bezel for the button to come through- This is relatively simple to fix.
You will need a 13/16ths spade bit. Like this one.
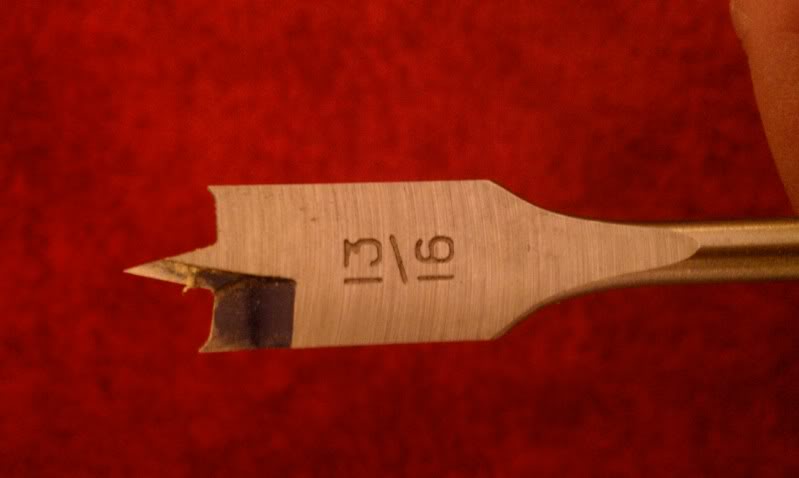
The original hole is exactly 20mm in diameter-according to my digital caliper. The closest, and near perfect imperial match for that is 13/16ths.
I taped the front of my waterfall where the bit will be passing through. I placed the retainer on the water fall to eye up the center with a Sharpie and placed a dot there.
I recommend doing something differently than I did. I was excited to be destroying my brand new car, and hesitated to measure exact center from the top of the trim piece... which, after the fact I found to be 22mm. If you measure down 11mm from where the channel of the trim piece, you will find center. Mine came out a weeee bit high... nobody can even tell but I can. The engineer in me will not live my incompetence down ::sad face::
I was also going to measure the button's exact center from the outer ring of the TC hole to give you a good coordinate, without eying it all up, and I will do this once it is nice out, I promise

Once you're ready to bore the hole, I recommend putting it down on a piece of wood with all the pieces that contact the wood covered with masking tape, as well as the outer surface to be bored. Have a helper hold it for you.
Its pretty straight forward. Bore from the back to the front and maintain a decent amount of speed and DON'T PUSH OR YOU WILL CHAFE.
Then, everything screws and snaps together all prim and proper


Member
Joined: 12-29-2010
Posts: 48
From: lockport.ny
unplug all the plugs nbehind the water fall. take it to your bench. remove the air vents (3screws) remove the screws holding the back plate. next to the traction control switch there is a cavity for the oem fog lt. switch. center a 1/8" in the oem cavity drill thru it. i then used a step drill to finish the hole size. the oem switch has two ears that will snap it in tight. then put every thing back together. i just got done doing the exact thing except i did not wire them into hhr wiring because of reprogramming the bcm. wire them direct with fuses in all neccessary lines for protection and can run them anyway i want to.


Thread
Thread Starter
Forum
Replies
Last Post
paulstanley19147
Audio and Video
0
Jun 28, 2012 05:48 PM
unique_w
"How To" Tutorial Library
12
Apr 4, 2011 09:19 AM
elvistar
Introductions
5
Sep 2, 2010 08:13 AM
-md- HHR
Mid East
18
Aug 5, 2010 06:29 AM