
LDK build


Thread Starter
Senior Member
Joined: 09-02-2010
Posts: 383
From: Philadelphia, PA
LDK build
After 81,000 miles, the turbo in my 2010 Auto SS kicked the bucket. Placed the car on a lift, and as soon as my brother saw the intake of the turbo was saturated in oil, he knew it was roasted. Options were to replace the turbo and intercooler, or just jump on ZZP's Black Friday deal and get a new setup. I plan on keeping my SS to turn into a show car when I'm older, so I figured might as well put the extra money out now - especially since ZZP was doing a decent black Friday deal. I went with the LDK motor with the K04 turbo, ZZP intercooler, the LDK fuel rail lines, Brembo front brake kit, and stainless brake lines.
Last Saturday my brother and I started the project. In a few hours we had everything disconnected and the engine removed out the bottom. Of course this brought the lower suspension, transmission, and everything else with it - but since we have the shop we figured this would be most productive.
Since the motor is out, I we're also going to install a TTR engine mount, TTR trans bushings (since they don't make mounts for the auto trans), all new lines, sway bar links, lower control arms, sway bar bushings, and a oil catch can. The old turbo fried due to oil saturation, and after checking the forms, along with talking to Tom at RX Speedworks, It was obvious to install their dual valve catch can system to feed clean air into the turbo inlet and intake manifold.
I'm going to post photos of the project here, starting with this one after the engine was removed and the radiator was taken off the motor. Tomorrow we hope to get the LDK on the engine mount, and will begin swapping parts from the LNF to the LDK.
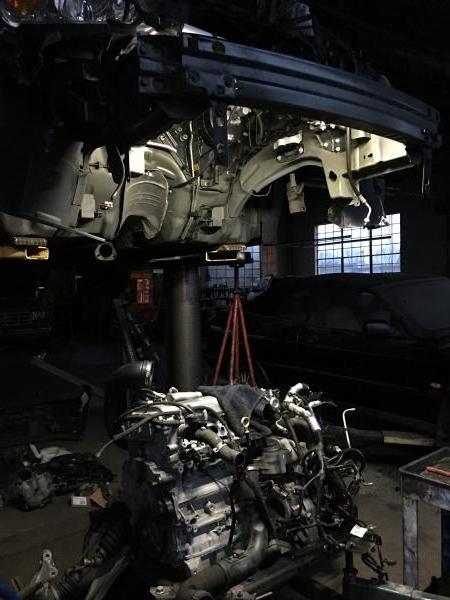


Thread Starter
Senior Member
Joined: 09-02-2010
Posts: 383
From: Philadelphia, PA
Quick Update:
Brother got injured at work, and has been out since mid February - which has put this entire project on hold. In the meantime I've been going back to check a few things that need to be done, like plumbing for the catch can, upgraded intake tube since the old one had a TON of oil in it when we removed it, etc. Since we're also going to be connecting the catch can to catch vapors for the intake manifold, I've decided to go with the TTR manifold with PCV external housing so it becomes plug and play.
Catch Can setup:
To answer your question Cat Man HHR, I got the RX Monster can - which has 1 dirty in (B) and 2 clean outs (A and C). I need to intercept 2 lines with the can. Line 1 is the valve cover to turbo inlet (red arrow below), and the other is the external PCV back into the TTR intake manifold. I'm going to have those two lines T'ed into the dirty of the can, then run 1 line to the turbo inlet, and the other clean to the intake manifold.
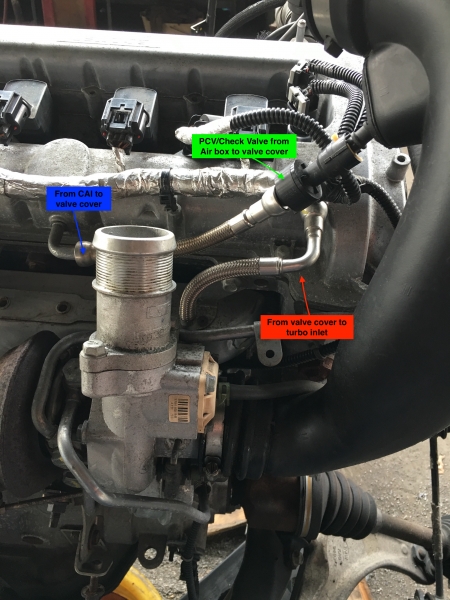
Since my brother and I have to intercept those lines, we weren't sure how to remove the line going from the valve cover to the turbo inlet. He told me you could use plug caps which allow you to remove these lines, but the space is so tight we couldn't get the plug caps underneath the ends of the line going from the valve cover to turbo inlet. I was however able to remove the line from the air box to the valve cover, which was used for the experiment below.
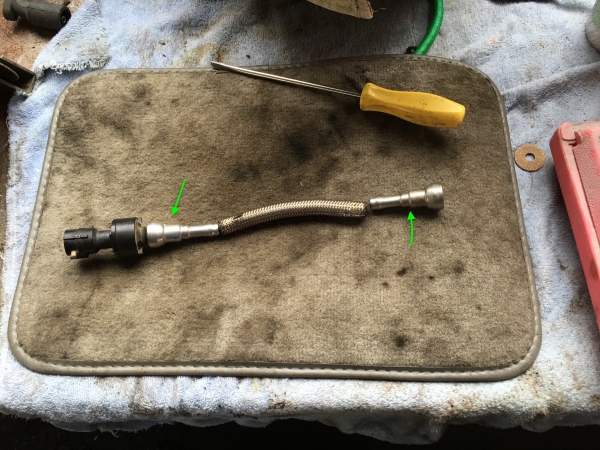
Using one of my brothers saw tools, I was able to cut the clamp holding the braided line to the end connection (green arrow). Seeing that this was possible, now it was time to figure out how to get to the line between the valve cover and turbo inlet. Luckily there's a bolt holding the inlet connection, so removing that allowed me to remove the entire connection, and move the line far enough away from the new LDK motor that I could saw the clamps off. Now I use the braided line from RX to run from the valve cover to the catch can, back to the turbo inlet without buying new connectors! Just need to find clamps to secure the new braided lines to the ends.
As we're going through this I'm concerned about the life of the new turbo. I'm trying to take any and all roads possible to make sure this new engine and turbo are good for the long haul - which is why I'm running the catch can. I'm also reading up on Blow Off Valves since I'm reading it helps with turbo seizing. I'm thinking about replacing the stock plastic Divertor with a forge divertor valve. If I do this, I'm reading that the vented divertor throws codes, but the non-vented doesn't. Is this true, or would I need a tune either way? The car will be tuned eventually, but I want to break in the motor first before I go tuning and pushing more PSI. If I don't need to tune using the non-vented valve, I'll install that now since it's easy access with the motor out of the car, then once the engine is broken in, I can install a BOV in the upper intercooler pipe.
Finally, If I install the forge Divertor valve, is it necessary to install a BOV in the upper intercooler pipe?
Brother got injured at work, and has been out since mid February - which has put this entire project on hold. In the meantime I've been going back to check a few things that need to be done, like plumbing for the catch can, upgraded intake tube since the old one had a TON of oil in it when we removed it, etc. Since we're also going to be connecting the catch can to catch vapors for the intake manifold, I've decided to go with the TTR manifold with PCV external housing so it becomes plug and play.
Catch Can setup:
To answer your question Cat Man HHR, I got the RX Monster can - which has 1 dirty in (B) and 2 clean outs (A and C). I need to intercept 2 lines with the can. Line 1 is the valve cover to turbo inlet (red arrow below), and the other is the external PCV back into the TTR intake manifold. I'm going to have those two lines T'ed into the dirty of the can, then run 1 line to the turbo inlet, and the other clean to the intake manifold.
Since my brother and I have to intercept those lines, we weren't sure how to remove the line going from the valve cover to the turbo inlet. He told me you could use plug caps which allow you to remove these lines, but the space is so tight we couldn't get the plug caps underneath the ends of the line going from the valve cover to turbo inlet. I was however able to remove the line from the air box to the valve cover, which was used for the experiment below.
Using one of my brothers saw tools, I was able to cut the clamp holding the braided line to the end connection (green arrow). Seeing that this was possible, now it was time to figure out how to get to the line between the valve cover and turbo inlet. Luckily there's a bolt holding the inlet connection, so removing that allowed me to remove the entire connection, and move the line far enough away from the new LDK motor that I could saw the clamps off. Now I use the braided line from RX to run from the valve cover to the catch can, back to the turbo inlet without buying new connectors! Just need to find clamps to secure the new braided lines to the ends.
As we're going through this I'm concerned about the life of the new turbo. I'm trying to take any and all roads possible to make sure this new engine and turbo are good for the long haul - which is why I'm running the catch can. I'm also reading up on Blow Off Valves since I'm reading it helps with turbo seizing. I'm thinking about replacing the stock plastic Divertor with a forge divertor valve. If I do this, I'm reading that the vented divertor throws codes, but the non-vented doesn't. Is this true, or would I need a tune either way? The car will be tuned eventually, but I want to break in the motor first before I go tuning and pushing more PSI. If I don't need to tune using the non-vented valve, I'll install that now since it's easy access with the motor out of the car, then once the engine is broken in, I can install a BOV in the upper intercooler pipe.
Finally, If I install the forge Divertor valve, is it necessary to install a BOV in the upper intercooler pipe?

Senior Member
Joined: 05-29-2015
Posts: 542
From: Cleveland, OH
Sorry to hear about your bro Drummerboy, here's hoping for a quick recovery. Before you get the TTR manifold on what does the PCV setup look like? Just curious is all. Too bad you're not in Pittsburgh, I'd spend a weekend and help ya out! Philly is a haul from Cleveland. Good luck with the build and keep us posted. A little trick Iearned by breaking my pcv line. You can use a small zip tie and tie it around the fitting end and shove it into the hose. Pops right off, wish I heard that before I busted mine.
I cant help much when it comes to the bypass valves. The wifes has a full BOV / wastegate setup. However, I'm sure someone more knowledgeable will help ya out. I broke in my engine with the full tune and new turbo. The key is good quality break in and following instrucitions. With good oil it's only a few hundred miles for break in. You won't be beating on it right away so there's nothing wrong with breaking it in tuned. After our break-in period we still went 1500-2000 miles before much boost. And now that the wife knows what boost feels like, her foot has converted to LEAD!
I cant help much when it comes to the bypass valves. The wifes has a full BOV / wastegate setup. However, I'm sure someone more knowledgeable will help ya out. I broke in my engine with the full tune and new turbo. The key is good quality break in and following instrucitions. With good oil it's only a few hundred miles for break in. You won't be beating on it right away so there's nothing wrong with breaking it in tuned. After our break-in period we still went 1500-2000 miles before much boost. And now that the wife knows what boost feels like, her foot has converted to LEAD!
Thread Starter
Senior Member
Joined: 09-02-2010
Posts: 383
From: Philadelphia, PA
Sorry to hear about your bro Drummerboy, here's hoping for a quick recovery. Before you get the TTR manifold on what does the PCV setup look like? Just curious is all. Too bad you're not in Pittsburgh, I'd spend a weekend and help ya out! Philly is a haul from Cleveland. Good luck with the build and keep us posted. A little trick Iearned by breaking my pcv line. You can use a small zip tie and tie it around the fitting end and shove it into the hose. Pops right off, wish I heard that before I busted mine.
I cant help much when it comes to the bypass valves. The wifes has a full BOV / wastegate setup. However, I'm sure someone more knowledgeable will help ya out. I broke in my engine with the full tune and new turbo. The key is good quality break in and following instrucitions. With good oil it's only a few hundred miles for break in. You won't be beating on it right away so there's nothing wrong with breaking it in tuned. After our break-in period we still went 1500-2000 miles before much boost. And now that the wife knows what boost feels like, her foot has converted to LEAD!
I cant help much when it comes to the bypass valves. The wifes has a full BOV / wastegate setup. However, I'm sure someone more knowledgeable will help ya out. I broke in my engine with the full tune and new turbo. The key is good quality break in and following instrucitions. With good oil it's only a few hundred miles for break in. You won't be beating on it right away so there's nothing wrong with breaking it in tuned. After our break-in period we still went 1500-2000 miles before much boost. And now that the wife knows what boost feels like, her foot has converted to LEAD!
The TTR manifold has a PCV delete - but they're already taped at the flange, so you can get their PCV external housing and run from the flange to the PCV housing to the catch can, then back to a port in the front of the manifold. Now I don't have to worry about drilling my stock manifold, since TTR already did it for me with their manifold. Aaron at TTR was super helpful with answering my questions as well!
ZZP recommended the comp cams break in oil and said the same thing - break in for 500 miles and be limited with boost. I know what the boost feels like and I know my foot is lead, so I'm gonna have to really fight that urge.
As for the bypass valve, I eventually want to setup a BOV/wastegate setup - but I'm curious to see if people are doing the bypass valve as well. For right now, I'm more concerned about getting the new engine/turbo, intake manifold, intercooler, front brakes, engine/trans mounts, and catch can in before I start investing in a BOV/wastegate setup.
Senior Member
Joined: 05-29-2015
Posts: 542
From: Cleveland, OH
Well before you get the intake on, get a pic of the flange if ya can. It can't quite tell from their online photos. Just wanted to see how the TTR manifold has dealt with the pcv.
Thanks, good luck with the project.
Thanks, good luck with the project.
Thread Starter
Senior Member
Joined: 09-02-2010
Posts: 383
From: Philadelphia, PA
Will do Dbeluscak.
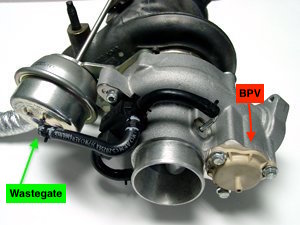
Update on turbo components - after spending yesterday reading up on turbos since this is all new territory for my brother and me (he's a engine head, but more the muscle car/pure power over turbo/supercharger setups) and it looks like the stock k04 turbo for us uses an internal wastegate and diverter valve (see picture below).
Sounds like installing an external Wastegate and BOV is more of a hassle than it's worth with the k04 setup, it makes sense to just upgrade the wastegate actuator and diverter valve - then worry about the external wastegate/bov setup when I decide to install a larger turbo down the line.
So with that being said, I'm going to upgrade the wastegate actuator to a TiAL MV-I, and get a Forge Diverter Valve (non-vented). Anything to give me piece of mind and strengthen this turbo so it doesn't crap out like the last one.