Discontinuing the XM Radio “Band” on the radio!
 05-10-2009, 08:08 PM
#1
Senior Member
Thread Starter

Join Date: 12-24-2008
Location: N/A
Posts: 717
Discontinuing the XM Radio “Band” on the radio!
Reason for Mod: When the “Band” button on the radio is pressed it cycles through the FM Band, the AM Band, the XM Band and then back to FM. Since my XM Radio subscription ran out I saw no reason for the extra button press or the XM Radio solicitation to come on each time I changed bands. By removing power from the XM Radio module, the vehicle detects no XM Radio present and removes the option from the radio’s “Band” button. The result is a simple toggle between FM and AM bands, just like an AM/FM radio should be.
This mod is only for those who have discontinued their XM Radio subscription and wish to keep the ONSTAR active. If you have discontinued both the On Star and XM Radio, the modification is even easier. Simply remove the XM/ONSTAR 10 Amp Fuse in what the Owners Manual calls the “Floor Console Fuse Block” a.k.a. the BCM. It is fuse #24. Done, both ONSTAR and XM Radio are disabled.
Caveat: This was performed on a 2009 LS equipped with the Base level radio head. I have not confirmed this works on the upgraded Radio and Amp on the SS or LT. Likewise I have no idea about 2008 and prior years.
The only tools required are a set of Jewelers Screwdrivers or other small pick like devices.
I like my modifications to be the least destructive as possible, i.e. I would like to put things back to stock if I change my mind or sell the vehicle. This modification can be reversed as easily as it is performed.
Where to remove the power from the XM Radio in the easiest manner possible? I chose a connector to the right of the front passenger feet. Only the heated seats and radio leads go through this connector.
Before starting, turn off all Radios in the vehicle and if equipped, the heated seats. If you like you can remove the associated fuses as well.
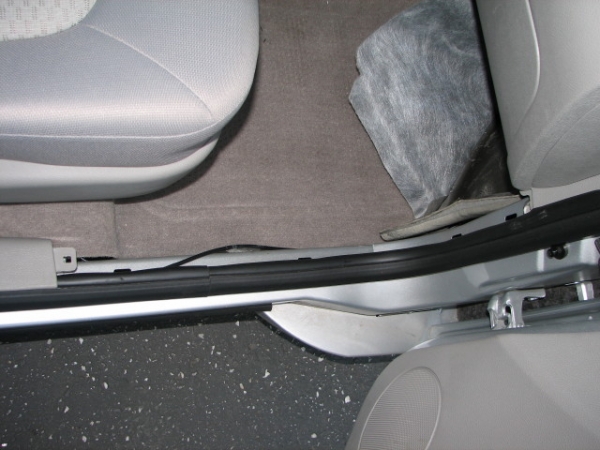
This connector is accessed just forward of the right kick panel and even with the bottom of the glove box. The removal of two plastic panels is needed to access the connector. The first panel to be removed is the threshold panel, it pulls straight up and is held in place with two plastic clips. The second is the kick panel itself, this one is removed by pulling rearward, again two plastic clips hold it on. The panels go back on in the opposite order. Now pull the top of the carpet back from the right side of the vehicle to reveal three connectors mounted to the side. The larger black connector in the middle is where you need to focus your attention.
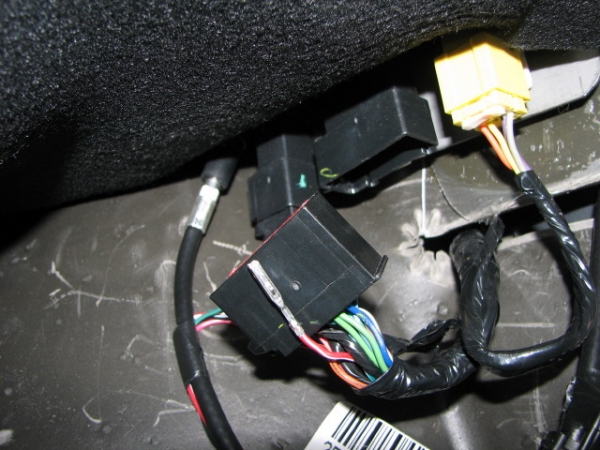
The connector has a latch on the narrow end towards the front of the vehicle, this needs to be pushed towards the body of the connector to release it from the part attached to the vehicle. Press the latch in and pull the connector down towards the floor of the vehicle. On the contact end of the connector there is a RED contact retainer, this retainer needs to be pried straight out of the connector. Getting this retainer out of the connector is the toughest part of this procedure and requires a small flat screwdriver or other small pry device.
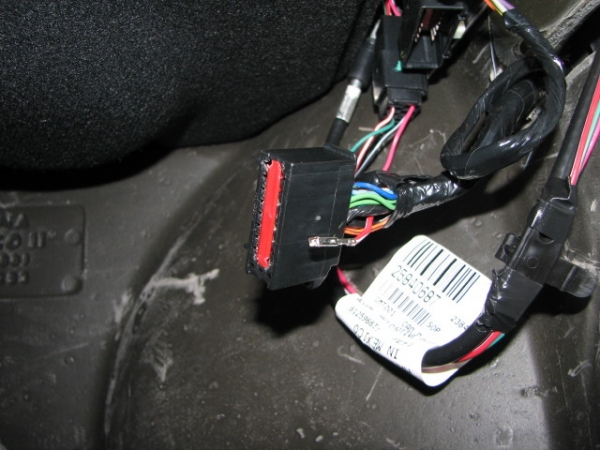
The next step is to remove the Red with White stripe wire from the connector body. This is done by looking into the hole from which the red retainer was just removed and releasing the flexible plastic pin retainer holding the connector pin in place. I can’t take a picture of this part, as it is too small for my camera. Describing it is difficult to do too, but if you have ever worked around electrical connectors with removable pins, you can handle it. The release is 3/8” to ˝” inside the connector body and is moved to the center of the connector body while gently pulling on the red/white wire. To give you an idea of how small a screwdriver or probe you will need, a paper clip is way too large. The pin pulls out the back of the connector body with the wire attached. You might wish to mark the contact cavity in case you ever wish to put it back. For testing, the connector can be plugged back into the vehicle without the retainer if you wish.
Replace the red retainer, plug the connector back together, replace fuses if needed, reassemble the vehicle in the reverse order and you are done. You can tape (insulate) the pin if you wish – it is not live. I left mine hanging free and tagged “XM Radio Power” as a very visible reminder that something is very different about this vehicle.
The access panels removed and the carpet pulled back:
Connector is unplugged and the pin has already been removed:
Good view of the Red retainer, notice pry marks at each end:
This mod is only for those who have discontinued their XM Radio subscription and wish to keep the ONSTAR active. If you have discontinued both the On Star and XM Radio, the modification is even easier. Simply remove the XM/ONSTAR 10 Amp Fuse in what the Owners Manual calls the “Floor Console Fuse Block” a.k.a. the BCM. It is fuse #24. Done, both ONSTAR and XM Radio are disabled.
Caveat: This was performed on a 2009 LS equipped with the Base level radio head. I have not confirmed this works on the upgraded Radio and Amp on the SS or LT. Likewise I have no idea about 2008 and prior years.
The only tools required are a set of Jewelers Screwdrivers or other small pick like devices.
I like my modifications to be the least destructive as possible, i.e. I would like to put things back to stock if I change my mind or sell the vehicle. This modification can be reversed as easily as it is performed.
Where to remove the power from the XM Radio in the easiest manner possible? I chose a connector to the right of the front passenger feet. Only the heated seats and radio leads go through this connector.
Before starting, turn off all Radios in the vehicle and if equipped, the heated seats. If you like you can remove the associated fuses as well.
This connector is accessed just forward of the right kick panel and even with the bottom of the glove box. The removal of two plastic panels is needed to access the connector. The first panel to be removed is the threshold panel, it pulls straight up and is held in place with two plastic clips. The second is the kick panel itself, this one is removed by pulling rearward, again two plastic clips hold it on. The panels go back on in the opposite order. Now pull the top of the carpet back from the right side of the vehicle to reveal three connectors mounted to the side. The larger black connector in the middle is where you need to focus your attention.
The connector has a latch on the narrow end towards the front of the vehicle, this needs to be pushed towards the body of the connector to release it from the part attached to the vehicle. Press the latch in and pull the connector down towards the floor of the vehicle. On the contact end of the connector there is a RED contact retainer, this retainer needs to be pried straight out of the connector. Getting this retainer out of the connector is the toughest part of this procedure and requires a small flat screwdriver or other small pry device.
The next step is to remove the Red with White stripe wire from the connector body. This is done by looking into the hole from which the red retainer was just removed and releasing the flexible plastic pin retainer holding the connector pin in place. I can’t take a picture of this part, as it is too small for my camera. Describing it is difficult to do too, but if you have ever worked around electrical connectors with removable pins, you can handle it. The release is 3/8” to ˝” inside the connector body and is moved to the center of the connector body while gently pulling on the red/white wire. To give you an idea of how small a screwdriver or probe you will need, a paper clip is way too large. The pin pulls out the back of the connector body with the wire attached. You might wish to mark the contact cavity in case you ever wish to put it back. For testing, the connector can be plugged back into the vehicle without the retainer if you wish.
Replace the red retainer, plug the connector back together, replace fuses if needed, reassemble the vehicle in the reverse order and you are done. You can tape (insulate) the pin if you wish – it is not live. I left mine hanging free and tagged “XM Radio Power” as a very visible reminder that something is very different about this vehicle.
The access panels removed and the carpet pulled back:
Connector is unplugged and the pin has already been removed:
Good view of the Red retainer, notice pry marks at each end:
Last edited by Sno White; 05-10-2009 at 10:02 PM. Reason: spelling
 05-10-2009, 09:06 PM
#2
Senior Member

Join Date: 10-09-2008
Location: Illinois
Posts: 105
hey!! thats the wire that caused my airbag problems ROFL JUST KIDDING  hehehe.... nice to know, i discontinued my xm after i figured out how much its going to cost to listen to "the radio" .... same with 'onstar' .... you wouldnt happen to know where that module is located would you?
*great pictures and excellent write up BTW*!!!
*great pictures and excellent write up BTW*!!!
05-10-2009, 09:56 PM
#3
Senior Member
Thread Starter
Join Date: 12-24-2008
Location: N/A
Posts: 717
Yup, the XM Radio Module, the Vehicle Communication Interface Module a.k.a. OnStar are both located behind the right rear plastic quarter panel. At least that is where the FSM says they are. Plus I've seen a few posts on this site that confirm the location.
08-22-2009, 12:47 AM
#4
New Member

Join Date: 08-21-2009
Location: Syracuse NY
Posts: 16
Are any of you interested in pulling out the XM radio? I have a LT2 2009 and the XM appears to have been pulled out as the owner prior to me was a car rental place. I'm also missing the OnStar and Bluetooth. I would assume that the XM radio is part of the wiring harness behind the stereo. Anyone know if you can pull it out and use on other HHRs?
08-22-2009, 10:04 AM
#5
Senior Member

Join Date: 11-15-2008
Location: Newburgh, NY
Posts: 1,599
How Can You Tell if You HHR is XM Ready?
I bought a preowned '08 and would like to find out if mine is XM ready, as I do not have a subscription. When I press the CAT button, the words "XM Feature" comes up on the screen, but does nothing (it stays on the current band such as FM). When I push the BAND button, it only toggles between AM and FM.
My son has an '09 Cobalt with what appears to be the same head unit. He has XM enabled. When we press the CAT button, the words "XM Only Feature" comes up as well and changes nothing. When I push the BAND button, it toggles between AM, FM and XM.
In this case would an activation enable the XM on the HHR, would the installation of a module be required or is XM unattainable?
08-22-2009, 10:20 AM
#6
Senior Member

Join Date: 09-14-2007
Location: SoCAL & Louisville, KY
Posts: 3,365
All the (premium?) radios show XM channels. I don't have it, but do have the PAL attachment (I love it--others don't) and I access that on the XM1 channel. So I assume it is XM ready. I don't listen to the radio much, so not a loss for me.
Some folks have had PAL/XM issues, but not many have the PAL so it may not be a concern.
@
Some folks have had PAL/XM issues, but not many have the PAL so it may not be a concern.
@
08-22-2009, 12:28 PM
#7
Senior Member
Thread Starter
Join Date: 12-24-2008
Location: N/A
Posts: 717
I bought a preowned '08 and would like to find out if mine is XM ready, as I do not have a subscription. When I press the CAT button, the words "XM Feature" comes up on the screen, but does nothing (it stays on the current band such as FM). When I push the BAND button, it only toggles between AM and FM.
OR
One of the service people may be able to run your VIN and tell you how the vehicle was originally equipped.
08-22-2009, 12:34 PM
#8
Senior Member
Thread Starter
Join Date: 12-24-2008
Location: N/A
Posts: 717
Are any of you interested in pulling out the XM radio? I have a LT2 2009 and the XM appears to have been pulled out as the owner prior to me was a car rental place. I'm also missing the OnStar and Bluetooth. I would assume that the XM radio is part of the wiring harness behind the stereo. Anyone know if you can pull it out and use on other HHRs?
XM is part of the Communication Module behind the right rear quarter panel, not in the head unit.
08-25-2009, 12:35 PM
#9
New Member
Join Date: 08-21-2009
Location: Syracuse NY
Posts: 16
There are a few threads already covering the "special" case of rental vehicles and the features they can and cannot have. AND what is needed to get them up and running. Search or just browse around.
XM is part of the Communication Module behind the right rear quarter panel, not in the head unit.
XM is part of the Communication Module behind the right rear quarter panel, not in the head unit.
BTW, Not sure how to "browse" the forums for this when most are 12+ pages long, and a search for "rental" comes up virtually useless in the Audio section.
08-25-2009, 06:26 PM
#10
Senior Member
Thread Starter
Join Date: 12-24-2008
Location: N/A
Posts: 717
You will correct me if I am wrong:
1) At this point you do not know for a fact if your "Rental" vehicle was wired at the factory for XM, so just asking somebody for their XM Radio module may do you no good. Adding the wires would be a bear IMHO.
2) Another possibility is the XM Module may be wired and present, just not turned on via programming.
3) There maybe other options I am not thinking of.
4) Thus you need more information to know what to ask for. This I believe is your main problem - getting information!
My thoughts are:
*To contact ChevyMgr via PM and supply him with your VIN # and ask him what your "Rental" vehicle is capable of, via programming, in the items you have found missing. Such as XM, OnStar, Bluetooth, etc.
*See a dealer for the same information.
*Go to the top of this thread and expose that connector and see if that RD/WH wire is in connector cavity #4 as well as cavities 5 - 8 being populated; these are all XM Radio related. If not your vehicle never got wired for XM. Just for giggles you could look at cavities 1 - 3, they are for OnStar Cellular. Speakers are on cavities 9 - 12. Passenger heated seat is on 13 - 15. #16 is not used.
***Your next question should be: How do I tell what cavity is what number? The numbers start at the top of the connector, with the top being where the clip is to keep the connector together. #1 is next to the indexing tab; there are two indexing tabs, both on the same side. All the odd numbers are on the index side of the connector and all the even numbers are on the other side.
****If your vehicle is wired for XM, I would take it to the next step, if not get yourself an aftermarket XM unit.
Myself, I have deactivated my Radio to not recognize the XM as you know from this thread, but would not consider removing it - as it would be way too much trouble. Besides I would like to leave it for the next owner or in case I change my mind.
EDIT: There is one thing I do know for sure: Bluetooth can not be added via factory components, ChevyMgr has made this very clear in another post. I remember it well.
Last edited by Sno White; 08-25-2009 at 06:28 PM. Reason: Add Bluetooth info