
How To Fix a Cracked Front Bumper


Thread Starter
New Member
Joined: 05-16-2011
Posts: 8
From: Michigan
How To Fix a Cracked Front Bumper
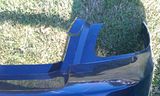
So I found a HHR SS Front Bumper Cover on Craigslist for $120 so I jumped on the deal and the only thing wrong was it was just the cover and there was a minor crack on the top middle left side. So the guy I bought it from gave me a part number from a product by 3M to use to fix the crack. I bought the Automix EZ Sand Flexible Part Repair #5887 from a local 3M distributor that I found on www.3M.com.
Here is what I started with.
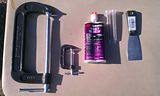
So my materials list for this project include:
1. 3M #5887 Automix EZ Sand Flexible Part Repair $40
2. 8" C-Clamp $5.99
3. 2" C-Clamp $1.99
4. Putty Knife $0.99
5. Tin Foil Already Had
6. Masking Tape Already Had
Instructions say to wash surface, sand surface with 180 grit sandpaper to prep, and wash again. Let dry then apply Automix EZ Sand then let set for 15 minutes then sand with 180 grit. Reapply Automix if needed, if not sand with 220 grit then finish with 320 grit.
So here is a picture of it Sanded with 180 grit to prep
I then washed it clean and let it dry.
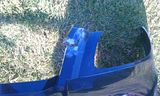
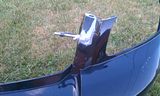
Next came the mixing part since Automix is a two part epoxy. Instead of buying the $20+ applicator gun I just bought a $6 8� C-Clamp. I didn�t use the mixing nozzles supplied with the product that are in the picture above because I wasn�t pushing both sides of epoxy at the same time. I first squeezed out the one side of epoxy then with masking tape I taped on the clamp threads where I stopped, un-did the clamp and went to the other side then speezed down till I came to the masking tape on the threads then mixed the two parts with my putty knife until I reached a same color consistency all the way through. Then I applied it to the bumper cover. I applied the epoxy inside the crack before I clamped the two sides together with the 2� C-Clamp. I wrapped the C-Clamp ends in tin foil before clamping over the epoxy just because I didn�t know if the epoxy would stick to the clamp and it worked out perfectly. After the epoxy had dried I was able to unclamp and pull the tin foil right off without the epoxy sticking to the tin foil. I also added epoxy over the crack and on the back side after clamping. Here is a picture of the C-Clamp with masking tape on the threads.
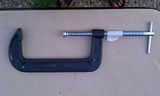
Here is how I clamped onto the epoxy while squeezing out one side.
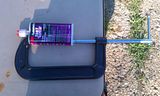
Here is the bumper cover with the 2� C-Clamp that was covered in tin foil on the ends
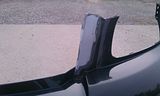
Next after waiting a half hour to be safe I sanded with 180 grit. And this stuff is really easy to sand no problems at all. I didn�t sand it to perfection just yet because I knew I still needed another coat. So I tack clothed the area I sanded then I mixed up another batch and reapplied to the area. I didn�t have to worry about a 2� C-Clamp this time because that crack was already glued together. I then waited another half hour and started with 180 grit, then 220, then finished with 320. And here is the finished product before paint.
Here are a few tips.
1. Make sure you prep with 180 because any area that wasn�t sanded you could easily just scratch off the epoxy with a fingernail.
2. After squeezing out the epoxy clean out the tips on the applicator before putting the cap back on because that little extra squeezes out when you put the cap on and can actually glue the cap on if the two mix in the cap.
3. Don�t worry about having to put on two coats this stuff sands and feathers out so good that it is worth it. And also the epoxy sets up so quick you really could sand it after 15 mins of waiting if it is a hot day I just decided a half hour because I had never used the product before.
Last but not least this was my first How To and bear with me I tried not to post all the pictures I took because I have so many I tried to sort out the good ones that were explained in my steps. Feel free for questions and requests for more pictures because I have them.
Here is what I started with.

So my materials list for this project include:
1. 3M #5887 Automix EZ Sand Flexible Part Repair $40
2. 8" C-Clamp $5.99
3. 2" C-Clamp $1.99
4. Putty Knife $0.99
5. Tin Foil Already Had
6. Masking Tape Already Had

Instructions say to wash surface, sand surface with 180 grit sandpaper to prep, and wash again. Let dry then apply Automix EZ Sand then let set for 15 minutes then sand with 180 grit. Reapply Automix if needed, if not sand with 220 grit then finish with 320 grit.
So here is a picture of it Sanded with 180 grit to prep

I then washed it clean and let it dry.
Next came the mixing part since Automix is a two part epoxy. Instead of buying the $20+ applicator gun I just bought a $6 8� C-Clamp. I didn�t use the mixing nozzles supplied with the product that are in the picture above because I wasn�t pushing both sides of epoxy at the same time. I first squeezed out the one side of epoxy then with masking tape I taped on the clamp threads where I stopped, un-did the clamp and went to the other side then speezed down till I came to the masking tape on the threads then mixed the two parts with my putty knife until I reached a same color consistency all the way through. Then I applied it to the bumper cover. I applied the epoxy inside the crack before I clamped the two sides together with the 2� C-Clamp. I wrapped the C-Clamp ends in tin foil before clamping over the epoxy just because I didn�t know if the epoxy would stick to the clamp and it worked out perfectly. After the epoxy had dried I was able to unclamp and pull the tin foil right off without the epoxy sticking to the tin foil. I also added epoxy over the crack and on the back side after clamping. Here is a picture of the C-Clamp with masking tape on the threads.

Here is how I clamped onto the epoxy while squeezing out one side.

Here is the bumper cover with the 2� C-Clamp that was covered in tin foil on the ends

Next after waiting a half hour to be safe I sanded with 180 grit. And this stuff is really easy to sand no problems at all. I didn�t sand it to perfection just yet because I knew I still needed another coat. So I tack clothed the area I sanded then I mixed up another batch and reapplied to the area. I didn�t have to worry about a 2� C-Clamp this time because that crack was already glued together. I then waited another half hour and started with 180 grit, then 220, then finished with 320. And here is the finished product before paint.

Here are a few tips.
1. Make sure you prep with 180 because any area that wasn�t sanded you could easily just scratch off the epoxy with a fingernail.
2. After squeezing out the epoxy clean out the tips on the applicator before putting the cap back on because that little extra squeezes out when you put the cap on and can actually glue the cap on if the two mix in the cap.
3. Don�t worry about having to put on two coats this stuff sands and feathers out so good that it is worth it. And also the epoxy sets up so quick you really could sand it after 15 mins of waiting if it is a hot day I just decided a half hour because I had never used the product before.
Last but not least this was my first How To and bear with me I tried not to post all the pictures I took because I have so many I tried to sort out the good ones that were explained in my steps. Feel free for questions and requests for more pictures because I have them.

Thread Starter
New Member
Joined: 05-16-2011
Posts: 8
From: Michigan
Funny thing about the crack is you won't even see it cause it is under the hood so I really didn't have to sand it perfectly but it gave me a chance to use a new product and the crack needed to be fixed so it would attach to the car right.


 Great writeup and repair, thanks for posting it!
Thread Starter
New Member
Joined: 05-16-2011
Posts: 8
From: Michigan
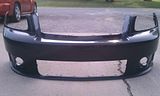
Here is a picture of the whole bumper I ended up having to do the same thing on the other side because there were a few deep scratches from where the hood was pressed up against it. The bumper came off a car that hit a deer but I guess it just wrecked the hood and the fender so that is why the top middle parts got wrecked because the hood was pushed up against them.


Thread
Thread Starter
Forum
Replies
Last Post