
How to Replace HVAC Blower fan/motor


Thread Starter
Founding Member
Joined: 11-23-2007
Posts: 8,210
From: Texas
2006 Chevrolet HHR | HHR (VIN A) Service Manual
--------------------------------------------------------------------------------
Blower Motor Replacement
Removal Procedure
Attachment 3729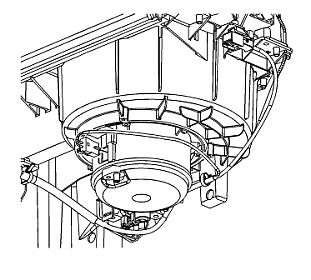
Remove the right sound insulator. Refer to Instrument Panel Insulator Replacement .
Remove the instrument panel (I/P) compartment. Refer to Instrument Panel Compartment Replacement .
Disconnect the blower motor electrical connector.
Attachment 3730
Remove the lower blower motor cover retaining screws.
Remove the lower blower motor cover.
Attachment 3731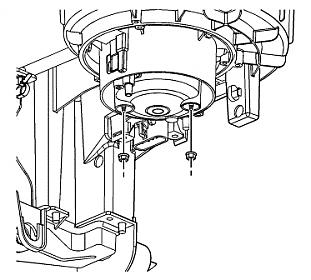
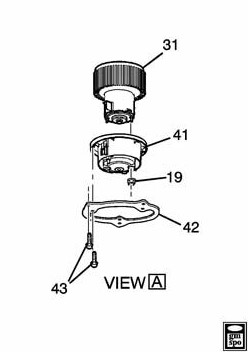
Remove the blower motor nuts.
Important: Cut through the case as straight as possible because the motor cup must be reused. In order to prevent damage to the component, do not cut any deeper than necessary to remove the motor cup.
Remove the blower motor and cup from the lower case by cutting through the case between the circular ribs around the motor with a sharp utility knife.
Attachment 3732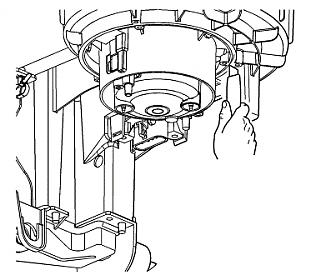
Release the blower motor retaining tab and remove the motor from the cup.
Installation Procedure
Attachment 3733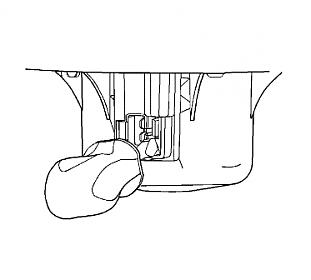
Install the blower motor (1) into the motor cup (2) that was cut out of the lower case.
Notice: Refer to Fastener Notice in the Preface section.
Install the blower motor nuts (3).
Tighten
Tighten the nuts to 2.4 N�m (21 lb in).
Attach the service ring (4) to the motor cup (2) with the screws (5) included in the kit.
Tighten
Tighten the screws to 1.8 N�m (15 lb in).
Attachment 3730
Install the blower motor and service ring into the HVAC module using the screws (5) included in the kit. Make certain the blower motor electrical connector is pointing rearward in the vehicle.
Tighten
Tighten the screws to 1.8 N�m (15 lb in).
Install the lower blower motor cover.
Install the lower blower motor cover retaining screws.
Tighten
Tighten the screws to 1.8 N�m (15 lb in).
Connect the blower motor electrical connector.
Install the I/P compartment. Refer to Instrument Panel Compartment Replacement .
Install the right sound insulator. Refer to Instrument Panel Insulator Replacement .
--------------------------------------------------------------------------------
Blower Motor Replacement
Removal Procedure
Attachment 3729
Remove the right sound insulator. Refer to Instrument Panel Insulator Replacement .
Remove the instrument panel (I/P) compartment. Refer to Instrument Panel Compartment Replacement .
Disconnect the blower motor electrical connector.
Attachment 3730
Remove the lower blower motor cover retaining screws.
Remove the lower blower motor cover.
Attachment 3731
Remove the blower motor nuts.
Important: Cut through the case as straight as possible because the motor cup must be reused. In order to prevent damage to the component, do not cut any deeper than necessary to remove the motor cup.
Remove the blower motor and cup from the lower case by cutting through the case between the circular ribs around the motor with a sharp utility knife.
Attachment 3732
Release the blower motor retaining tab and remove the motor from the cup.
Installation Procedure
Attachment 3733
Install the blower motor (1) into the motor cup (2) that was cut out of the lower case.
Notice: Refer to Fastener Notice in the Preface section.
Install the blower motor nuts (3).
Tighten
Tighten the nuts to 2.4 N�m (21 lb in).
Attach the service ring (4) to the motor cup (2) with the screws (5) included in the kit.
Tighten
Tighten the screws to 1.8 N�m (15 lb in).
Attachment 3730
Install the blower motor and service ring into the HVAC module using the screws (5) included in the kit. Make certain the blower motor electrical connector is pointing rearward in the vehicle.
Tighten
Tighten the screws to 1.8 N�m (15 lb in).
Install the lower blower motor cover.
Install the lower blower motor cover retaining screws.
Tighten
Tighten the screws to 1.8 N�m (15 lb in).
Connect the blower motor electrical connector.
Install the I/P compartment. Refer to Instrument Panel Compartment Replacement .
Install the right sound insulator. Refer to Instrument Panel Insulator Replacement .
Last edited by donbrew; Oct 11, 2017 at 10:21 PM.

Senior Member
Joined: 10-20-2011
Posts: 134
From: Portland, OR
How to Replace HVAC Blower fan/motor
Written from a 2009 SS Auto, but all HHR should be the same.
(NOTE: I'm going to try to add pictures later, it seems to hard from my laptop)
My fan started squeaking and driving me crazy. Fairly inexpensive replacement part online, and fairly basic service can be done at home. Of course it took me longer than I wanted.
Biggest tip: Use a really sharp knife.
Sources: shop manual, sheet that came with fan, experience.
Tools needed:
Steps:
Fan removal
(NOTE: I'm going to try to add pictures later, it seems to hard from my laptop)
My fan started squeaking and driving me crazy. Fairly inexpensive replacement part online, and fairly basic service can be done at home. Of course it took me longer than I wanted.
Biggest tip: Use a really sharp knife.
Sources: shop manual, sheet that came with fan, experience.
Tools needed:
- Socket set
- Utility knife & spare blades (Sharp, no broken tips)
- Trim removal tools
- Fan replacement kit GM part # 25776197
Steps:
Fan removal
- Open glove box and remove bolt on damper on right side. I just used a socket with no wrench � it�s very narrow in there but able to hand turn since it�s in plastic.
- Empty the glove box. (Yes the next step dumped all the contents on the floor. )
- Drop glove box door farther by squeezing plastic dash panel pieces to either side to release the glove box door stops.
- Remove the glove box door by lifting up and releasing the hinges (snap fit on hing pins)

- You can now see your goal: The fan motor and electrical plug

- Disconnect the electrical plug from the front, making note of the orientation
- Remove the �sound damper� from below the fan. Mine had 3 body plugs holding it up � 2 in front and one in back. The damper has many more holes that look like they could accept more plugs.Use a trim removal tool, a weed puller, butter knife, fingers, or�
Buy spares and cut the darn things off. Pain to get out. - The service manual says to remove a "lower blower motor cover". Mine didn't have one.
- The service manual says to remove the two nuts holding the blower motor in the cup. I followed instructions, but I don't know why you wouldn't do the next step first, getting the whole mess out of the car then dissemble at the comfort of your workbench. You can see the plastic rings around the nuts in this picture:

- Using a sharp utility knife (Change the blade before you start, this is too hard to do with even a slightly dull blade. Keep your spares at the ready � I broke a tip or two), cut around the fan motor cup from the underside.
- Look for the two concentric rings of plastic around the bottom of the motor. See the picture above, you can see the concentric rings around the cup.
- You�re supposed to cut between these rings. Yes GM planned it this way.
- Cutting around the back is a major pain as the floorboard comes up and gets in the way of the knife. Better suggestions on this step appreciated!
- Once the cut is complete, the whole assembly of motor cup (what you cut), motor, and fan (blue squirrel cage) should drop out into your hand.
- Invert the motor cup and old fan. Remove (3?) nuts holding the fan motor in the cup. Discard the old fan motor/fan
- Install the new motor in the motor cup and fasten with the nuts
- The replacement fan kit came with a metal ring and new machine screws to hold the fan and fan cup in the original location.
- Install the whole mess where it came from, fastening with the new machine screws.
- Reconnect the electrical plug
- Test it now! My squeak was gone, but I could still hear a pretty unbalanced motor noise. Not the smoothest bearings perhaps. I addressed this in the next step.
- After being dissatisfied that the new fan wasn�t closer to �silent�, I got busy with some left over materials from door sound deadening work (mostly from sounddeadenershowdown.com)
- The most important thing was to block the low frequency sound of the fan and motor. So I used some MLV (Mass Loaded Vinyl) of 1 lb./sq. ft.
- Cut MLV to the shape of the existing �sound damper�. The sound damper has a bulge in the center where the motor cup sticks out. It�s tight in there so I just cut a panel of MLV with a hole in the center for the bulge. Then I filled the bottom of the bulge with another circle. Just lay this layer inside the original �sound damper�. No adhesive necessary in any of this.
- Cut MLV in a rectangle to fit across the front of the opening behind the glove box. I just propped this up in the slot made by the glove box hinges.
- I made a blanket of 3M Thinsulate Acoustic for the bottom layer, then padded the gaps on either side of the motor with some more.
- For bonus points I put another slice of MLV in the glove box itself because it was so easy to do, and if I ever needed another 1/8� of space in there I�ll just throw it away.
- Trial fit everything and trim anything that makes it too stuffed up.
- Replace the original �Sound damper� below the fan cup. Install with 3 body plugs, either new or saved from before.
- Replace the glove box door, connecting the hinges, swinging up until the stops snap in place, replacing the bolt on the damper.
- Close it and you�re done!
Last edited by donbrew; Oct 11, 2017 at 10:25 PM. Reason: add photos
Deceased
Joined: 06-30-2010
Posts: 25,739
From: Kannapolis NC
 Excellent write up, it's been "Stuck" so it won't get lost.
You have about a 24 hour window to edit your own post, if you can't open it to edit it, just contact me of one of our Moderators and we will gladly add them to the first post for you.

Senior Member
Joined: 07-17-2011
Posts: 130
From: va
In Aug of 2008 ChevyMgr posted how to do this from the service manual. See it for clear details. https://www.chevyhhr.net/forums/show....php?t=18419#9


Platinum Member
Joined: 04-09-2006
Posts: 7,043
From: Vancouver, BC, Canada
I copied Chevymgr's post into this thread but due to the date, it added it to the thread at the very top - dang - but will leave it here for clarification.
Awesome write up paulBvtn - and the pictures really help!!!!!!!!!!!!
Awesome write up paulBvtn - and the pictures really help!!!!!!!!!!!!
Deceased
Joined: 06-30-2010
Posts: 25,739
From: Kannapolis NC
One of the quirks of the forum is that relocated posts always sort by chronological order, hence ChevyMgr's long lost post popping up on top.
But paulBvtn's write-up is excellent, and I'm with whopper, the photos make all the difference.
But paulBvtn's write-up is excellent, and I'm with whopper, the photos make all the difference.
