Power Steering Motor Replacement w/Pics
 07-21-2013, 04:00 PM
#71
Premium Member

Join Date: 11-26-2010
Location: Chicagoland NW
Posts: 59
Power Steering Replacement
Bought motor on EBay for $84 (Freedom Chev. Dallas TX) free shipping. Part # 19257875. Took longer to put dash back together than the R&R of the motor. Am I right to assume the tie strap is only for keeping wiring snug under the dash? I couldn't see that the strap was serving any other purpose.
Took a 4 mile drive , including circles in the Target parking lot and all seems well. With old motor I couldn't get to the end of my block without it going out.
Has anyone read if the motor is repairable? There was core return info sheet in box so I assume that they may do something with the old motors. I figure that info sheet is for dealers seeing that there was no mention of sending my old motor to back the dealer.
Again great pic's and directions- So nice to work under the dash without looking up from the floor board with a flashlight propped up by the gas pedal
 08-09-2013, 07:07 PM
#72

Join Date: 08-09-2013
Location: Florida
Posts: 1
Big Thanks to ChevyMgr for all of his information and guidance. I think its good that someone in the business cuts through the crap and tries to truly help people. A lot dealers and such just want to milk you for whatever they can and don't want anyone doing things themselves. Without the information he posted in the thread linked below, with diagrams and step by step instructions it would have been much harder.
I have included real pictures so people can get a better view of what has to be done. There are two steps that aren't really mentioned in ChevyMgr's thread and that's removing the knee plate and the knee bolster reinforcement. I will show all that in the coming information. I might not refer to stuff by the correct name either, but I show the part so you know what I am talking about :)
Here is ChevyMgr's original post, I used the instructions here. MAKE SURE YOU REFER TO BOTH POSTS. I didn't want to redo all the stuff he already posted plus I could have missed a step.
https://www.chevyhhr.net/forums/show...1&postcount=14
Tools Needed:
Small socket wrench
12mm socket
10mm socket
7mm socket
Wire cutters(to remove old tie wrap)
Lint Free cloth
Package Contents:
New motor
Tie Wrap
Rubber O-ring
Lubricant
Core Sticker for refund
Installation Time:
1 hour, includes un-boxing, replacement, and cleanup
First the box, the motor, and accessory kit(you know its going to be an easy job when you are only given a o-ring, tie wrap, and some lube )
)


I didn't think about taking pictures until I had already removed the two knee parts so I have pictures of them, but I am just holding it up where they use to go. You will notice in the one picture of the knee bolster with retaining clips the actual reinforcement isn't behind there. I show a picture of it, but not mounted.
So here is a quick overview and then I will post pictures.
1) Remove Knee Bolster. 3xPush Clips, pull out gently, 2x7mm bolts on bottom
2) Remove Knee Bolster Reinforcement. 4x10mm bolts
3) Observe Tie wrap placement
4) Unplug motor power
5) Unplug gray clip so you can access top bolt
6) Clip Tie Wrap
7) Loosen Top Motor Bolt 12mm
8) Loosen Bottom Motor Bolt
9) Pull motor out gently
10) Clean worm spline and inside cover
11) Apply the supplied lubricant to inside of new motor cylinder
12) Slowly insert new motor
13) Finger tighten bolts to hold new motor in place
14) Secure Tie Wrap around motor and power cable
15) Tighten down the 12mm bolts to specifications
16) Attach Power Cable
17) Reinstall Bolster Reinforcement
18) Reinstall Knee Bolster
19) Enjoy power steering once again
So without further ado.
Top shows the push clips, just reach into the little gap and pull them out. Then locate the two 7mm bolts on the bottom and loosen them


Here is the Bolster Reinforcement. 4x10mm bolts.(This is what sits behind the knee cover you just removed)

Be sure the retaining clips don't fall out. This is what the bolster nuts screw into. Mine were very loose.

Observe Tie Wrap Placement

Unplug motor power, here you will also see top and bottom motor bolts

Clip Tie Wrap from the above pictures
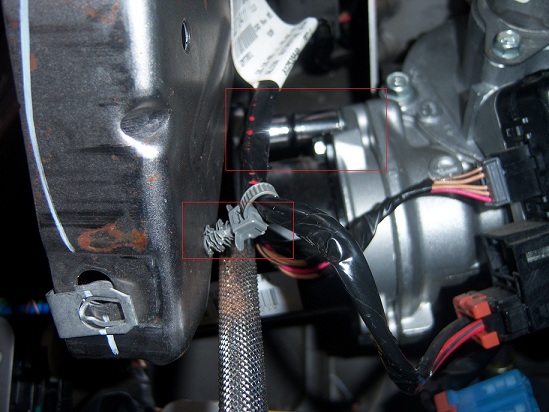
Loosen Top Motor Bolt 12mm socket. This is very tricky. I have highlighted something here because the cables get in the way and you can't get to the top nut properly. You also need a very thin walled socket.
Wiggle the gray tab out so you can move the cable out of your way. In my picture I have the tip sitting in the hole so you can see where it comes from, but I pulled it all the way out and pushed it to the top.
Follow the rest of the instructions and you should be good to go.
I have included real pictures so people can get a better view of what has to be done. There are two steps that aren't really mentioned in ChevyMgr's thread and that's removing the knee plate and the knee bolster reinforcement. I will show all that in the coming information. I might not refer to stuff by the correct name either, but I show the part so you know what I am talking about :)
Here is ChevyMgr's original post, I used the instructions here. MAKE SURE YOU REFER TO BOTH POSTS. I didn't want to redo all the stuff he already posted plus I could have missed a step.
https://www.chevyhhr.net/forums/show...1&postcount=14
Tools Needed:
Small socket wrench
12mm socket
10mm socket
7mm socket
Wire cutters(to remove old tie wrap)
Lint Free cloth
Package Contents:
New motor
Tie Wrap
Rubber O-ring
Lubricant
Core Sticker for refund
Installation Time:
1 hour, includes un-boxing, replacement, and cleanup
First the box, the motor, and accessory kit(you know its going to be an easy job when you are only given a o-ring, tie wrap, and some lube
)I didn't think about taking pictures until I had already removed the two knee parts so I have pictures of them, but I am just holding it up where they use to go. You will notice in the one picture of the knee bolster with retaining clips the actual reinforcement isn't behind there. I show a picture of it, but not mounted.
So here is a quick overview and then I will post pictures.
1) Remove Knee Bolster. 3xPush Clips, pull out gently, 2x7mm bolts on bottom
2) Remove Knee Bolster Reinforcement. 4x10mm bolts
3) Observe Tie wrap placement
4) Unplug motor power
5) Unplug gray clip so you can access top bolt
6) Clip Tie Wrap
7) Loosen Top Motor Bolt 12mm
8) Loosen Bottom Motor Bolt
9) Pull motor out gently
10) Clean worm spline and inside cover
11) Apply the supplied lubricant to inside of new motor cylinder
12) Slowly insert new motor
13) Finger tighten bolts to hold new motor in place
14) Secure Tie Wrap around motor and power cable
15) Tighten down the 12mm bolts to specifications
16) Attach Power Cable
17) Reinstall Bolster Reinforcement
18) Reinstall Knee Bolster
19) Enjoy power steering once again
So without further ado.
Top shows the push clips, just reach into the little gap and pull them out. Then locate the two 7mm bolts on the bottom and loosen them
Here is the Bolster Reinforcement. 4x10mm bolts.(This is what sits behind the knee cover you just removed)
Be sure the retaining clips don't fall out. This is what the bolster nuts screw into. Mine were very loose.
Observe Tie Wrap Placement
Unplug motor power, here you will also see top and bottom motor bolts
Clip Tie Wrap from the above pictures
Loosen Top Motor Bolt 12mm socket. This is very tricky. I have highlighted something here because the cables get in the way and you can't get to the top nut properly. You also need a very thin walled socket.
Wiggle the gray tab out so you can move the cable out of your way. In my picture I have the tip sitting in the hole so you can see where it comes from, but I pulled it all the way out and pushed it to the top.
Follow the rest of the instructions and you should be good to go.
08-20-2013, 08:26 PM
#73
New Member

Join Date: 08-13-2013
Location: Houston, TX
Posts: 22
Replaced it tonight, and it feels like it turns smoother with the new motor! Very glad to not have it keep doing that anymore!
08-24-2013, 10:26 PM
#74

Join Date: 08-24-2013
Location: killeen, tx
Posts: 2
Excellent write up Stryker! Appreciate your write up as well as the afterposts. Helped my girlfriend and I do this one ourselves. I do it all myself anyway, however, talkin the GF into my doin stuff on her vehicle's another story! I basically walked her thru the entire thing besides the actual physical removal and reinstall of the motor itself, she even took the two big bolts out of the motor and put them back in after I put the new motor back in place!
She had PLENTY of motivation for us to replace this motor ourselves due to the local Chevy dealer wanting 3 hours labor at $109/hr! PLUS at least the $114 for the motor itself! Took HER less than an hour to do this swap w/ just my pointers here and there! She doesn't work on cars, she works in an office, and is from Germany, so this is amazing that GM wants 3 hrs labor for this simple lil task that a 4 or 5 yr old could do w/ almost NO prob! WOW! Think I'm in the wrong profession! GF thinks she wants to open a garage now! Even if for only the more simple jobs! "HHR Garage of Texas" maybe? lol... thnx again for the post! BTW, I ALMOST took a pic of the ONE thing you were missin in your post, and that is of the splined input area of the column where the motor output shaft goes. But I'd JUST gotten a new iphone and was synchin it for first time so didn't have a cam to take a pic of this with, sorry, maybe next time! Keep up the GREAT work!
Her HHR is a stick(She insisted) snagged it used from a UAV creator out in San Antonio area, gets right at 28 mpg city/highway...
BTW steering works EXCELLENT now. Will see if keeps working with this new motor!
Sincerely,
Todd
Last edited by whopper; 09-15-2013 at 02:46 AM. Reason: removed spam link
09-14-2013, 12:37 PM
#75
Banned

Join Date: 07-18-2012
Location: Michigan
Posts: 8
getting ready to do this repair myself. my power steering goes out random times, and its driving me up the wall. doesn't matter the temp, the time of day, the length of time on the road, the number of turns or turn radius....just completely random. can go a full day without a single failure, then other days it'll fail within 5 minutes after every start. Beyond irritating.
11-05-2013, 12:27 PM
#76

Join Date: 11-05-2013
Location: Clermont, FL
Posts: 1
New to this forum. Can't begin to tell you how happy I am that I found this. Having same problem with ps. On my way to dealership to get a new motor ($104.00 plus tax). Thank you all for your inputs and the very detailed instructions....can't wait to fix it.
12-15-2013, 03:23 PM
#77

Join Date: 12-15-2013
Location: Minnesota
Posts: 1
Hi, did you say that your steering worked then? Is this the usual reason for power steering failure in these cars?

 12-24-2013, 10:10 AM
#79

Join Date: 07-09-2012
Location: Central
Posts: 1
I just wanted to say thanks for the write up. I too submitted a complaint to the NHTSA regarding the issue.
I will add, it does appear to be heat related as well. If I have the heater on floor, the motor stops functioning regularly, but with the heat diverted to the dash and/or the defrosters, the steering seems to have no issue. I haven't tested extensively, but it might be useful for those still waiting to put their new motor in.
Thanks!
12-27-2013, 06:11 PM
#80

Join Date: 12-26-2013
Location: Farmersville, TX
Posts: 1
absolutely heat related; could drive considerably further if I directed heater off the floor when starting up in the morning; but once it happened it was pretty much done for the day.
I can't complain of anything; my 2007 has 310K+ on it and motor just failed... but $76 and a 1 hour repair is better than the $400 estimate by the dealer.
Thanks for great write up.
I can't complain of anything; my 2007 has 310K+ on it and motor just failed... but $76 and a 1 hour repair is better than the $400 estimate by the dealer.
Thanks for great write up.