
Running wires into doors


Thread Starter
Senior Member
Joined: 02-01-2006
Posts: 1,471
From: lockport,ny
Running wires into doors
I finally got around to installing the heated mirror element retrofit for my HHR.
I had to run 2 extra wires into each front door for the mirror heater elements. All the other cars that I had worked on previously had the rubber bellows tube going from the door into the jamb into which the wires passed.
The HHR is different because Chevy uses a connector right at the door jamb end of the rubber bellows. You can't just push wires through into the underdash area.
One of the options is to use any unused connector spots by purchasing the right pins and crimping them onto your new wires.
After checking and measuring numerous times, I found that you can pass at least four wires alongside the existing connector, two on top and two on the bottom. This will probably work for wiring that is 14AWG or smaller. My two wires were 16AWG.
Removing the door jamb end of the rubber bellows is done by pressing in on both sides of the connector to release the two tabs that hold it in the stamped metal door jamb hole. The tabs are hidden under the rubber seals. You can pull the seal away from the door jamb to access the tabs. This is what it looks like after pulling it out:

Since I didn't take a picture before I ran the extra wires, you'll notice that my extra wiring shows. This picture was taken after everything was finished and I was ready to snap it back into the hole.
The next step is to unplug the connector. Try to keep the door jamb side connector from falling too far into the hole as you will have to fish it out later then. Here is a picture of the unplugged connector:
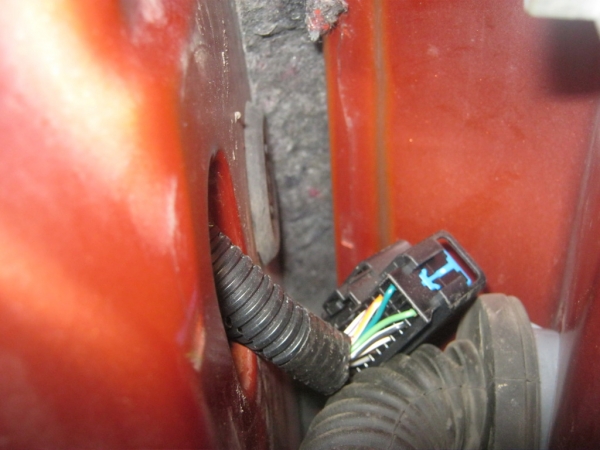
The next picture shows the weatherproof boot pulled off the connector to show the existing wires along with my additions. I put heat shrink over the two wires to provide extra abrasion resistance. The extra wires have to be pulled through the slot in the connector as shown, otherwise they will pinch in the hole later.
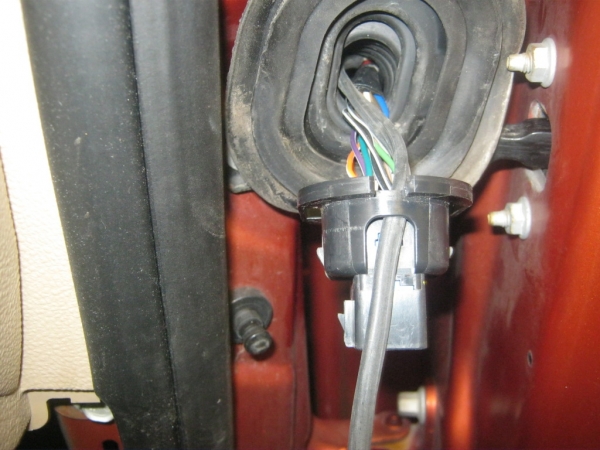
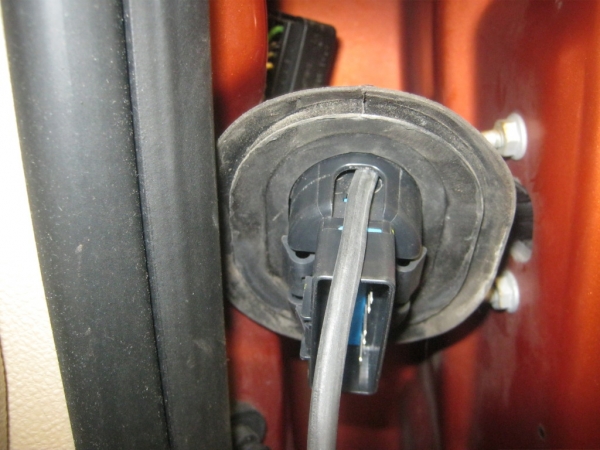
The boot is now pulled back over the connector. There is a rubber flange that has to be stretched over the connector around its perimeter. with the boot back on it looks like this:
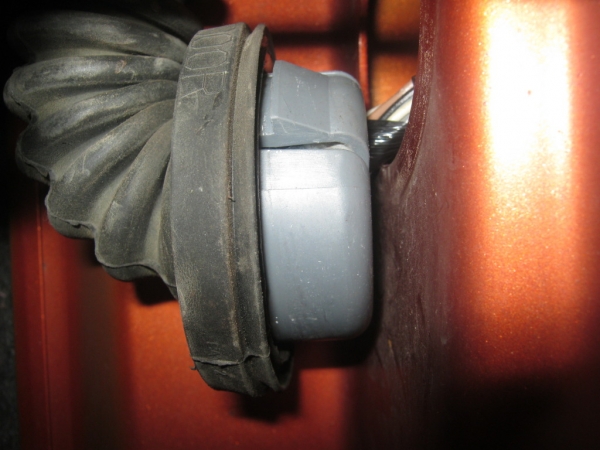
Here is a picture of how the rubber bellows attaches at the door end. You can reach into the door and pop the tabs to release it. After putting it back in, I had to reach into the door again and push out on the tabs to snap it in securely enough.
Hope this helps someone who needs to run wires into the front doors. I didn't do the rear doors, but I assume they are similar.
Steve
I had to run 2 extra wires into each front door for the mirror heater elements. All the other cars that I had worked on previously had the rubber bellows tube going from the door into the jamb into which the wires passed.
The HHR is different because Chevy uses a connector right at the door jamb end of the rubber bellows. You can't just push wires through into the underdash area.
One of the options is to use any unused connector spots by purchasing the right pins and crimping them onto your new wires.
After checking and measuring numerous times, I found that you can pass at least four wires alongside the existing connector, two on top and two on the bottom. This will probably work for wiring that is 14AWG or smaller. My two wires were 16AWG.
Removing the door jamb end of the rubber bellows is done by pressing in on both sides of the connector to release the two tabs that hold it in the stamped metal door jamb hole. The tabs are hidden under the rubber seals. You can pull the seal away from the door jamb to access the tabs. This is what it looks like after pulling it out:
Since I didn't take a picture before I ran the extra wires, you'll notice that my extra wiring shows. This picture was taken after everything was finished and I was ready to snap it back into the hole.
The next step is to unplug the connector. Try to keep the door jamb side connector from falling too far into the hole as you will have to fish it out later then. Here is a picture of the unplugged connector:
The next picture shows the weatherproof boot pulled off the connector to show the existing wires along with my additions. I put heat shrink over the two wires to provide extra abrasion resistance. The extra wires have to be pulled through the slot in the connector as shown, otherwise they will pinch in the hole later.
The boot is now pulled back over the connector. There is a rubber flange that has to be stretched over the connector around its perimeter. with the boot back on it looks like this:
Here is a picture of how the rubber bellows attaches at the door end. You can reach into the door and pop the tabs to release it. After putting it back in, I had to reach into the door again and push out on the tabs to snap it in securely enough.
Hope this helps someone who needs to run wires into the front doors. I didn't do the rear doors, but I assume they are similar.
Steve
Last edited by ChevyMgr; Dec 30, 2011 at 12:23 PM. Reason: reduced picture size per site guidelines

Premium Member
Joined: 10-09-2010
Posts: 14,420
From: Tacoma
Here's the whos who on heated mirrors I would love it, but the butt comes first
https://www.chevyhhr.net/forums/show...heated+mirrors
https://www.chevyhhr.net/forums/show...heated+mirrors
Thread Starter
Senior Member
Joined: 02-01-2006
Posts: 1,471
From: lockport,ny
The easiest way to get heated mirrors is to buy the aftermarket replacements. I couldn't afford those, so I did it the cheap way.
I bought a pair of GM mirror glass replacements for about $20 each online. Then I bought a pir of Burco mirror heater elements for about $30 each. Total cost was about $100.
There is a lot of labor involved. You have to remove the new mirrors from their plastic backing plate (carefully!) by heating them to 200F to soften the adhesive. The plastic backing plate has to be modified with a slot to accommodate the two tabs for the heating element. Then you glue the heating elements to the back of the mirror, followed by gluing the plastic backing plate back on.
The mirror housing itself cannot be disassembled (It may use a one-time snap joint at the rotating joint for folding). The plastic pieces unscrew but cannot come off unless the rotating joint is taken apart. I just fished the wires through many hidden areas and finally go it through the rotating joint and out to the door mounting area. A small hole had to be drilled in the plastic directly under the rotating joint to help fish the wire through, which I will fill with black RTV later (you can't see it anyway).
The final step I have to do is wire the switch. I'm installing a lighted rocker switch in the plastic plug for the fog light switch area. I don't have fog lights, so the plug covers the hole. This way I don't have to make any extra holes in dash panels.
I'll have more pictures when I'm done. This is a project for those who really like to do mods because it takes a pretty long time and you ad lib as you go along sometimes.
Steve
Thread Starter
Senior Member
Joined: 02-01-2006
Posts: 1,471
From: lockport,ny
The aftermarket mirrors I was referring to was the Muth mirrors discussed in the thread that SS fan posted the link to. The company link is:
http://www.muthco.com/
Even though the HHR is not listed on the Muth site, they can make a pair, as they did for forum member Doctuh.
The mirrors cost $317.50 for left and right sides, which were heated and had the turn signal built into them. I think the installed cost was about $520.
Even if you buy the aftermarket mirrors, you still have to wire them by running the wiring through the doors.
I am hooking up to an unused fused output at the BCM. There is (at least on my 2006 HHR) a 15A fuse marked "S ROOF" that is unused. Even if you have the optional sunroof, that line is unused according to the factory service manual. The fused output is brought out to connector C3, pins C3 and D3. The BCM connector C3 is the one that plugs into the front of the BCM and is easily accessed by popping off the BCM cover on the passenger side footwell of the center console. All you need is to get the mating pin (GM # 12110844), crimp a wire onto it and push it into the connector. I'll probably replace the fuse with a smaller one, probably about 10A.
Steve

Moderator
Joined: 01-23-2009
Posts: 26,539
From: Fredericksburg,VA
The aftermarket mirrors I was referring to was the Muth mirrors discussed in the thread that SS fan posted the link to. The company link is:
http://www.muthco.com/
Even though the HHR is not listed on the Muth site, they can make a pair, as they did for forum member Doctuh.
The mirrors cost $317.50 for left and right sides, which were heated and had the turn signal built into them. I think the installed cost was about $520.
Even if you buy the aftermarket mirrors, you still have to wire them by running the wiring through the doors.
I am hooking up to an unused fused output at the BCM. There is (at least on my 2006 HHR) a 15A fuse marked "S ROOF" that is unused. Even if you have the optional sunroof, that line is unused according to the factory service manual. The fused output is brought out to connector C3, pins C3 and D3. The BCM connector C3 is the one that plugs into the front of the BCM and is easily accessed by popping off the BCM cover on the passenger side footwell of the center console. All you need is to get the mating pin (GM # 12110844), crimp a wire onto it and push it into the connector. I'll probably replace the fuse with a smaller one, probably about 10A.
Steve
http://www.muthco.com/
Even though the HHR is not listed on the Muth site, they can make a pair, as they did for forum member Doctuh.
The mirrors cost $317.50 for left and right sides, which were heated and had the turn signal built into them. I think the installed cost was about $520.
Even if you buy the aftermarket mirrors, you still have to wire them by running the wiring through the doors.
I am hooking up to an unused fused output at the BCM. There is (at least on my 2006 HHR) a 15A fuse marked "S ROOF" that is unused. Even if you have the optional sunroof, that line is unused according to the factory service manual. The fused output is brought out to connector C3, pins C3 and D3. The BCM connector C3 is the one that plugs into the front of the BCM and is easily accessed by popping off the BCM cover on the passenger side footwell of the center console. All you need is to get the mating pin (GM # 12110844), crimp a wire onto it and push it into the connector. I'll probably replace the fuse with a smaller one, probably about 10A.
Steve

Senior Member
Joined: 12-24-2008
Posts: 717
From: N/A
Excellent point! If you try it this way, wire off the Under Hood Fuse box as that is where the Rear Defog Fuse(#2 - 40 AMP) and Relay(#14) reside. At least that is what my 2009 FSM has to say � you won�t find any switched power for the Defog at the BCM. Of course the wire to the rear hatch probably goes thru the firewall somewhere.

Thread
Thread Starter
Forum
Replies
Last Post