
Blacking out your hubcaps


Thread Starter
Member
Joined: 06-07-2012
Posts: 65
From: Buford, GA
Blacking out your hubcaps
So I decided rather than spend the money on black rims (which I don't the money for anyways) I would black out my hubcaps. The process was a little time consuming but the end product made it worth it.
Materials I used:
1500 Grit Wet/Dry Sandpaper
Kitchen sponge
Krylon Fusion Glossy Black plastic bonding spray paint
Rust-Oleum High Performance Enamel in Black
Masking tape
House fan
Hand towel
Step One:
Use a kitchen sponge to CLEAN the hubcaps completely. I did mine in our extra bathroom's bathtub. (this helps the paint bond better with the plastic as well as making it more comfortable to handle them)
Step Two:
Lightly wipe the hubcaps down so they're not soaked but still wet. Then proceed to sand them. Make sure to do this in the same direction for each hubcap. I did circular strokes in the middle, rounded strokes along the edges and back and fourth stroke on each spoke. Take your time and make sure to get every nook and cranny.
Step Three:
Rinse off the hubcaps, wiping them again if necessary, then using your towel completely dry them. (Leaving them in the sunlight for 15 minutes will ensure all the water dries up)
Step Four:
Apply masking tape over the center Chevy jewel on each hubcap. Take your time and try to make it look as perfect as possible without covering up the hubcap itself. I used small pieces at an angle and wedged the tape in between the lip of the hubcap and the jewel.
Step Five:
Apply 3 - 4 coats of the Krylon Fusion leaving 15 - 20 minute intervals in between coats for proper drying. Be sure not to overspray too much as this will cause bubbles which can pop the paint off later after it dries. Keep about a 1.5 - 2 foot distance from the spray can to the hubcaps. Use the house fan to help with the drying.
Step Six:
Leave the hubcaps to dry for about an hour or so before beginning the Rust-Oleum. Once dried, repeat step four but only this time with the Rust-Oleum obviously.
Step Seven:
After giving them a good 24 hours to sit and set, remove the masking tape from the jewel on the hubcaps. Re-mount them back on your HHR and bask in the awesomeness of your work.
Here is what the final product should look like...
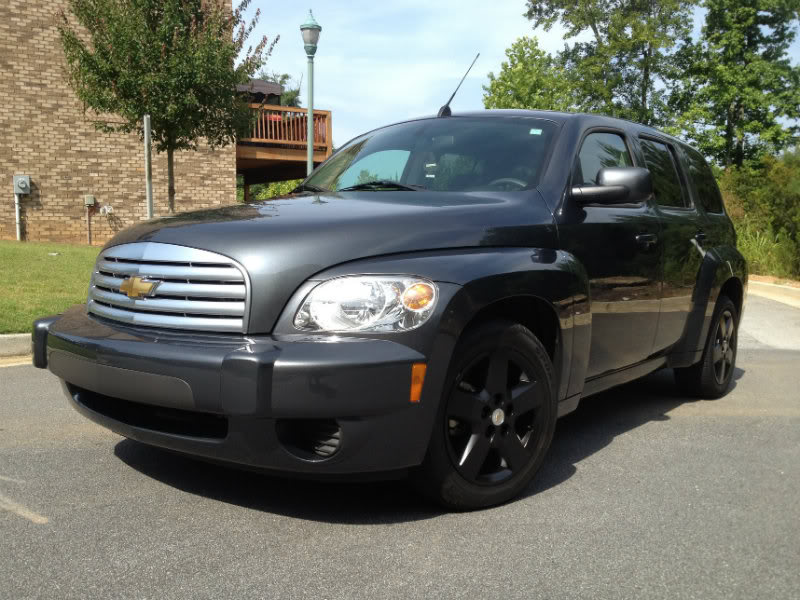

By the way, I couldn't find a page with a tutorial on this... so if another exists, my apologies and just enjoy the picture then.
Materials I used:
1500 Grit Wet/Dry Sandpaper
Kitchen sponge
Krylon Fusion Glossy Black plastic bonding spray paint
Rust-Oleum High Performance Enamel in Black
Masking tape
House fan
Hand towel
Step One:
Use a kitchen sponge to CLEAN the hubcaps completely. I did mine in our extra bathroom's bathtub. (this helps the paint bond better with the plastic as well as making it more comfortable to handle them)
Step Two:
Lightly wipe the hubcaps down so they're not soaked but still wet. Then proceed to sand them. Make sure to do this in the same direction for each hubcap. I did circular strokes in the middle, rounded strokes along the edges and back and fourth stroke on each spoke. Take your time and make sure to get every nook and cranny.
Step Three:
Rinse off the hubcaps, wiping them again if necessary, then using your towel completely dry them. (Leaving them in the sunlight for 15 minutes will ensure all the water dries up)
Step Four:
Apply masking tape over the center Chevy jewel on each hubcap. Take your time and try to make it look as perfect as possible without covering up the hubcap itself. I used small pieces at an angle and wedged the tape in between the lip of the hubcap and the jewel.
Step Five:
Apply 3 - 4 coats of the Krylon Fusion leaving 15 - 20 minute intervals in between coats for proper drying. Be sure not to overspray too much as this will cause bubbles which can pop the paint off later after it dries. Keep about a 1.5 - 2 foot distance from the spray can to the hubcaps. Use the house fan to help with the drying.
Step Six:
Leave the hubcaps to dry for about an hour or so before beginning the Rust-Oleum. Once dried, repeat step four but only this time with the Rust-Oleum obviously.
Step Seven:
After giving them a good 24 hours to sit and set, remove the masking tape from the jewel on the hubcaps. Re-mount them back on your HHR and bask in the awesomeness of your work.
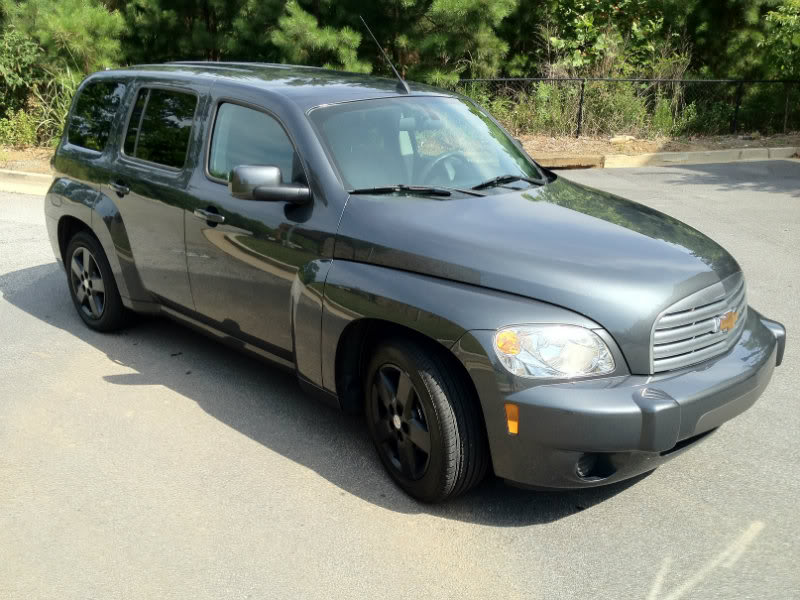
Here is what the final product should look like...
By the way, I couldn't find a page with a tutorial on this... so if another exists, my apologies and just enjoy the picture then.
 Great write up, sharp results!


Senior Member
Joined: 09-05-2009
Posts: 452
From: New England
As a future reference for anyone wanting to do this, you really want to stay away from using sandpaper this fine
When prepping a surface for paint, you want to stay around a 600 grit. When you start going with to fine of a paper, you are giving the paint to smooth of a surface so it can't 'bite' into it good enough. 1500 is much closer to a finishing grit paper, that is used for wetsanding a finished project, than it is for prep work
Granted this might work ok for the op, but if you want to do it the best way possible, go with the 600 and the job will look just as good and be a lot more durable. Also 1500 grit paper is to fine to get rid of a lot of blemishes in any of your parts. 600 will work much better, but you should even start with a rougher paper than that if your surface is bad
Not trying to be an ass or anything. I'm just trying to help people do a better job on their projects, because it sucks when you work harder than needed and you end up with an inferior product

Senior Member
Joined: 11-05-2010
Posts: 1,492
From: Detroit, Michigan USA
I agree 110% with "843de"; easy to follow direction on the process you performed. So easy, I believe I could even do it. LOL
Love the look!!!!
Great job!!
Michelle, Chevrolet Customer Service
Love the look!!!!
Great job!!
Michelle, Chevrolet Customer Service
Last edited by ChevyMgr; Jul 6, 2012 at 04:31 PM. Reason: removed quote...it wasn't necessary for the post
