
HomeLink Install


Thread Starter
Member
Joined: 09-14-2015
Posts: 74
From: Peck, MI
HomeLink Install
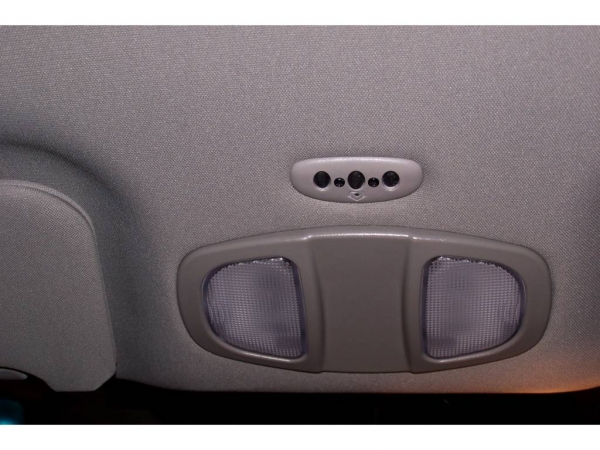
Having a HomeLink transmitter right in your vehicle is always a welcome addition; no more fumbling around for your garage door remote, or seeing that ugly thing hanging on your visor. There are a lot of options to consider on where is the best place to install one. In my Pontiac Torrent, it was fairly easy to mount it in the ceiling because the dome light assembly gave me easy access to that area (pic below).
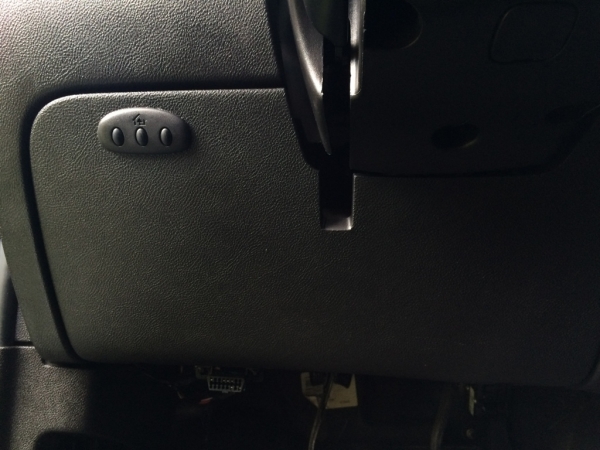
But in the HHR, it would be a little more difficult; still possible though, so that's a decision you'll need to make. I scoped out the interior and decided the blank space on the left lower side of the steering wheel was a good spot.
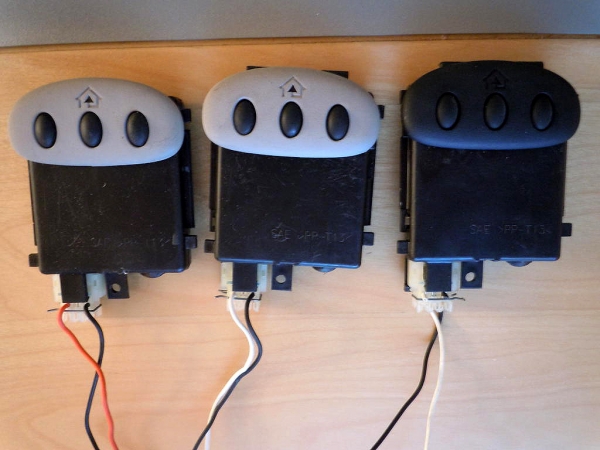
First thing to do, buy a HomeLink unit. Log into eBay and type in "Homelink", and you'll get a ton of hits, expect to pay in-between $20 to $40 bucks, make sure it includes the electrical connector and a little length of wire.
Next, remove the lower dash panel, there are two screws on the bottom edge to take out, the upper part is held on with clips (so just pull outward to release).
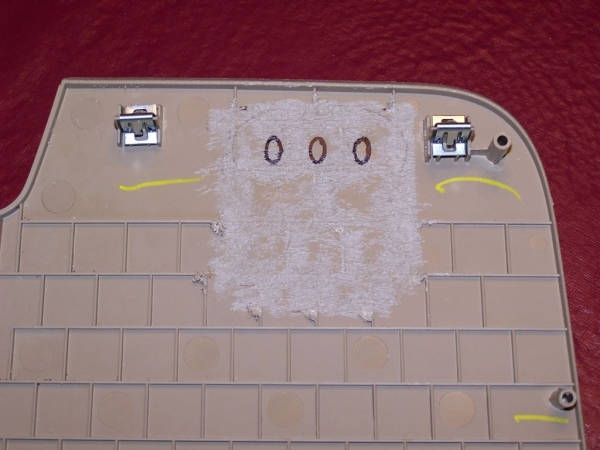
Do some measuring for location and clearance; you can see in the photo where I marked the location on the back of the panel for mine. Make sure you put it low enough to clear the upper dash where it protrudes along the bottom. If you put the unit too high in the panel, it will hit in this area when you try to re-install the panel (see arrow in pic). If by chance you do mount it too high, you can trim a little bit out of that upper dash area, it does get covered up when you put the lower panel back in.

After you determine the location, use the HomeLink bezel to mark out your holes. You will also need to grind down the re-enforcement grooves on the back side of the dash panel so the HomeLink unit fits down flush. Drill a small hole in the center of your markings and use a dremel or small round file to make the oval holes.
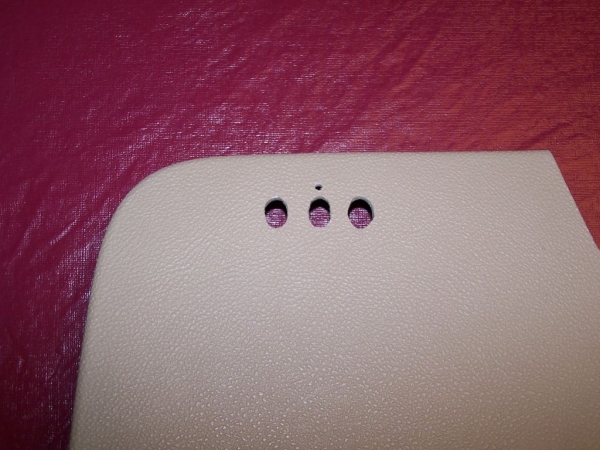
You should end up with something like this. I drilled a small round hole to line up with the LED indicator above the buttons. Some of my oval holes got a little out of wack, so be careful and go slow. Experience with a dremel helps here. I think I should have stuck with a small round file, maybe easier to control.
The LED indicator has a clear rubber piece (connected to the black buttons) which transmits the red light. Since I did not try to cut a small "triangle" hole in the dash panel to match this, you will need to trim the clear rubber back a little bit so it doesn't restrict the HomeLink unit from sitting flush to the panel. You will see what I mean when you're lining things up, but be sure to check this before moving forward. Next, line everything up and glue the HomeLink unit down. I used silicone, that way I could remove it or replace it later on if needed.
Here it is ready to install. I drilled a couple holes in the clip areas and put an extra support wire on the back. Not sure if that's necessary, more than likely overkill, but not much room for silicone near the top due to the buttons.
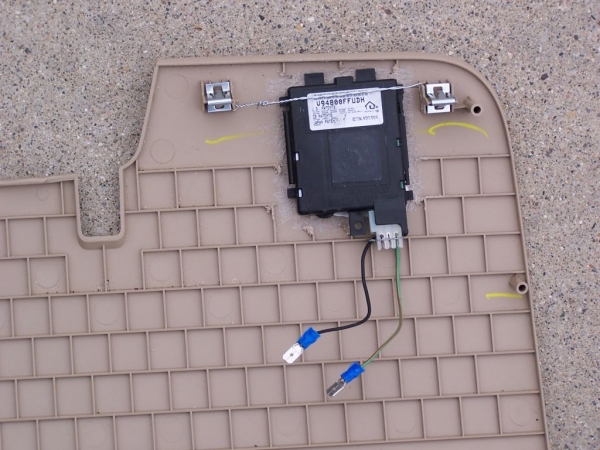
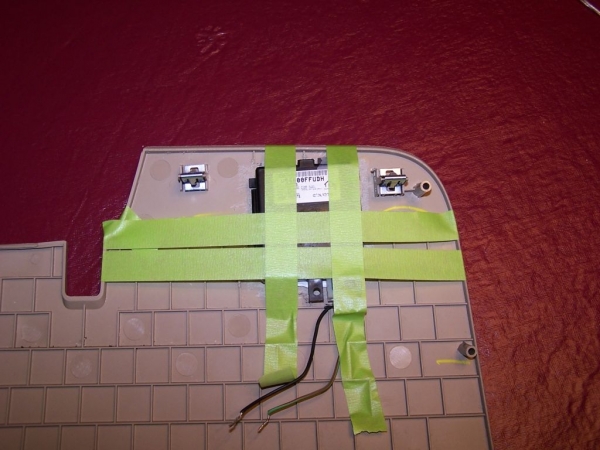
Dash prep, you need to remove some of the dash backer material to allow for the HomeLink unit (first arrow). The backer is easy to remove, I believe there were three bolts. I used a hacksaw to cut the plastic material. Run a power wire over to your fuse box, and another one for a ground (I used that mounting screw in the lower left corner in the metal dash sub-frame, see second arrow).
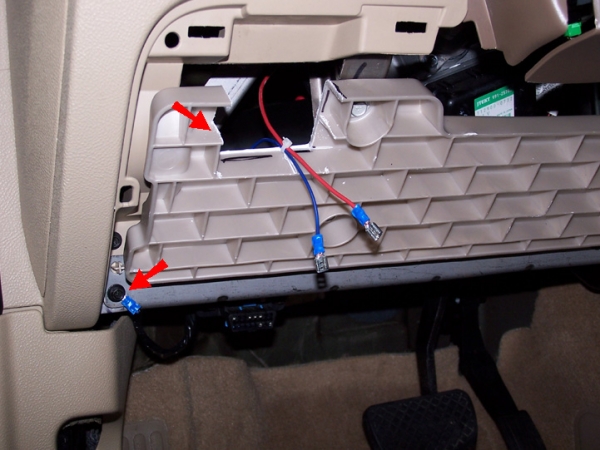
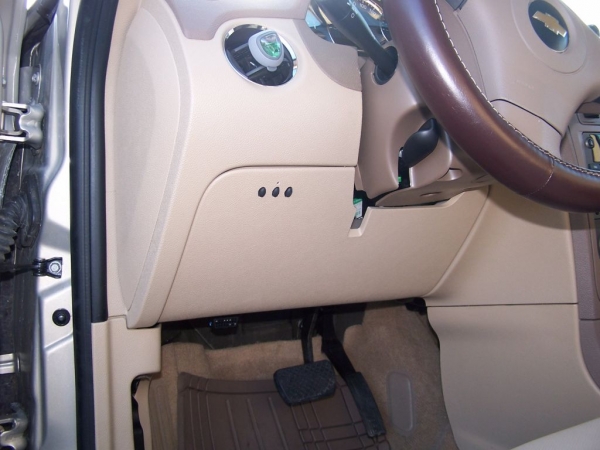
Connect your wires, re-install lower dash unit, and test/program your HomeLink unit. Final results with dash panel back in place.
Another member here did a similar install (Amarv12), but he used the HomeLink bezel (pic below). This provides for a very clean & professional finished look. However, you will need to address extending the buttons as they are too short due to the dash material thickness. Amarv12 had a solution for that, see this thread for more information. (https://www.chevyhhr.net/forums/how-...ink-add-49389/)
So that's about all there is to it. Not overly difficult, and every day you press that HomeLink button, it will put a smile on your face! Hope this was helpful to others wanting to do this mod.
Art
Yet Another Option: If drilling/cutting the dash parts is a direction you'd rather not go, here is yet another option that creates a very clean, professional end result. The only difference is, you'll need to do a little soldering instead, and purchase a few additional items (3 buttons and a LED socket). Check it out here: http://audi-diy.blogspot.com/2007/10...k-install.html
************************************************** ********************************
HomeLink Programming Instructions:
RECOMMENDED STEP: (if any of the buttons are already programmed to work other units/devices, skip this step because it clears the memory of all 3 buttons)
To clear the memory of all three buttons in the HomeLink transmitter, hold down the two outside buttons (1 & 3, 2 being the one directly under the house logo/light) for approx. 20 seconds until the red light begins to flash rapidly. Release both buttons.
Phase 1
Be sure people and property, including yourself and your vehicle are NOT in the travel path of the garage door and that nothing will be struck when the door attempts to close or open !
A second person will make the following steps quicker and easier. Be sure people and property, including yourself and your vehicle are NOT in the travel path of the garage door and that nothing will be struck when the door attempts to close or open !
But in the HHR, it would be a little more difficult; still possible though, so that's a decision you'll need to make. I scoped out the interior and decided the blank space on the left lower side of the steering wheel was a good spot.
First thing to do, buy a HomeLink unit. Log into eBay and type in "Homelink", and you'll get a ton of hits, expect to pay in-between $20 to $40 bucks, make sure it includes the electrical connector and a little length of wire.
Next, remove the lower dash panel, there are two screws on the bottom edge to take out, the upper part is held on with clips (so just pull outward to release).
Do some measuring for location and clearance; you can see in the photo where I marked the location on the back of the panel for mine. Make sure you put it low enough to clear the upper dash where it protrudes along the bottom. If you put the unit too high in the panel, it will hit in this area when you try to re-install the panel (see arrow in pic). If by chance you do mount it too high, you can trim a little bit out of that upper dash area, it does get covered up when you put the lower panel back in.
After you determine the location, use the HomeLink bezel to mark out your holes. You will also need to grind down the re-enforcement grooves on the back side of the dash panel so the HomeLink unit fits down flush. Drill a small hole in the center of your markings and use a dremel or small round file to make the oval holes.
You should end up with something like this. I drilled a small round hole to line up with the LED indicator above the buttons. Some of my oval holes got a little out of wack, so be careful and go slow. Experience with a dremel helps here. I think I should have stuck with a small round file, maybe easier to control.
The LED indicator has a clear rubber piece (connected to the black buttons) which transmits the red light. Since I did not try to cut a small "triangle" hole in the dash panel to match this, you will need to trim the clear rubber back a little bit so it doesn't restrict the HomeLink unit from sitting flush to the panel. You will see what I mean when you're lining things up, but be sure to check this before moving forward. Next, line everything up and glue the HomeLink unit down. I used silicone, that way I could remove it or replace it later on if needed.
Here it is ready to install. I drilled a couple holes in the clip areas and put an extra support wire on the back. Not sure if that's necessary, more than likely overkill, but not much room for silicone near the top due to the buttons.
Dash prep, you need to remove some of the dash backer material to allow for the HomeLink unit (first arrow). The backer is easy to remove, I believe there were three bolts. I used a hacksaw to cut the plastic material. Run a power wire over to your fuse box, and another one for a ground (I used that mounting screw in the lower left corner in the metal dash sub-frame, see second arrow).
Connect your wires, re-install lower dash unit, and test/program your HomeLink unit. Final results with dash panel back in place.
Another member here did a similar install (Amarv12), but he used the HomeLink bezel (pic below). This provides for a very clean & professional finished look. However, you will need to address extending the buttons as they are too short due to the dash material thickness. Amarv12 had a solution for that, see this thread for more information. (https://www.chevyhhr.net/forums/how-...ink-add-49389/)
So that's about all there is to it. Not overly difficult, and every day you press that HomeLink button, it will put a smile on your face! Hope this was helpful to others wanting to do this mod.
Art
Yet Another Option: If drilling/cutting the dash parts is a direction you'd rather not go, here is yet another option that creates a very clean, professional end result. The only difference is, you'll need to do a little soldering instead, and purchase a few additional items (3 buttons and a LED socket). Check it out here: http://audi-diy.blogspot.com/2007/10...k-install.html
************************************************** ********************************
HomeLink Programming Instructions:
RECOMMENDED STEP: (if any of the buttons are already programmed to work other units/devices, skip this step because it clears the memory of all 3 buttons)
To clear the memory of all three buttons in the HomeLink transmitter, hold down the two outside buttons (1 & 3, 2 being the one directly under the house logo/light) for approx. 20 seconds until the red light begins to flash rapidly. Release both buttons.
Phase 1
Be sure people and property, including yourself and your vehicle are NOT in the travel path of the garage door and that nothing will be struck when the door attempts to close or open !
- Turn your vehicles ignition to the "Run" (or "accessory") position.
- Hold the transmitter 1 - 3 inches away from the HomeLink buttons in you vehicle (do not block your view of the HomeLink indicator light)
- Simultaneously press the transmitter button and the HomeLink button you wish to program (you may need two hands). Hold both buttons pressed until the indicator light changes from a slow flash to a rapid flash.
- Rapid flashing indicates successful programming - Release both buttons (HomeLink and transmitter)
- Press and hold the newly programmed HomeLink button,
- If the indicator light is solid (not flashing) your garage door should now activate and you are complete. There is no need for Phase 2
- If the indicator light flashes for 2 seconds before turning solid (not flashing) your garage door opener is rolling code technology and you must continue Phase 2 of these instructions.
A second person will make the following steps quicker and easier. Be sure people and property, including yourself and your vehicle are NOT in the travel path of the garage door and that nothing will be struck when the door attempts to close or open !
- Locate the "Learn" (or "Smart") Button on the motor-head unit of your garage door opener. (This button is normally located on the back side, near the hanging wire antenna. Consult your manual for exact location.)
- Fully press and quickly release the "Learn" Button (holding this button pressed for too long will erase all existing transmitters and keypads and they will need to be reprogrammed into the unit)
- Within 30 second of pressing the "Learn" Button, return to the vehicle. Press the desired HomeLink button for 2 second, then release. Repeat this one step up to 3 times.
- Your Garage door opener should now activate with a single press of the HomeLink button
Last edited by a_bartle; Nov 4, 2015 at 06:56 AM.


Thread
Thread Starter
Forum
Replies
Last Post