Adding radio buttons on steering wheel
 01-17-2009, 11:42 AM
#541
New Member

Join Date: 11-20-2008
Location: Chicago
Posts: 29
Has Chevy possibly changed anything with the 2009? I can�t seem to get the center Horn/Airbag assembly out. When I look through those two holes there is white plastic visible. What seems to me to be pushing very hard does nothing except slide off those white plastic parts. Is the direction of force suppose to line up with the steering wheel center or elsewhere?
I tried and failed as well. I can not get the air bag off. I also see white plastic when I look thru the hole. The replacement I have from an 08 looks real easy to do. I can see the metal lever and it moves freely. Hopefully some one has done this on an 09. Anyone? Thanks in advance.

 01-17-2009, 04:15 PM
#543
New Member
Join Date: 11-20-2008
Location: Chicago
Posts: 29
Were you able to see them? Are they behind the white plastic (i.e. toward the engine compartment)? When I look at my replacement wheel, they are really easy to activate and I do not see the plastic like I do on the original wheel. Maybe I just have to wait until it gets a little warmer....
01-17-2009, 10:45 PM
#545
Senior Member

Join Date: 11-11-2007
Location: Sheboygan WI
Posts: 364
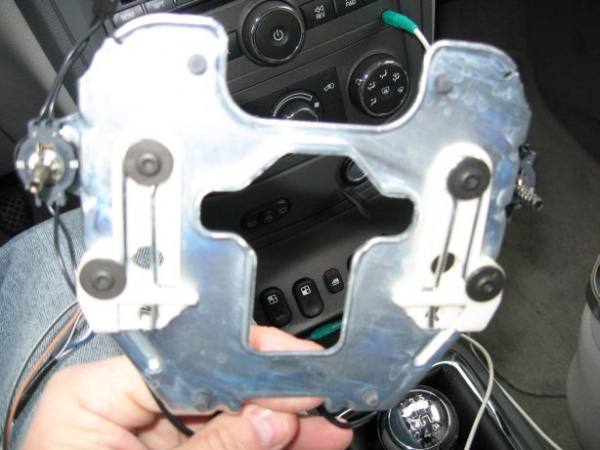
Not sure if anything's different on the '09s to my '07, but mine has the white plastic moldings on the back of the steel plate, and the clips are riveted to the back face. Push the wrench (I used a long terminal screwdriver) in and allow it to slide off the side of the plastic part facing the hole, then while it's sliding along the back face of the plastic towards the center of the wheel, it's bound to contact the spring, it's just a U shaped piece of wire, which doesn't need much pressure, it's just located into a groove around the bullet on the airbag assembly that locates through the hole in the plate. Once the clip disengages, the airbag assembly pops out.
Has attaching images privilege been removed from the free membership? I have pics, but can't attach...
Has attaching images privilege been removed from the free membership? I have pics, but can't attach...
01-18-2009, 10:14 AM
#546
New Member
Join Date: 11-20-2008
Location: Chicago
Posts: 29
Not sure if anything's different on the '09s to my '07, but mine has the white plastic moldings on the back of the steel plate, and the clips are riveted to the back face. Push the wrench (I used a long terminal screwdriver) in and allow it to slide off the side of the plastic part facing the hole, then while it's sliding along the back face of the plastic towards the center of the wheel, it's bound to contact the spring, it's just a U shaped piece of wire, which doesn't need much pressure, it's just located into a groove around the bullet on the airbag assembly that locates through the hole in the plate. Once the clip disengages, the airbag assembly pops out.
Has attaching images privilege been removed from the free membership? I have pics, but can't attach...
Has attaching images privilege been removed from the free membership? I have pics, but can't attach...
 01-18-2009, 03:05 PM
#548
Senior Member

Join Date: 12-24-2008
Location: N/A
Posts: 717
OK, I finally got it.
Turns out I have been hitting the right spot the whole time and not realizing it. It doesn’t take as much pressure as my interpretation of post #32 on page four of this thread says. I’ll just chalk this up to the differences between a man and a women’s (the author of post #32) perspective.
When you apply pressure, you must pull the Airbag away from the wheel on one side and then start on the other side, all the time keeping the side already released still released by inserting a key or small screwdriver between the wheel and Airbag assembly. My unit only separated by less than an 1/8 of an inch until both sides were released – this small movement I previously misinterpreted as just the Horn movement play – reinforced by the horn honking each time I moved. Nope, I didn’t remove any fuses. Simple, there is NO large amount of force required – I was just about to bend my Allen wrenches from pushing so hard.
Use at most an 1/8” or 3MM Allen wrench and visit the first picture in post #32. It does indeed show the correct angle to apply pressure. I took out a small scale and measured with the Airbag assembly removed and it only took approximately 5 – 6 pounds to release.
An 1/8” round rod or a 7/64th Allen wrench fit my vehicle best, 7/64th would be my choice. If you use a small screwdriver of that size keep the flat side aligned with the steering column. When I tried my small screwdriver with the blade perpendicular to the steering column it didn't engage the spring as well.
Thanks
Last edited by Sno White; 01-18-2009 at 03:19 PM. Reason: Word selection
01-18-2009, 05:11 PM
#549
New Member
Join Date: 11-20-2008
Location: Chicago
Posts: 29
Woot. I finally got it too. Thanks everyone for your help. The white plastic I saw is part of the assembly that holds the metal levers as pg318 shows in the picture above. There is a channel/opening thru that plastic. That is where the metal lever is. I did as Sno White suggested and did one side and then kept it pried open w/ a screw driver. It all installed rather easy. I tested everything and it works. Unfortunately, it appears that bluetooth is disabled or not there in hardware. If you press the audio button for more than a few seconds, it accesses the phone system. If you say "bluetooth" it says "pardon" so, it appears there is something missing in software or hardware. I will have to investigate this further. Thanks again for everyone for your help! I now have a rocking leather steering wheel!!
