LED MOD - Radio, HVAC, I/P - Step-By-Step Tutorial 2006-2008


 03-01-2009, 08:16 PM
#23
Senior Member
Thread Starter

Join Date: 02-09-2009
Location: New Jersey
Posts: 296
I didnt change the LCD Displays in the I/P Cluster or Radio. For now, I just took a Blue sharpie over the glass. I will be putting a color gel lens over top of the LCD and removing th sharpie. That is only temporary, but does the trick. I'm looking into asking Panasonic if they can sell me that part so I can change it. Or I may even get a junk radio jus like mine and rip the LCD Display apart and change the LED's that light it up! I'm undecided for now.

 03-02-2009, 05:27 AM
#25
Senior Member
Thread Starter
Join Date: 02-09-2009
Location: New Jersey
Posts: 296
If not, your looking at about $60-$70 with everything.
03-03-2009, 05:57 PM
#26
Senior Member

Join Date: 12-24-2008
Location: N/A
Posts: 717
GREAT POST!!
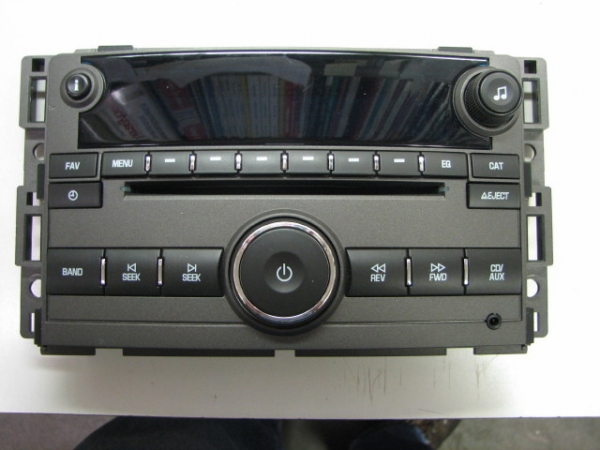
However, there are some differences between your 2007 radio and my 2009 radio. The face of your 2007 Radio as shown in Post #4, figure #2 AND the PCB(Printed Circuit Board) as shown in Post #9 picture 3 differ in button function and most importantly internal construction.
I bring this up for three reasons:
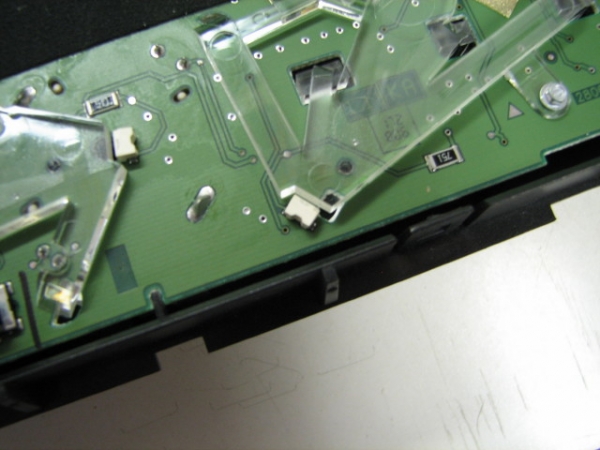
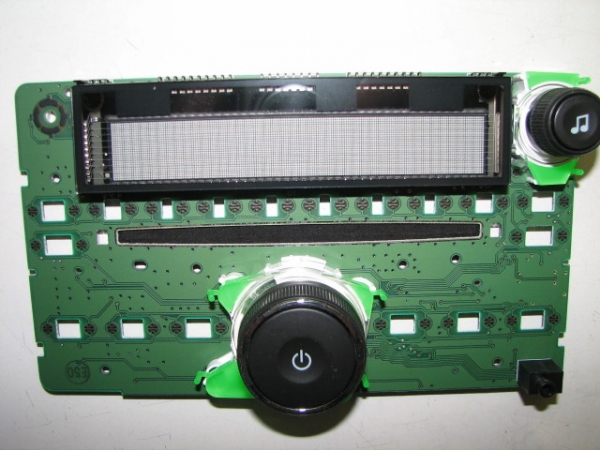
1) People wishing to try this modification may encounter something different from what you have documented, i.e. they may wish to delay ordering the LEDs by type and quantity (at least for the radio) until they open it up to see for themselves as to what is needed. This caution may apply to the other components as well, as the manufacturing changes may not apply just to the radio. It seems GM or their supplier has simplified and economized on the construction of the radio from 2007 to 2009; there are less LEDs and less gold plating. I’m going to guess there are ~20 LEDs in the 2007 radio, with the 2009 radio this has been reduced to 5 LEDs. None are located under the knob switches. In the 2009 radio the LEDs transmit the light parallel to the surface of the PCB thru a clear plastic light guide. I believe the LEDs in the 2007 radio transmit light at right angle or perpendicular to the surface of the PCB and there is one LED for each button and knob. The reduction from ~20 LEDs to 5 LEDs is quite a savings, but the two types of LEDs are not interchangeable.
2) Your second Aux jack hook up showing a separate small PCB cut out from the big PCB is again different from the 2009 radio. I will consider adding my own Aux jack elsewhere in the vehicle at a later date as well. Thank you for the idea! I will just have to figure out the 2009 version of the radio.
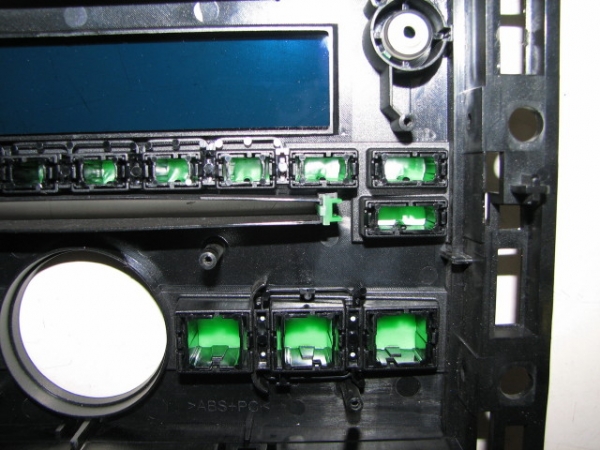
3) In the 2009-year radio the color of the buttons is basically controlled by the color of the Green translucent button plastic, not by the LED color. Some interesting combinations could occur, but would have to be experimented with for color and intensity. The “presumably” white light from the 2009 model year LEDs is transmitted through clear plastic light guides that direct the light through holes in the PCB to the buttons, knobs and CD slot.
In general the 2009 radio would be easier to work on if anybody wishes to experiment with a LED color change. For tools, all that are needed to investigate is a 7MM & a 5/32” Hex drive to get the radio out and the faceplate detached. A 1/8” or 3.2MM Hex drive is needed to remove the light guides – that’s it. I didn’t even disconnect the wires to the back of the radio. If you wish just leave the radio on when you turn the vehicle off to remove the faceplate and you will have tunes while you work or wait for parts to arrive. Discovered this by accident.
Some Pics:
Faceplate
Light Guides

Close Up Light Guide & LEDs
Green Button Interior
Knob Side of PCB
However, there are some differences between your 2007 radio and my 2009 radio. The face of your 2007 Radio as shown in Post #4, figure #2 AND the PCB(Printed Circuit Board) as shown in Post #9 picture 3 differ in button function and most importantly internal construction.
I bring this up for three reasons:
1) People wishing to try this modification may encounter something different from what you have documented, i.e. they may wish to delay ordering the LEDs by type and quantity (at least for the radio) until they open it up to see for themselves as to what is needed. This caution may apply to the other components as well, as the manufacturing changes may not apply just to the radio. It seems GM or their supplier has simplified and economized on the construction of the radio from 2007 to 2009; there are less LEDs and less gold plating. I’m going to guess there are ~20 LEDs in the 2007 radio, with the 2009 radio this has been reduced to 5 LEDs. None are located under the knob switches. In the 2009 radio the LEDs transmit the light parallel to the surface of the PCB thru a clear plastic light guide. I believe the LEDs in the 2007 radio transmit light at right angle or perpendicular to the surface of the PCB and there is one LED for each button and knob. The reduction from ~20 LEDs to 5 LEDs is quite a savings, but the two types of LEDs are not interchangeable.
2) Your second Aux jack hook up showing a separate small PCB cut out from the big PCB is again different from the 2009 radio. I will consider adding my own Aux jack elsewhere in the vehicle at a later date as well. Thank you for the idea! I will just have to figure out the 2009 version of the radio.
3) In the 2009-year radio the color of the buttons is basically controlled by the color of the Green translucent button plastic, not by the LED color. Some interesting combinations could occur, but would have to be experimented with for color and intensity. The “presumably” white light from the 2009 model year LEDs is transmitted through clear plastic light guides that direct the light through holes in the PCB to the buttons, knobs and CD slot.
In general the 2009 radio would be easier to work on if anybody wishes to experiment with a LED color change. For tools, all that are needed to investigate is a 7MM & a 5/32” Hex drive to get the radio out and the faceplate detached. A 1/8” or 3.2MM Hex drive is needed to remove the light guides – that’s it. I didn’t even disconnect the wires to the back of the radio. If you wish just leave the radio on when you turn the vehicle off to remove the faceplate and you will have tunes while you work or wait for parts to arrive. Discovered this by accident.
Some Pics:
Faceplate
Light Guides
Close Up Light Guide & LEDs
Green Button Interior
Knob Side of PCB
Last edited by Sno White; 03-03-2009 at 07:09 PM. Reason: added pics
03-03-2009, 07:08 PM
#27
Senior Member
Join Date: 12-24-2008
Location: N/A
Posts: 717
Since somebody will ask about those two small blue wires in the second picture above.
I don’t know the functioning of the previous years radio buttons, so this may apply to the 2009 model year only.
The two blue jumper wires in the pictures are the reason I entered the radio in the first place. I have swapped the function of two of the buttons on the face of the radio. The FAV and the MENU buttons:
On the 2009 radio the six(6) preset buttons have up to six additional levels of presets accessed by pressing the “FAV” button. This gives the user 36 presets that can be programmed. Each time you press the “FAV” button you index through the six levels. On the lower left side of the display the digits “1” through “6” are displayed letting you know what level the radio is currently in. The “1” through “6” are displayed above the “MENU” button, not the “FAV” button, as it should logically be. This was a problem for my logical mind and for Delphi’s illogical mind or lack there of. So I swapped the functions of the buttons.
Note: the labeling is not changed, only the function, the two buttons differ in size and would not interchange. The white lettering you see on the outside of the radio as well as the green coloring behind, is molded into the plastic, both colors are translucent allowing the transmission of light. So there was no easy modification to the labeling – perhaps I’ll just put some other label on the outside of the button.
IMO Delphi really goofed in this regard.
03-03-2009, 08:02 PM
#28
Senior Member
Thread Starter
Join Date: 02-09-2009
Location: New Jersey
Posts: 296
Since somebody will ask about those two small blue wires in the second picture above.
I don’t know the functioning of the previous years radio buttons, so this may apply to the 2009 model year only.
The two blue jumper wires in the pictures are the reason I entered the radio in the first place. I have swapped the function of two of the buttons on the face of the radio. The FAV and the MENU buttons:
On the 2009 radio the six(6) preset buttons have up to six additional levels of presets accessed by pressing the “FAV” button. This gives the user 36 presets that can be programmed. Each time you press the “FAV” button you index through the six levels. On the lower left side of the display the digits “1” through “6” are displayed letting you know what level the radio is currently in. The “1” through “6” are displayed above the “MENU” button, not the “FAV” button, as it should logically be. This was a problem for my logical mind and for Delphi’s illogical mind or lack there of. So I swapped the functions of the buttons.
Note: the labeling is not changed, only the function, the two buttons differ in size and would not interchange. The white lettering you see on the outside of the radio as well as the green coloring behind, is molded into the plastic, both colors are translucent allowing the transmission of light. So there was no easy modification to the labeling – perhaps I’ll just put some other label on the outside of the button.
IMO Delphi really goofed in this regard.
I don’t know the functioning of the previous years radio buttons, so this may apply to the 2009 model year only.
The two blue jumper wires in the pictures are the reason I entered the radio in the first place. I have swapped the function of two of the buttons on the face of the radio. The FAV and the MENU buttons:
On the 2009 radio the six(6) preset buttons have up to six additional levels of presets accessed by pressing the “FAV” button. This gives the user 36 presets that can be programmed. Each time you press the “FAV” button you index through the six levels. On the lower left side of the display the digits “1” through “6” are displayed letting you know what level the radio is currently in. The “1” through “6” are displayed above the “MENU” button, not the “FAV” button, as it should logically be. This was a problem for my logical mind and for Delphi’s illogical mind or lack there of. So I swapped the functions of the buttons.
Note: the labeling is not changed, only the function, the two buttons differ in size and would not interchange. The white lettering you see on the outside of the radio as well as the green coloring behind, is molded into the plastic, both colors are translucent allowing the transmission of light. So there was no easy modification to the labeling – perhaps I’ll just put some other label on the outside of the button.
IMO Delphi really goofed in this regard.
Thanks for that info. I thought they would be the same way? That kinda limits your ability to modify it. I mean you can still get the LED's, they would just have to be different. Have you powered it up so you can see what color the LED's are? Just wondering. You would have to micrometer them and then try to match the style at mouser.com to find the proper ones. I would still use the manufacturer Lite-On. They make great quality stuff. The green buttons could be change out, possibly with a faceplate of an earlier one. I believe this was the same. I wonder about that. Because the 2006-2008 have only white ones an their LED's were color diffused.
Thanks for the info. I definately learned something.
03-03-2009, 08:41 PM
#29
Senior Member
Join Date: 12-24-2008
Location: N/A
Posts: 717
I am only "presuming" the 2009 radio LEDs are white. The faceplate has to be attached to the radio unit to power the faceplate and I wasn't interested in taking the time to hook up some jumpers and resistors to power the LEDs. Wasn�t what I was doing and I don't like very small stuff. Yeah, I know 30 gauge wire wrap wire is small, but in my case necessary.
NxlKing2304 said:
�Because the 2006-2008 have only white ones an their LED's were color diffused.�
How were they "color diffused"? By the LED manufacturer or by the radio manufacturer?
AND I learned as well!
NxlKing2304 said:
�Because the 2006-2008 have only white ones an their LED's were color diffused.�
How were they "color diffused"? By the LED manufacturer or by the radio manufacturer?
AND I learned as well!
03-03-2009, 08:51 PM
#30
Senior Member
Thread Starter
Join Date: 02-09-2009
Location: New Jersey
Posts: 296
I am only "presuming" the 2009 radio LEDs are white. The faceplate has to be attached to the radio unit to power the faceplate and I wasn't interested in taking the time to hook up some jumpers and resistors to power the LEDs. Wasn�t what I was doing and I don't like very small stuff. Yeah, I know 30 gauge wire wrap wire is small, but in my case necessary.
NxlKing2304 said:
�Because the 2006-2008 have only white ones an their LED's were color diffused.�
How were they "color diffused"? By the LED manufacturer or by the radio manufacturer?
AND I learned as well!
NxlKing2304 said:
�Because the 2006-2008 have only white ones an their LED's were color diffused.�
How were they "color diffused"? By the LED manufacturer or by the radio manufacturer?
AND I learned as well!