
Installing an Oil Catch Can


Senior Member
Joined: 05-01-2016
Posts: 140
From: Utah

Moderator
Joined: 05-01-2014
Posts: 8,512
From: California
Well, I am still blowing oil vapor out the filler cap!! So I'm still not evacuating the crankcase pressure!! So insufficient flow, or insufficient vacuum. The lines seem big enough for good flow, so I thought about what would cause poor vacuum. A problem with my check(PCV) valves could cause that. I had good vacuum through the stock PCV valve, so that's not it.
Aha! The PCV valve I installed in the line to the turbo has failed, only blocking 70-80% of reverse flow. So the manifold vacuum was pulling strong, but only part of it was being applied to the crankcase, with the rest sucking air from the inlet of the turbo.
I'll have to get another check valve. I should revisit phases 2 and 3.
Moderator
Joined: 05-01-2014
Posts: 8,512
From: California
Shoot, that explanation doesn't satisfy me. I have little to no crankcase pressure at idle, which is when this bad check valve reverses flow. I am more inclined to think that the oil vapor is blowing out the filler cap at higher RPMs and while boosting.
The stock PCV valve is functioning properly, blocking 100% of reverse flow, so it's not that. Maybe I should just go back to phase 1(2 catch cans). There was no oil vapor blowing out the filler cap in that configuration.
The stock PCV valve is functioning properly, blocking 100% of reverse flow, so it's not that. Maybe I should just go back to phase 1(2 catch cans). There was no oil vapor blowing out the filler cap in that configuration.


Thread Starter
Senior Member
Joined: 05-29-2015
Posts: 542
From: Cleveland, OH
I think 2 cans is the way go. The only way without an external vacuum source. On the K.I.S.S. scale, that's as close to stock as you can get. The wife's been running her car now 2 weeks with only the mini catch cans I made. Running all 1/4" tubing, clean checks, and I'm using the factory intake pcv to handle the fresh air at port 1 (center VC).
No whining and no oil blowing out the filler cap. Maybe I'll open them up today and see what's inside. For science if course!
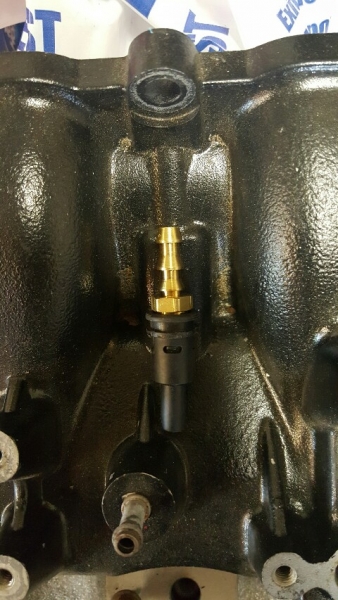
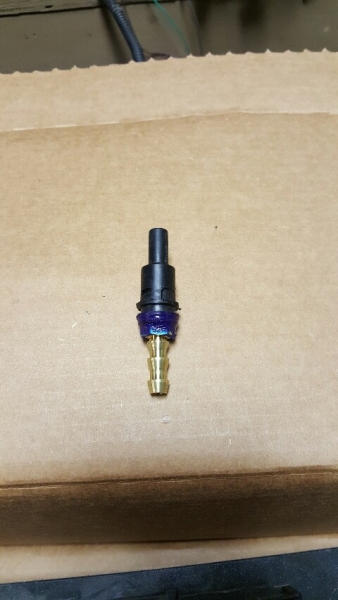
Here's a shot of the pcv valve mod I came up with. Out of necessity of course. I forgot the housing I made for it at work and just wanted to get the car running and out of the garage. I had an extra 1/8NPT fitting and threaded into the IN side of the PCV valve. Sealed with RTV and a piece of shrink tubing. Looks better then the large housing I had for it. I wonder if I can purchase just the PCV from GM..here's a pic
No whining and no oil blowing out the filler cap. Maybe I'll open them up today and see what's inside. For science if course!
Here's a shot of the pcv valve mod I came up with. Out of necessity of course. I forgot the housing I made for it at work and just wanted to get the car running and out of the garage. I had an extra 1/8NPT fitting and threaded into the IN side of the PCV valve. Sealed with RTV and a piece of shrink tubing. Looks better then the large housing I had for it. I wonder if I can purchase just the PCV from GM..here's a pic
Last edited by Dbeluscak; Jun 18, 2016 at 07:14 PM.
Moderator
Joined: 05-01-2014
Posts: 8,512
From: California
I just switched back to phase 1 configuration. Prior to the switch, I tested vacuum at a few locations, to see have much vacuum was being lost. At idle, I lost 1 - 2 inches because of the faulty check valve, and about 1 inch on the dirty side of the catch can. This still left me with ~ 16 inches of vacuum, plenty to evacuate the small amount of crankcase pressure at idle.
Back to 2 separate catch can systems, I expect to eliminate the oil vapor escaping at the oil filler cap.
Back to 2 separate catch can systems, I expect to eliminate the oil vapor escaping at the oil filler cap.
Moderator
Joined: 05-01-2014
Posts: 8,512
From: California
Still having problems. Pulled the car out of the garage and noticed a small oil spot on the floor. Turns out the bottom of my catch can is cracked. Aaargh! This vacuum leak might explain why I am still getting just a bit of oil vapor blowing by the oil filler cap.
Upon disassembly of the catch can, I see that the internal hard plastic piece is also broken. The internal copper pipe is an interference fit between the bottom of the bowl and this piece. The vibrations from driving were just too much for it.
This is the O-ring holder for the sintered brass filter. It is one piece, but is now completely falling apart.

For reference, this is when in place in the top of the can.

And when new.

This is after about 4,000 miles of driving, but only 1,800 miles of actual use in phase 1. Exposure to the crankcase chemicals may have hastened it's demise. Off to Home Depot for a new compressor filter and swap the bowls.
I see that this is a short term solution, I need better catch cans. The other catch can probably has the same part broken, which would help explain why it was allowing vapors past it.
Upon disassembly of the catch can, I see that the internal hard plastic piece is also broken. The internal copper pipe is an interference fit between the bottom of the bowl and this piece. The vibrations from driving were just too much for it.
This is the O-ring holder for the sintered brass filter. It is one piece, but is now completely falling apart.
For reference, this is when in place in the top of the can.
And when new.
This is after about 4,000 miles of driving, but only 1,800 miles of actual use in phase 1. Exposure to the crankcase chemicals may have hastened it's demise. Off to Home Depot for a new compressor filter and swap the bowls.
I see that this is a short term solution, I need better catch cans. The other catch can probably has the same part broken, which would help explain why it was allowing vapors past it.
Moderator
Joined: 05-01-2014
Posts: 8,512
From: California
Not ready to give up on these catch cans yet. I tapped the drain hole in the new bowl and installed the fitting. I hope with careful positioning and handling it won't crack. I felt the bottom of the other can and there was no oil residue, so I don't think it's cracked.
While I was at the Depot, I thought "what if I replaced the plastic part that broke with a large metal washer?" They didn't seem to have anything big enough, so I went to ACE hardware and came home with a couple options. The one that worked is Hillman Machine Bushings 7/8" x 1-3/8" x 14GA.

The bushing isn't as thick as the original plastic part, so I cut 2 rubber washers to make the copper pipe fit tight again.
I still want to take apart the other can to see if the plastic piece is broken. I'll do it up like this one with the bushing, the copper pipe seals better against rubber than plastic anyway.
Pulling the hose off the fitting in the bottom of the bowl is somewhat violent, and can damage the bowl. I think I should get slightly larger hose.
While I was at the Depot, I thought "what if I replaced the plastic part that broke with a large metal washer?" They didn't seem to have anything big enough, so I went to ACE hardware and came home with a couple options. The one that worked is Hillman Machine Bushings 7/8" x 1-3/8" x 14GA.
The bushing isn't as thick as the original plastic part, so I cut 2 rubber washers to make the copper pipe fit tight again.
I still want to take apart the other can to see if the plastic piece is broken. I'll do it up like this one with the bushing, the copper pipe seals better against rubber than plastic anyway.
Pulling the hose off the fitting in the bottom of the bowl is somewhat violent, and can damage the bowl. I think I should get slightly larger hose.

